
You are using an out of date browser. It may not display this or other websites correctly.
You should upgrade or use an alternative browser.
You should upgrade or use an alternative browser.
SoCal Sawdust
- Thread starter sfanale
- Start date
Been a long pause in the garage in SoCal! However... that isnt to suggest work around the house has stopped.
First, the city sent letters out offering to plant free street trees so I got on that right quick:


They planted two Ash trees in front of the house, and six Hong Kong Orchids down the side of the house. Looking forward to some nice shade, in a decade or two! I have heard Ash trees can be problems if they are close to sidewalks, pipes, etc... SO I made sure to have the city plant them next to my water main, sewer main, AND front sidewalk! Obviously, I am still working on the landscaping, but I was able to get the drip lines in and start the mulch beds for 5 of the 8 trees.
The really big project which has been eating up my time was Summit's revamped playroom. Just to show what I started with. Looking into the room from the original livingroom before remodeling the house interior:

and inside the room itself:

Frankly, it was ROUGH in there. No insulation, single pane windows, the ceiling was old painted plywood, commercial carpet on slab, flimsy doors hung inside out... just ROUGH. My dad was generous enough to come back to SD for a few weeks and I had two weeks of paternity leave for us to get moving. We made so much progress I forgot to take early photos of the work, but I did grab a couple before the drywall went up:


At this point we had already re-framed the walls, installed new windows and doors, and I had run every stud seam with canned spray foam. I checked into full closed-cell sprayfoam, but it was like $1500, which was just too much for the budget. Then I pushed fiberglass bats into the bays (6" in the ceiling also, not pictured):

My dad was around long enough to really wrap up just about all the outer siding and painting:

The last interior steps were to pull my final wiring, hang the new can lights, put up the new ship-lap ceiling, lay the floor, and get to trim and paint. I was working alone at that point and just churned away without taking progress photos. Here is the final product:


The matching shot to that first interior shot:

Of course little Summit got to test out his new reading tee-pee:

This was a huge project that really killed over two months of my time--paternity leave, weekends, weeknights... totally exhausting, but so happy to have it done!
First, the city sent letters out offering to plant free street trees so I got on that right quick:
They planted two Ash trees in front of the house, and six Hong Kong Orchids down the side of the house. Looking forward to some nice shade, in a decade or two! I have heard Ash trees can be problems if they are close to sidewalks, pipes, etc... SO I made sure to have the city plant them next to my water main, sewer main, AND front sidewalk! Obviously, I am still working on the landscaping, but I was able to get the drip lines in and start the mulch beds for 5 of the 8 trees.
The really big project which has been eating up my time was Summit's revamped playroom. Just to show what I started with. Looking into the room from the original livingroom before remodeling the house interior:
and inside the room itself:
Frankly, it was ROUGH in there. No insulation, single pane windows, the ceiling was old painted plywood, commercial carpet on slab, flimsy doors hung inside out... just ROUGH. My dad was generous enough to come back to SD for a few weeks and I had two weeks of paternity leave for us to get moving. We made so much progress I forgot to take early photos of the work, but I did grab a couple before the drywall went up:
At this point we had already re-framed the walls, installed new windows and doors, and I had run every stud seam with canned spray foam. I checked into full closed-cell sprayfoam, but it was like $1500, which was just too much for the budget. Then I pushed fiberglass bats into the bays (6" in the ceiling also, not pictured):
My dad was around long enough to really wrap up just about all the outer siding and painting:
The last interior steps were to pull my final wiring, hang the new can lights, put up the new ship-lap ceiling, lay the floor, and get to trim and paint. I was working alone at that point and just churned away without taking progress photos. Here is the final product:
The matching shot to that first interior shot:
Of course little Summit got to test out his new reading tee-pee:
This was a huge project that really killed over two months of my time--paternity leave, weekends, weeknights... totally exhausting, but so happy to have it done!
sean Buick 76
Well-known member
Oh wow, I was super impressed the whole way through your thread but your last few posts are simply outstanding!!!! Amazing transformation, you are a pro!
turbowoodworker
Well-known member
Very nicely done on that room remodel.
Bob Heine
ALLIANCE MEMBER
Steve, very nice re-model. I can see why you haven't been updating your thread and thank you for doing it now.
Since the playroom is finished, I basically took a break from working on anything. Spending lots of time with little baby SoCal and enjoying my weekends "off". However, its time to get back into the garage...
Started off easy with a little something for the baby, a "Pikler Triangle". Everything was milled out of poplar and walnut:


So far, he is loving it:

Another project I finally got off the list was setting up my security cameras. I got 4x 2K Amcrest POE cameras and hooked them up to my Synology NAS. The Synology Surveillance Station was a bit of work to get all set up, but now I am loving it. I got all the cameras running with motion detection through Surveillance Station and I can pull up the feeds from my phone so overall, I'm stoked. Caught a solicitor on camera today:

I pulled dedicated CAT6 lines through the attic to each camera and landed them all back in my AV closet, powering them all through an 8 port POE switch. For the most part the process was painless aside from one camera being DOA. Ill get that one replaced and set up soon.
Finally, today I started on one of my long awaited garage projects, a miter saw stand. This will eventually be 1/3 of a set of rolling carts forming a stand and wings. The goal is another scrap wood project--I have been stocking up collecting sheets of plywood from the trash pile at work. For now... its just a rough box full of potential:

I havent done ANY sanding yet, but I couldn't help but throw my saw up on there to get an idea of what to expect...

Started off easy with a little something for the baby, a "Pikler Triangle". Everything was milled out of poplar and walnut:
So far, he is loving it:
Another project I finally got off the list was setting up my security cameras. I got 4x 2K Amcrest POE cameras and hooked them up to my Synology NAS. The Synology Surveillance Station was a bit of work to get all set up, but now I am loving it. I got all the cameras running with motion detection through Surveillance Station and I can pull up the feeds from my phone so overall, I'm stoked. Caught a solicitor on camera today:
I pulled dedicated CAT6 lines through the attic to each camera and landed them all back in my AV closet, powering them all through an 8 port POE switch. For the most part the process was painless aside from one camera being DOA. Ill get that one replaced and set up soon.
Finally, today I started on one of my long awaited garage projects, a miter saw stand. This will eventually be 1/3 of a set of rolling carts forming a stand and wings. The goal is another scrap wood project--I have been stocking up collecting sheets of plywood from the trash pile at work. For now... its just a rough box full of potential:
I havent done ANY sanding yet, but I couldn't help but throw my saw up on there to get an idea of what to expect...
Last edited:
ddawg16
Well-known member
I should have looked at this thread sooner.....boy, can I relate to some of the stuff you went through....great job.....and congrats on the baby....
Bob Heine
ALLIANCE MEMBER
Steve, you have my undivided attention. The next project I want to tackle is a miter saw stand for my 12" one. It's heavy and even on one of those folding wheeled stands it's a pain to set up.
greyghost18t
Well-known member
That pikler triangle came out great. What other activity projects are you going to do for his playroom? I am hoping to try that and also a learning tower as well.
That pikler triangle came out great. What other activity projects are you going to do for his playroom? I am hoping to try that and also a learning tower as well.
So far the only other toy I have made is this little "object permanence box". Super straight forward, drop a ball in, it rolls out the front. Summit loves it.

I do have plans for add-ons to the triangle, but those are a bit out in the future.
I had HUGE plans for the long labor day weekend, but as usual, I just couldn't get out into the shop as much as I had hoped. I did get just enough time out there to talk myself into series of compromises to my usual standards and in the process learned a lesson the hard way...
The plan was to add two shallow drawers (4" tall) to the top of the miter cabinet for TBD supplies . I thought I had enough 1/2" pre-finished birch to accomplish this, but actually I had two pieces, one of which was already ripped to 3". I figured: "ok, one 3" drawer and one 4" drawer. I can live with that.". If you are taking notes, this is to be known henceforth as compromise #1. I imagined these as pretty light duty drawers, so I tested out a simpler construction method that is much faster than my usual finger jointed corners. Enter "easy" drawer boxes built with rabbeted corner joints and staples (compromise #2):

(not mine, example photo)

Normally, I wouldn't go for less than 3/8" ply as a drawer bottom, however I had some 1/4" cherry veneer plywood and in the spirit of "fast-n-cheap", I figured what the heck (compromise #3). The bottoms were a little wiggly, and the corners a bit more flimsy than my usual comfort level, but it was a drawer:

Just to be clear, it was not the sum of compromises #1-3 which stopped the project at this point... instead, it was my severe case of baby brain after being kept up for 48 hours with a sick toddler. Somehow I managed to only leave 1/2" for BOTH drawer slides instead of the required 1/2" for each (mistake #1). With the drawer box just centered up, I didn't even have 1/4" on each side:

(Just look how **** that 3/4" baltic birch is... the layers... the absence of voids... heaven will exclusively sell baltic birch)
There is an expression about this... measuring, cutting, something... I was quite determined to make these damned boxes work, so I came up with a hack job under-mount technique (compromise #4):

In order to make that fly, I needed to buck up the bottom of the drawer so the slides could clear the underside of the dadoes. I attempted this trick I have seen using dots of CA & wood glue and it worked like charm. I sprayed the shim with CA kicker and pressed it onto the glue on the drawer bottom confidently--stuck perfectly and held in place without needing any clamping pressure:


I used 20" over travel slides, so the drawer is really hanging out there:

The real problem with laying the slides flat is that they have no strength. Even these cheaper slides are engineered well enough to really resist the tension/compression applied at full extension, but only if mounted on their edge. Laying flat, they bend easily and the drawer bounces around like a ruler slapped against the edge of a table:
(not mine, example photo)
At this point, I have one drawer mounted:

..and I absolutely hate it.
The plan was to add two shallow drawers (4" tall) to the top of the miter cabinet for TBD supplies . I thought I had enough 1/2" pre-finished birch to accomplish this, but actually I had two pieces, one of which was already ripped to 3". I figured: "ok, one 3" drawer and one 4" drawer. I can live with that.". If you are taking notes, this is to be known henceforth as compromise #1. I imagined these as pretty light duty drawers, so I tested out a simpler construction method that is much faster than my usual finger jointed corners. Enter "easy" drawer boxes built with rabbeted corner joints and staples (compromise #2):
(not mine, example photo)
Normally, I wouldn't go for less than 3/8" ply as a drawer bottom, however I had some 1/4" cherry veneer plywood and in the spirit of "fast-n-cheap", I figured what the heck (compromise #3). The bottoms were a little wiggly, and the corners a bit more flimsy than my usual comfort level, but it was a drawer:
Just to be clear, it was not the sum of compromises #1-3 which stopped the project at this point... instead, it was my severe case of baby brain after being kept up for 48 hours with a sick toddler. Somehow I managed to only leave 1/2" for BOTH drawer slides instead of the required 1/2" for each (mistake #1). With the drawer box just centered up, I didn't even have 1/4" on each side:
(Just look how **** that 3/4" baltic birch is... the layers... the absence of voids... heaven will exclusively sell baltic birch)
There is an expression about this... measuring, cutting, something... I was quite determined to make these damned boxes work, so I came up with a hack job under-mount technique (compromise #4):
In order to make that fly, I needed to buck up the bottom of the drawer so the slides could clear the underside of the dadoes. I attempted this trick I have seen using dots of CA & wood glue and it worked like charm. I sprayed the shim with CA kicker and pressed it onto the glue on the drawer bottom confidently--stuck perfectly and held in place without needing any clamping pressure:
I used 20" over travel slides, so the drawer is really hanging out there:
The real problem with laying the slides flat is that they have no strength. Even these cheaper slides are engineered well enough to really resist the tension/compression applied at full extension, but only if mounted on their edge. Laying flat, they bend easily and the drawer bounces around like a ruler slapped against the edge of a table:
(not mine, example photo)
At this point, I have one drawer mounted:
..and I absolutely hate it.
Steve, you have my undivided attention. The next project I want to tackle is a miter saw stand for my 12" one. It's heavy and even on one of those folding wheeled stands it's a pain to set up.
Yes, my rickety folding table has seen its final days. I cant wait to have something better in its place!
PS, its "Sal", not "Steve"

Motoman1100
Well-known member
Great job sfanale! Man this thread started with a little reorg and has really blossomed into something special. Subscribed.
Bob Heine
ALLIANCE MEMBER
Sal, my sincere apology. I don't remember how I got it wrong but it's what I do. I inherited an issue with names -- my mother called me **** and my brother Bob almost daily and she was a teacher. I changed the entry in my Word file so maybe I'll get it right in the future. Thanks for the heads-up Sam.PS, its "Sal", not "Steve"
Bob Heine
ALLIANCE MEMBER
Sal, sorry about the drawer and I know how you feel. You inspired me to step up my techniques so I made a 22"x30" drawer for my 6 routers and some accessories. Made it with 1"x12" pine with blind dovetails and 3/4" plywood slotted into the bottom (it's removable just in case).

Must have measured 50 times and was positive I left 1-1/2 inches to fit the cabinet and clear the European hinges. Your half-inch and my half-inch must have run away together because I ended up with exactly one inch of space. I ended up OK after I discovered Blum makes some tight clearance hinges.

Must have measured 50 times and was positive I left 1-1/2 inches to fit the cabinet and clear the European hinges. Your half-inch and my half-inch must have run away together because I ended up with exactly one inch of space. I ended up OK after I discovered Blum makes some tight clearance hinges.
Attachments


slodat
ALLIANCE MEMBER
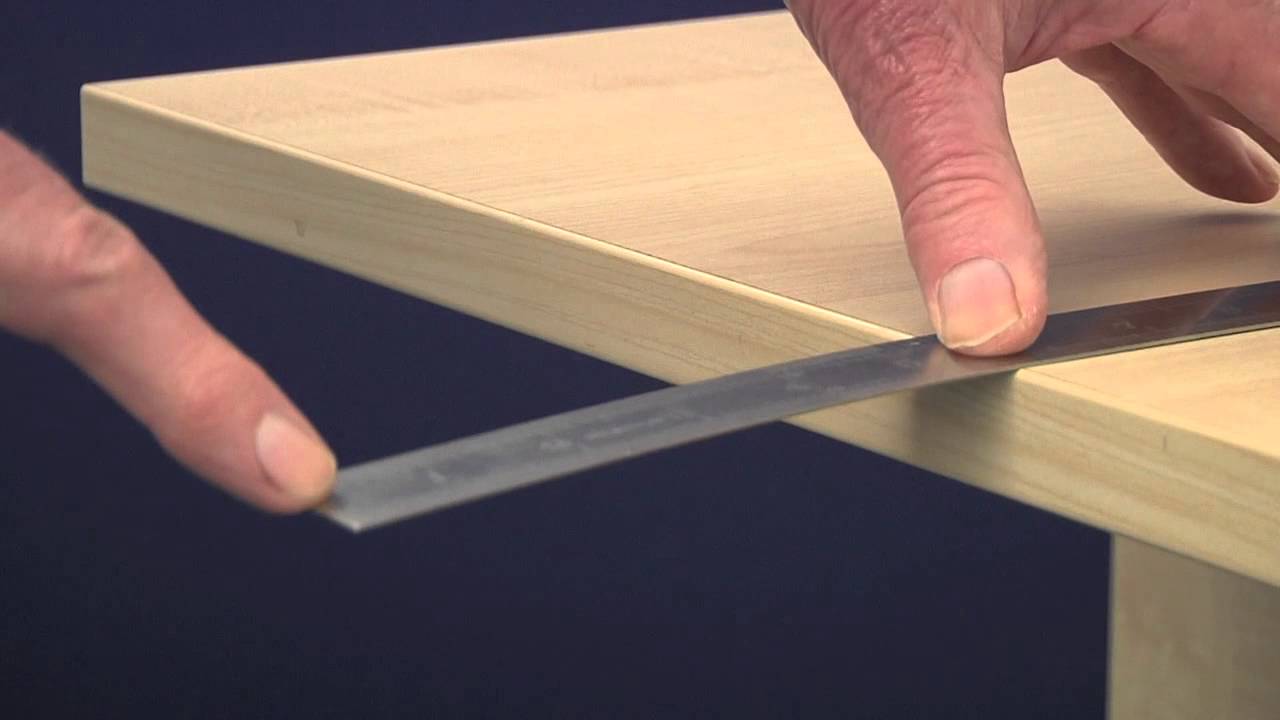
The way I measure my drawer box fronts doesn't (initially) involve a ruler/tape measure. I lay everything in the cabinet carcass side by side and use shims/spacers where necessary so all that's left is space for the drawer front. I haven't screwed one up too bad since I started doing it this way. More of a story stick approach than a measurement.
Your place is looking good!
Your place is looking good!
Sal, my sincere apology. I don't remember how I got it wrong but it's what I do. I inherited an issue with names -- my mother called me **** and my brother Bob almost daily and she was a teacher. I changed the entry in my Word file so maybe I'll get it right in the future. Thanks for the heads-up Sam.
No prob Bob!
You really went heavy duty with the router drawers! Understandable though with so many motors tucked away in there for safe keeping. I don't think I have ever complained about a drawer box being too well built...

The way I measure my drawer box fronts doesn't (initially) involve a ruler/tape measure. I lay everything in the cabinet carcass side by side and use shims/spacers where necessary so all that's left is space for the drawer front. I haven't screwed one up too bad since I started doing it this way. More of a story stick approach than a measurement.
Your place is looking good!
Im on the same page as you for drawer fronts! I usually over cut them, and then start nibbling down until the fit is right, barely uses a ruler. Then I use playing cards for the fit inside a frame, European style.
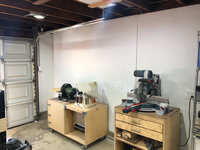
also, just went through your shop thread... your place is looking real nice! Super jealous of all the space you have to keep separate areas by trade (wood, metal, sewing, CNC). Cool stuff.
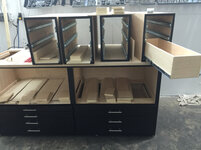
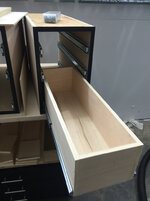
Snuck out into the garage the last couple of nights and finished up the miter-saw stand. First step was to rebuilt the drawer boxes, no compromise style. 3/4" sides, 1/2" bottom. I stuck to the rabbeted edge construction, which FYI, works MUCH better with 3/4" material:


(Much more room in the joint for stability!)

(Staples eventually are hidden by drawer fronts)
and just a little fancy on the drawer faces to match:

Final build all pretty including two coats of poly:


(Specifically sized that bottom shelf for two milk crates to hold the "good off-cuts")

Now that the center saw station is done, I have a little room in my brain to start imagining the two wing tables. They will be similar in construction, but I don't have enough free material left so I'll have to be a bit more careful with the measuring! On the positive side, that means I can built a little more optimally as 1/2" drawer bottoms and cabinet-backs was overkill. I do like the rabbeted drawer construction however with 3/4" material so that is a much faster option for these shop drawers which I want to be able to make faster/easier.
One thing I know is the right table will house my pancake air compressor on the bottom, maybe a cord reel, and all the air guns/screws. These cabinets were all designed a bit taller than even counter height to leave plenty of room for a future compressor upgrade. For the left stand I was dreaming about integrating my shop vac/canister cyclone. I also have two more of the same motors I used in my overhead air cleaner, so that is inspiring a few creative ideas as well...
For the tops, I was expecting to build the usual fence/stop combination you see so often, but then I watched this video:
I actually love this idea because then the two side wings can serve essentially as extra table tops when I need them, and wings with stop blocks when I need that.
(Much more room in the joint for stability!)
(Staples eventually are hidden by drawer fronts)
and just a little fancy on the drawer faces to match:
Final build all pretty including two coats of poly:
(Specifically sized that bottom shelf for two milk crates to hold the "good off-cuts")
Now that the center saw station is done, I have a little room in my brain to start imagining the two wing tables. They will be similar in construction, but I don't have enough free material left so I'll have to be a bit more careful with the measuring! On the positive side, that means I can built a little more optimally as 1/2" drawer bottoms and cabinet-backs was overkill. I do like the rabbeted drawer construction however with 3/4" material so that is a much faster option for these shop drawers which I want to be able to make faster/easier.
One thing I know is the right table will house my pancake air compressor on the bottom, maybe a cord reel, and all the air guns/screws. These cabinets were all designed a bit taller than even counter height to leave plenty of room for a future compressor upgrade. For the left stand I was dreaming about integrating my shop vac/canister cyclone. I also have two more of the same motors I used in my overhead air cleaner, so that is inspiring a few creative ideas as well...
For the tops, I was expecting to build the usual fence/stop combination you see so often, but then I watched this video:
I actually love this idea because then the two side wings can serve essentially as extra table tops when I need them, and wings with stop blocks when I need that.
slodat
ALLIANCE MEMBER
I thought I’d share a drawer box construction that has treated me really well. These are 24” deep, 1/2” sides, 1/4” Baltic birch bottoms. No rabbits or dados. **** joints with glue and 1” staples. They have served me well, no issues and the large drawers are 25” or so wide.


Attachments


I thought I’d share a drawer box construction that has treated me really well. These are 24” deep, 1/2” sides, 1/4” Baltic birch bottoms. No rabbits or dados. **** joints with glue and 1” staples. They have served me well, no issues and the large drawers are 25” or so wide.
OH, **** JOINTS!
 Too bold, sir... too bold.
I am probably going to drop down to 1/4" for the drawer bottom and cabinet sides. I cut the joinery on these with my standard table saw blade in, but if I get to the point where I need to batch out more than 2 drawers at once, I will switch over to my dado stack. With the stack installed, it would actually be a pretty easy milling job.
The last few weeks have been busy with small projects trying to shorten my list of to-do's in preparation for the next big project.
Started with refurbishing this old lateral file cabinet I got for free:

Primed

Painted, new handles added, and in its new home
Originally, I thought I would want to go with a more flashy/bright color, but Ms. SoCal and I couldn't agree on a color, so I went with this pretty basic grey, but in a hammered finish:

The next project on the list was finishing up the wire pulls for the last two security cameras. Since we are getting to the age where baby SoCal will be left with babysitters, these were placed inside the house to make Mrs. SoCal rest a little easier:

Static 2K cam for the entire living room view

1080p PTZ in the nursery
I wanted to stay with Amcrest for all the cameras, however that left me with this ugly mounting being my only option for an Amcrest PTZ POE cam... Its unfortunate they don't have a flush mount POE for a reasonable price-would have been so much less obtrusive. Regardless, everything is wired up through the attic and into SurveillanceStation:

Then there was an actual garage project. I finally pulled the next set of wiring across the ceiling and into the west wall. On the last wall, I only pulled 1-gang boxes on a single 20A breaker, but I found I was immediately filling all the plugs. Therefore, on this side, I ran two 20A lines to 1-gang boxes, 5x each down the entire wall.

Nothing fancy, just finally getting power everywhere I need it
This means I am basically ready to hang sheets on this wall and close everything up. That project is pinned for a little while because I wanted to get started on the aforementioned large project: THE FRONT FENCE! I bought the steel a few months ago and its just been sitting in the corner of the shop collecting dust. I washed it all down, scrubbed with acetone and got the first coat of Rustolem on there:

I also started the layout in the front yard:

There is going to be a lot of grading and digging holes in this dirt is insanely difficult, so I am going to rent some equipment to get this done...hopefully next weekend, but no promises there.
Started with refurbishing this old lateral file cabinet I got for free:
Primed
Painted, new handles added, and in its new home
Originally, I thought I would want to go with a more flashy/bright color, but Ms. SoCal and I couldn't agree on a color, so I went with this pretty basic grey, but in a hammered finish:
The next project on the list was finishing up the wire pulls for the last two security cameras. Since we are getting to the age where baby SoCal will be left with babysitters, these were placed inside the house to make Mrs. SoCal rest a little easier:
Static 2K cam for the entire living room view
1080p PTZ in the nursery
I wanted to stay with Amcrest for all the cameras, however that left me with this ugly mounting being my only option for an Amcrest PTZ POE cam... Its unfortunate they don't have a flush mount POE for a reasonable price-would have been so much less obtrusive. Regardless, everything is wired up through the attic and into SurveillanceStation:
Then there was an actual garage project. I finally pulled the next set of wiring across the ceiling and into the west wall. On the last wall, I only pulled 1-gang boxes on a single 20A breaker, but I found I was immediately filling all the plugs. Therefore, on this side, I ran two 20A lines to 1-gang boxes, 5x each down the entire wall.
Nothing fancy, just finally getting power everywhere I need it
This means I am basically ready to hang sheets on this wall and close everything up. That project is pinned for a little while because I wanted to get started on the aforementioned large project: THE FRONT FENCE! I bought the steel a few months ago and its just been sitting in the corner of the shop collecting dust. I washed it all down, scrubbed with acetone and got the first coat of Rustolem on there:
I also started the layout in the front yard:
There is going to be a lot of grading and digging holes in this dirt is insanely difficult, so I am going to rent some equipment to get this done...hopefully next weekend, but no promises there.
One other little project I squeezed in this weekend was a gift for a coworker who is leaving to take another job in Boston. Hes a major coffee snob, and WAAAAYYYY into his pretentious, but admittedly delicious, pour-over coffee. I started the job off with a simple design in sketchup:

I stacked four sheets of plywood and taped them together using double sided tape so I could make two of these stands at the same time:

Second coat of finish going down...

The first one all done!

Fits perfectly, even though it wont live here
Just to provide a little design context...The robotics we manufacture at work are usually wrapped in safety guarding, typically framed with aluminum extrusion. Its sort of our product's identifying look and this was one stick I pulled out of the trash that came off some old equipment being broken down. I chopped it into the longest 4 pieces I could and tapped the ends for M6 screws. Super easy to build!
Overall, its not the prettiest thing I have ever made, but it will be a sentimental gift for my [now former] coworker. Every time he brews coffee, he will be reminded of the good times here in San Diego!
I stacked four sheets of plywood and taped them together using double sided tape so I could make two of these stands at the same time:
Second coat of finish going down...
The first one all done!
Fits perfectly, even though it wont live here
Just to provide a little design context...The robotics we manufacture at work are usually wrapped in safety guarding, typically framed with aluminum extrusion. Its sort of our product's identifying look and this was one stick I pulled out of the trash that came off some old equipment being broken down. I chopped it into the longest 4 pieces I could and tapped the ends for M6 screws. Super easy to build!
Overall, its not the prettiest thing I have ever made, but it will be a sentimental gift for my [now former] coworker. Every time he brews coffee, he will be reminded of the good times here in San Diego!
Made great progress on the front fence project over the weekend. I set up my string lines and a friend helped me run a two man auger too get the five post holes dug. I was expecting holy hell (pun intended) because the clay in my neighborhood is just horrific, but it actually went really smoothly. Five holes took less than an hour total time including turn around on the rental.
This is where I expect to catch from flack from the old timers... I really hate mixing concrete. And with my bum back, I was planning to just rent a little mixer to get the posts set in the ground, but then I saw the recent video from Matt Rislinger. He basically did an infomercial with Kyle from R&R Buildings and they talked post hole foam... I saw some videos of this about a year ago, but didn't give it a second thought... until this video... next thing I know:


BOOM, five posts sunk and set like it was nothing. Seriously, it took me an hour, by myself, to set all the posts perfectly. The foam was expanded/set in 3 minutes and pretty damn hard after about an hour so I just started building the fence:


I never expected to make so much progress in a single day on this project! I was so dreading the concrete work that I put this off for months. I seriously cannot see using concrete on fence posts in the future--the foam is such an easy alternative. At worst, I figured I might regret setting the gate supporting post in foam, but once all the posts where tied together, I doubt you could tell these aren't concrete. I still need to build the gate and finish the end panel, but that is for this weekend.
This entire thing was a calculated risk for me and I debated back and fourth for a couple days if it was worth the risk. Here are a few of my notes to maybe help anyone else willing to take this same plunge:
Long story short: for my application this stuff worked great. Now, let the vitriol begin...
This is where I expect to catch from flack from the old timers... I really hate mixing concrete. And with my bum back, I was planning to just rent a little mixer to get the posts set in the ground, but then I saw the recent video from Matt Rislinger. He basically did an infomercial with Kyle from R&R Buildings and they talked post hole foam... I saw some videos of this about a year ago, but didn't give it a second thought... until this video... next thing I know:
BOOM, five posts sunk and set like it was nothing. Seriously, it took me an hour, by myself, to set all the posts perfectly. The foam was expanded/set in 3 minutes and pretty damn hard after about an hour so I just started building the fence:
I never expected to make so much progress in a single day on this project! I was so dreading the concrete work that I put this off for months. I seriously cannot see using concrete on fence posts in the future--the foam is such an easy alternative. At worst, I figured I might regret setting the gate supporting post in foam, but once all the posts where tied together, I doubt you could tell these aren't concrete. I still need to build the gate and finish the end panel, but that is for this weekend.
This entire thing was a calculated risk for me and I debated back and fourth for a couple days if it was worth the risk. Here are a few of my notes to maybe help anyone else willing to take this same plunge:
- I used this product, readily available at my local home depot: https://www.homedepot.com/p/Sika-33-fl-oz-Fence-Post-Mix-483503/205671519. It's about twice the cost of concrete per post, but no clean up, no mess, no strenuous lifting/mixing. When I accounted for the cost of renting a mixer, it actually cheaper. It also looks like HD sells a 20-post kit of something called "secure set" which is the same thing, but requires some measuring, for only $140. That's basically the same cost as concrete.
- Mix the foam for 20 seconds, not 15s like the package says. The difference seems trivial, I know, but it made a noticeable difference in the hardness/expansion of the foam. At 20 seconds you really have to move fast, because by 25 seconds, the foam is starting to expand.
- if you pack gravel at the bottom of the holes like you are supposed to, tamp a really thin layer of dirt (1/4") on top of that BEFORE pouring the foam in. Otherwise, the before-expansion, full liquid mixture will sink right between all the gravel and you wont get as good of an expansion up and out of the hole.
- I found one bag over filled an 18" depth once I mixed it for 20 seconds. I bet if you did 24", a single bag would be the perfect amount of expansion to fill the hole just to grade.
- Mask off your posts because the foam sticks to everything, including your skin, and its impossible to clean off the posts. Try to minimize/control contact as much as possible.
Long story short: for my application this stuff worked great. Now, let the vitriol begin...
Bob Heine
ALLIANCE MEMBER
Sal, great job on the fence. The foam looks like a great solution. Not having to wait a day for concrete to set is a big deal if you are on a roll.
My fence is attached to pressure treated wood 4x4 posts. Between hurricanes snapping them off and bugs or fungi destroying the buried part, I get to dig up the stumps quite often. Digging/pulling up the post is enough for me so I just set them in the ground. No concrete and none of them have ever tipped over. I thought about setting 4x4 steel sockets with some kind of quick connect but that's when I get that "You need to be in a nursing home" look.
I've heard about your ground moving around every once in a while so anything you can do to secure the posts would be a good idea.
TurtleValley
Well-known member
I love the expanding foam for post holes as well. you seem to have it down to a science now. I had the brainfart idea to put some bricks on top of the foam as it expanded to make it pressure and fill the hole better. Guess what... it takes a lot of work to remove the bricks after the foam cures. It did seem to make things a bit more dense in the foam, but next time I will wrap them in cling wrap first!
That stuff has soo many uses around the yard when setting rocks and filling behind cut in steps in the hillside before backfilling, etc.
That stuff has soo many uses around the yard when setting rocks and filling behind cut in steps in the hillside before backfilling, etc.
I love the expanding foam for post holes as well. you seem to have it down to a science now. I had the brainfart idea to put some bricks on top of the foam as it expanded to make it pressure and fill the hole better. Guess what... it takes a lot of work to remove the bricks after the foam cures. It did seem to make things a bit more dense in the foam, but next time I will wrap them in cling wrap first!
That stuff has soo many uses around the yard when setting rocks and filling behind cut in steps in the hillside before backfilling, etc.
I don’t know about calling it a science, but I definitely got some experience and feel comfortable using it again.
Sent from my iPhone using The Garage Journal mobile app
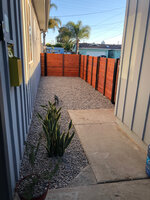
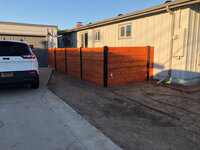
Made some great progress the last two days. I took off Friday to wrap everything in the front yard up, but turns out I didn’t need it:
View from the end of the driveway:

Here is the gate from the outside:

From the front door:

Right now it’s a little barren, but the snake plants will fill in over time and I’ve got some other ideas to add in. At least it’s not dirt anymore!
Sent from my iPhone using The Garage Journal mobile app
View from the end of the driveway:
Here is the gate from the outside:
From the front door:
Right now it’s a little barren, but the snake plants will fill in over time and I’ve got some other ideas to add in. At least it’s not dirt anymore!
Sent from my iPhone using The Garage Journal mobile app
Attachments

Did you try using a hammer drill?
Hammer drill where? To break concrete away or dig holes?
Sent from my iPhone using The Garage Journal mobile app
Wrapped up a smaller project this weekend and last couple nights. It’s a trophy for the costume contest at work. I think these photos are enough to explain it:


On to the next project!
Sent from my iPhone using The Garage Journal mobile app
On to the next project!
Sent from my iPhone using The Garage Journal mobile app
Attachments
-
 7dac4b7c4c9adf125845f4944b082df6.jpg626.9 KB · Views: 0
 -
 3ae2d43c537ab277954d1668ae92832d.jpg625.4 KB · Views: 0
 -
 46e289c4281def467b37b53b42dfeca7.jpg612.3 KB · Views: 0
 -
 1695b9208e90b906b74c5c9a0f57f138.jpg598.9 KB · Views: 0
 -
 07b675d8d083187e9785262a3ff64242.jpg63.1 KB · Views: 0
 -
 ae3783cc3c23c6dce533524691e7b123.jpg964.1 KB · Views: 0
wasfast
Well-known member
Very nice trophy! Love it.
I’ve been busy working on another little fun project, a set of jewelry boxes made from a special log. A while back, on a 4x4 trip into the mountains, a fallen tree blocked the trail. We chainsawed the log out of the road, and I kept a 2’ section for “later”. I roughly milled and stacked it:

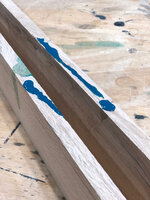
The stack has been bouncing around my garage for about two years now with no progress. I did two rounds of final milling (jointing, planing) then filling cracks and gaps with epoxy:

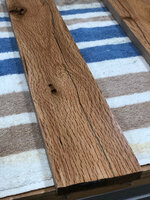
And finally a halfway decent stack of what I think is coast live oak:


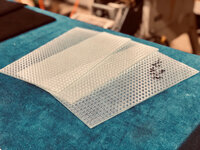
Tonight I had a chance to make a little progress on building all the final pieces before assembly. I got some textured glass for the tops and wrapped the bottom panels in padded black suede:


And now all my parts are ready to go:

I’m hoping to get all the assembly done this week at night. I’ll see how that plan goes...
Sent from my iPhone using The Garage Journal mobile app
The stack has been bouncing around my garage for about two years now with no progress. I did two rounds of final milling (jointing, planing) then filling cracks and gaps with epoxy:
And finally a halfway decent stack of what I think is coast live oak:
Tonight I had a chance to make a little progress on building all the final pieces before assembly. I got some textured glass for the tops and wrapped the bottom panels in padded black suede:
And now all my parts are ready to go:
I’m hoping to get all the assembly done this week at night. I’ll see how that plan goes...
Sent from my iPhone using The Garage Journal mobile app
Attachments
-
 cac0d18c895607bcdfd0e70f299393b9.jpg1.1 MB · Views: 0
 -
 d3f89b887e2e0abeb65bd5b1afd7c81e.jpg1,010.1 KB · Views: 0
 -
 65a1a595c7dc29b980418370282547ff.jpg956.9 KB · Views: 0
 -
 7459f25cd7e51db685a330d074347c6d.jpg986.8 KB · Views: 0
 -
 e4cea3552d545ba8980850261e6a973a.jpg869.8 KB · Views: 0
 -
 ef317c7ab475f0ef31ca3b455250fc1f.jpg760 KB · Views: 0
 -
 c9f78603606291ba7f1f0d1378fc2d58.jpg804.5 KB · Views: 2
Growlertdi
Well-known member
nice thread so far, I look forward to more.
Snuck away into the garage over the last few nights—small progress made... got all three boxes glued up:


Then I was able to cut up some scrap aluminum and glue in splines:


All sanded down, they don’t look half bad:

And finally, tonight I cut the top off the first box:


Slowly but surely, getting there.
Sent from my iPhone using The Garage Journal mobile app
Then I was able to cut up some scrap aluminum and glue in splines:
All sanded down, they don’t look half bad:
And finally, tonight I cut the top off the first box:
Slowly but surely, getting there.
Sent from my iPhone using The Garage Journal mobile app
I’ve been too distracted with typical end of year stuff to make much progress. I did a little sanding and mortised one of the hinge sets— just not a favorite process of mine. Very tedious...
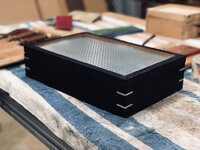
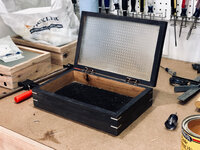
More importantly I tested out a new wood finishing technique using vinegar with steel wool soaked in it. When applied to Oak, it turns the wood dark black. The effect is really astounding!
The rusty jar:

Before:

After:

Comparison:

I haven’t put any actual finish on yet, this feels just like raw wood. The change from such a simple homemade chemical is really crazy!
Sent from my iPhone using The Garage Journal mobile app
More importantly I tested out a new wood finishing technique using vinegar with steel wool soaked in it. When applied to Oak, it turns the wood dark black. The effect is really astounding!
The rusty jar:
Before:
After:
Comparison:
I haven’t put any actual finish on yet, this feels just like raw wood. The change from such a simple homemade chemical is really crazy!
Sent from my iPhone using The Garage Journal mobile app
Attachments


As usual projects pile up around the holidays. I made a tiny bit of progress on the oak boxes by carving the hinges in:


Then I got derailed with a little baby project for the Mrs... a “learning tower” so the baby can reach the counter and destroy anything he can reach up there also! This was more an “ikea-hack” than scratch woodworking, so it started with some test fitting with the little guy:

Then some super basic construction from some leftover pine shelves I ripped out of the house years ago, but couldn’t bare to burn... take that scrap pile!

Finally, painted and in use:

Now back to the oak boxes!
Sent from my iPhone using The Garage Journal mobile app
Then I got derailed with a little baby project for the Mrs... a “learning tower” so the baby can reach the counter and destroy anything he can reach up there also! This was more an “ikea-hack” than scratch woodworking, so it started with some test fitting with the little guy:
Then some super basic construction from some leftover pine shelves I ripped out of the house years ago, but couldn’t bare to burn... take that scrap pile!
Finally, painted and in use:
Now back to the oak boxes!
Sent from my iPhone using The Garage Journal mobile app
Attachments


Hello world! I’ve come back for air! Actually, I just took a couple months break from working on the garage and dove into other hobbies for a bit. Long story short: I’m back.
Started this month off with another work trophy, this time for someone leaving our institute... my boss. I played with the idea of a DNA double helix (though technically this is a triple helix):


And because that wasn’t enough, I played a bit with an arduino and added some LEDs to get a light pipe effect/internal reflection:


I think it came out killer, but I’m biased. Mostly, I wanted an excuse to learn more about arduino programming and controlling LEDs because I have a HUGE project using them coming up in May. I think this was my favorite of these trophies and honestly one of the easiest to make.
After that was done and gone, I decided to get back to working on the shop. I started by sheathing the remaining wall with more 5/8 particle board. Then everything was painted white:


This time you’ll notice I didn’t cut the boards down to 4” tall sections. I toughed it out and scrolled the outlets from the whole sheets. It was annoying, but good practice for cutting outlet reliefs. I did a bit of reorganizing after the sheathing went up and then promptly started on my dust collection system. I am going to convert a HF 2hp unit to a 2 stage collector (with a super dust deputy cyclone) as well as upgrade the impeller to a bigger 12” fan. Then I’ll be running 4” sewer lines to all my tools... I’ve waffled about this decision for days now—4” pvc or 5” metal... I am probably limiting myself a little with the 4” pipes but the big box stores in my area have very limited selection in hvac pipe and fittings. That, coupled with at least 3x the cost and the added difficulty in working with metal ducts, I’m just going 4” pvc.
First things first... had mount the blower up on the wall. I went with a big trusty French cleat and used some serious 6” specialty lag screws to mount everything to studs. I mounted the blower itself to a 3/4 sheet of ply, then glued, screwed, and bolted the other half of the cleat:

Couple things to note:
1) Before I mounted the blower I pulled a dedicated 20a circuit with GFCI protection. I dropped a 20a switch down about 36” from the outlet to control power. Eventually this will be remotely switched as well, but baby steps.
2) I modified the blower to rotate the shroud outlet to point right into the wall, which I am going to duct outside. Instead of using a bag/filter inside, I am going to dump the mostly clean air right into the side yard outside the garage. I might have hesitated to go this route IIIIIIFFFFF my frat boy neighbors weren’t such assholes. But... alas karma kids, karma. The full howl of this monster is going to land right outside their little smoking patio... take that f***ers. Keep throwing parties boys, I’m still considering putting my air compressor right there too.
3) the cleat feels strong, but I don’t want to risk it somehow slipping off so once the install is final, I’ll be running two jumbo lag screws through the top cleat to lock it to the studs also.
I also used this project to teach little SoCal how to use his first bearing puller:

I bought all the blast gates, tubing, and fittings this weekend... I doubt it will take me long to get started hanging all the ducts.
Sent from my iPhone using The Garage Journal mobile app
Started this month off with another work trophy, this time for someone leaving our institute... my boss. I played with the idea of a DNA double helix (though technically this is a triple helix):
And because that wasn’t enough, I played a bit with an arduino and added some LEDs to get a light pipe effect/internal reflection:
I think it came out killer, but I’m biased. Mostly, I wanted an excuse to learn more about arduino programming and controlling LEDs because I have a HUGE project using them coming up in May. I think this was my favorite of these trophies and honestly one of the easiest to make.
After that was done and gone, I decided to get back to working on the shop. I started by sheathing the remaining wall with more 5/8 particle board. Then everything was painted white:
This time you’ll notice I didn’t cut the boards down to 4” tall sections. I toughed it out and scrolled the outlets from the whole sheets. It was annoying, but good practice for cutting outlet reliefs. I did a bit of reorganizing after the sheathing went up and then promptly started on my dust collection system. I am going to convert a HF 2hp unit to a 2 stage collector (with a super dust deputy cyclone) as well as upgrade the impeller to a bigger 12” fan. Then I’ll be running 4” sewer lines to all my tools... I’ve waffled about this decision for days now—4” pvc or 5” metal... I am probably limiting myself a little with the 4” pipes but the big box stores in my area have very limited selection in hvac pipe and fittings. That, coupled with at least 3x the cost and the added difficulty in working with metal ducts, I’m just going 4” pvc.
First things first... had mount the blower up on the wall. I went with a big trusty French cleat and used some serious 6” specialty lag screws to mount everything to studs. I mounted the blower itself to a 3/4 sheet of ply, then glued, screwed, and bolted the other half of the cleat:
Couple things to note:
1) Before I mounted the blower I pulled a dedicated 20a circuit with GFCI protection. I dropped a 20a switch down about 36” from the outlet to control power. Eventually this will be remotely switched as well, but baby steps.
2) I modified the blower to rotate the shroud outlet to point right into the wall, which I am going to duct outside. Instead of using a bag/filter inside, I am going to dump the mostly clean air right into the side yard outside the garage. I might have hesitated to go this route IIIIIIFFFFF my frat boy neighbors weren’t such assholes. But... alas karma kids, karma. The full howl of this monster is going to land right outside their little smoking patio... take that f***ers. Keep throwing parties boys, I’m still considering putting my air compressor right there too.
3) the cleat feels strong, but I don’t want to risk it somehow slipping off so once the install is final, I’ll be running two jumbo lag screws through the top cleat to lock it to the studs also.
I also used this project to teach little SoCal how to use his first bearing puller:
I bought all the blast gates, tubing, and fittings this weekend... I doubt it will take me long to get started hanging all the ducts.
Sent from my iPhone using The Garage Journal mobile app
Attachments
-
 86a7d9fdfe6c9777ae07da3131be1ce7.jpg650.6 KB · Views: 1
 -
 079f10368a68ad09300945ba7853f839.jpg631.1 KB · Views: 1
 -
 b5ce38909d5668dd12aa6de968730395.jpg835 KB · Views: 2
 -
 a53c4d55dc2e359de918c07fefde1987.jpg720.6 KB · Views: 1
 -
 665ef91165e28ca051e2c24799f3c242.jpg401.8 KB · Views: 1
 -
 c0fe651f82bd0c6a3c44f87a68f199e6.jpg602.2 KB · Views: 1
 -
 6854f719182c4b913d5f31e919f49c7f.jpg645.5 KB · Views: 1
 -
 c8db4c8669e12c577bb02d2275392cfc.jpg362 KB · Views: 1
Last edited: