To avoid these ads, REGISTER NOW!

solving an open bottomed workbench project...

worriedshrimp

Member
Joined
Oct 28, 2013
Messages
15
greetings and happy new year,

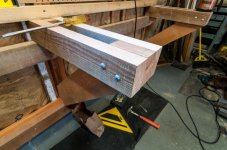
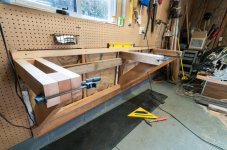
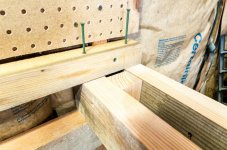
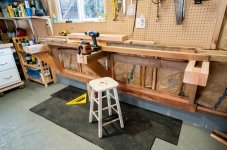
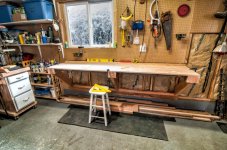
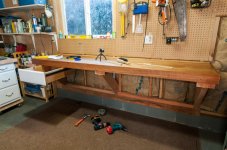
i am constructing an 8’ by 24” workbench in my garage. i fear i made at least one engineering mistake by not fastening the top 2×4’s to the wall joist. my remedy was to place a 2×2 along the top and fasten the cross pieces to the wall joist with screws. i am unfamiliar with weight and loads but understand that any weight on this type of wall workbench will want to pull the 2×4’s from the wall. pictures attached.

what is a preferred surface material for a bench such as this? i will be using the surface for fly tying and mount a computer tower underneath with flat screen monitor on an arm above the bench... this bench is a portion my my garage dedicated to studio photography. also is it better to glue the top workbench surface to the supports rather than nail or screw? would liquid nails be adequate?


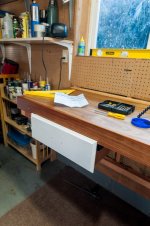
finally, i have some old drawers to mount. this must be an open bottomed workbench solution - hung from the top or sides. can anyone recommend quality rails or possible attachment hardware – or a link to how to best fasten them to this type workbench?. they are going to be a very tight fit.

thank you for an excellent forum.

i hope my pictures explain my questions.

tws
 

Attachments

  • workbench1-_MEF9063-January 02, 2014.jpg
    workbench1-_MEF9063-January 02, 2014.jpg
    92.4 KB · Views: 366
  • workbench4-_MEF9051-January 01, 2014.jpg
    workbench4-_MEF9051-January 01, 2014.jpg
    108.9 KB · Views: 376
  • workbench3-_MEF9048-January 01, 2014.jpg
    workbench3-_MEF9048-January 01, 2014.jpg
    104.2 KB · Views: 318
  • workbench5-_MEF9054-January 02, 2014.jpg
    workbench5-_MEF9054-January 02, 2014.jpg
    108.1 KB · Views: 334
  • workbench8-_MEF9077-January 02, 2014.jpg
    workbench8-_MEF9077-January 02, 2014.jpg
    114.7 KB · Views: 340
  • workbench7-_MEF9080-January 02, 2014.jpg
    workbench7-_MEF9080-January 02, 2014.jpg
    107.5 KB · Views: 307
To avoid these ads, REGISTER NOW!

Boomer343

Well-known member
Joined
Mar 19, 2012
Messages
519
Welcome to the forum Worried..... I believe I have driven across bridges that had less structural support than what you have built.

I would just screw the top down. To hang the drawers look at what a place like Lee Valley offers and go from there. The way I would do it would be to run a piece of plywood under the drawers between the supports and use under drawer guides if the side clearance was tight.

As for a top surface you will have to decide what works for your situation.... probably Formica or a product like it would serve you well. Get something that is a good background for your photos.
 

lotsoftools

Well-known member
Joined
Oct 22, 2011
Messages
1,317
Location
Inland Empire
Look up pencil drawer slides. They hang from above so you may be able to attach them directly to the underside of your work top.
 

Scott H in Wheaton

Well-known member
Joined
Mar 18, 2013
Messages
3,155
Location
Plainfield, suburb of Indianapolis
I don't think you need that 2x2 across the top, and you don't need that 2x4 underneath either.
The angle braces you made look strong enough to hold up an engine block, so doing a bit of fly tying is no problem.
Re-do the angle braces to attach to the wall studs and you are good to go.
Cover the whole thing with 1/2" or 3/4" plywood screwed to the angle braces, then cover that with 5/8" or 3/4" mdf for a nice flat and strong work surface.

I occasionally do some scale model building and find that a white workbench surface covered with a piece of glass works very well for intricate detail work. Paint drips and glue are easy to clean off and the white surface under glass makes it easy to see small parts and bright enough to work in.
 
OP
W

worriedshrimp

Member
Joined
Oct 28, 2013
Messages
15
wow! thanks taumac, boomer, lotsoftools and scott...

that's just the info i need... yes i was thinking of using mdf and i work for a glass company and can get 3/8" tempered pencil polished glass for the top - great idea! i'll have a look at pencil drawer slides and lee valley... i get bits and pieces for my garage over the years at our local restore - lots of used house parts to be had there.

thanks again everyone!

tws
 

lonestarky

Well-known member
Joined
Mar 28, 2011
Messages
367
Location
Lindenhurst IL
Hi. Great bench design. Great notches and angle cuts too. The 2x2 and screw solution you came up with is adequate for extremely light loads, but I fear the screws will break since they're the only thing holding it, and they'd be in single shear. The strongest way would be to raise the 2x4 underneath that is holding the horizontal 2x4 up, and notch the horizontal 2x4 on top so it pulls against the notch. The other option is to recut the horizontal 2x4 longer and lag bolt it directly to the studs on both sides. A third option is to wood glue the bottom face of the bench top support 2x4 to the horizontal support, and then toenail or screw on an angle into it. The glued and screwed or nailed combination joint will be incredibly strong.

Photography and fly tying backdrop. I would think you would want something with a relatively matte finish. Laminate might be too shiny and reflect in the flash. How about MDF painted, eggshell white or light gray, or a melamine panel.
 
OP
W

worriedshrimp

Member
Joined
Oct 28, 2013
Messages
15
i think i'll redo the 2x4's and thru bolt them into the joist. piece of mind. the mdf sounds good and a white finish.

thanks lone starky
 
To avoid these ads, REGISTER NOW!
OP
W

worriedshrimp

Member
Joined
Oct 28, 2013
Messages
15
workbench project continued...

rather than redo the 2x4s and attach them to the wall studs, i've added metal brackets to the bottom since i intend to do only light work on this bench. the greatest weight will come from 4 suspended drawers on the appropriate sliders... found here:

http://www.drawerbuilder.com/drawer-runners-light-duty-slides-c-29_608.html

here are images of my progress so far. i still need to decide on a final 1 or 3/4" surface material - i'm going to check to see what my local restore has before committing.

finally, the 3/4" hardwood plywood is only clamped at this time. i will probably glue the final top surface to this before screwing the under plywood in place. however, i wonder if there is a better way to attach this in case i want to remove the top at some future date? screws buried under a glued top material are not accessible.

any and all ideas welcomed.

tws
 

Attachments

  • _MEF9141_2_3_4_5-Edit.jpg
    _MEF9141_2_3_4_5-Edit.jpg
    131.8 KB · Views: 126
  • _MEF9136_37_38_39_40-Edit.jpg
    _MEF9136_37_38_39_40-Edit.jpg
    126.4 KB · Views: 118
  • _MEF9131_2_3_4_5-Edit.jpg
    _MEF9131_2_3_4_5-Edit.jpg
    129.3 KB · Views: 117
  • _MEF9106_07_08_09_10-Edit.jpg
    _MEF9106_07_08_09_10-Edit.jpg
    121.8 KB · Views: 120
  • _MEF9081.jpg
    _MEF9081.jpg
    68.7 KB · Views: 119

QwikKotaTx

Well-known member
Joined
Aug 10, 2013
Messages
967
Location
Seabrook, TX
Screw the upper sheet to the lower sheet from below, countersunk etc. Another thread mentioned that which is what I will do, good tip.
 
OP
W

worriedshrimp

Member
Joined
Oct 28, 2013
Messages
15
taumac, by screwing the upper sheet to the lower from below i reckon i can do just that, occasionally replace the top hardwood plywood.

cheers!

btw what does that glove represent... i can't quite make out the lettering in your images?

tws
 

taumac

Well-known member
Joined
Aug 30, 2011
Messages
8,104
Location
Brooksville, Fl
OP
W

worriedshrimp

Member
Joined
Oct 28, 2013
Messages
15
moving along and installing shelves. the suspended keyboard sliders were a bit expensive but they really save the day in terms of ease of installation and practicality in this particular application. for the time being i'll only be mounting two drawers one at either end of the workbench. maybe later i'll mount a couple of pencil drawers inboard of these two larger drawers. slider specs declare i can load up to 75lbs.
 

Attachments

  • _MEF9218.jpg
    _MEF9218.jpg
    106 KB · Views: 56
  • _MEF9219.jpg
    _MEF9219.jpg
    106.4 KB · Views: 57
  • _MEF9220.jpg
    _MEF9220.jpg
    91.4 KB · Views: 62
  • _MEF9223.jpg
    _MEF9223.jpg
    95.9 KB · Views: 51

lonestarky

Well-known member
Joined
Mar 28, 2011
Messages
367
Location
Lindenhurst IL
Looks good. Can I ask how sturdy the top feels? I would think that its alright with the header board on top of the 2x4 and the angles underneath. Its important to remember that with the support structure you have set up (angled struts from the wall) the top is actually pulling out away from the wall, not just pushing down.

Also, the stain\poly looks great! Really great. The matte doesn't look too harsh in the pictures either, which was your goal.
 
OP
W

worriedshrimp

Member
Joined
Oct 28, 2013
Messages
15
you are so correct lonestarky. indeed the physics are as you say and tho feeling very solid it does upon great weight have flex. if i had it to do over again i would have bolted it to the wall studs. but alas i carried on such as it is.

nonetheless i think it will be adequate for my needs. i do not intend to mount vises or use it for heavy projects. the drawers will have weight and i think i'll use pencil drawers for the inboard desk space to use less weight. the left side of this bench will be for fly tying and the right side nearer my photography studio will be for a wall monitor and pc tower beneath.

tws
 
To avoid these ads, REGISTER NOW!
Top Bottom