You are using an out of date browser. It may not display this or other websites correctly.
You should upgrade or use an alternative browser.
You should upgrade or use an alternative browser.
Stainless Teaser
- Thread starter Rated ///M
- Start date


akdiesel
Well-known member
NICE. Is the seem locked together or just sitting there?
OP
Rated ///M
Well-known member
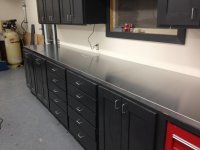
I have countertop draw bolts underneath it to level and pull it together. They were going to weld it all and make it one long piece, but 16feet of countertop is alot to move around..
BigGMC
Well-known member
that's ****!! 
you build the cabinets?
you build the cabinets?
danieldd
Well-known member
I like the cabinets. Did you build those yourself or did you buy? If you bought them, then who is the source?
burgie
Well-known member
Damn nice looking setup!!!
DAMM!!! I like it!
and if you don't mind me asking how much did that SS set you back? I'm sure it was a pretty penny, but looks to be well worth it! I intend on doing SS top on my new bench one day...
Also how thick is it and do you have wood under it?
and I think you just motivated me to paint my bench and cabinets black...been trying to decide on a color.
thanks for posting!
chrisMason
Active member
- Joined
- Dec 21, 2012
- Messages
- 33
I have countertop draw bolts underneath it to level and pull it together. They were going to weld it all and make it one long piece, but 16feet of countertop is alot to move around..

OP
Rated ///M
Well-known member
Cabinets were all hand built by me... I was shopping around for custom ones, but couldn't justify the price for what I wanted. I have a full setup for less than $1000.

OP
Rated ///M
Well-known member
DAMM!!! I like it!
and if you don't mind me asking how much did that SS set you back? I'm sure it was a pretty penny, but looks to be well worth it! I intend on doing SS top on my new bench one day...
Also how thick is it and do you have wood under it?
and I think you just motivated me to paint my bench and cabinets black...been trying to decide on a color.
thanks for posting!
I have two sheets of 3/4 Particle lam glued and screwed together. The stainless has a 3/4" lip on the bottom of the front side that very fit over the top of the two sheets very snug and a 3/4 overhang on the back. This allowed me to countersink some screws in and hold the whole assembly down while still being able to remove it should I ever have to.
Oh, and its 16GA stainless.
danieldd
Well-known member
Those are some mighty nice cabinets! I'm assuming you built the doors as well. I could do something similar, but I don't have the tools (nor the experience) to build the cabinet doors - and they're the most expensive part of the cabinets.
OP
Rated ///M
Well-known member
Those are some mighty nice cabinets! I'm assuming you built the doors as well. I could do something similar, but I don't have the tools (nor the experience) to build the cabinet doors - and they're the most expensive part of the cabinets.
Doors were actually cheap and easy.. Some straight pine 1x4's and 1/4" cheapy ply (cause it was getting painted).
Cut your 1x4's to size and then run them through your table saw with a dado blade, or like me just use a 1/8" Kerf blade and set it at 3/8 and run it through twice, once on each side. Clamp and glue them up and finish sand and your done.
Mortise and Tenon baby! I built all these doors in an afternoon and painted them in the morning.
danieldd
Well-known member
Doors were actually cheap and easy.. Some straight pine 1x4's and 1/4" cheapy ply (cause it was getting painted).
Cut your 1x4's to size and then run them through your table saw with a dado blade, or like me just use a 1/8" Kerf blade and set it at 3/8 and run it through twice, once on each side. Clamp and glue them up and finish sand and your done.
Mortise and Tenon baby! I built all these doors in an afternoon and painted them in the morning.
I can do that!
Thanks.
964haus
Well-known member
Great job. As someone in the process of building workbenches, shelves, etc for my own shop, it really does take a lot of work. Looks so simple and elegant when done, but the work behind it is awesome.
Top job!
M.
Top job!
M.
Tbucit
Well-known member
Looking way too good!!!!
fringeofinsanity
Well-known member
Now that is some seriously **** garage ****!
therealjakeg
Well-known member
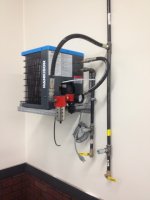
Whats the large silver tube hanging on the wall by your air compressor?
digdug18
Well-known member
Nice looking cabinets, not a fan of stainless though.
santagary
Well-known member
Whats the large silver tube hanging on the wall by your air compressor?
Ditto...what is that silver tube connected to your compressor and hanging on the wall next to it???
Spareparts
Well-known member
Looks like a seperator to get rid of water
OP
Rated ///M
Well-known member
Ditto...what is that silver tube connected to your compressor and hanging on the wall next to it???
Exactly! I have a pretty crazy water separator setup in the garage. I use that as a giant "condenser" to expand into the 3" piping and back down to the 1/2" line I have above it. I haven't had many hot days yet to completely test it out, but when I am running my sanders and the compressor has been going full bore for awhile I'll pull a little over a cup of water out of that and nearly nothing at the other end of my shop where I hook up my air lines.
I also have a Hankinson refrigerated air dryer to use when I am sand blasting/ Plasma cutting / or HVLP spraying that will dry the remaining moisture out of my air lines.
I have attached a picture from before it was complete, but here is the dryer side.