To avoid these ads, REGISTER NOW!

Stairway Construction... For A Barn

lakeroadster

Well-known member
Joined
Jan 19, 2015
Messages
5,166
Location
Central Colorado
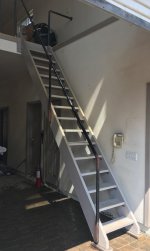
I'm going to build a stairway to access the loft in my barn.

I've been using my Werner 8 ft Type IA Fiberglass Platform Ladder but trying to carry / retrieve items from the 10 foot high loft using a ladder just isn't very safe.

The Hansen Pole Building site has a nice design Pole Barn Stairs.

I'm thinking 3 foot wide, nothing fancy, just raw 2x materials out of pine. Looks like materials will be about $250.

But before I pull the trigger and buy materials I was wondering if perhaps somebody here had a better design or some insight into different designs?

attachment.php
 

Attachments

  • Barn Stairway Drawing No Name.jpg
    Barn Stairway Drawing No Name.jpg
    84.7 KB · Views: 204
Last edited:
To avoid these ads, REGISTER NOW!

firebirdparts

Well-known member
Joined
Jun 8, 2016
Messages
10,588
Location
Kingsport, TN
The way they show to do it on the Hansen site is right. That is basically the only rational way they can be made using a stringer. Stairs of a normal pitch are basically all that way. Some pitfalls I see are:
1. Making the rise some hard dimension so that you have an oddball stair height on one end. I personally do not do this.
2. Doing the math wrong on the final floor elevations on either end, so that your attempt to get the stair heights right still doesn't work out. For instance, they are correct to say the bottom of the stringer is "rise - 1-1/2". In a house, though, if somebody puts a tile floor down after you do that, then it throws the rise off again on that one step.
3. Bad joinery. If you look at their picture of the Simpson LSCZ bracket, you can see that by building the stairs with the top step level with the floor, they could have created a huge joint area. Instead, they have illustrated the stringers mounted 8" down on a 2X10, which nowadays is only 9" tall. This is crummy. I personally do not do this, and in fact their illustrative example of stairs (first photo) isn't built that way either.

Personally I have never seen the 2x2's used. that is a new one on me.
 
Last edited:
OP
L

lakeroadster

Well-known member
Joined
Jan 19, 2015
Messages
5,166
Location
Central Colorado
Thanks for the replies and insight.

3. Bad joinery. If you look at their picture of the Simpson LSCZ bracket, you can see that by building the stairs with the top step level with the floor, they could have created a huge joint area. Instead, they have illustrated the stringers mounted 8" down on a 2X10, which nowadays is only 9" tall. This is crummy. I personally do not do this, and in fact their illustrative example of stairs (first photo) isn't built that way either.

Personally I have never seen the 2x2's used. that is a new one on me.

Agreed on the bad joinery. I noticed that when making the CAD model, and moved the top step flush with the landing.

The 2 x 2's are new to me as well, but you can't leave an opening above 30" that a 4" ball can fit through. It's basically the handrail code being applied to the riser opening.

I'll likely use plywood or soffit board, ripped down to size instead of the 2x2's. I can route a groove under the step for it to slip into, then nail it into the next step down.

Using 2 x 2's would be "split city".
 

ishiboo

Well-known member
Joined
Oct 27, 2010
Messages
9,481
Location
Oshkosh, WI
I like to use a solid wood 2x12 on both outsides, with wood cleats or if you want to spend the $$ steel angles that Simpson/USP/etc. make for stair treads. It's not only having to cut 1 or 2 stringers instead of 3 or 4, I think it makes for a nicer stair without the ability for stuff to roll off the sides, and it looks better going up IMO too.

Your materials cost seems quite high... I can get 3 pressure-treated pre-cut stringers for 96" rise as well as 7 2x12x6' pressure treated stair treads for $259 before any sales/discounts. That pretty much leaves just nailing it together. I prefer a solid 2x12' for the stair treads, IMO it seems to look better and its a bit stiffer... just personal preference though. The stairs in my barn are double 2x6s (since I bought a few hundred 2x6s for under 2 bucks a piece from Lowes) and they work just fine.
 

Doug B

Well-known member
Joined
Dec 24, 2008
Messages
1,236
Location
Schroon Lake, NY
A couple of options for fastening the stringers to the landing. Raising the top tread up to landing height makes the overall run one tread longer.
I use 2-2x6s for treads as a single 2x12 is more likely to cup or warp.
I have used another 2x12 on the outside of the stringers in place of the 2x6 'strongback'. Yeah, it's more lumber, but hella strong, especially on long runs.
 

Attachments

  • stringer 1.jpg
    stringer 1.jpg
    9.8 KB · Views: 132
  • stringer 2.jpg
    stringer 2.jpg
    9.8 KB · Views: 136
  • 2x stringer.jpg
    2x stringer.jpg
    13 KB · Views: 54

ard

Well-known member
Joined
Feb 16, 2015
Messages
4,391
Location
Sierra Foothills... California
I just did this for my barn loft. After the wife has been using an extension ladder for 15 years....

1.75x 11.5 P veneer/paralam for the stringers
Simpson stair tread brackets
2x8 treads

It is not code compliant, the way it runs I only had 9.5ft of run, and 11.5 of rise. But it works. Welded up a railing using 1.25 in sch 40 pipe w weld fitting.

Very secure. I felt the laminated stringers would add quite a bit of strength.
 
OP
L

lakeroadster

Well-known member
Joined
Jan 19, 2015
Messages
5,166
Location
Central Colorado
How much did you fellas pay for those TA10Z Simpson Stair Tread Angles?

Cheapest I can find is $4.00 each...

At 14 steps that's $112.. yowza!
 

PugetDude

ALLIANCE MEMBER
Joined
Mar 13, 2013
Messages
22,349
Location
Superstition Mountains, AZ
Wish I was closer- I love to do stairs. I recently did a set for my brother's motorhome garage- 14' ceilings and we had to work around 3 windows. Passed inspection with flying colors. :)

I'm old school on stair design. I draw it out on graph paper, denote every riser, tread, and run length. Add them all up and make sure you're not missing anything. Don't forget to drop the carriage (where the bottom stringer lands on the pad) by the thickness of your treads.

I'd cut (3) stringers out of 2x12's. and forgo the Simpson stuff. Cut the one that is secured to the wall first, that way you can make any minor adjustments without wasting a 16' 2x12. When you get it right, use it as a pattern for the other two.

Also, I'd use (2) 2x6's side by side instead of a single 2x12 tread-cheaper and less tendency to cup and split.

I also like to tack a piece of composition roofing on the bottom of the stringer to keep it from absorbing moisture out of the concrete floor.

Good luck with the project.
 

ard

Well-known member
Joined
Feb 16, 2015
Messages
4,391
Location
Sierra Foothills... California
How much did you fellas pay for those TA10Z Simpson Stair Tread Angles?

Cheapest I can find is $4.00 each...

At 14 steps that's $112.. yowza!

Ah, yeah. I found a cheap price at a local simpson dealer, then strong-armed home depot to price match. $1.62.

https://www.shop.com/STAIRCASE+ANGL...MItpn65JaS1gIVBZ7ACh1bfwecEAkYBiABEgLU3PD_BwE

20 for $75 ish

Oh, I actually used a Trus Joist 1.55E TimberStrand LSL 1.75" wide. 11 7/8 deep.

Two 17 footers (lumber year cuts to length, them come on ~70 foot long pallets!)

Menards has 17 ft at $70 per: https://www.menards.com/main/buildi...r/1-3-4-x-11-7-8-lvl-1-9e/p-1444438532385.htm


And now I have a small confession. This was a Christmas present. After squirreling away the materials in the shop, I constructed the parts, test fitted, then painted it all. She was using the old ladder the whole time. Son came home xmas 
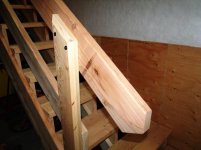
eve. After she did the animals, he and I snuck down and installed the stringers and 3 steps...and a big bow.
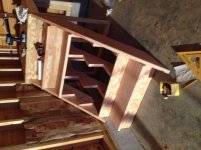
Next morning great video of her looking in shock, then muttering "I *knew* he was up to something in the shop..."
 

Voi

Well-known member
Joined
Oct 10, 2010
Messages
5,140
Location
Western South Dakota
Oh, I actually used a Trus Joist 1.55E TimberStrand LSL 1.75" wide. 11 7/8 deep.

Two 17 footers (lumber year cuts to length, them come on ~70 foot long pallets!)

Menards has 17 ft at $70 per:

Do you have pictures? I'm thinking about using LSL or LVL to make an alternating ladder stair for our cabin.
 

gungatim

Well-known member
Joined
Jan 8, 2013
Messages
8,101
Location
west mich
Wish I was closer- I love to do stairs. I recently did a set for my brother's motorhome garage- 14' ceilings and we had to work around 3 windows. Passed inspection with flying colors. :)

I'm old school on stair design. I draw it out on graph paper, denote every riser, tread, and run length. Add them all up and make sure you're not missing anything. Don't forget to drop the carriage (where the bottom stringer lands on the pad) by the thickness of your treads.

I'd cut (3) stringers out of 2x12's. and forgo the Simpson stuff. Cut the one that is secured to the wall first, that way you can make any minor adjustments without wasting a 16' 2x12. When you get it right, use it as a pattern for the other two.

Also, I'd use (2) 2x6's side by side instead of a single 2x12 tread-cheaper and less tendency to cup and split.

I also like to tack a piece of composition roofing on the bottom of the stringer to keep it from absorbing moisture out of the concrete floor.

Good luck with the project.

pretty much how I do it. get the math right and it's easy. I use those brass thingys that clamp onto a framing square, lay it out with pencil and just do the first one to verify, then template for the other two. it's not as hard as people make it out to be...if the math is wrong and you have an odd riser height for some reason, better it be the bottom than the top!
 

73RR

Blank Email
Joined
Dec 13, 2016
Messages
300
Location
Central Ory-Gun
Instead of cutting notches in the stringer, I prefer to mount a 1½ x 1½ angle iron to the inside face of the stringer for the treads. You can buy a lot of angle iron and carriage bolts for the price of Simpson stuff......
 

n20junkie

Well-known member
Joined
Aug 22, 2010
Messages
538
Location
Grand Island, NY
It's hard to beat 2x12's for stairs.

Cut stringer with end plates, middle support stringer with 2x12 treads. Put 1/2 plywood kick plates up behind each tread and glue and screw it all together.


It will be like a rock, hold anything you and 4 of your friends can carry and not make a squeek.
 

Attachments

  • IMG_0647.jpg
    IMG_0647.jpg
    141.3 KB · Views: 150
Last edited:

ard

Well-known member
Joined
Feb 16, 2015
Messages
4,391
Location
Sierra Foothills... California
Do you have pictures? I'm thinking about using LSL or LVL to make an alternating ladder stair for our cabin.

Some pics.

The stringers sit on two 2x6 Trex blocks, to isolate from damp and water.

Parts listed above.

Need to paint the trim on top. Fabbed two angles to hold the stringers to the header across the opening. This was a double 2x12, so lagged into that. Piece of plywood over the sheetrock first.

Yes, its steep- but whatever. Works perfectly well. (All users go through a job specific training protocol for use of a non-compliant stairway system as part of their documented training program...)

You can see I integrated a railing with a way to attach a bale elevator when we load it with hay... used to sit on the wood edge, now there is a metal rest with hitching loops to hold it.

The railing will get sprayed with epoxy when I do the next batch of metal stuff...;)


Some of that was welded in place- with the welder on the bucket of the tractor 8 ft in the air.... fun times.
 

Attachments

  • stair4.jpg
    stair4.jpg
    127.6 KB · Views: 134
  • stair3.jpg
    stair3.jpg
    138.7 KB · Views: 132
  • stair2.jpg
    stair2.jpg
    135.8 KB · Views: 135
  • stair1.jpg
    stair1.jpg
    138.9 KB · Views: 1,206
Last edited:

6768rogues

Banned
Joined
Nov 28, 2007
Messages
4,524
Location
Western NY
It takes a lot of time to build stairs from scratch. I used to do it and have done many. Now I call a good full service lumber yard that is nearby and they custom make them to my specifications and wood preference and deliver them for not a lot more money than it costs to do it myself. It is not worth the time to me anymore to build them myself.
 
To avoid these ads, REGISTER NOW!

kbs2244

Well-known member
Joined
Nov 11, 2006
Messages
14,065
The problem with all this is you are still carrying stuff up.
You cannot help but be off balance.

I would look into a lift or hoist setup to get the stuff up there.
Then worry about getting yourself up.
 

Beemie

Member
Joined
Dec 6, 2016
Messages
23
Add posts where the stringers meet the landing.
That connection is really questionable as noted. You really have a hinge there and shouldn't.
The only way I'd try to have a "bent" stringer is if it was welded steel members like channels; never wood.
 

MushCreek

Well-known member
Joined
Jan 14, 2015
Messages
9,760
Location
Upstate South Carolina
The key is being careful and thorough in your design and measurements. The stairway height is based on the exact height from finished floor to finished floor, the key word being 'finished'. As mentioned, don't forget to deduct the thickness of your treads. As little as an 1/8" difference in rise can cause people to trip. Once I do all of the math, I draw it to scale to be sure I didn't forget something.

In my barn, I'm going to use solid side stringers, with either wood or angle iron to support the steps, and a notched stringer in the middle. 2X12 treads, carefully selected from lumberyard stock, and placed so that they won't cup upwards. I use deck screws, and the ones down to my basement haven't moved at all.
 
OP
L

lakeroadster

Well-known member
Joined
Jan 19, 2015
Messages
5,166
Location
Central Colorado
The problem with all this is you are still carrying stuff up.
You cannot help but be off balance.

I would look into a lift or hoist setup to get the stuff up there.
Then worry about getting yourself up.

Nothing heavy is stored in the loft. The loft is not designed for heavy storage.

Add posts where the stringers meet the landing.
That connection is really questionable as noted. You really have a hinge there and shouldn't.
The only way I'd try to have a "bent" stringer is if it was welded steel members like channels; never wood.

Good observation.

What isn't shown is the landing and stairway attaches to an adjacent wall, and to a building support column. It should be plenty sturdy... if it isn't I will indeed add an additional post.
 

JRC3

Well-known member
Joined
Jun 30, 2014
Messages
12,481
Location
Southwestern OH
I've done two projects by flipping pre cut stringers. The first was my crawlspace, sure they are steeper than regular stairs, but they are much better than a step ladder or nothing at all. My thought is the more accessible the crawlspace, the more likely it will be maintained and inspected through the years.

The second is my garage. Same thing, yes they are steeper than regular stairs, but they are way better than a step ladder and even much more than a pull down ladder. I still need to add a handrail of some sort and these pics were before I added a jack post. 2x10 treads. I figure the loss of space for its footprint is worth it for all the light storage I'm getting. Please ignore my mess and inherited wiring in the garage.
 

Attachments

  • IMG_3209[1].jpg
    IMG_3209[1].jpg
    132.9 KB · Views: 406
  • IMG_3210[1].jpg
    IMG_3210[1].jpg
    128.9 KB · Views: 787
  • stair.jpg
    stair.jpg
    125.4 KB · Views: 371

kbs2244

Well-known member
Joined
Nov 11, 2006
Messages
14,065
The "flipping" of pre-cuts is something I have never thought of.
You will need to leave them open for toe room though.

Good idea!
 

JRC3

Well-known member
Joined
Jun 30, 2014
Messages
12,481
Location
Southwestern OH
You will need to leave them open for toe room though.

Yeah, no risers.

That's one of the worst things about a pull down ladder, those steps near the top only have room for the balls of your feet at best. I used 10" treads so it gives you a bit of wiggle room even though the stringer depth is only 7" or so.
 
OP
L

lakeroadster

Well-known member
Joined
Jan 19, 2015
Messages
5,166
Location
Central Colorado
Here's a link to stairs I built. Instead of glulams, you could use 2x12's. I don't like the thought of cutting so much material out of the stringers done the conventional way.

https://www.garagejournal.com/forum/showthread.php?t=335958&page=2

__________________________________________________________

So today I decided to put is some stairs. I have never liked the idea of taking a perfectly good 2x12 stringer and cutting treads and risers out of it.
Seems like you're cutting out alot of the structure and unless the stairs are tied to a wall they can wave back and forth as you ascend/descend.
Thus I started with some 3.5" x 12" glulams.

attachment.php


The glulams are cut to size and then attached at the top with a piece of grade 5 allthread. Had to drill 1' vertically through the horizontal glulam it
attaches to and about 10" through the stringer. Will cut the excess allthread off later. The all thread appears to go at an angle. It is really vertical
but I bent it at an angle on the bottom to match the slope of the stringer. This was tough allthread and I bent a 1" schedule 40 pipe trying to
bend it cold. I eventually had to heat it with a torch to make the bend.

attachment.php


Welded up some tread and riser brackets out of 2"x2"x1/8" angle iron. The tread portion is 8" with 6 holes and riser portion is 6" with 4 holes.
Overall the bracket is 8"x8" after welding.

attachment.php


Here the brackets are screwed onto the stringer.

attachment.php


Attaching treads and risers. I had a bunch of 2x12 and used this for both. I cound have used 2x10 for the risers, but used what was on hand.

attachment.php


Here you can see a bracket in place from the underside of the stairs.

attachment.php


Finished stairs. Now I can carry furniture up the stairs without fear of collapse.

attachment.php
 

larry_g

Well-known member
Joined
Apr 28, 2007
Messages
16,874
Location
oregon
If you look in posts 11,13 & 14 of my build thread below you can see how I did mine. What is different is that I incorporated storage and a work bench into the stairs. The 4x4's on the back of the bench are also legs to support the stair stringers. I also now have the air compressor under the stairs. The high storage can be accessed from the stair side, the 4x4 on the left end of the bench is also the newel post for the railing on the landing. The railing on the landing is quick removal so I can lift things up with the tractor bucket. Maybe a couple of ideas you can use.

lg
no neat sig line
 

ard

Well-known member
Joined
Feb 16, 2015
Messages
4,391
Location
Sierra Foothills... California
Nice/

1.25 inch steel water pipe w/ Weld on fittings FTW for railings! They actually make connectors and angles that will match stair pitches...King Architectural Metals for one.
 

Voi

Well-known member
Joined
Oct 10, 2010
Messages
5,140
Location
Western South Dakota
1.25 inch steel water pipe w/ Weld on fittings FTW for railings! They actually make connectors and angles that will match stair pitches...King Architectural Metals for one.

I'm not having any luck on King Architectural Metals site. I poked around on the internet and found some adjustable angle fittings but they were aluminum.

Can you post a link or two?

Thanks.
 
OP
L

lakeroadster

Well-known member
Joined
Jan 19, 2015
Messages
5,166
Location
Central Colorado
Nice/

1.25 inch steel water pipe w/ Weld on fittings FTW for railings! They actually make connectors and angles that will match stair pitches...King Architectural Metals for one.

Thanks Ard, much appreciated.

I really like the steel railing idea... but I have enough left over materials from the two decks we built this year and this stairway to build railings out of 2x6's.

I'll post some photo's once it's done.
 
Last edited:
OP
L

lakeroadster

Well-known member
Joined
Jan 19, 2015
Messages
5,166
Location
Central Colorado
Finished Stairway.. thanks everybody for your valued advice.

attachment.php


attachment.php


attachment.php
 

Attachments

  • Stariway Railing Detail 001.jpg
    Stariway Railing Detail 001.jpg
    75.1 KB · Views: 111
  • Stairway Newel Post Attachment at Landing.jpg
    Stairway Newel Post Attachment at Landing.jpg
    71.5 KB · Views: 113
  • Stairway With Railing 800 x 600.jpg
    Stairway With Railing 800 x 600.jpg
    70.6 KB · Views: 90
Last edited:

Bob Heine

ALLIANCE MEMBER
Joined
Oct 24, 2009
Messages
10,703
Location
Boca Raton, Florida
John, I don't know if this is helpful but here's the illustration of attaching a photo.
attachment.php


To insert the larger version of the photo in the Attached Thumbnails box:

  1. Click "Preview Post" before you "Submit Reply."
  2. Click the image in the "Attached Thumbnail," box. A new tab should open with the larger image.
  3. Right click on the image and select "Copy Image" (or key Ctrl+C).
  4. Right-click the spot in the text of the post where you want the picture to appear and select "Paste" (or key Ctrl+V).
 

Attachments

  • 00001 Picture Posting.jpg
    00001 Picture Posting.jpg
    136.5 KB · Views: 120

ard

Well-known member
Joined
Feb 16, 2015
Messages
4,391
Location
Sierra Foothills... California
Thanks Bob. I followed the instructions.. and as you can see from thread #38 above, the photo doesn't show up. What shows up is a link to the photo. :confused:

If you place img and /img (with the [] brackets) around your links, the image will be displayed instead of the text link

Actually, edit your post and replace "url" with "img" and that will do it
 
To avoid these ads, REGISTER NOW!
Top Bottom