To avoid these ads, REGISTER NOW!

Stand for bench top mill...

TerryH

Well-known member
Joined
Dec 8, 2012
Messages
2,248
Location
Springdale, AR
I'm in the planning stages for a new stand for my Enco 105 mill. Looking for input/pics/etc.. What are you guys using? How tall is it? Wood or metal?
 
To avoid these ads, REGISTER NOW!

matt_i

Well-known member
Joined
Mar 14, 2008
Messages
10,746
Location
SE Michigan
I'd go angle iron like 2" x 2" x 1/4" despite the high price of steel. Id also x-brace it with some flat strap like 1/8x1 or 1/4 x 1 on 3 sides. Mass is your friend when it comes to machine tools.

Top? Also as thick as you can go, 1/2" min sounds about right to me.

I would include leveling mounts (swivel feet) for each leg so you can level the table if needed plus adjust out any "rock" in the structure due to concrete (and you can have that same capability wherever you move it).

I have a full sized mill but keep it on 4x4 wood blocks and it wouldn't hurt to have it on a 6x stack. Bottom line is it has to be ergonomic for you and your height which is hard to hit exactly right on the first try. Do you know anyone in your area with a similar milldrill that you could check in person for height?
 

OccupantRJ

Well-known member
Joined
May 15, 2009
Messages
11,244
Location
Eastern North Carolina
I can easily give you the height from floor to the center of the quill pinion rack for both a 40's and 60's era Bridgeport mill if that will help you on design. The earlier machines are about 4" shorter in height.
 
OP
T

TerryH

Well-known member
Joined
Dec 8, 2012
Messages
2,248
Location
Springdale, AR
I can easily give you the height from floor to the center of the quill pinion rack for both a 40's and 60's era Bridgeport mill if that will help you on design. The earlier machines are about 4" shorter in height.

Thanks. I’d be interested in that measurement.
 
OP
T

TerryH

Well-known member
Joined
Dec 8, 2012
Messages
2,248
Location
Springdale, AR
I'd go angle iron like 2" x 2" x 1/4" despite the high price of steel. Id also x-brace it with some flat strap like 1/8x1 or 1/4 x 1 on 3 sides. Mass is your friend when it comes to machine tools.

Top? Also as thick as you can go, 1/2" min sounds about right to me.

I would include leveling mounts (swivel feet) for each leg so you can level the table if needed plus adjust out any "rock" in the structure due to concrete (and you can have that same capability wherever you move it).

I have a full sized mill but keep it on 4x4 wood blocks and it wouldn't hurt to have it on a 6x stack. Bottom line is it has to be ergonomic for you and your height which is hard to hit exactly right on the first try. Do you know anyone in your area with a similar milldrill that you could check in person for height?

The current base is wood and 31” tall. It’s on wheels. I feel like it could be a little taller. Don’t know anyone with another mill. Think I’ll put some spacer blocks between the mill and the stand just to see how it feels.

I am much more skilled and equipped to make a wood base. I know I want drawers for the tooling to keep things free of chips and organized. I do have 2” angle and strapping On hand if I go the metal.
 

kkroger

Well-known member
Joined
Apr 21, 2013
Messages
1,143
This is what I have my round column Mill/Drill on... https://www.northerntool.com/shop/tools/product_200322819_200322819
It didn't cost anywhere near that when we bought it way back when...
This is another similar model
http://www.grizzly.com/products/Mill-Drill-Stand/T25677
I am pretty sure the one I have is not a JET or any brand for that matter.
MSC Sells the RONG FU version...
https://www.mscdirect.com/product/details/09519919
if you plan to use coolant be sure to put a catch tray under the machine.
 
OP
T

TerryH

Well-known member
Joined
Dec 8, 2012
Messages
2,248
Location
Springdale, AR
This is what I have my round column Mill/Drill on... https://www.northerntool.com/shop/tools/product_200322819_200322819
It didn't cost anywhere near that when we bought it way back when...
This is another similar model
http://www.grizzly.com/products/Mill-Drill-Stand/T25677
I am pretty sure the one I have is not a JET or any brand for that matter.
MSC Sells the RONG FU version...
https://www.mscdirect.com/product/details/09519919
if you plan to use coolant be sure to put a catch tray under the machine.

Thanks! I don't think I want to spend that much when I could build something that has more storage. All those factory stands seem to be about 29" tall which seems kinda short to me.
 

larry_g

Well-known member
Joined
Apr 28, 2007
Messages
16,893
Location
oregon
Like Matt said, Mass is your friend. My tale; I had a smaller 10" that once that was on a nice rigid steel stand that sometimes would start to chatter and 'walk' the whole table around. I moved the lathe to a solid heavy wood desk and the chatter really decreased. My theory is that the woods resonant frequency was so low that it would damp out the vibrations (chatter) in the system and allowed much heavier cuts with less chatter.

I understand that the mills doesn't rely so much on the table for good work, it is something to think about.

lg
no neat sig line
 
OP
T

TerryH

Well-known member
Joined
Dec 8, 2012
Messages
2,248
Location
Springdale, AR
Like Matt said, Mass is your friend. My tale; I had a smaller 10" that once that was on a nice rigid steel stand that sometimes would start to chatter and 'walk' the whole table around. I moved the lathe to a solid heavy wood desk and the chatter really decreased. My theory is that the woods resonant frequency was so low that it would damp out the vibrations (chatter) in the system and allowed much heavier cuts with less chatter.

I understand that the mills doesn't rely so much on the table for good work, it is something to think about.

lg
no neat sig line

I agree. It's a good point. I think perhaps a hybrid would be in order. I could weld up a heavy steel frame with a plywood drawer cabinet incorporated for storage.
 

jimreed2160

Well-known member
Joined
Aug 7, 2016
Messages
3,589
Location
Tallahassee FL
I have a small desktop mill from HF. I built a table of plywood and 2x4s over in a garage bump out and then installed a Husky rolling cart underneath for drawers. I will look for some pictures.
 
OP
T

TerryH

Well-known member
Joined
Dec 8, 2012
Messages
2,248
Location
Springdale, AR
Have you considered pouring a concrete benchtop to add mass and reduce vibration?

I have not. It's on a wooden base now and it works fine. The base was not built well and isn't serviceable so warrants replacement. It's an Enco 105-1110 mill so pretty hefty for a bench top. I'm in the process of restoring it. Have the mill done except for some cosmetic table repair so ready to move on to the new base project.

As found on Craig's list...


And now...

 
OP
T

TerryH

Well-known member
Joined
Dec 8, 2012
Messages
2,248
Location
Springdale, AR
I have a small desktop mill from HF. I built a table of plywood and 2x4s over in a garage bump out and then installed a Husky rolling cart underneath for drawers. I will look for some pictures.

Would love to see it. Thanks!
 
Last edited:

jimreed2160

Well-known member
Joined
Aug 7, 2016
Messages
3,589
Location
Tallahassee FL
Mill table

Here is my mill table. The HF mill is much smaller than your Enco but the concept is still valid. I replaced the 2x4 bench with a floating 2x4 top and rolled the Husky cabinet under it. There was valuable storage space under the mill that was going to waste.
 

Attachments

  • DSCN4624.jpg
    DSCN4624.jpg
    154.5 KB · Views: 104
  • DSCN4625.jpg
    DSCN4625.jpg
    154.9 KB · Views: 83
  • DSCN4626.jpg
    DSCN4626.jpg
    154.8 KB · Views: 84
  • DSCN4627.jpg
    DSCN4627.jpg
    153.6 KB · Views: 89
  • DSCN4628.jpg
    DSCN4628.jpg
    149.8 KB · Views: 74
OP
T

TerryH

Well-known member
Joined
Dec 8, 2012
Messages
2,248
Location
Springdale, AR
Mill table

Here is my mill table. The HF mill is much smaller than your Enco but the concept is still valid. I replaced the 2x4 bench with a floating 2x4 top and rolled the Husky cabinet under it. There was valuable storage space under the mill that was going to waste.

Thanks. I definitely want to utilize the space under my mill for storage.
 

Packard V8

Well-known member
Joined
Mar 16, 2009
Messages
7,380
Location
Spokane, WA
Just me, but I'd not put a mill, even a small one, on wheels.

Yes, as to mass and yes as to woodworking. I've found glulam beams to be a great component. Off-cuts large enough for a bench top can sometimes be found for free/cheap and notching in 4x4 legs makes an inexpensive, heavy and hell-for-stout bench, especially if that first shelf is also a glulam.

My woodworking lathe is on such a bench and it's served so well, I'm going to put my new/old Craftsman/Atlas 12" metalworking lathe on a similar build.

jack vines
 
OP
T

TerryH

Well-known member
Joined
Dec 8, 2012
Messages
2,248
Location
Springdale, AR
Just me, but I'd not put a mill, even a small one, on wheels.

Yes, as to mass and yes as to woodworking. I've found glulam beams to be a great component. Off-cuts large enough for a bench top can sometimes be found for free/cheap and notching in 4x4 legs makes an inexpensive, heavy and hell-for-stout bench, especially if that first shelf is also a glulam.

My woodworking lathe is on such a bench and it's served so well, I'm going to put my new/old Craftsman/Atlas 12" metalworking lathe on a similar build.

jack vines

I'm not a fan of machines on wheels. Most everything in my shop is leveled and bolted to the floor. I've built other heavy wood benches. Still trying to make up my mind. Had not considered gluelams but that sounds like a great idea.

I will say that the wheeled base has made working on it easier but no wheels on the new base.
 
OP
T

TerryH

Well-known member
Joined
Dec 8, 2012
Messages
2,248
Location
Springdale, AR
Terry, the quill feed height from floor is about 53-1/2" on the older Bridgeport and 56 on the newer.


Thanks RJ! More food for thought. I mounted my quill DRO last night which required some milling on a few of the pieces. After using it a bit more I feel like the stand could definitely be taller. Going to live with it for a while longer and see.
 
Last edited:

astroracer

Well-known member
Joined
Jun 22, 2005
Messages
3,001
Location
Mid_Michigan
I put my Smithy Combo Lathe/Mill on a US General 56" roller cabinet. It's been on there for 4 years with zero stability issues. The amount of storage is ridiculous and the working height is perfect for my 6' 2".
photo3-vi.jpg

photo3-vi.jpg

Mark
 
To avoid these ads, REGISTER NOW!
OP
T

TerryH

Well-known member
Joined
Dec 8, 2012
Messages
2,248
Location
Springdale, AR
I put my Smithy Combo Lathe/Mill on a US General 56" roller cabinet. It's been on there for 4 years with zero stability issues. The amount of storage is ridiculous and the working height is perfect for my 6' 2".
photo3-vi.jpg

photo3-vi.jpg

Mark

That looks good. I'm still considering the new 26" bottom box. The dimensions are just about right if I turn it sideways. If it came in black I would already have it.
 

bimmer1980

Well-known member
Joined
Feb 5, 2009
Messages
2,105
Location
York, PA
While I'm a fan of steel stands for my equipment in my shop, I'm more set up and comfortable with steel....

I get that you are more comfortable with Wood, so I would recommend the following....

I would design a stand that is similar to a pro-grade wood working bench, but with out the vises. Use a mortise and tenon construction for two side trestles, with a 2" or thicker top for the machine to bolt to. Then the center area has room for a wood carcass box with drawers built into it. You could get the main stand build with the machine on it. Then build the box with all the features and slide it into the base stand.

I would design the trestles to accommodate a way to move the machine--room for a pallet jack. I probably would not bother trying to bolt it to the floor.

I would recommend a heavy duty bottom shelf for a variety of heavy tooling or steel drops for machining.... i.e. a rotary table, etc.

I would also plan and build in side tooling holders, etc.

The wood would provide a solid base and a fair amount of dampening.

An alternate plan would be to just build a plywood box with some doubler pieces in the corners and under the top. With 3/4" birch ply, that should be sufficiently strong and rigid... maybe not enough overkill for GJ, but it would work if done correctly.

Enjoy! I'll wait for the pictures of the build
 
OP
T

TerryH

Well-known member
Joined
Dec 8, 2012
Messages
2,248
Location
Springdale, AR
While I'm a fan of steel stands for my equipment in my shop, I'm more set up and comfortable with steel....

I get that you are more comfortable with Wood, so I would recommend the following....

I would design a stand that is similar to a pro-grade wood working bench, but with out the vises. Use a mortise and tenon construction for two side trestles, with a 2" or thicker top for the machine to bolt to. Then the center area has room for a wood carcass box with drawers built into it. You could get the main stand build with the machine on it. Then build the box with all the features and slide it into the base stand.

I would design the trestles to accommodate a way to move the machine--room for a pallet jack. I probably would not bother trying to bolt it to the floor.

I would recommend a heavy duty bottom shelf for a variety of heavy tooling or steel drops for machining.... i.e. a rotary table, etc.

I would also plan and build in side tooling holders, etc.

The wood would provide a solid base and a fair amount of dampening.

An alternate plan would be to just build a plywood box with some doubler pieces in the corners and under the top. With 3/4" birch ply, that should be sufficiently strong and rigid... maybe not enough overkill for GJ, but it would work if done correctly.

Enjoy! I'll wait for the pictures of the build

I am certainly more comfortable building a wood stand. I just built a reloading bench with a very similar design. Milled and then laminated 2x lumber frame with multiple layer mdf/melamine top. Slide in cases for drawers. Would be pretty simple to do the same on a smaller scale for the mill.
 
OP
T

TerryH

Well-known member
Joined
Dec 8, 2012
Messages
2,248
Location
Springdale, AR
And we're off...

Formed a plan for the base. Will be doing something similar to my reloading bench build just on a smaller yet heavier duty scale. I made a slide in drawer unit for one end of the reloading bench so same sort of idea here.

4 drawers on the front on 18" full extension slides. The drawer sizes always seem to get tweaked during the build but these dimensions should be in the ball park. Double layers of 3/4" Baltic Birch ply for the top. Perhaps a formica surface or metal. Jury is still out on that.


Side panels will be 3/4" BB ply.


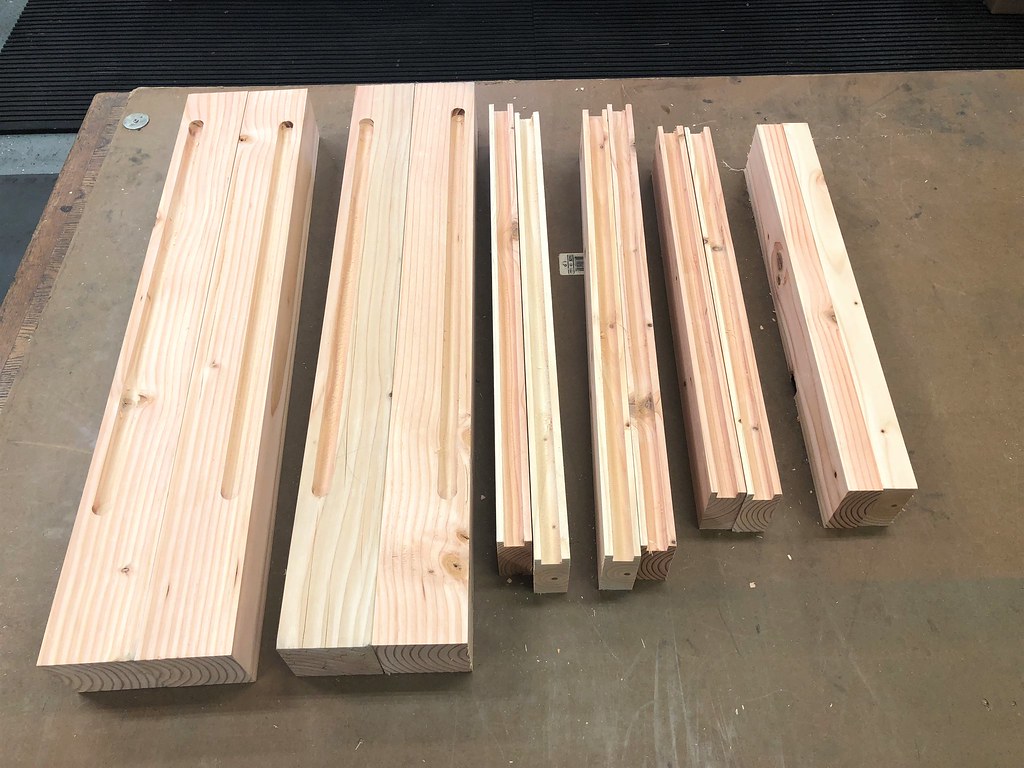
Picked up some 4x and 2x doug fir lumber. Squared 2 faces on the jointer and planed to finish dimension. 3 1/4 x 3 1/4 for the corners and 1 1/4 x 3 1/4 for the rails and braces. Will pick up some 3/4 BB tomorrow and get to building.


Could not have done it without the usual drafting helper. lol... Stupid cat.


Reloading bench I built earlier this year for reference...

 
Last edited:

bimmer1980

Well-known member
Joined
Feb 5, 2009
Messages
2,105
Location
York, PA
Looks like it is coming together! The reloading bench is nicely done!

I'm looking forward to seeing more pictures as you make progress. It's inspiring!
 
OP
T

TerryH

Well-known member
Joined
Dec 8, 2012
Messages
2,248
Location
Springdale, AR
Looks like it is coming together! The reloading bench is nicely done!

I'm looking forward to seeing more pictures as you make progress. It's inspiring!

Thanks! Might have a little time to work on it tomorrow but it'll be next week past that. I'm anxious to get it built. It's a simple build so shouldn't take long. Have a few days off next week.
 
Last edited:
OP
T

TerryH

Well-known member
Joined
Dec 8, 2012
Messages
2,248
Location
Springdale, AR
Vacation day today so that equals a morning spent in the shop. Got the stand parts cut to length and the grooves for the panels milled on the router table.


I also cut the panels and drilled for the pocket screws. Dry fit everything to make for sure I was good.


Pretty much just a matter of lots of glue in the grooves and clamping everything together so I can put in the pocket screws.


Added the front rails and the basic assembly is complete.


I added a couple of cross braces also attached with pocket screws. The base is plenty stout for sure.


That's going to be about it for today and I'm out of town until next week so will resume construction then.
 
OP
T

TerryH

Well-known member
Joined
Dec 8, 2012
Messages
2,248
Location
Springdale, AR
Took a few minutes to stop by my local Habitat Store. Scored a massive 1 3/4" thick solid core door for $10.25. Love these solid core doors for bench tops. Super heavy and flat. I'm going to brake up some stainless or aluminum to cover it.


New stand is 33" tall and the one that came with the mill is 31".

 
OP
T

TerryH

Well-known member
Joined
Dec 8, 2012
Messages
2,248
Location
Springdale, AR
Little more progress. I ripped some 2x lumber for supports for the 3/4" BB ply that I'm using to mount the drawer slides and got all of that glued and screwed to the cabinet.


Cut more 2x lumber and pocket screwed those pieces into the top structure to mount the top and eventually the mill. Even got to whip out the old 606C Bedrock plane to get everything dead flat so the top mounts to a rock solid base.


Had my buddy at my local sheetmetal shop fab up a stainless pan to go on the top.


Started milling some chunks of white oak to house the end mills and such so I can finalize what the drawer configuration is going to be. I think these are going to work out pretty well. I have a bunch of scraps so I'll make these for all the mills, collets etc..


Getting closer. Hope to be done with the fab work and have it painted this weekend!
 

Ign

Well-known member
Joined
Jul 7, 2006
Messages
12,769
Location
Butte Peak ND
The current base is wood and 31” tall. It’s on wheels. I feel like it could be a little taller. Don’t know anyone with another mill. Think I’ll put some spacer blocks between the mill and the stand just to see how it feels.

I am much more skilled and equipped to make a wood base. I know I want drawers for the tooling to keep things free of chips and organized. I do have 2” angle and strapping On hand if I go the metal.

Aye......this feels wrong from someone who is inquiring about metal-machining tools :D

Anyway if I ever had a bench top mill (although I likely never will 'cause I think they're toys - and yes I own two knee mills) I'd consider mounting it to one of the tool boxes, say a HF 44 or Milwaukee 60. A butcher block top oughta prevent sag, you've got bench space on either side, and drawers below for all your tooling.

Remove the casters if "walk" proves to be an issue, put it on spacers or cribbing if you need toe kick space.
 

Packard V8

Well-known member
Joined
Mar 16, 2009
Messages
7,380
Location
Spokane, WA
Coincidentally, a friend who was a big proponent of having his bench drill press mounted on a roller cab, just called me to come over and help him clean up the mess. He was moving it, a caster caught, pulling the DP over, fortunately only breaking the cast iron belt guard.

Picking it up was complicated by all the drawers trying to open. I came up with the idea of putting a truck load strap around vertically to hold the drawers mostly in and then putting a come-along on a ceiling joist to help us get it back up.

Your opinions and results may vary.

jack vines
 

jimreed2160

Well-known member
Joined
Aug 7, 2016
Messages
3,589
Location
Tallahassee FL
I love the shot of the Bedrock in action. It is nice to be able to use your ww skills to build a nice stand and then build storage for all of the associated tooling.
 
OP
T

TerryH

Well-known member
Joined
Dec 8, 2012
Messages
2,248
Location
Springdale, AR
Coincidentally, a friend who was a big proponent of having his bench drill press mounted on a roller cab, just called me to come over and help him clean up the mess. He was moving it, a caster caught, pulling the DP over, fortunately only breaking the cast iron belt guard.

Picking it up was complicated by all the drawers trying to open. I came up with the idea of putting a truck load strap around vertically to hold the drawers mostly in and then putting a come-along on a ceiling joist to help us get it back up.

Your opinions and results may vary.

jack vines

Yikes Jack! That doesn't sound like much fun but I suppose it could have been much worse.
 
OP
T

TerryH

Well-known member
Joined
Dec 8, 2012
Messages
2,248
Location
Springdale, AR
I love the shot of the Bedrock in action. It is nice to be able to use your ww skills to build a nice stand and then build storage for all of the associated tooling.

Thanks Jim! I have restored quite a few Type 2 Bedrocks and they all get used. Quite often, as in this case, they are the best tool for the job.
 
OP
T

TerryH

Well-known member
Joined
Dec 8, 2012
Messages
2,248
Location
Springdale, AR
Got the top permanently glued and screwed to the base before calling it a day yesterday.


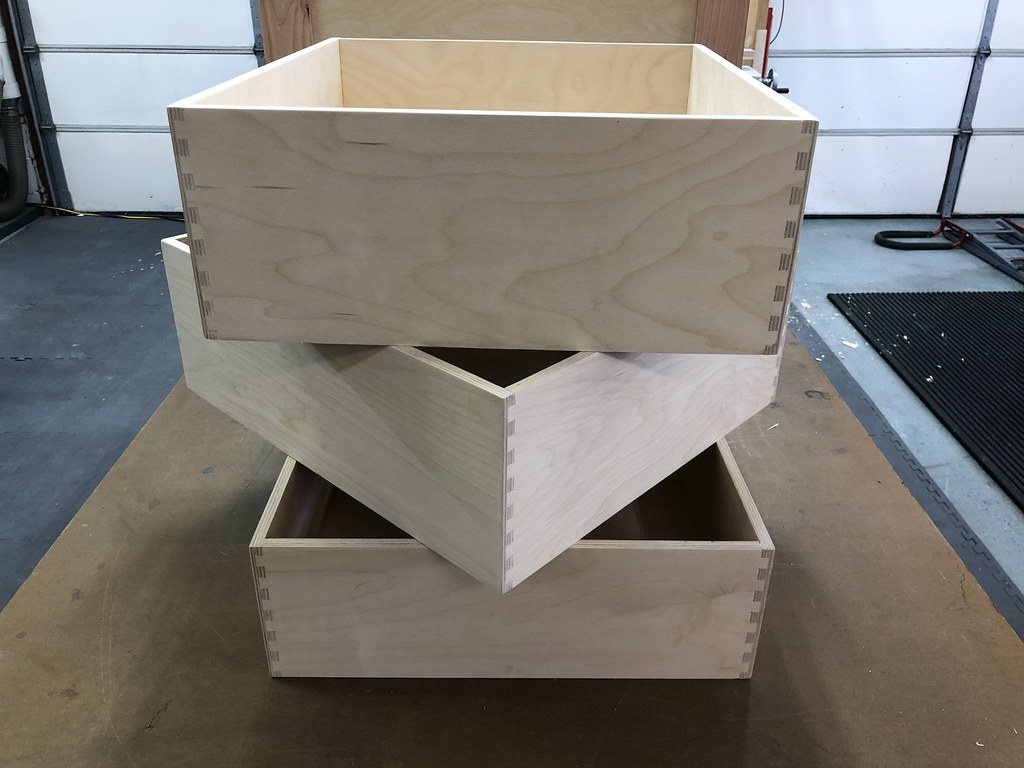
The word of the day for today is drawers. The Porter Cable 4210 jig makes pretty quick work of it.


I wanted to use 1/2" BB ply for the bottoms for stiffness. I milled a 5/16" groove and rabbited the edge of the ply to fit.


Assembled and sanded.

 
Last edited:

bimmer1980

Well-known member
Joined
Feb 5, 2009
Messages
2,105
Location
York, PA
Nice progress. The drawers really turned out good tight joints. I have a router jig for dovetails but I have never used it.....hmmmm...

The stainless steel top will be helpful when you have various coolant and oils from cutting and tapping...

Pretty soon you'll actually be ready to make some chips!
 
OP
T

TerryH

Well-known member
Joined
Dec 8, 2012
Messages
2,248
Location
Springdale, AR
Nice progress. The drawers really turned out good tight joints. I have a router jig for dovetails but I have never used it.....hmmmm...

The stainless steel top will be helpful when you have various coolant and oils from cutting and tapping...

Pretty soon you'll actually be ready to make some chips!
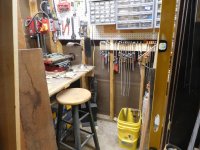
Thanks! I'm making chips now albeit wood chips. lol... Milling some holders for collets etc...
 
To avoid these ads, REGISTER NOW!
Top Bottom