
You are using an out of date browser. It may not display this or other websites correctly.
You should upgrade or use an alternative browser.
You should upgrade or use an alternative browser.
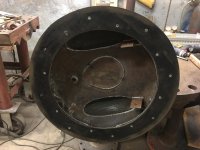
Starrett 924-1/2 stand
- Thread starter royce
- Start date
Bigblue&Goldie
Well-known member
I love the styling; reminds me of something "futuristic" from the 50's or 60's.
matt_i
Well-known member
I was really impressed at the teardrop-cross-section-tube...
But Wait, There's More! As usual, very impressive work!
I really like those Starrett vises, the (trying to think of the word) under-support part that sticks out from the fixed jaw casting to support the slide is the meatiest I've seen, much larger than on a Reed.
But Wait, There's More! As usual, very impressive work!
I really like those Starrett vises, the (trying to think of the word) under-support part that sticks out from the fixed jaw casting to support the slide is the meatiest I've seen, much larger than on a Reed.
Last edited:
fnieto
Well-known member
Outstanding!
jhn9840
Well-known member
Another great piece of work Royce. Can’t wait to see the finished product.
jhn9840
John
jhn9840
John
Thanks
Matt
Fnieto
Jhn
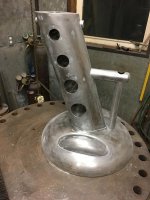
Got started sanding today, but the jack screw housing support bracket has been bothering me, it just does not look right, to my eye.
So then, I lopped the flat bar off and replaced it with a chunk of 2" pipe and a cap.
It looks more fitting now, to me, anyways.
Also, drug into the shop a piece of conveyer belt, I think I'll cut a ring out of it to bolt to the base for traction and to keep from chipping the paint off the base.
Royce
Matt
Fnieto
Jhn
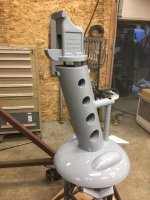
Got started sanding today, but the jack screw housing support bracket has been bothering me, it just does not look right, to my eye.
So then, I lopped the flat bar off and replaced it with a chunk of 2" pipe and a cap.
It looks more fitting now, to me, anyways.
Also, drug into the shop a piece of conveyer belt, I think I'll cut a ring out of it to bolt to the base for traction and to keep from chipping the paint off the base.
Royce
Attachments

Bighead38
Well-known member
I love when I see that Royce has made a new thread. It’s always something awesome.

KMScott
Well-known member
Gotta love those wheel wells. Nice work Royce.


Jayman17
Well-known member
Royce, that is really looking nice, can't wait to see it final coated. I have a question though, how do you determine the angle of the support piece so that the vise will not tip when applying pressure downward? Thanks for posting your build of the stand. 
Jay
Jay
Bears Fan,
I hear you, this one is way too fancy, but a ball to build.
I've already filled the house with other iron work, so I won't burdon her with this one!
Jayman,
Thanks and it is my pleasure to share.
The angle of the column is determined by lining up the rear jaw with the front of the base.
The center of gravity on this stand, with this vise, is a bit high and too far forward,as it is.
I will put some steel punchings in the column to lower and move the center of gravity back.
To me, having toe space is important for comfort while working, so that is why I like to lean the column.
Shot the color on it a bit a go and will go for the pearl in a couple hours.
Royce
manwithtools
ALLIANCE MEMBER
Royce,
You are my hero. I know how hard it is to do what you regularly post. Hat's off to you sir!
From, function, art? you have it all.
You are my hero. I know how hard it is to do what you regularly post. Hat's off to you sir!
From, function, art? you have it all.
PugetDude
ALLIANCE MEMBER
Royce, you never cease to amaze me with your eye for design and fabrication skills.
Wish I lived closer so I could just come over and bask in your aura.
Wish I lived closer so I could just come over and bask in your aura.


wrenchguy
Well-known member
Awesome! but u got to much time on er hands up there in the dark.
Jayman17
Well-known member
Got it all assembled and could not be happier.
The camera really does not capture the look of the pearl very well.
Everything functions great and looks nice, at least to my eye, anyways.
Mission accomplished.
Royce
wow! That's a great job Royce...
Jay