To avoid these ads, REGISTER NOW!

Started the lighting project today.

Charles (in GA)

Well-known member
Joined
Jan 11, 2006
Messages
12,489
Location
50 mi south of Atlanta
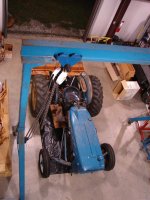
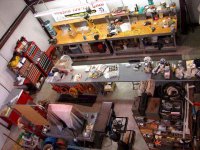
Received my new (to me) JLG scissor lift. Its a 19 ft model and works nice. Bought it from United Rental. It is about 5 years older than the next oldest one they have, so it was real cheap. Other than sheetrock mud and broken bits of concrete block on it (a mechanical contractor had been using it for some time) it was not in bad shape. Yesterday I ran it up and installed the safety bar, cleaned out the deck under the scissors, ran it down and scrapped and cleaned the walk deck and took it out and pressure washed it (avoiding the electrical areas).

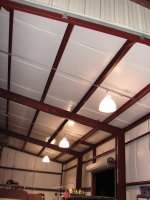
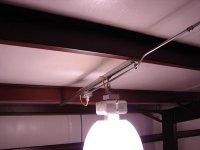
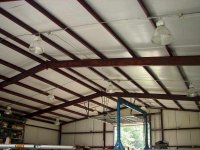
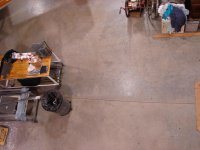
Spent today cutting unistrut, measuring and marking and drilling to mount three of the 13 pieces of unistrut for mounting boxes and hanging lights. Its a slow go, since I have to move alot of **** in the shop and work the bugs out of my process of measuring and drilling. Things will speed up now that I have it figured out.

Charles
 

Attachments

  • JLG_1932E.jpg
    JLG_1932E.jpg
    68.1 KB · Views: 1,909
To avoid these ads, REGISTER NOW!

kbs2244

Well-known member
Joined
Nov 11, 2006
Messages
14,065
Those are real neat toys. I will bet you have a big grin.
And it will sure speed up your project.
To say nothing about safety and saved energy compared to scaffolding and ladders.
Enjoy it.
 

Aceman

Well-known member
Joined
Jan 28, 2007
Messages
2,513
Location
Eastern Oregon
We used a JLG 4x4 scissor lift once to check some low bays in a few barns. 6 alleys at a 1/4 mile long each, it didn't take long before we bypassed the limit switches. Luckily we didn't have to look too hard to find them, there was a "do not bypass limit switches" sticker right next to them.:thumbup: We just had to be careful it wasn't in full rabbit mode 30' up.:shocking:
 
OP
C

Charles (in GA)

Well-known member
Joined
Jan 11, 2006
Messages
12,489
Location
50 mi south of Atlanta
I give that about a week. :D :lol:

I've been using various model scissor lifts at work for nearly twenty years now. 2046's, 2546's, 1532's, Snorkels, JLG's, Marklifts, Genies, Skyjack, some very large gasoline powered JLG's..... I'm pretty used to using the equipment, but still careful with it. At work we have to drive the equipment quite some distance from one hangar to another, sometimes we forklift it, sometimes we drive it. It doesn't bother me to hang over the rail, sometimes even have to get half outside the lift standing on the rails, thats the problem with working around airplanes, you gotta do what you gotta do, but I'm still careful with it.

This one has a computer in the control head, so there isn't much cheating it. They did put a brand new joystick in it before they delivered it, and for that I was glad to see it.

Charles
 

rburke65

Well-known member
Joined
Nov 10, 2007
Messages
12,349
Location
Canfield, Ohio
5 years oler than their oldest..........so what year is it and what could I expect to pay for a lift like this?
 

d110pickup

Well-known member
Joined
Feb 4, 2005
Messages
265
Location
Canton, Ga.
Charles,
I got my scissor lift last year when I started my shop build and I love that thing.
Which lights are you installing? I've decided on the T5-HO's for my shop.
Do you work at Hartsfield or a smaller airport?
Mike
 
OP
C

Charles (in GA)

Well-known member
Joined
Jan 11, 2006
Messages
12,489
Location
50 mi south of Atlanta
5 years oler than their oldest..........so what year is it and what could I expect to pay for a lift like this?

Their normal inventory consists of lifts that are no older than about 5 or 6 years old. This lift is a '97 model, 11 years old, and was $2500. They are asking anywhere from $4000 to $6000 for the remainder of their oldest used lifts of this size.

Here is where you can search their nationwide inventory for used equipment.

http://usedequipment.ur.com/usedequip/search.do

and here is the results of a search for 19 ft mini lifts, all manufacturers, all locations in the US. It locates 1345 lifts in the search.

http://usedequipment.ur.com/usedequ...&countryState=&lowPrice=&highPrice=&x=54&y=15

You can search for anything specific or a specific location. This one just happened to be at a large facility very near my work and they are making daily trips past where I live to a new KIA plant under construction, so it was a perfect match for me. United takes good care of their equipment and when they swapped it out for another unit with the mechanical contractor that was using it, just so I could see it, they did a through checkout of the unit, battery check, etc, and found the joystick was bad and replaced it (big bucks I'm sure), but that was after I had already agreed to buy it and paid for it.


Charles
 
OP
C

Charles (in GA)

Well-known member
Joined
Jan 11, 2006
Messages
12,489
Location
50 mi south of Atlanta
I've decided on the T5-HO's for my shop.

Way too pricey for my budget, I bought 13 used 400w MH fixtures (120v only) with acrylic low bay reflectors (formerly used in a Sam's Club or a Wal-Mart), for $500 (all bulbs and ballast work, I tested each one). One is a spare, I will use 12. They, of course, can be easily replaced with something else later on if I or someone else so desires, as they will be plug in. I'm wiring it as a "Edison" multi-wire circuit with double pole breakers and switches and a shared neutral. Three switches, four lights on each switch.

Do you work at Hartsfield or a smaller airport?

Hartsfield, at the Jet Base.

Charles
 
OP
C

Charles (in GA)

Well-known member
Joined
Jan 11, 2006
Messages
12,489
Location
50 mi south of Atlanta
Well, moving right along, I have installed four of the 12 mountings for my MH lights. On one I pulled wires from the junction box to the light and connected everything and installed a light, so I attached a pigtail to the wires at the junction box and powered up this one light to see it work. The base of the reflector is exactly 14 ft off the floor.

Yep, works OK. It is seven and a half feet from the wall, 15 ft to the next light in the row, 15 more to the third light in the row, 15 more to the last light in the row, and another seven and a half feet to the far wall. The rows are spaced a little further apart, each row is centered in its 20 ft "bay" of the building (thus 3 rows of 4 lights, 60x60 building.)

I raised the reflector all the way up, reasoning that this would give a better spread of light. I assume that a reflector lowered down all the way in its adjustable bracket, will focus the light more and provide less spread.

Charles
 

Attachments

  • first_light_installed.jpg
    first_light_installed.jpg
    60.5 KB · Views: 406
OP
C

Charles (in GA)

Well-known member
Joined
Jan 11, 2006
Messages
12,489
Location
50 mi south of Atlanta
Six of the twelve mountings completed, the long runs of conduit to the main junctions are done, conduit runs to one side are done, so I have one half of the building to go, plus pulling most of the wire (I have already pulled the short runs from the main junctions to the fixtures you see installed, and have them temporarily powered by pigtails wirenutted to them and extension cords hanging. Mostly want to be sure they work)

Charles
 

Attachments

  • first_three_MH_fixtures_installed.jpg
    first_three_MH_fixtures_installed.jpg
    57.3 KB · Views: 352
  • close_up_MH_light_mounting.jpg
    close_up_MH_light_mounting.jpg
    35.5 KB · Views: 2,640
To avoid these ads, REGISTER NOW!

Aceman

Well-known member
Joined
Jan 28, 2007
Messages
2,513
Location
Eastern Oregon
Looks good Charles.

I usually pipe it a little different though. I'll hang the box so the 1/2 or 3/4 KO, whatever size I need, is hanging off one side. Then I'll run the pipe down the side of the strut and just offset right before the box for 2 reasons:

1. Keeps the pipe tighter to the building finish and it looks a little cleaner IMO.

2. You're able to one hole strap it right to the unistrut saving some money/time by not having to buy/assemble a beam cleam/minerallac strap.

Just my opinion there's nothing wrong with the way you're doing it.:thumbup:
 
OP
C

Charles (in GA)

Well-known member
Joined
Jan 11, 2006
Messages
12,489
Location
50 mi south of Atlanta
After I got the first six done this way, I started wondering if there was a better way. Then I started thinking about the one hole ******** the side of the unistrut, but that would put the self drilling screw nearly in the rolled edge of the strut, then I thought about simply screwing it to the purlin. Now that I have six done that way, and some of the L brackets fabricated for the others (made them from unistrut cut up and drilled) I suppose I'll finish the others out this way so it all looks the same. I already had the conduit hangars, but ended up getting one hole strap clamps to secure to the inbetween purlins anyhow.

Probably hard to tell from the pic, but the box is offset and the conduit hangar is nut and bolted to a L clip that is self drilling screwed to the side of the unistrut. This does let me fabricate and assemble everything on the workbench and a minimal of assembly and some tightening up after installing it.

The one thing this does for me is give me a little bit more leeway for slightly misbent conduit.:)

The purlins are spaced so that the unistrut has to be 64 inches to span them. Thus I have 56" sections left that I largely cannot use on the job. Sure would have been nice if the spacing allowed for 60" sections of unistrut. This odd spacing also cause me to have to elongate the end holes in the unistrut. Nothing lined up any way I tried, so each piece has to be slotted slightly.

Charles
 
Last edited:

Aceman

Well-known member
Joined
Jan 28, 2007
Messages
2,513
Location
Eastern Oregon
The purlins are spaced so that the unistrut has to be 64 inches to span them. Thus I have 56" sections left that I largely cannot use on the job. Sure would have been nice if the spacing allowed for 60" sections of unistrut. This odd spacing also cause me to have to elongate the end holes in the unistrut. Nothing lined up any way I tried, so each piece has to be slotted slightly.

I hate that.

Another trick that works well and speeds up the piping process is to take the pipe running from the peak down to the eave and punch through the back of the purlin right into a recep box. Shoot out the side of the box and run down the purlin dropping recep boxes wherever you need them. Since the pipe/boxes are hidden by the bottom lip of the purlin, you can even skip the box offsets if you don't want to. You'll only see one pipe running across the ceiling this way, since all your other pipe runs will be running in the purlin rather than across the bottom of it.

Just some ideas for next time....:)
 

kbs2244

Well-known member
Joined
Nov 11, 2006
Messages
14,065
So, you are 14' up on lights that are speced for 20' ?
I will like to know if the "hot spot" issue occures.
 
OP
C

Charles (in GA)

Well-known member
Joined
Jan 11, 2006
Messages
12,489
Location
50 mi south of Atlanta
So, you are 14' up on lights that are speced for 20' ?
I will like to know if the "hot spot" issue occures.

I suppose that technically, these lights are high bay, from looking at the Lithonia web site. (they are a PA22)

http://www.acuitybrandslighting.com...igh%20Bay/Acrylume%AE%20Acrylic/TH%20PA22.pdf

and............

http://www.acuitybrandslighting.com...r HID/Open High Bay/Open High Bay/TH-PA22.pdf

The outer rows of lights (such as the ones in the pic) are at 14 ft, however, the inner two rows will be about 16 ft and will yield a slightly better light spread. From the three I have temporarily operating now, I do not think there will be any issues. I think the Acrylic reflector with up to 20% uplighting helps eliminate the "cave effect" and also "hot spots" that might be caused by highly focused lights. In addition, I have the reflectors adjusted all the way up, which appears to allow the widest spread of light. It appears that the same reflector is used in both high and low bay lighting, the difference lies in the use of a bottom lens on the low bay, and a slightly different mounting of the lens at the top of it.

We'll see when they all are operating.

Charles
 
OP
C

Charles (in GA)

Well-known member
Joined
Jan 11, 2006
Messages
12,489
Location
50 mi south of Atlanta
Well, spent the last two rainy days working on the lighting project. I could work faster if I didn't have to move so much stuff. Garage door tracks made it more difficult also. I now have 9 of the 12 pieces of unistrut/superstrut installed and conduit run and wires pulled in all installed conduit sections. I have six light fixtures installed, finished the wiring in the box on those, closed the box and installed the light fixture. All fixtures work, I connected pigtails and extension cords to each one to prove out the wiring I do have run and connected. Easier to find a problem now/as I go, than when it is all done and closed up.

Sure am glad I got the scissor lift, never could have done it any other way. I now can see all kinds of uses for it (adjusting the garage door opener and chain, and lubing it, painting the header of the 12w x 14h garage door, adjusting the roll door, running air lines, changing light bulbs later on.).

Charles
 

Iron-Iceberg

Well-known member
Joined
Feb 14, 2006
Messages
887
Location
A-town
Sure am glad I got the scissor lift, never could have done it any other way. I now can see all kinds of uses for it (adjusting the garage door opener and chain, and lubing it, painting the header of the 12w x 14h garage door, adjusting the roll door, running air lines, changing light bulbs later on.).

Charles
Star gazing, joining the 19 foot club, water balloon drop, paper airplane launch site. Wow the list is endless. :lol_hitti
Sorry just for fun. LOL
 
OP
C

Charles (in GA)

Well-known member
Joined
Jan 11, 2006
Messages
12,489
Location
50 mi south of Atlanta
Well, after quite a bit of work, the lighting project is nearing the end. Everything is done except for the front mounting plate for the switch gangbox. Best part is, it all works.

Boy, does that meter spin, start the compressor too, and it REALLY spins.

Twelve light, 400 watt Metal Halide, 4 amps each (thats 480 watts total draw, there's that induction thing, eating up current). Three double pole switches, three duplex 20 amp breakers, a multiwire circuit arrangement, two hots and one neutral per duplex breaker/double pole switch. Four lights on a switch. I went multiwire since four lights on a single 20 amp circuit would be 16 amps, the absolute max (80%) for continuous loads such as lighting, and didn't want that, plus I wanted the ability to convert the whole thing to 240v in the future if needed should the lighting be upgraded.

This project has nearly been an obsession with me, mostly because it is so much trouble to move things and get set up to do the work in a particular area, that once I get started, I wouldn't quit till that section was done. I now have some minor maintenance on the scissor lift I bought, the hydraulic swivels at the wheel motors are weeping, so I will tear them down and replace the o-rings, and repack the wheel bearings, check the battery water, and later this winter I'll be back at it installing plumbing for an air system, and also installing the ceiling fans.

This evening I'll get a couple of shots and hopefully answer the question about light spread and "hot spots" with these lights. I'll shoot one or two from the manlift, of the floor.

Charles
 

Attachments

  • new_MH_lights.jpg
    new_MH_lights.jpg
    47.7 KB · Views: 287
OP
C

Charles (in GA)

Well-known member
Joined
Jan 11, 2006
Messages
12,489
Location
50 mi south of Atlanta
Here are a few shots after dark. Motel 6 never had this much light to leave on:)

Just ignore any junk you might spy in the pics. I tried hard to frame them so it would not show. Have been dealing with it, and have got to get a friend of mine to get his tractor (not the one in the pics) out of there, I'm tired of it sitting in the way.

Charles
 

Attachments

  • open_floor_no_noticable_shadows.jpg
    open_floor_no_noticable_shadows.jpg
    59.1 KB · Views: 378
  • tractor_from_eighteen_feet.jpg
    tractor_from_eighteen_feet.jpg
    70 KB · Views: 403
  • workshop_area_from_eighteen feet.jpg
    workshop_area_from_eighteen feet.jpg
    75.1 KB · Views: 456
  • All_lights_on_plus_workbench_lights.jpg
    All_lights_on_plus_workbench_lights.jpg
    68.1 KB · Views: 6,334
  • more_open_floor_few_shadows.jpg
    more_open_floor_few_shadows.jpg
    66.5 KB · Views: 342

W-Cummins

Well-known member
Joined
Jan 9, 2006
Messages
1,639
Location
Iowa
Charles looks great! I like the aerial shots from the lift:) I'm sure that you have tons of light as I have about the same number per bay running and it's tons of light and I can't see any hot spots in my setup. I do have slightly higher mounting heights but not that much...

William.....
 

AGBill

Well-known member
Joined
Dec 11, 2006
Messages
62
Charles:

Looks good, the conduit runs look real nice...I see a lot of offsets which I am sure were a lot of fun at that height...

Are your fixtures cord connected into boxes using a twist-lock type plug?

I have some 320W, pulse start, MH, low bay fixtures that I got used off e-bay and they have twist locks on them....I was trying to decide to use the plug or just hard wire in a 4 square box...

Bill
 
OP
C

Charles (in GA)

Well-known member
Joined
Jan 11, 2006
Messages
12,489
Location
50 mi south of Atlanta
Charles looks great! I like the aerial shots from the lift:) I'm sure that you have tons of light as I have about the same number per bay running and it's tons of light and I can't see any hot spots in my setup. I do have slightly higher mounting heights but not that much...

William.....

Outboard lights (lower ones) are at 14 ft 1 in at the base of the reflector. Inboard lights are at 16 ft 6 in to the base of the reflector.

Charles
 
OP
C

Charles (in GA)

Well-known member
Joined
Jan 11, 2006
Messages
12,489
Location
50 mi south of Atlanta
Charles:

Looks good, the conduit runs look real nice...I see a lot of offsets which I am sure were a lot of fun at that height...

Are your fixtures cord connected into boxes using a twist-lock type plug?

I have some 320W, pulse start, MH, low bay fixtures that I got used off e-bay and they have twist locks on them....I was trying to decide to use the plug or just hard wire in a 4 square box...

Bill

Would like to have pulse start, that is the current standard, these are probe start. The lights I got had the cords cut off, so I had to replace the cords. Used a bunch of real dirty cord I got out of the scrap bin at work. The equipment maintenance shop just threw it out. Soaked it overnite in a bucket of Tide and water (with the ends out of the water) and it was as clean as new. Cord was a rubber (not plastic) wet rated and 105*C rated wire. Could not afford twist locks, either plugs or receptacles, they are dang expensive, so I used good quality straight plugs and Leviton back wired Pro quality receptacles, they have the grip of a bulldog so I don't see any problem with them working out.......... Course if they do, I have a manlift to get back up and plug them back in:)

Did all conduit bends on the floor or a metal work table, measure, cut, bend, and fit...... made good use of a Northern band saw to cut conduit and unistrut with.

Biggest problem is if I'm working and the power blinks off and on. The lights, being probe start will take 5 minutes or more to restart, and I'll be in total darkness until then. I will probably mount a couple of sockets with compact florescents in them for light during a restart.

Charles
 

IDASHO

Well-known member
Joined
Mar 5, 2007
Messages
1,809
Location
Moscow, Idaho
Looks good!

When I started work on the attic of my garage, I decided to build myself a scaffold :)

Has been SWEET for hanging sheetrock, and lately doing exactly what you are doing... lighting.

My ceiling is 13 foot though :beer:

October1_01.jpg
 

Leyenda30

Active member
Joined
Jun 5, 2011
Messages
44
Location
NE Florida
Great looking shop. I appreciate the pictures since it gives us some perspective of size...we are building a 60 x 80 and are worrying over the lighting as well. We are leaning toward the T5s as of now but you have a very bright shop which is what we want. A bit off topic but how did you do your floor...it looks shiny...is it epoxy? JP :thumbup:
 
To avoid these ads, REGISTER NOW!
Top Bottom