To avoid these ads, REGISTER NOW!

Starting to prep for Epoxy, and have questions

Keyblazer

Well-known member
Joined
Jul 30, 2009
Messages
1,471
Location
Irvine, CA
Finally its time to do it...
I looked at the options and decided to go with the simple Rustoleum floor coating, and maybe a clearcoat on top.
So, today I humped everything onto one side and swept and washed everything down.. I dont have space to take every out, and do it all at once, so its half at a time!
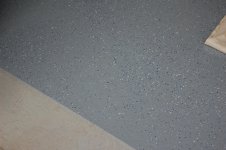
Here is what I have...
DSC07726.jpg


I have a couple of concerns..
1/ Household paint spots and splashes everywhere... something to clean off?
2/ Expansion joints... fill them?
 
To avoid these ads, REGISTER NOW!
OP
K

Keyblazer

Well-known member
Joined
Jul 30, 2009
Messages
1,471
Location
Irvine, CA
So, the plan is to repair any damaged edges with Cement-All first.
Then I bought Bond-Lok to prep, although I already Degreased any small spots on this side of the garage.

I bought the 2.5 garage kit of Rustoleum Epoxy Shield.
Should use as they say for the whole garage, or but 2 coats down and use a kit for each side. What will get me the best finish bearing in mind I plan to clearcoat over it?
The kit comes with 2 packets of Citrus degreaser/prep... do I need to use this before the Bondlok or after?
 

DBALL

Well-known member
Joined
Apr 3, 2007
Messages
107
Location
Milton,Ontario, Canada
I just finished doing my floor with the Rustoleum kit. I have a gas powered pressure washer that made quick work of the paint splatter. I used epoxy sheild 2 part concrete repair for cracks but I probably wouldn't fill in the expansion joints. I degreased the floor twice and used the etcher that comes in the kit it seemed to do a good job. I didn't use any type of primer as I was afraid of compatability with the top coat. I got good coverage with the colour kits had some left over (2 water base kits) I used the professional for the clear coat (1 kit) is supposed to cover 500sqft I barely had enough to cover 400 sqft. The citrus stuff is etch it is not a degreaser I would use that befor the bondlok.
 
Last edited:
OP
K

Keyblazer

Well-known member
Joined
Jul 30, 2009
Messages
1,471
Location
Irvine, CA
Thanks!
How about posting some pics?
So, its suggested to use the kit degreaser, then the Bondlok?
I have decided not to paint the foundation wall at the side... its really course concrete, will take a lot of time to do therefore limiting my pot life and it will be non visble with the bench/cabinets alond that wall.
 

DBALL

Well-known member
Joined
Apr 3, 2007
Messages
107
Location
Milton,Ontario, Canada
I am still working at it but I will get pictures up soon. I used 2L of the epoxy shield degreaser scrubbed the floor then used the citrus stuff in the kits as final prep. My stem walls are a lot higher than yours and rough as well I just used cheap concrete paint to do those it really finishes it off. The clear coat is worth it, it reflects a lot of light and looks cool as well.
 
OP
K

Keyblazer

Well-known member
Joined
Jul 30, 2009
Messages
1,471
Location
Irvine, CA
Yes, I thought the same about a simple concrete paint on the foundation walls.
I think I will paint and then fill the joints with a color matched mastic.
I was in there last night as it was dry... it looks good, but I think I am gonna hit the paint spots with my angle grinder and a cup wire brush.
Its been 100F here all week, but a low of about 80F overnight. I hope to get all the concrete patched today and rewash it, then I will paint early tomorrow morning!
I bought the Clear yesterday, and also I have an additional 4 bags of chips cos I want lots of chips on the floor. They only had the "Behr" make chips, so will check the color match and mix them all thoroughly.
How long after I do the base color and chips is ideal for adding the clearcoat?
 
Last edited:

AlphaGarage

Well-known member
Joined
Apr 16, 2008
Messages
1,298
Location
Every Garage, AnyTown, USA
For most coatings the ideal time to over coat is as soon as the last coat applied is tack free, that is you can walk on it without leaving any imprints. Don't forget to scrape off any flakes that aren't lying flat, are sticking up, or didn't adhere well.
 

DBALL

Well-known member
Joined
Apr 3, 2007
Messages
107
Location
Milton,Ontario, Canada
For the Rustoleum clear coat if you are putting it over their water based product they say any time after 24hrs. If you are using the professional kits they say wait 16hrs to put it down but not to wait any longer then 72hrs before you put it down.:headscrat hopefully this makes sense to you I am not a master of words by any means. These where the actual instructions from Rustoleum.
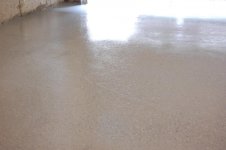
 
Last edited:

LegacyIndustrial

ALLIANCE MEMBER
Joined
Jun 7, 2010
Messages
7,994
Location
deerfield, IL
You have a window of opportunity.
It starts at "tack free".
Miss it and you will be a sanding.
Miss it without the sanding and you will run the risk of a DELAMINATION.
 
OP
K

Keyblazer

Well-known member
Joined
Jul 30, 2009
Messages
1,471
Location
Irvine, CA
I think it went well!
Here was the floor this am. Floor temp was 75deg and RH was 40%.
Good to go!
DSC07731.jpg

DSC07732.jpg


I assembled my gear together...
DSC07734.jpg


I noticed that the kit supplied paint chips seemed to be "smaller pieces" than the Behr chips I got, so I mixed one of the supplied bags with 3 bags of Behr chips to even it out.
DSC07733.jpg


I mixed the 2 parts, and went for it...
Here is the result...
DSC07740.jpg

DSC07737.jpg


I wanted a heavier fleck, so I ended up using one of the supplied packs plus 5 Behr packs to get this level of fleck on one side...
DSC07739.jpg


I agree with what some other people have worried about.. that is the difficulty in getting a level of consistancy in the chip coverage... its not as easy as you would think... so I just kept adding more!

I am gonna leave it 24 hours, so tomorrow morning I will apply the clear!
 
Last edited:
To avoid these ads, REGISTER NOW!

LegacyIndustrial

ALLIANCE MEMBER
Joined
Jun 7, 2010
Messages
7,994
Location
deerfield, IL
Most of the people on this post try to master the art of epoxy coatings on one job. Us "veterans" honed the technique over thousands of square feet.

Anyway, I think your floor looks good. You should be happy.:thumbup:
 

HOYTBOY

Member
Joined
Mar 5, 2010
Messages
13
Has anyone tried one of those small hand grass seed broadcaster that you crank? I am getting ready to do mine and this run across my mind. Thoughts/concerns?:headscrat
 
OP
K

Keyblazer

Well-known member
Joined
Jul 30, 2009
Messages
1,471
Location
Irvine, CA
Has anyone tried one of those small hand grass seed broadcaster that you crank? I am getting ready to do mine and this run across my mind. Thoughts/concerns?:headscrat

Doh, I have one of those.....

Ok, so its warm here today... 85 ish... I just went out and checked it, and its almost dry... just a slight tack now.
Question...
Whats the next step... brush/vac off the loose chips?
 

HOYTBOY

Member
Joined
Mar 5, 2010
Messages
13
At this pont I wouldn't do anything! I think it looks fine the way it is! I was just wondering if anyone else had thought about using one of those and how it worked out?:) Great job!!!
 

AlphaGarage

Well-known member
Joined
Apr 16, 2008
Messages
1,298
Location
Every Garage, AnyTown, USA
Yes - they usually work well, but every now and then they'll be erratic and spit out too much flake. The thing with flakes is that if oyu put down too much in one spot, well you can't unring that bell. If the spreader worked fine but once in a while sit out too few flakes, not a problem, just make another pass, but too many flakes and you are stuck with it.

But the same rule holds true for spreading by hand, so we suggest tossing tiny, small amounts; it's easy to toss out a few more, but impossible to pick up any if you tossed a too full hand.

A contractor I know has taken a leaf blower and affixed a big funnel (it has a 1" diameter down spout) on the blowing nose. He just turns it on and keeps feeding flake into the funnel. Haven't seen it in operation, so can't vouch for it. I'm sure it works for full broadcast, but then anything works for a full broadcast, it's the lesser densities that present a challenge.

Practice & small hand fulls. Repeat.
 
OP
K

Keyblazer

Well-known member
Joined
Jul 30, 2009
Messages
1,471
Location
Irvine, CA
What do I do about the flakes that are loose on the surface?
Brush/vac them up, or just clear over them?
 
OP
K

Keyblazer

Well-known member
Joined
Jul 30, 2009
Messages
1,471
Location
Irvine, CA
Thanks,
I hit it with the shop vac... the did the leaf blower...
Then I went for it.
Only issue I had was keeping the antislip in suspension..
I decided to put the whole gallon down on one side to give a thicker coating... and I am glad I did... it would have been stretching it..
DSC07743.jpg


Here is how it looked 10 mins after I finished rolling!
DSC07745.jpg

DSC07746.jpg

DSC07747.jpg

DSC07748.jpg


I am pleased!
The clearcoat really makes the chips "Pop" and the contrast stands out better.
DSC07749.jpg
 

Bill W

Member
Joined
Sep 3, 2010
Messages
6
Looks great, you did a good job.

I am going to have to do my floor oneside at a time like you. Did you pressure wash the floor during prep?
 
OP
K

Keyblazer

Well-known member
Joined
Jul 30, 2009
Messages
1,471
Location
Irvine, CA
Thanks,
No, I didnt pressure wash for 2 reasons... 1/ I dont have one... 2/ I had enough trouble keeping whats on side 2 dry as it was!
I treated any spots with degreaser, and scrubbed, and repeated that 3 times. Then I washer it down twice with the hose and swept/squeeged it. Then I hit it with the cirus degreaser from the kit, then did a Bond lok. Then rinsed it twice. It felt good then so I put the Epoxy down.
Time will tell if I got it right!
 

DBALL

Well-known member
Joined
Apr 3, 2007
Messages
107
Location
Milton,Ontario, Canada
Looks good I wish I had bought more flakes like you did I like the look. I know what you mean about the clear kit I barely had enough to finish 400sqft.I still have a lot of work to do but here are a couple of pictures as promised.
 

Attachments

  • DSC_0412.jpg
    DSC_0412.jpg
    153 KB · Views: 47
  • DSC_0416.jpg
    DSC_0416.jpg
    143.9 KB · Views: 47
  • DSC_0419.jpg
    DSC_0419.jpg
    134.2 KB · Views: 45
OP
K

Keyblazer

Well-known member
Joined
Jul 30, 2009
Messages
1,471
Location
Irvine, CA
Looking good, Dball!
I wish I had put more down now, but its done!
I have so much stuff to put in it, you will hardly see the floor again!

Ok, moving on...
I want to fill the joints with caulk... I am thinking a dark chocolate brown...
Something to stop the dust/dirt getting in there.... just a slight negative radius finished.
Anyone got suggestions?
 

Kimble Fowler

New member
Joined
Oct 1, 2010
Messages
1
Those pics look fantastic. Are you asking for color suggestions or brand suggestions? Or something else?
 
OP
K

Keyblazer

Well-known member
Joined
Jul 30, 2009
Messages
1,471
Location
Irvine, CA
Suggestions for type of Caulk...
Want something that I can put in there , smooth out into a mild negative radius.
Flexible enough to move with the slab, but tough enough to withstand sweeping etc?
 
To avoid these ads, REGISTER NOW!
Top Bottom