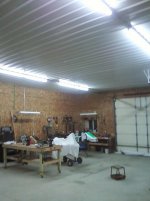
Hey guys looking for some advice on hanging the steel ceiling.(Pro Rib) So I have 28x32Ft garage. Putting up the ceiling and the overlap ribs are off a bit.Know where the two pieces over lap. Just trying to see if this is normal or if I'm doing something wrong.


You are using an out of date browser. It may not display this or other websites correctly.
You should upgrade or use an alternative browser.
You should upgrade or use an alternative browser.
steel celing help
- Thread starter Tofast4U
- Start date
green.bubbly
Well-known member
Not exactly understanding your issue. You screwed down one sheet to the ceiling. The next sheet should overlap the first. Is it not square or what is preventing them from properly overlapping?
Can you take a picture?
Can you take a picture?
I had the same thoughts regarding my install. One thing to remember is the edge with more of a lip goes down and the edge with no lip or less of a lip goes on top or overlaps. However my ends when you look at the profile still don't match the way I think they should. I have gotten all the way across the garage and everything stayed nice and square and lined up. I am using 20' panels and on the last panel that I had to cut to fit was off 1/8" in 20'. Not much advice but this is how it worked for me.
Foamer
Foamer
green.bubbly
Well-known member
Sounds like the building is not square or your first sheet is not square??
Hmmm, not sure about square, mine is quite close. My point is that when I overlap the panels the profiles are close but just not perfect and I checked this on the ground as well putting two panels together. I should take a picture of this to show what I am trying to describe.
Foamer
Foamer
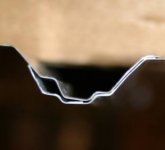
Here is a picture looking at the end of the panel, maybe this will better explain what I am seeing. Half of the profile is perfect the other half...well.......
Though like I have said before the ceiling turned out nearly perfect so this was not an issue, however why would it not be perfect profile on the other side?
Though like I have said before the ceiling turned out nearly perfect so this was not an issue, however why would it not be perfect profile on the other side?
Attachments
green.bubbly
Well-known member
Here is a picture looking at the end of the panel, maybe this will better explain what I am seeing. Half of the profile is perfect the other half...well.......
Though like I have said before the ceiling turned out nearly perfect so this was not an issue, however why would it not be perfect profile on the other side?
Now I follow. Not sure if I have an answer for you but at least I understand what the issue is. It seems that it is like this by design. The two profiles are not identical. Maybe to allow any trapped rain moisture to escape?
My wall panels looked like the pic below and matched up perfectly. I would check with the supplier that sold you the panels.

jlckmj
Well-known member
You will never see it once it is up,
They are all like that.
Jim
They are all like that.
Jim
wachtman12
New member
- Joined
- Sep 16, 2010
- Messages
- 3

You will never see it once it is up,
They are all like that.
Jim
You are 100% correct. The ceiling looks great and you will never see this. Coming from the inexperienced (me) When first installing the product I had to wonder if I was doing something wrong because you would think that the profile would be perfect. I see the other picture posted and his panels are perfect; go figure huh.....
rburke65
Well-known member
I have no experience in any of this ceiling install, but I did put on a new metal roof years ago. That said, the pictured panels look to me as if they were stamped incorrectly on the left end. I think they should match and "nest" when they are over lapped. And, NO.....I don't think 'they are all like that'.
samert111
Well-known member
The overlap along the sides you will not see, it's the overlap on the ends where one entire panel overlaps the previous panel like you can see in the photo here. It's unavoidable unless your using 1 panel to run the entire length which is not practical in most cases. I used 10'-1" panels for a 40 foot length because I didn't have any help to put it up so I have 3 overlaps which are visable only from the back of the building.
I've seen where others have put screws in on both sides of the ribs and this will pull the overlapping panel up nicely at the overlap, but it looks strange if you only do it on the panel ends and to do it on the entire panel it can get costly and time consuming.
Sometime you just have to tell yourself it's just a garage or pole barn and doesn't need to be perfect. I know it's hard for some if us but it's reality.
Attachments

CamarosRus
Well-known member
Samert111, Can you (or somebody) elaborate on how you installed insulation between trusses and what are the pcs called that are holding the bats up prior to the metal ceiling being installed ???
At what point would you "floor off" the area above trusses for "Attic" storage ????
Thanks
At what point would you "floor off" the area above trusses for "Attic" storage ????
Thanks
Samert111, Can you (or somebody) elaborate on how you installed insulation between trusses and what are the pcs called that are holding the bats up prior to the metal ceiling being installed ???
At what point would you "floor off" the area above trusses for "Attic" storage ????
Thanks
I am not sure how he handled the install, for me I stapled my batts in-between the trusses.
Foamer
samert111
Well-known member
Samert111, Can you (or somebody) elaborate on how you installed insulation between trusses and what are the pcs called that are holding the bats up prior to the metal ceiling being installed ???
At what point would you "floor off" the area above trusses for "Attic" storage ????
Thanks
CameroRus,
I used the 24" wide Kraft faced R30 fiberglass batts. They were 4 ft long and I just stapled them to the bottom chord of the trusses. My trusses are not designed for any significant storage weight so I did not floor them off as you say. It's all closed off up there with no access. If I wanted to add more blown in insulation or get up there for any reason I would just remove a pc of the exterior siding above my large overhead door to gain access.
OccupantRJ
Well-known member
I believe you will find this mismatch in the profile referred to as an anti-siphon channel, to help prevent water wicking into the joint.
I believe you will find this mismatch in the profile referred to as an anti-siphon channel, to help prevent water wicking into the joint.
Just as RJ said. After a contact with the manufacture he emailed this:
"That hole on the left is the drain channel. It is meant to drain moisture out from the panel so water does not wick up and over the rib. The drain channel is meant to work for steel installed on a roof. When used on a ceiling there is no water to drain but the drain channel would be there no matter what. It does not change the way the panel would lay or look in any way.
Now I can sleep better!

Foamer
rburke65
Well-known member
So is this for only steel meant for a roof installation only? Is there steel that is made for siding only that does not have these drain channels? Hmmm???
KELLHAMMER
Well-known member
I love it
OccupantRJ
Well-known member
How is the noise when running an angle grinder in a shop with the metal ceiling? Seems like the noise would echo badly.
PCO6
Well-known member
I thought noise might be a problem when I installed a metal ceiling but it hasn't been a problem at all.
Have any of you guys screwed directly to the tresses or have you used furring strips perpendicular to the trusses? I'm about ready to hang steel on my ceiling (40 x 80) and with a 40 lenght on the truss there is a bit of wiggle and i'm worried that trying to hit the 1.5" width with a screw is going to be a challange. My plan is to run 12 ft x 3ft panels perpendicular to the trusses.
Also is it better to run all the panels to fill the 40ft direction and then start another row or run the panels to fill the 80 ft direction and start another row?
Any thoughts on this?
Also is it better to run all the panels to fill the 40ft direction and then start another row or run the panels to fill the 80 ft direction and start another row?
Any thoughts on this?
sberry
Banned
Personally I like to put layout marks where the far edge of the sheet goes, put a screw to hold it in location and screw back toward the seam, keeps the sheets from creeping. If something is a bit off it allows for a bit of correction before you get all the way to the other side and find out something is wrong or that the sheets creeped and got out of square.
OccupantRJ
Well-known member
Have any of you guys screwed directly to the tresses or have you used furring strips perpendicular to the trusses? I'm about ready to hang steel on my ceiling (40 x 80) and with a 40 lenght on the truss there is a bit of wiggle and i'm worried that trying to hit the 1.5" width with a screw is going to be a challange. My plan is to run 12 ft x 3ft panels perpendicular to the trusses.
Also is it better to run all the panels to fill the 40ft direction and then start another row or run the panels to fill the 80 ft direction and start another row?
Any thoughts on this?
I would center the panels to the width of the room, to make each side alike. Mark out from each end of your side walls the width of your first panel, then pop a chalkline to align the panel edge to. Running the panels the full length for each row will be smarter, as any misalignment will be exaggerated if you do it all the way across in sets. Start at the end away from your entrance door, and the seams will look less obtrusive when you enter and look up to admire your handywork.