To avoid these ads, REGISTER NOW!

steelspan shop new post

autoclassicnut

Well-known member
Joined
Nov 24, 2007
Messages
1,382
Location
Montana
These are some photos of my shop project first 3 are the prepping of the ground for the concrete as it was about 3-4 feet lower than the surrounding land. The rock and dirt were pushed up to form the irrigation ditch many moons ago.
Luckily my father-in-law donated the fill of rock and dirt. ( I love that guy).
After spreading and rolling it with a vibratory roller, picture three is what it looked like in June '07.
 

Attachments

  • MVC-969S.JPG
    MVC-969S.JPG
    37.9 KB · Views: 705
  • MVC-971S.JPG
    MVC-971S.JPG
    37.1 KB · Views: 774
  • MVC-073S.JPG
    MVC-073S.JPG
    37.8 KB · Views: 760
To avoid these ads, REGISTER NOW!
OP
A

autoclassicnut

Well-known member
Joined
Nov 24, 2007
Messages
1,382
Location
Montana
next pics are of the slab pour and rebar....last one has the welded baseplates mounted on slab
 

Attachments

  • poured slab with welded base-plates on.jpg
    poured slab with welded base-plates on.jpg
    27.5 KB · Views: 843
  • diffrent view of slab.jpg
    diffrent view of slab.jpg
    30.1 KB · Views: 1,022
  • smoothing slab.jpg
    smoothing slab.jpg
    39.1 KB · Views: 632
  • pouring slab.jpg
    pouring slab.jpg
    31.9 KB · Views: 495
  • rebar before pour.jpg
    rebar before pour.jpg
    34.8 KB · Views: 503
  • rebar inforcement of slab.jpg
    rebar inforcement of slab.jpg
    45.8 KB · Views: 659
  • rebar pic.jpg
    rebar pic.jpg
    53.7 KB · Views: 546
OP
A

autoclassicnut

Well-known member
Joined
Nov 24, 2007
Messages
1,382
Location
Montana
next few are the arches being put up.... I welded a bracket that acts as a guide to set the arches on, It has two rebar pockets (bent metal much like if you hold your hands out with your palms upand thumbs close to you. the arches rest in these and I just raise the bracket up and in place with the forklift, works pretty slick. I was using the extendaboom lift but was too expensive for how long i'll need to rent it. Luckily a freind has a forklift available, Thanks Casper!
 

Attachments

  • first few go up.jpg
    first few go up.jpg
    22.9 KB · Views: 530
  • saving cost of extend-a-boom lift.jpg
    saving cost of extend-a-boom lift.jpg
    30 KB · Views: 631
  • using extend-a-boom lift to raise arches.jpg
    using extend-a-boom lift to raise arches.jpg
    23.2 KB · Views: 657
  • arches ready to go up.jpg
    arches ready to go up.jpg
    26.6 KB · Views: 495
  • assembling arches to go up.jpg
    assembling arches to go up.jpg
    22 KB · Views: 529
  • different angle of process (arch raising).jpg
    different angle of process (arch raising).jpg
    24.5 KB · Views: 567
Last edited:
OP
A

autoclassicnut

Well-known member
Joined
Nov 24, 2007
Messages
1,382
Location
Montana
pics of the first 8 or so up and ready.....
 

Attachments

  • picture of first 8 or so panels.jpg
    picture of first 8 or so panels.jpg
    22.7 KB · Views: 419
  • first 9 panels up.jpg
    first 9 panels up.jpg
    24.5 KB · Views: 535
  • first 9 panels go up.jpg
    first 9 panels go up.jpg
    24.7 KB · Views: 393
OP
A

autoclassicnut

Well-known member
Joined
Nov 24, 2007
Messages
1,382
Location
Montana
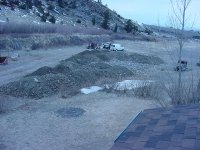
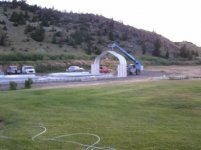
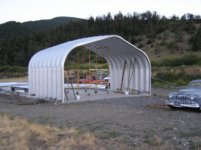
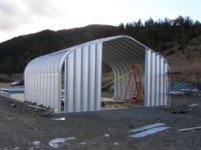
Things were going good , between my son, my brother and my brother-in law helping. I was trying to get as much done before the snow was to fly, but keep in mind I was only able to work on this on the weekends.
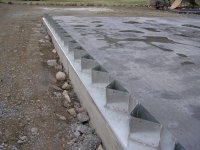
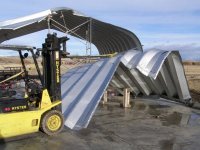
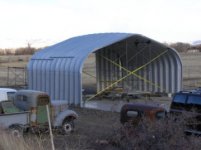
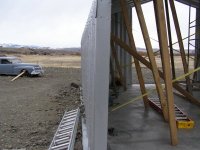
We were having trouble lining up the holes in the panels as they were sagging outward, the company calls it creeping . What it amounts to is the outside curves are like springs and the bends are loaded to have them line up...I thought that the lower baseplates would take care of it... i was wrong. the more we added to the building the more it creeped or sagged.
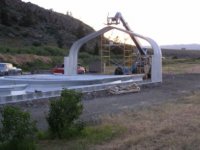
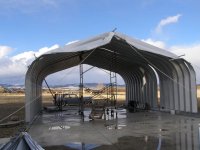
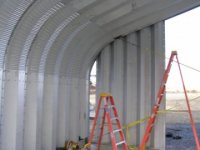
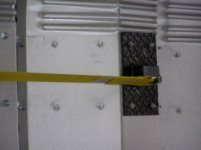
I decided to research more and in the manual there was a small one paragraph where you need to have 1 1/2" angle iron drilled at 24 1/2" centers to bolt the panels together to keep things lined up... I proceeded to "fix" things as best I could .
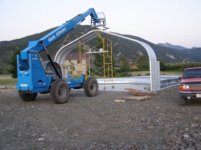
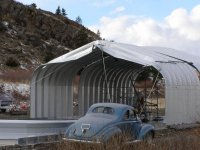
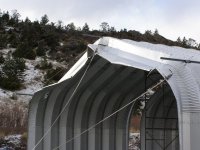
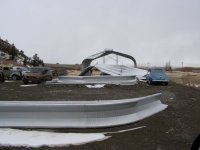
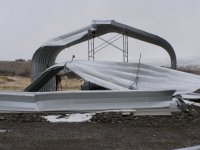
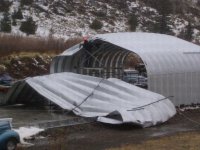
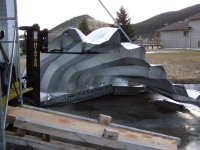
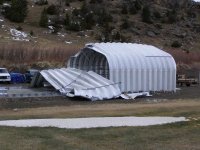
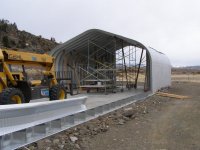
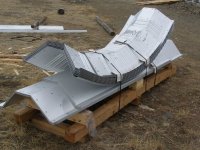
To make a long story short, I decide I'd skip a section and put up more panels, then put one in the middle when I get things pulled together and aligned. I am swallowing some pride here and really setting myself up for some "what the #$&@# were you thinking " comments but here's what happened. I skipped the panel and put up 7 more and braced them together...on November the 11th , I had to leave town to work on the 12th,the night of the 11th we had 152 m.p.h. gusts hit our town... here's what my wife emailed me...
 

Attachments

  • more damage pics.jpg
    more damage pics.jpg
    29 KB · Views: 727
  • damaged panels.jpg
    damaged panels.jpg
    28.8 KB · Views: 651
  • arches damaged on November 12th.jpg
    arches damaged on November 12th.jpg
    28.8 KB · Views: 761
  • 152 m.p.h. wind gusts.jpg
    152 m.p.h. wind gusts.jpg
    24.3 KB · Views: 801
Last edited:
OP
A

autoclassicnut

Well-known member
Joined
Nov 24, 2007
Messages
1,382
Location
Montana
I braced the building as best I could on the next couple weekends. And I caught a bad cold and couldn't work on it the 3rd weekend.Then for the next two weeks i was out of town trying to finished up our companies project for the winter shutdown.
I got a call form my wife that she heard the biggest wind storm hit our place... see attached photos, i almost cried...
 

Attachments

  • morning after second wind storm .....jpg
    morning after second wind storm .....jpg
    19.8 KB · Views: 480
  • wind damage pics.jpg
    wind damage pics.jpg
    23.7 KB · Views: 492
  • after I got sent home to deal with mess.jpg
    after I got sent home to deal with mess.jpg
    28.5 KB · Views: 656
OP
A

autoclassicnut

Well-known member
Joined
Nov 24, 2007
Messages
1,382
Location
Montana
Removing damaged panels... i wish I could've finished in the summer...
 

Attachments

  • taking panels out.jpg
    taking panels out.jpg
    29.3 KB · Views: 308
  • shredded panels.jpg
    shredded panels.jpg
    31.5 KB · Views: 332
  • ripping out the damage.jpg
    ripping out the damage.jpg
    24.6 KB · Views: 259
  • heave ho-.jpg
    heave ho-.jpg
    31.1 KB · Views: 305
  • damaged baseplates.jpg
    damaged baseplates.jpg
    37.9 KB · Views: 359
  • cleaning up this mess.jpg
    cleaning up this mess.jpg
    30.1 KB · Views: 322
OP
A

autoclassicnut

Well-known member
Joined
Nov 24, 2007
Messages
1,382
Location
Montana
These are pics of the shop after I replaced the baseplates and removed the damaged panels ... I am using straps and installed the endwall for strength.I will take more pics tomorrow as i have finished the outside bracing and am using 2 x 6 's to support the roof. If I ever get a couple days without wind blowing i could get more done..
 

Attachments

  • straps for extra bracing.jpg
    straps for extra bracing.jpg
    19 KB · Views: 249
  • endwall installed.jpg
    endwall installed.jpg
    18.3 KB · Views: 269
  • inside view of endwall.jpg
    inside view of endwall.jpg
    17.9 KB · Views: 253
  • shop today.jpg
    shop today.jpg
    18.4 KB · Views: 277

PurdueSD

Well-known member
Joined
Mar 25, 2006
Messages
1,577
Location
Indiana
WOW!
highway.jpg

truckersblownaway.jpg
 
To avoid these ads, REGISTER NOW!

RenegadeEngr

Well-known member
Joined
Nov 27, 2007
Messages
86
Location
Iowa City
Mother Nature destroying a Man's Shop! I feel for you as well man, glad to see you were able to get 'er back up.
 
OP
A

autoclassicnut

Well-known member
Joined
Nov 24, 2007
Messages
1,382
Location
Montana
That's what I told my wife!...And none of my projects either.... My 1939 ford Standard coupe was nearby though...that's my baby!
 
OP
A

autoclassicnut

Well-known member
Joined
Nov 24, 2007
Messages
1,382
Location
Montana
I am trying to figure out which endwall I like the best as it doesn't have to be just plain...here's some of my choices...
 

Attachments

  • endwall 13.jpg
    endwall 13.jpg
    19.8 KB · Views: 87
  • endwall 14.jpg
    endwall 14.jpg
    22.3 KB · Views: 95
  • endwall 15.jpg
    endwall 15.jpg
    24.1 KB · Views: 117
  • endwall 16.jpg
    endwall 16.jpg
    23.4 KB · Views: 109
  • endwall 17.jpg
    endwall 17.jpg
    18.7 KB · Views: 116
  • endwall 18.jpg
    endwall 18.jpg
    27.9 KB · Views: 109
  • endwall inset.jpg
    endwall inset.jpg
    29 KB · Views: 132
Last edited:
OP
A

autoclassicnut

Well-known member
Joined
Nov 24, 2007
Messages
1,382
Location
Montana
Some have the ends plain...
 

Attachments

  • endwall 6.jpg
    endwall 6.jpg
    25.4 KB · Views: 68
  • endwall 7.jpg
    endwall 7.jpg
    26.9 KB · Views: 52
  • endwall 8.jpg
    endwall 8.jpg
    26 KB · Views: 117
  • endwall 9.jpg
    endwall 9.jpg
    23 KB · Views: 49
  • endwall 10.jpg
    endwall 10.jpg
    28.3 KB · Views: 56
  • endwall 11.jpg
    endwall 11.jpg
    32.2 KB · Views: 56
  • endwall 12.jpg
    endwall 12.jpg
    29.5 KB · Views: 54
OP
A

autoclassicnut

Well-known member
Joined
Nov 24, 2007
Messages
1,382
Location
Montana
Some have the endwall inset a panel which is cool but a wasted space...
 

Attachments

  • endwall 2.jpg
    endwall 2.jpg
    20.4 KB · Views: 74
  • endwall 3.jpg
    endwall 3.jpg
    12.8 KB · Views: 90
  • endwall 4.jpg
    endwall 4.jpg
    27.5 KB · Views: 61
OP
A

autoclassicnut

Well-known member
Joined
Nov 24, 2007
Messages
1,382
Location
Montana
Some have windows , i might need some natural lighting....
 

Attachments

  • fancy endwall 1.jpg
    fancy endwall 1.jpg
    44.8 KB · Views: 49
  • fancy 6.jpg
    fancy 6.jpg
    29.2 KB · Views: 45
  • fancy 2.jpg
    fancy 2.jpg
    15.5 KB · Views: 60
  • fancy 3.jpg
    fancy 3.jpg
    17.7 KB · Views: 52
  • fancy 4.jpg
    fancy 4.jpg
    20.7 KB · Views: 66

truck

Well-known member
Joined
Feb 8, 2008
Messages
203
Location
Manassas, Va
Mine will look a lot like this with siding to match the house:
attachment.php


I also have 4 skylight panels in mine which is supposed to help a lot with natural light.

Truck
 
OP
A

autoclassicnut

Well-known member
Joined
Nov 24, 2007
Messages
1,382
Location
Montana
Hey Truck thanks for the post : I guess with 30' wide straight wall buildings, you can't have the skylight panels... That's what the salesman told me, there's too big of a span up top for the snow load...
 
OP
A

autoclassicnut

Well-known member
Joined
Nov 24, 2007
Messages
1,382
Location
Montana
It was nice and calm on Sunday so I went out to put up a panel by myself... That makes 15 panels so far, only 23 to go, LOL

I also included some shots of the brackets I made to help pull the panels square, using a truckers strap and a come-along. It really pulls the curves tightly together lengthwise then I climb up and put the bracing up.(1 1/2 " angle iron with 24 1/2" center holes drilled for width of panels used.)
I bought the angle iron in 20' lengths but I needed to put them up as needed so I cut them for 5 panels and 4 panels as they overlap one panel each side for more strength.

here's some pix
 

Attachments

  • lower crossbracing plates.jpg
    lower crossbracing plates.jpg
    23 KB · Views: 249
  • pulling panels in line.jpg
    pulling panels in line.jpg
    22.2 KB · Views: 194
  • upper straps different angle from north.jpg
    upper straps different angle from north.jpg
    25.6 KB · Views: 215
  • upper straps pulling panels in.jpg
    upper straps pulling panels in.jpg
    22.4 KB · Views: 233
  • shop as of 3-3-08 #3.jpg
    shop as of 3-3-08 #3.jpg
    31 KB · Views: 149
  • west wall from ditch.jpg
    west wall from ditch.jpg
    19.1 KB · Views: 177
  • shop as of 3-3-08 #4.jpg
    shop as of 3-3-08 #4.jpg
    28.3 KB · Views: 167
Last edited:
OP
A

autoclassicnut

Well-known member
Joined
Nov 24, 2007
Messages
1,382
Location
Montana
Here's a coupls shots of the replacement panels and installed baseplates. Also the use of 2 x 6 's as the wind is kicking up again. maybe I'll be able to work on it tomorrow.
 

Attachments

  • bracing 4.jpg
    bracing 4.jpg
    25.6 KB · Views: 93
  • bracing 1.jpg
    bracing 1.jpg
    27.7 KB · Views: 89
  • replaced baseplates.jpg
    replaced baseplates.jpg
    28.1 KB · Views: 107
  • east wall.jpg
    east wall.jpg
    22.6 KB · Views: 71
  • west wall.jpg
    west wall.jpg
    27.9 KB · Views: 83
  • bracing 3.jpg
    bracing 3.jpg
    31.1 KB · Views: 84
  • shop as of 3-3-08  #1.jpg
    shop as of 3-3-08 #1.jpg
    26.8 KB · Views: 96
OP
A

autoclassicnut

Well-known member
Joined
Nov 24, 2007
Messages
1,382
Location
Montana
OOps here's the panels on the pallet. Doesn't look like there can be 8 arches here but there is!
 

Attachments

  • replacement panels on skid.jpg
    replacement panels on skid.jpg
    32.4 KB · Views: 149
Last edited:

banzaitoyota

Well-known member
Joined
Apr 2, 2006
Messages
587
Location
Aiken SC
Based on my experience with my building: DO NOT install the fiberglass roof panells for light. Mine are delaminating after 7 years. And yes I twisted a panel or two installing my 25 x 32
John
 
OP
A

autoclassicnut

Well-known member
Joined
Nov 24, 2007
Messages
1,382
Location
Montana
I am probably going to install a few windows on each end up high towrds the peak for light, and then just rely on flipping a switch for more.
I drive by an older building witht the plastic panels and I can see the discoloring of them from year to year.
You'd think that with today's tech advances they'd come up with better panels to resist the effects of the sun. Anyone out there know of some?
 
OP
A

autoclassicnut

Well-known member
Joined
Nov 24, 2007
Messages
1,382
Location
Montana
updates of build , also included close-ups of brackets I made to pull things square...
 

Attachments

  • method of pulling this square.jpg
    method of pulling this square.jpg
    17.3 KB · Views: 172
  • brackets I made.jpg
    brackets I made.jpg
    18 KB · Views: 234
  • brackets.jpg
    brackets.jpg
    16 KB · Views: 164
  • 3-8-08.jpg
    3-8-08.jpg
    21.5 KB · Views: 163
To avoid these ads, REGISTER NOW!
Top Bottom