To avoid these ads, REGISTER NOW!

Stooge's Longer term car projects, Part 2

To avoid these ads, REGISTER NOW!
OP
S

Stooge

Well-known member
Joined
Mar 24, 2013
Messages
3,533
Location
South Shore, MA
Thanks guys, good to finally be close to buttoning the trunk section, still alot of cleaning up to do, but the major pieces are all in. After this, the driver side lower front cowl and door sill is next and the last big project sheet metal repair wise

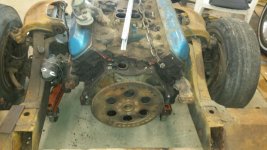
2021-03-08_06-09-33 by Dan Haas, on Flickr

2021-03-08_06-09-54 by Dan Haas, on Flickr

2021-03-08_07-16-19 by Dan Haas, on Flickr

2021-03-08_06-11-52 by Dan Haas, on Flickr

2021-03-08_06-10-31 by Dan Haas, on Flickr

2021-03-08_06-10-09 by Dan Haas, on Flickr

2021-03-08_06-14-36 by Dan Haas, on Flickr

2021-03-08_06-14-51 by Dan Haas, on Flickr

2021-03-08_06-11-10 by Dan Haas, on Flickr

2021-03-08_06-10-50 by Dan Haas, on Flickr

21 by Dan Haas, on Flickr

2021-03-08_06-09-09 by Dan Haas, on Flickr
 

Kev442

Well-known member
Joined
Jan 15, 2009
Messages
5,386
Location
Wi
Boy, when I think back to some of the swiss cheese you've repaired to where it is now... So many of these get to a point and stall due to burnout. That's why it is always good to have something else to concentrate on instead, like a chevy pickup.
My old roommate from my bachelor days was one of those guys who had one iron in the fire and could spend 30 hours a week on a car while working fulltime too. He burned a lot of midnight oil and I was always impressed by his tenacity, but I could never do that.
So, I have nothing to report. Pesky real life has gotten in the way with temps hitting the 50's a lot lately. Very unusual for March, so I've concentrated on getting caught up on deferred maintenance. I did grab the other half of the rotisserie from the pole building and get it to the garage, that was a couple hours of finagling things. Tried to grab a caster at HF for it, sold out like so many things these days.
 
OP
S

Stooge

Well-known member
Joined
Mar 24, 2013
Messages
3,533
Location
South Shore, MA
... So many of these get to a point and stall due to burnout. That's why it is always good to have something else to concentrate on instead, like a chevy pickup.
.

heh, oh im well aware of trying to keep from getting burnt out, and probably a little why i didnt mind digging into the truck over the winter, but ive still been keeping busy with the other on going projects. A little photo dump from the last week or 2 :beer:

Started the lower lip around the trunk perimeter that i didnt know i needed. Fits well but still has some finishing, along with the rest of the trunk, i just need to spend a solid weekend or 2 going over all of the areas and getting it buttoned up and ready for body work. dimensionally, the new lip probably is a little small, but i didnt know i was missing it when the rest of section was made so i didnt account for it. it will do its job of making a seal around the weatherstripping though so i cant complain and i dont suspect this car will spend much time sitting in the rain in the future....but i also said that about a certain white truck

2021-03-23_10-32-04 by Dan Haas, on Flickr

2021-03-23_10-31-56 by Dan Haas, on Flickr

Made a quicky little patch for the '37 plymouth. from the inside, you could see a gap to the outside, its tacked in currently, but needs to be finished. The owner just wants to get out and enjoy it, and isnt so concerned about the body being perfect. The body is also COVERED in a thick layer of bondo, but its been that way for 20+yrs and still looks 'fine'

2021-03-23_10-31-18 by Dan Haas, on Flickr

2021-03-23_10-31-38 by Dan Haas, on Flickr

Engine for the plymouth (fairly hot 350, the owner of the plymouth is good friends with the owner of the machine shop/ alcohol funny car builder out front, so they out together something nice for him)

2021-03-23_10-35-50 by Dan Haas, on Flickr

Finally got around to making the spacers for the front coilover brackets so i can finally put those in hopefully permanently. 1/4 wall tubing, 1/2" ID was probably a little over kill, but was cost effective and should work well.

2021-03-23_10-30-42 by Dan Haas, on Flickr

Bought a new old stock voltage regulator for the buick, this one is from a 40/41, and eliminates the extra leg that is part of the accelerator pedal vacuum switch start, since i will be using a push button instead. Apparently this was a conversion that was done way back when, since the starter would sometimes accidentally engage while the car was running. Also, from the same guy, i also bought some new old stock fender lamp lenses since one of mine was cracked.

2021-03-23_10-33-29 by Dan Haas, on Flickr

2021-03-23_10-33-40 by Dan Haas, on Flickr

2021-03-23_10-30-11 by Dan Haas, on Flickr

These little ones on the fenders
20190827_184128 by Dan Haas, on Flickr

Rebuilt the fuel sending unit/ pick up for the truck that i had modified to use the '50 ford gauges, but got all gummed up from water sitting in the gas tank. Also got the new tank neck welded in and the extra spout welded closed, i dont think i have any pictures though.

2021-03-23_10-31-04 by Dan Haas, on Flickr

Swapped in some new spark plugs in the white truck sunday and changed the oil to get it started sometime this week, even bought a priming tool as a precaution. Ive never had an oil filter as stuck as that one, and having the engine raised up in the frame because of the aftermarket crossmember but it right in line with the frame. My filter sockets were just slipping off, so i broke down and bought some locking pliers for it and after a solid 45minutes of crushing the filter, it finally came off, and a nice new delco filter in its place. im guessing sitting outside basically on the ground was what did it.

2021-03-23_10-27-53 by Dan Haas, on Flickr

2021-03-23_10-28-13 by Dan Haas, on Flickr

Even had time to paint some stupid stuff! :lol_hitti

2021-03-23_10-33-07 by Dan Haas, on Flickr
 
OP
S

Stooge

Well-known member
Joined
Mar 24, 2013
Messages
3,533
Location
South Shore, MA
I'm surprise you can't get reasonable gauges for AN fittings.

There was a guy who was just grabbing old posts and reposting them in threads, that post was probably from over a year ago. im assuming he's banned by now. The inside of that fuel rail isnt tapped, just a smooth inner space, that i would need to thread. I havent started anything yet, but theres some changes being made to the intake, not an aftermarket one, but im rethinking the 4 single barrels in lieu of (2) 2 barrels like the factory set up for 1941/ 42 was. I was stuck on using the 4 singles, but things change, and im aware how much i dont know, and using 2 new carbs, with manufacturer support for being able to just buy the parts i need to rejet them, get linkages and fuel that i dont need to re-engineer from the ground up and hope they work. I was never too concerned about the design of the intake itself, there are enough inline engines with log style manifolds, but the 4 carburetors was maybe a little ambitious for my first go around with multi carb set ups, and dicking around for months and months trying to get them sorted and running right would really irritate me to the point of not enjoying it. I still want this to be streetable and be able take it on road trips. Similar design intake to what i have now, but most likely with stromberg 97's due to parts availability.
 

Kev442

Well-known member
Joined
Jan 15, 2009
Messages
5,386
Location
Wi
Lots of work on all fronts, except the possibly mythical ford drivetrain. :)

I never knew you had a mezzanine in your shop until the staircase showed up in the background. Nice to see the Plymouth getting love. I have no idea how that engine oilpan will fit in there, it would never fit my '51.
Did that Pontiac ever leave?

Color me astonished, I would have never guessed you would abandon the 4 carbs without even trying them after getting those linkages fabbed up.

Supposed to be cold and rainy Saturday, a perfect day to spend in the garage with wood heat going in the house. I'm looking forward to it.
 

Kev442

Well-known member
Joined
Jan 15, 2009
Messages
5,386
Location
Wi
Wow, 7 weeks gone by, and I was the last post. I never even got answers!:)

In spite of the weather still producing frost and freeze warnings, I was (slowly) able to open up the pole building and start things back up.
Late April I kicked a car out so I could move my testing frame/engine cradle next to the project.

Early May I pulled the test mule engine out, not that easy with the body on now, lots of wobble and regular extensions put to work! Very tight, reminded me of working on G bodies.

This weekend I got the motor plates and mounts about where I want them and was actually able to set the motor in place. Even finding exhaust manifolds has been a challenge, especially on the drivers side where the power steering is backwards on these models.
So, two boring, blurry pictures to represent untold hours of headscratching and cutting, then more cutting and modifying. Such is life.
 

Attachments

  • 20210516_151611.jpg
    20210516_151611.jpg
    148.4 KB · Views: 44
  • 20210516_151550.jpg
    20210516_151550.jpg
    137.7 KB · Views: 39

xtremek

Well-known member
Joined
Apr 13, 2012
Messages
11,603
Location
St. Johns, Mi
Hopefully our hero is either out cruising in the pick-up, or working a ton at the day job to make money for his play things.
 
OP
S

Stooge

Well-known member
Joined
Mar 24, 2013
Messages
3,533
Location
South Shore, MA
The intake change has alot to do with parts/ tuning knowledge availability, and re-evaluating and reining in my first multi carb project. It would have looked the part, but more important is reliability and enough confidence in the car to feel comfortable taking it on some extended drives, which was the plan from the start, to be able to get to the point where i can take it on some thousand+ mile road trips. I also started to feel like i was dragging my feet too much and this was going to turn into another better-part-of-a-decade project and spending months and months messing around with rebuilding and tuning atleast (4) 75yr old carburetors with limited parts availability, definitely would have dampened some of the fun.

Im pretty bad at setting goals and worse at sticking to them, but with the cancellation of one of the few big shows i go to every year, i decided im going to try and drive the Buick to the rescheduled show in July 2022! 14ish months to get it bodyworked, painted, plumbed and wired and i work annoyingly slow. Its the BSAAC (Bay State antique auto club) show at the Endicott Estates in Dedham, MA, (a picture thread fron '18 https://www.garagejournal.com/forum/showthread.php?t=395645 )

Work on the car has been alot of not much to see finishing welding up the floor and getting that cleaned up. I'll be starting the driver side cowl/ fender mount repair probably this week and that will be the last "big" sheet metal project to do.

Truck fired up but i still need to buy the rear coilovers and im not in much of a rush, but the front sits pretty nice with the 700lb springs
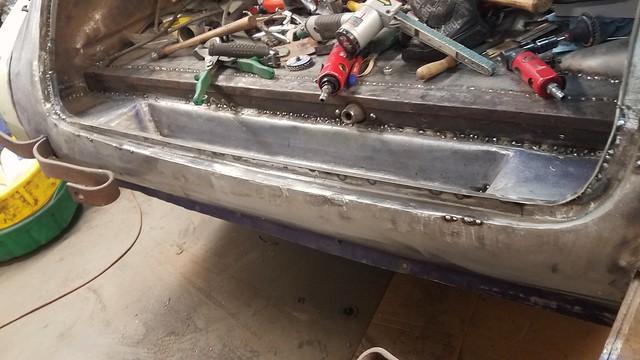
20210409_151838 by Dan Haas, on Flickr

i painted the firewall of the plymouth a gloss black before the engine went back in, and its looking pretty spiffy. the carbs on it and a few accessories are on it, but i dont have a more recent picture
2021-05-17_07-41-57 by Dan Haas, on Flickr

20210410_133900 by Dan Haas, on Flickr

20210410_133907 by Dan Haas, on Flickr

Put together a starter solenoid and found a plunger to fit it, but i might need a different actuator linkage to fit a bit better.

20210425_104000 by Dan Haas, on Flickr

Picked up a 6volt Optima to make a battery tray. i still have another piece to make, but it will be held in with 3 3/8 weld nuts welded to the inside of the frame on the passenger side under the hood, rather than the under the seat mount. with the weldnuts, if i ever want to use the under the floor one, there will just be 3 threaded holes as evidence.
20210425_142904 by Dan Haas, on Flickr

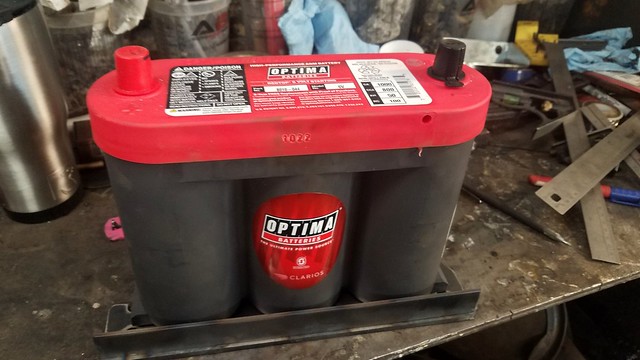
2021-05-17_07-42-17 by Dan Haas, on Flickr

And where im going to be starting on the new intake, i figured i should get the exhaust header welded up so i can stop knocking the tubing on the floor whenever i bump it by accident

Hogging out the holes, they were cleaned up and fitted to the tubing nicer than this picture
20210513_205504 by Dan Haas, on Flickr

20210514_165037 by Dan Haas, on Flickr

When i first welded up the runners to the big sweeping piece, it looked alright, but it didnt seem finished, so for aesthetics, i made another pass on each tube so i could have enough material to kind of blend the tubing together how i was orignally imagining it. still alot left to do, but after a few hours with some carbide bits and flap discs, it started to look better.
The last tube was sort of a concession due to space restrictions, but i'll take being reasonably happy with 7 out of 8. I have no idea about flow and im awful at math, this is an amalgamation of having a long obsession with Brooklands era/ 20s-30s race cars and the big sweeping headers they'd make for airplane engined cars and the like :dunno::lol:

Dont inspect too closely, its still a work in progress and im ordering some small sanding bits to pretty it up a bit

20210515_130831 by Dan Haas, on Flickr

20210515_131015 by Dan Haas, on Flickr

20210515_131005 by Dan Haas, on Flickr

Also looks like im getting my rear shocks rebuilt. they build pressure and tension, but are leaking at the joint, and one of them was questionably building spring tension. Theres a local place that does them, so i will stop by there sometime

20210509_101223 by Dan Haas, on Flickr

And since i'd like to start body work sooner than later, i want to be able to close the trunk and doors, so instead of trying to find a locksmith to do it on my day off, i bought a Curtis model #15 key clipper, and the associated cam and carriages to do GM cars from 1935 through 1966, and ford cars from 1952 though sometime in the mid 60s, so i can do both the buick and edsel keys. Im still waiting on some code books so i have really given a try yet, but i bought extra keys since im sure i'll mess up a few times figuring it out

2021-05-05_06-10-00 by Dan Haas, on Flickr

The GTO is also at the paint shop, sounds like its going to be a version of the 60s chevelle maroon color rather than the brighter red is was before. i havent really heard many updates on it or when its coming back. No news on the Edsel, though we did get some motor mounts that seem to have been made for this. 80s-early 90s Ford f250/F350 big block mounts fit perfectly into the original engine mounts in the crossmember, and were alot cheaper than the aftermarket swap mounts for similar yr ford cars, and have rubber isolators unlike the aftermarket ones, which were only steel.
 

Kev442

Well-known member
Joined
Jan 15, 2009
Messages
5,386
Location
Wi
Finishing that exhaust header is a pretty big step finished. I hope it was somewhat enjoyable to do.

I hadn't realized the Plymouth was subframed.

The pickup is sooo close. Probably felt pretty good to hear it run and idle correctly again.
 
OP
S

Stooge

Well-known member
Joined
Mar 24, 2013
Messages
3,533
Location
South Shore, MA
Thanks guys
Yup, plymouth has a cut out mustang clip, and had ridetech shockwave air bag integrated shocks, but is now coilovers. Theres going to be some body cutting to change the taillights and license plate box in the trunk, and theres a good bit of bondo on that car so it should be intersting to see how that goes and what condition the trunk area is really in.

Making the header wasnt so bad, and i like how its coming along, still some more sanding to do to get it where i want it. I think if i was doing it again, or if theres another tubing project in my future, i'd like to get some modest tube notching set up, going in with a flap wheel and grinder after using a chop saw to cut the angles got old, and could have been a little more precise.

I was talking to my buddy that owns the paint and powdercoating shop the other night about what to coat the headers and eventually the intake with. i'd sort of like to see whats out there for a ceramic polished finish maybe for the intake and maybe the header too, though id like to get the header coated with something before it starts to flash rust. Maybe black header and polished intake?

the truck is my leisurely it'll-get-done project!
 

BORING HOP YARD

Well-known member
Joined
Jan 13, 2007
Messages
1,101
Location
Boring Oregon
Hey Dan, I use these guys for ceramic coating but there local to me close to the Portland area.
I've had headers and valve covers done by them.
The web site has some information that you might find useful.
Make sure they coat both the inside and the outside, that's what these guys said and did.
http://finishlinecoatings.com/us/faq/
http://finishlinecoatings.com/
Good luck on your quest!
 
OP
S

Stooge

Well-known member
Joined
Mar 24, 2013
Messages
3,533
Location
South Shore, MA
Black header, silver intake.

Thats what im leaning towards, though a chrome'ish finish on the header along with the matching intake could look pretty spiffy

Hey Dan, I use these guys for ceramic coating but there local to me close to the Portland area.
I've had headers and valve covers done by them.
The web site has some information that you might find useful.
Make sure they coat both the inside and the outside, that's what these guys said and did.
http://finishlinecoatings.com/us/faq/
http://finishlinecoatings.com/
Good luck on your quest!

Thanks! have you ever gotten the chrome finish done? i've had other v8 headers ceramic coated black, but never the shiny polished finish, and i dont know what kind of prep is needed for that type of fiish.

I dont know how long they've been there for, but i noticed this place i drive by all of the time, in an industrial park all of 10minutes away from me https://www.htcracing.com/aboutus.htm i was going to ask my buddy with the powdercoating shop if he's heard of them. surprisingly when i was talking to him yesterday and asked what he would use, he suggested some stuff from Eastwood so that if i needed to make a change or it got scratched, or wanted to do some more of the exhaust parts other than just the header, it could be touched up without having to be stripped/ sandblasted, as well as being cost effective, (he said he would coat them for free outside of material, but i know he's swamped and i try not to call in friend favors if i can help it). Maybe for the intake, we'll do something a little fancier since it will be more pronounced and visible. Im fine with the Eastwood stuff, and im an alliance member over on the HAMB, so a little discount doesnt hurt. A pint of the the satin black hi temp paint and a few cans of the inner hi temp paint, with a hose attachment to get into the tubes and crevices, are on their way and i should have them by the weekend so maybe we'll get to see how it looks in a few days!
 
To avoid these ads, REGISTER NOW!

BORING HOP YARD

Well-known member
Joined
Jan 13, 2007
Messages
1,101
Location
Boring Oregon
Thats what im leaning towards, though a chrome'ish finish on the header along with the matching intake could look pretty spiffy


Thanks! have you ever gotten the chrome finish done? i've had other v8 headers ceramic coated black, but never the shiny polished finish, and i dont know what kind of prep is needed for that type of fiish.

I dont know how long they've been there for, but i noticed this place i drive by all of the time, in an industrial park all of 10minutes away from me https://www.htcracing.com/aboutus.htm i was going to ask my buddy with the powdercoating shop if he's heard of them. surprisingly when i was talking to him yesterday and asked what he would use, he suggested some stuff from Eastwood so that if i needed to make a change or it got scratched, or wanted to do some more of the exhaust parts other than just the header, it could be touched up without having to be stripped/ sandblasted, as well as being cost effective, (he said he would coat them for free outside of material, but i know he's swamped and i try not to call in friend favors if i can help it). Maybe for the intake, we'll do something a little fancier since it will be more pronounced and visible. Im fine with the Eastwood stuff, and im an alliance member over on the HAMB, so a little discount doesnt hurt. A pint of the the satin black hi temp paint and a few cans of the inner hi temp paint, with a hose attachment to get into the tubes and crevices, are on their way and i should have them by the weekend so maybe we'll get to see how it looks in a few days!
I have gotten the chrome finish on the headers and the valve covers, Let me see if I can get a picture posted.
 

xtremek

Well-known member
Joined
Apr 13, 2012
Messages
11,603
Location
St. Johns, Mi
For something as nice as the Buick, I'd let the professional powdercoaters do it. The Girlfriend on the other hand, just gets rattle cans. After all she is a just a hard working woman.
 
OP
S

Stooge

Well-known member
Joined
Mar 24, 2013
Messages
3,533
Location
South Shore, MA
For something as nice as the Buick, I'd let the professional powdercoaters do it. The Girlfriend on the other hand, just gets rattle cans. After all she is a just a hard working woman.
Which ones the girlfriend, the truck? The edsel? The plymouth? The equinox? I think the intake will get the fancy treatment, both for aesthetics, since it will more prominently seen, and since its feeding into the engine, any potential coating material failure on the inside would be assumedly less with a professional application. the exhaust will be a home jobber, because its going to be black and is just a header, keeps costs lower, and isnt it funner to do as much of the work yourself?? Plus this was delivered surprisingly quick
20210521_054640.jpg

And the new flanges for the 2 barrel carbs from Hells Gate Hot rods, same company i bought the engine side exhaust and intake flanges from. Im going to break out the cardboard and brown paper and get some measurements and a "good" plan for the intake.

(Actual new phone last week so pictures should look a little nicer than the 5 or 6yr old phone camera pictures!)
20210521_054305.jpg
Still waiting for my frontier.com email to receive the pictures from my phone, sent a test message and still a no show.
I know the feeling! No rush, it will be a bit before the intake will be anything to see, but polished/shiny with black exhaust will be a good combo i think . I know my buddy has done chrome powdercoat before and looked good, but im not too familiar with the jet coat stuff, but with the close proximity the intake will be too the hot exhaust, its not a bad idea to go for
 

xtremek

Well-known member
Joined
Apr 13, 2012
Messages
11,603
Location
St. Johns, Mi
My apologies, the Girlfriend is the '82 c30 I'm bringing back from the dead. If you powder coat the inside of the intake, how're you going to give it texture?
 

BORING HOP YARD

Well-known member
Joined
Jan 13, 2007
Messages
1,101
Location
Boring Oregon
Here you go, The car was just started road testing before it was put away for the winter so its a little dirty.
Let me know if you need anything.
Greg
 

Attachments

  • IMG_20210520_152851121.jpg
    IMG_20210520_152851121.jpg
    2 MB · Views: 28
  • side'.jpg
    side'.jpg
    314.8 KB · Views: 27
OP
S

Stooge

Well-known member
Joined
Mar 24, 2013
Messages
3,533
Location
South Shore, MA
My apologies, the Girlfriend is the '82 c30 I'm bringing back from the dead. If you powder coat the inside of the intake, how're you going to give it texture?

Like to give it texture to aid in air/fuel turbulence and keep from puddling? I didnt say this was a well thought out plan! Maybe the inside will be uncoated since id also hate to have the gas cause a coating failure and **** it into the engine

Here you go, The car was just started road testing before it was put away for the winter so its a little dirty.
Let me know if you need anything.
Greg

That looks really good! Did you have to do anything special with the surfaces prior to it, like polishing it or anything? Id be very happy if the intake could have that sort of finish, thanks for the pictures!

A whole lot of hours this weekend with a few die grinders and sanders getting the header pretty. Not perfect but for an exhaust header, it will do its job and look presentable enough i think. The inside of the tubing runners are fully welded inside to the flange, and outside and ground down to blend into the flange. Coated inside with the eastwood interior exhaust coating (most of which i dumped on the floor when i flipped it over) and sprayed the exterior satin black through a gun, though its supposed to darken up when its cured

20210523_135431.jpg

20210523_144343.jpg

20210523_144409.jpg
 
Last edited:

xtremek

Well-known member
Joined
Apr 13, 2012
Messages
11,603
Location
St. Johns, Mi
The pics won't load completely for me (I'm guessing an internet issue on my end), but what I can see looks really good.
 
OP
S

Stooge

Well-known member
Joined
Mar 24, 2013
Messages
3,533
Location
South Shore, MA
The pics won't load completely for me (I'm guessing an internet issue on my end), but what I can see looks really good.
Drat! I did try attaching them through the forum on my phone rather than using flickr. Maybe i have some new forum set up learning curve

Does this work?? (Truck someone was unloading this morning at the car club out front)
20210523_110428.jpg
 

xtremek

Well-known member
Joined
Apr 13, 2012
Messages
11,603
Location
St. Johns, Mi
I'm at least 85% sure the issue is on my end. The large picture size, coupled with my super slow internet is going to cause a little heartburn until I figure a work around.
 

Kev442

Well-known member
Joined
Jan 15, 2009
Messages
5,386
Location
Wi
Pictures are fine. They are slow to load on GJ's end as I have 100mbps and they still took awhile. Things are looking good!
 

BORING HOP YARD

Well-known member
Joined
Jan 13, 2007
Messages
1,101
Location
Boring Oregon
Your Header came out great!
The company that I used also did the prep work before coating, not sure what media was used.
The valve covers had lots of metal work done, I blended out and sand blasted my welds to get them smooth to assure a good finish after coating.
The headers had a very small amount of surface rust, this was a tight engine swap and I wanted to make sure the headers were perfect before coating them.
FWIW
On the last 2 intakes that I have done, one new and one very modified I used the highest quality clear wheel paint.
The new one was prepped by washing with a heavy degreaser making sure it didn't turn dark then shot with clear.
The other was blasted, etched with aluminum brighter "napa brand" scrubbed down with Dawn dish soap, set in the sun to dry and get warm, then clear coated. I would like to say both look great and they do but, both are still in final stages of getting back on the road so they don't have very many long heat cycles on them.
 

BORING HOP YARD

Well-known member
Joined
Jan 13, 2007
Messages
1,101
Location
Boring Oregon
I should also add that you can make a steel manifold come close to looking like a aluminum one.
Prep the steel well and give it a good shot of primer, scuff with scotch-brite
Get a can of "aluminum" paint and give it a good coat but no runs.
Once the aluminum flashes off clear it with a good quality clear or semi clear.
Sorry if everybody all ready knows this, we used to do this when detailing cars to flip back in the day.
I have seen this done with Aluminum, Stainless and Magnesium paint and then clear coated.
 
OP
S

Stooge

Well-known member
Joined
Mar 24, 2013
Messages
3,533
Location
South Shore, MA
Thats been sort of the plan, and why the jet coat seemed appealing, to give it maybe a cast or polished feel to it. I was toying with the idea of trying to make it out of aluminum, but i have done very little aluminum welding and even less what i would be proud of, and where it needs to be a little structural and support some weight, and stay together, im not super confident in it, so steel it is for now, and maybe i'll try my hand at making an aluminum one down the road.

Got the GM key code book last night, and finally got to play with my new to me Curtis #15 key clipper. Worked great, and was successful first try and made a few of both the trunk and door keys. thanks to @jeffmoss26 for pointing me in the right direction on where to look for this stuff!

Now i'll be able to shut and latch the doors and trunk so i can start body work soon
20210524_205945.jpg
 
OP
S

Stooge

Well-known member
Joined
Mar 24, 2013
Messages
3,533
Location
South Shore, MA
Cool job on the keys. Was it hard?
Honestly, I couldnt make sense of the tool at first, like i knew how it was supposed to work but loading the key and setting it, but when i actually sat down last night with the book and stuff, i had the 'Oooh, thats how it works, im an idiot' i tried attaching a video of it, but it was too big, so i just uploaded it to an unlisted youtube, i dont know if it will work

 
OP
S

Stooge

Well-known member
Joined
Mar 24, 2013
Messages
3,533
Location
South Shore, MA
Everything is out there if you wait long enough...

I saw those those this morning and im still hemming and hawing over them. the guy who has them listed also runs a 1937,1938 Buick facebook page im on and have been tempted to message him. Its not a bad deal, they dont match the seat but not too far off, but the surprise $600+ it would cost to get them from Wisconsin to mass might not be in the toy money piggy bank this week. I think last time i had something shipped fastenal it was around $150 or so but that was a few yrs ago.
I'll be thinking it over until theyre sold so i can kick myself later for not acting on them ;)
 
To avoid these ads, REGISTER NOW!
Top Bottom