To avoid these ads, REGISTER NOW!

Stooge's longer term car projects

OP
S

Stooge

Well-known member
Joined
Mar 24, 2013
Messages
3,533
Location
South Shore, MA
Started on trying fill the gap between the trunk and afternarket rear deck lid. The new lid was undersized in a few dimensions of the stamping around the weather channel/step down for the trunk surround, and with the V groove around the rear windshield which places the deck lid, not alot of adjustment available and subsequently causing a big gap between the trunk. Trying to add sheet metal to the edge of the trunk and rolling the edge to look stock seemed like it would be pretty difficult to getto look right over the large width and curve of the trunk, so im trying it with mild steel rod. Maybe 3/16" but i atleast didnt buy a long enough of a piece so i couldnt finish it , but i'll be adding another section up until the corners where the tape is.


Need to stop by the hardware store and grab another stick of steel rod and hopefully get this finished tomorrow
 
To avoid these ads, REGISTER NOW!

nine4gmc

Well-known member
Joined
Mar 24, 2012
Messages
14,357
Location
Dallas
Nice, great idea to just use rod there, rolling that edge would have been a nightmare!


Sent from my iPhone using Tapatalk
 
OP
S

Stooge

Well-known member
Joined
Mar 24, 2013
Messages
3,533
Location
South Shore, MA
Some catch up from the last week or so. Finished adding the filler pieces to the edge of the trunk, worked pretty good, few spots need a little massaging to get the gap to be uniform, but its alot better than it was
I added a little extra to the end of the corners so i could cut it down a little more exacting.


Probably a waste,but i threw some sound deadening on the backside of the dash just incase it sounds tinny or something. Also did the inside of both doors with it. The floor was already covered in several layers of a different brand, but the dash and doors get the budget brand.


Gave the stock plastic interior trim that in still using a little rattle can refurb wih duplicolor vinyl trim black. I dont know what the longevity of it will be, but i had a case of cans i got from a speed shop that was closing down. I'll probably eventually make some homemade door cards, but in the meantime i wanted to pretty things up a bit. Also did a quick single stage black on the interior side of the doors, the A pillars and a few spots under where the dash will be. Im missing some of the stock door interior trim pieces, if theyre not too much or if i find someone with extras i'll use them, but some of the repro stiff gets expensive quick!


And started fitting the console and seats to see where i have to trim back parts of the carpet, gives me a little much needed motivation to see some of this coming together!


Really going to try and take advantage of the long weekend and see if i can have both the dash and console permanently installed and hopefully most everything working by the end of the weekend.

And i need to figure out how to get those lame headrests with the little mountain scene on them out of the seats, doesnt seem to be any button or anything that i can see. 2000'ish s10/blazer seats
 
OP
S

Stooge

Well-known member
Joined
Mar 24, 2013
Messages
3,533
Location
South Shore, MA
And the first test fit of the painted parts, few little adjustments to the side holding dash mounts and the carpet needs to be trimmed more since the console is sitting a little too high, but nothing major


OP
S

Stooge

Well-known member
Joined
Mar 24, 2013
Messages
3,533
Location
South Shore, MA
Some combination of jamming a micro screwdriver, a piece of scrap sheet metal, some pinching and angrily ripping at finally seemed to work to get these damn headrests out! No such luch of a pinhole release and i couldnt exain how to do it if i tried. Looks better i think!


Also started figuring out to mount the shaved cowl without having the plastic thing underneath since it doesnt seem to fit anymore and got the windshield, roof and cab ready for some paint so i can put a windshield in and seal off the inside.

Finally started on the gto front cowl/ lower windshield lip. A real mess of brazing, rivets, screws, bondo, putty and rtv for good measure. The underside structure is going to need some repairs as its just mostly rust, but im trying to get the replacement piece fitted and figure out what will still need to be cut out before i start rust repairs. Going to be a real pain to weld the new one in, the dash sheetmetal is paper thing, putted and has some brazing still around it.might have to dust off the tig or possibly invest in a new tig machine.


The end result


OP
S

Stooge

Well-known member
Joined
Mar 24, 2013
Messages
3,533
Location
South Shore, MA
Well since my thread got pretty messed up, im going to start posting some of the more interesting/ standout build pictures while I maybe work on rebuilding the thread but so far just with the first page, its a pain in the ***

20160529_160505 by Dan Haas, on Flickr


49'ish ford gauges and clock, still all 6volt positive ground


2017-07-20_08-08-52 by Dan Haas, on Flickr

2017-07-20_08-20-22 by Dan Haas, on Flickr

2017-07-20_08-12-46 by Dan Haas, on Flickr

20150421_175208 by Dan Haas, on Flickr

2017-07-20_08-13-23 by Dan Haas, on Flickr

20150627_134018 by Dan Haas, on Flickr

20150524_095212 by Dan Haas, on Flickr

20150627_133149 by Dan Haas, on Flickr


Mix of Gold, Brown and Rootbeer metal flake over HOK gold base. bottom is el cheapo deluxe Shoreline Beige single stage from TCP global


2017-07-20_08-23-06 by Dan Haas, on Flickr

2017-07-20_08-24-12 by Dan Haas, on Flickr

2017-07-20_08-23-44 by Dan Haas, on Flickr

2017-07-20_08-24-58 by Dan Haas, on Flickr

20161001_160515 by Dan Haas, on Flickr

20161001_160616 by Dan Haas, on Flickr

20161001_160819 by Dan Haas, on Flickr

Instasize_0528141548 by Dan Haas, on Flickr

Instasize_0528141824 by Dan Haas, on Flickr

Instasize_0528141616 by Dan Haas, on Flickr

Instasize_0528141750 by Dan Haas, on Flickr

Instasize_0528141644 by Dan Haas, on Flickr

2017-07-18_10-54-23 by Dan Haas, on Flickr


And how its sitting right now

Got a new hood last week , and finishing bodyworking the sectioned/ lowered fenders before it all gets pulled apart for paint, hopefully paint in the next 2 weeks if I can get some stuff done.

2017-07-24_07-22-11 by Dan Haas, on Flickr
 
Last edited:
OP
S

Stooge

Well-known member
Joined
Mar 24, 2013
Messages
3,533
Location
South Shore, MA
I figure ill add is some bits of the GTO build since that's all wiped out now too. I've been working on for someone for around 2yrs I think now , although there was a lengthy hiatus halfway through

66 GTO, original 389 with a 4speed. it had been thoroughly messed with sloppy **** repairs and had a good amount of rot and every little project has turned into a big to do with uncovering more old repairs. the 66 also seems to be quite the orphan for repair sheetmetal so some stuff had to be made from scratch, primarily the entire rear sail panels. still working on this but its winding down as I think im only doing the metal work, not the body and finishing work.

IMG_20141130_113958_300 by Dan Haas, on Flickr

IMG_20141130_114206_500 by Dan Haas, on Flickr

IMG_20141130_114027_277 by Dan Haas, on Flickr

20150404_133830 by Dan Haas, on Flickr

20150404_133810 by Dan Haas, on Flickr

20150404_133758 by Dan Haas, on Flickr

20150426_093548 by Dan Haas, on Flickr

20150426_094952 by Dan Haas, on Flickr

20150430_164311 by Dan Haas, on Flickr

20150503_101332 by Dan Haas, on Flickr

20150510_105541 by Dan Haas, on Flickr

20150516_141428 by Dan Haas, on Flickr

20150530_141019 by Dan Haas, on Flickr

20150605_183918 by Dan Haas, on Flickr

20150606_111118 by Dan Haas, on Flickr

20150606_114940 by Dan Haas, on Flickr

20150718_085500 by Dan Haas, on Flickr

20150802_111228 by Dan Haas, on Flickr

20150802_121048 by Dan Haas, on Flickr

20151010_113341 by Dan Haas, on Flickr

20160101_122156 by Dan Haas, on Flickr

20160306_155523 by Dan Haas, on Flickr

20161029_084723 by Dan Haas, on Flickr

20170331_192103 by Dan Haas, on Flickr

20170513_102936 by Dan Haas, on Flickr

20170520_144752 by Dan Haas, on Flickr

20170401_192827 by Dan Haas, on Flickr

20160530_120545 by Dan Haas, on Flickr
 
OP
S

Stooge

Well-known member
Joined
Mar 24, 2013
Messages
3,533
Location
South Shore, MA
I have a sort of deadline along with my own made up time of when I wanted the truck drivable, (first it was by my birthday in September) but now, Massachusetts is changing the way they do state inspections in October, and rather than find out how strict its going to be or whats changing, I'd rather have it done before the change rather than after.


after a week or 2 of trying to get everything pretty straight, I was aiming to start painting the front half of the truck this weekend. I was contemplating waiting and doing the bed at the same time, but the front was close and I didn't hold up the rest of the stuff I could get done as the bed still needs work, but also space is an issue and I don't have enough of it to blow apart the front end and bed with enough space to paint around them, although im sure I could've just kicked the gto out of the garage for the day but it was kind of drizzly in the morning.


only 1 or 2 problems came up during it, first was the reducer for the high build primer had gelled up and was unusable, ( I put on an extra coat or 2 of sealer primer to make do as I didn't want to push it back another week). second was the passenger side fender was all masked off, cleaned and sitting on a foldable work stand and I was across the shop mixing primer and the fender somehow slipped off the stand and must have given it a good shock and caused a crack in some filler so i'll need to fix that and either paint it when I paint the bed, or just on its own some night. I also hadn't really intended on painting the cab but I thought it would be a good time to do it and it was pretty close already.


2017-08-14_07-25-36 by Dan Haas, on Flickr


2017-08-14_07-25-23 by Dan Haas, on Flickr


Cheap single stage artic white from TCP Global. Far from perfect, and theres a spot or 2 im going to touch up next time I have some paint mixed up, but its presentable and gets it on the road a little sooner. theres a good chance it will be getting painted again if I keep it so it was always planned as being an interim color. Plus I'd like to drive it a lot and don't want to be too **** about getting it marked up from use


Instasize_0813101211 by Dan Haas, on Flickr


20170813_100523 by Dan Haas, on Flickr


Instasize_0813101115 by Dan Haas, on Flickr
 
OP
S

Stooge

Well-known member
Joined
Mar 24, 2013
Messages
3,533
Location
South Shore, MA
i was on vacation last week and stayed pretty busy! the first weekend was flying out to Iowa to pick up the 1958 Edsel Villager station wagon a buddy of mine bought on ebay and drove 29hrs straight back with it on the back of a trailer, labor day was just spent poking around the new car, getting it off the trailer and stuff.

20170902_123544 by Dan Haas, on Flickr

20170902_123718 by Dan Haas, on Flickr

20170902_123851 by Dan Haas, on Flickr

20170902_123725 by Dan Haas, on Flickr

20170902_124037 by Dan Haas, on Flickr

2017-09-11_08-50-33 by Dan Haas, on Flickr

20170904_162021 by Dan Haas, on Flickr

His wife hasn't warmed up to it yet, but the kids seem to like it

20170904_151716 by Dan Haas, on Flickr

20170904_153503 by Dan Haas, on Flickr

Tuesday was spent messing around with another buddy's 64 impala SS that we pulled the engine out of awhile back and its getting ready to go back in maybe this week. original 327, just put the fuelie hump heads back on, with l79 cam, lifters, etc.

20170905_141214 by Dan Haas, on Flickr

Wednesday, another buddy and I drove up to WAY upstate New York, ( the Canadian boarder was down the street, and he even sent me an email to make sure I didn't miss his street or I'd be in for a headache at security and im not allowed in Canada last time I went) to pick up my new project, a 1937 Buick Century Sports coupe.
Its blown apart but whoever took it all apart, was pretty **** about bagging and tagging almost everything! Theres nothing on or with this car that doesn't belong to it, super original and the sheetmetal is immaculate for the most part. few spots on the bottom of the door/ rocker corners and some spots on the floor, but nothing crazy. there is no engine or trans but there is a vin and a clean Massachusetts title!

it's massive, has 126" wheelbase, without the bumpers, the body is over 16ft and it just barely fit on the 12ft trailer. from the windshield to the front grill is over 6ft and the headlights are 20" long for reference.

20170906_150216 by Dan Haas, on Flickr

20170906_150307 by Dan Haas, on Flickr

20170906_152328 by Dan Haas, on Flickr

20170906_155630 by Dan Haas, on Flickr

20170907_095527 by Dan Haas, on Flickr

20170907_095712 by Dan Haas, on Flickr

20170907_100601 by Dan Haas, on Flickr


20170907_100203 by Dan Haas, on Flickr


I don't think I didn't any car things on Thursday!

Friday and Saturday was spent doing body work and painting truck bits and Sunday I started working on the bed mounts, gas tank stuff, running the taillight wiring and putting the exhaust back on.

the white is super bright in person out in the sun

20170909_102921 by Dan Haas, on Flickr

20170909_102929 by Dan Haas, on Flickr

Because I have no space between the bed floor and the gas tank, I found a rubber grommet for some year mustang, modified it to fit the Hagan gas door stuff and drilled a new hole for it after shaving the stock blazer/suburban neck.

20170910_121037 by Dan Haas, on Flickr

20170910_120738 by Dan Haas, on Flickr

20170910_122020 by Dan Haas, on Flickr

20170910_122026 by Dan Haas, on Flickr

20170910_122036 by Dan Haas, on Flickr

And threw the bed back together to mark out where I would drill the holes for the bed mounts. I still need to paint a fender and the other bedside, not enough space to paint everything at once.

20170910_143826 by Dan Haas, on Flickr

20170910_143858 by Dan Haas, on Flickr
 
Last edited:

kbs2244

Well-known member
Joined
Nov 11, 2006
Messages
14,065
I am not a fan of the super lowered style, but that truck is sweet!

Keep us up to date on the Buick.
I hope to see more restro than rod for it.
The factory guys got the look right from the start.
 
OP
S

Stooge

Well-known member
Joined
Mar 24, 2013
Messages
3,533
Location
South Shore, MA
Thanks! Im pretty excited about the buick, its exactly what i wanted in a project; interesting, cheap, a good frame and paperwork!
Plans for it are still up in the air, but its going to be fairly traditional. Lowered a bit, black steel wheels,small caps with a wide white or black wall, probably black outside without going crazy on body work, and i've had an art deco'ish style console/wrap around seat divider planned in my head for a bit that i might try to make work. Also have a few matching, old Stewart Warner gauges that i might try and make a complete set out of to use since the stock dash needs a rebuild.
Undecided if im going to seriously look for a straight 8, sort of leaning towards a buick nailhead or a big straight 6 like a 292 or gmc 302. I figure a nailhead or straight 6 will be around 500 pounds lighter than the straight 320 and trans combo, (1100'ish pounds) so it can be a fairly mild engine and should still be fine. theres also a probably free 454 sealed up waiting to be used for something but i dont know if i want to go that way with it. Probably a 4 speed if i can make it work within a budget, and the suspension and steering will get cleaned up, probably sand blasted and painted, with new rubber but no plans to replace it all with an aftermarket setup.
 
To avoid these ads, REGISTER NOW!

xtremek

Well-known member
Joined
Apr 13, 2012
Messages
11,603
Location
St. Johns, Mi
My $.02 would be build a hotrod straight 8. That'd be challenging, but hey you seem like someone who likes a challenge. Looking forward to the new adventure
 
OP
S

Stooge

Well-known member
Joined
Mar 24, 2013
Messages
3,533
Location
South Shore, MA
Awesome metalwork!

Hey thanks! I appreciate it!

My $.02 would be build a hotrod straight 8. That'd be challenging, but hey you seem like someone who likes a challenge. Looking forward to the new adventure

I like to think of it as fumbling through bad decisions! :lol_hitti

the straight 8 would be the first choice, but im just not finding many available for sale, ( there is one for sale on ebay for $600'ish but it looks like its been sitting in a lake). Aiming for a later 40's/early 50's Buick 320 for higher compression and some improved internal changes and it seems to be something to mate it to an overdriven 700r4 since the straight 8's don't seem to like to rev too high. Doesn't seem like there were a lot of speed parts for them without getting into custom made stuff. There aren't a lot of buick nailheads for sale around here though either, so I guess either one is worth looking for!

Truck news, I finally got my windshield delivered yesterday that I probably ordered a month ago. I was just going to drop it off at my shop and recruit a buddy to help this weekend, but I got curious and just did it myself. really easy for never having done one before and with just some cheap nonmarring tools and suction cup handles from either amazon or HF. Still need to put the locking strips in the front and back windshields, I have the tool for it, I just haven't done it yet.

20170911_204108 by Dan Haas, on Flickr
 

WWIIFAN

Member
Joined
Jan 5, 2017
Messages
12
Location
Salina, Kansas
I have installed many of those windshields and back glass's over the years. When ya go to installing the locking strip. Use some dish soap and water in a spray bottle. Start in the bottom center and slowly work around. When ya get close to finishing...push the locking strip back a bit in the direction you came from. This stuff will shrink over the years. This will allow you some extra. Then cut and install the stainless end cover.
 

Chicken

Well-known member
Joined
Jan 3, 2015
Messages
129
Location
NC
I like what i see, unfortunately can't se it all due to photobucket..truck looks great.
 
OP
S

Stooge

Well-known member
Joined
Mar 24, 2013
Messages
3,533
Location
South Shore, MA
I have installed many of those windshields and back glass's over the years. When ya go to installing the locking strip. Use some dish soap and water in a spray bottle. Start in the bottom center and slowly work around. When ya get close to finishing...push the locking strip back a bit in the direction you came from. This stuff will shrink over the years. This will allow you some extra. Then cut and install the stainless end cover.

I ended up frequently dipping the nonmarring glass tools into a cup of car soap and kind of coating the gasket and glass as I went, and it sounds like i'll be using it for the locking strip too, thanks! :thumbup:

I like what i see, unfortunately can't se it all due to photobucket..truck looks great.

Yeah, I had a little motivation early on to go through and fix it, but i'll probably just post some of the older ones to the end of this thread, and maybe start a new one when I start on the buick and edsel, as those seem like they'll be my next Longer term car projects and this thread is too much of a mess now.

Some pictures of how I built the dash. Started out with some cereal box cardboard and some scrap industrial shelves. I had plans of using a compass or ruler, but I just drew it with a sharpie

IMG_20140913_094713_024 by Dan Haas, on Flickr

IMG_20140913_095828_084 by Dan Haas, on Flickr

IMG_20140913_115436_248 by Dan Haas, on Flickr

most of this got cut out after it was skinned

IMG_20140913_122711_653 by Dan Haas, on Flickr

IMG_20140914_121306_584 by Dan Haas, on Flickr

IMG_20140920_134054_641 by Dan Haas, on Flickr

IMG_20141011_145520_182 by Dan Haas, on Flickr

IMG_20141018_131740_837 by Dan Haas, on Flickr

IMG_20141102_120312_051 by Dan Haas, on Flickr

IMG_20141130_103343_416 by Dan Haas, on Flickr

Sectioned and tubbed front fenders to match the bedside wheel opening, easier to see in one of the new painted pictures a few posts ago


IMG_20130730_184330_643 by Dan Haas, on Flickr

IMG_20130730_192558_527 by Dan Haas, on Flickr

IMG_20130731_200829_052 by Dan Haas, on Flickr

IMG_20130804_111537_919 by Dan Haas, on Flickr

IMG_20130810_095904_111 by Dan Haas, on Flickr

20170910_143826 by Dan Haas, on Flickr

$25 tractor supply trailer fender


IMG_20130813_193522_769 by Dan Haas, on Flickr


I even got fancy once! windshield washer jug


20160120_182133 by Dan Haas, on Flickr

20160120_182445 by Dan Haas, on Flickr
 
OP
S

Stooge

Well-known member
Joined
Mar 24, 2013
Messages
3,533
Location
South Shore, MA
Havent really been updating much, but its been full bore on a lot of the boring stuff on the truck the last month or 2 to get it driving, and while it may not be 'finished', its driving!

20171004_190723 by Dan Haas, on Flickr

20171004_190808 by Dan Haas, on Flickr

20171006_192005 by Dan Haas, on Flickr

got it moving Friday night to swap a few cars around in the garage

20171006_193543 by Dan Haas, on Flickr

and out and about the next day after another 10hrs of buttoning things up! still a few things to address/ adjust, but nothing major, just things you can only set as a baseline until its out driving. it's loud and pretty rowdy , but not major calamities or catastrophic failures, so im calling it a success!

20171007_151043 by Dan Haas, on Flickr
 

pi_guy

Well-known member
Joined
Jul 27, 2014
Messages
2,815
Location
N/A
Looks interesting.
I will look for it when I am up there**.
Almost looks like the ride height is lower than some of the formula cars I have worked on.
Guessing it is not a winter car.

**Trying to get one more feeding at Jake's before they close in Nov.
 
OP
S

Stooge

Well-known member
Joined
Mar 24, 2013
Messages
3,533
Location
South Shore, MA
Two hips and a hooray. :bounce: Well done sir. :bowdown:

:beer: thanks! Its really snowballed over the years from what was going to be a simple little cruiser and parts getter, but its pretty surreal to actually be driving it after all this tme!
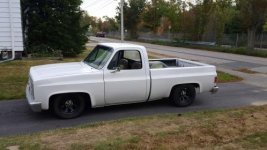
Looks interesting.
I will look for it when I am up there**.
Almost looks like the ride height is lower than some of the formula cars I have worked on.
Guessing it is not a winter car.

**Trying to get one more feeding at Jake's before they close in Nov.

Interesting works for me! Alot of it, the dynamic suspension, scratch built interior, etc was mostly done since i thought it was funny and wanted a learning project. Ride height is about 30% of full travel, but is driveable down to a fraction of an inch of the ground, road condition permitting.
*Accuair self levelling air management
*Tubular upper and lower control arms, delrin bushings (Porterbuilt)
*Tubular raised front crossmemeber (Porterbuilt)
*Converted to power rack and pinion from the old gm steering box
*adjustable triangulated 4 link with uniball style uppers

Fully Up, and it just looks like a very mildly lowered truck. Around 8.5" travel up front and the rear will get 13" of travel but is limited by the shocks to about 11"
 

Attachments

  • 7710.jpg
    7710.jpg
    26.5 KB · Views: 90

Kev442

Well-known member
Joined
Jan 15, 2009
Messages
5,386
Location
Wi
I'd like to say I spent hours stalking this out, but you have a link on page one of part two.:)

As too why I went to page one, I'll talk about it on two.
 
To avoid these ads, REGISTER NOW!
Top Bottom