To avoid these ads, REGISTER NOW!

Storage Unit Build Help...

swedevil

Active member
Joined
Apr 12, 2010
Messages
43
Started drawing designs for the garage to be redone today and realized that I'm not going to get anything in there redone WITHOUT having a storage unit where I can put the wife's christmas decor, childhood memories, and all the other junk she feels the need to keep. So before I do the garage, I've got to do a storage unit.

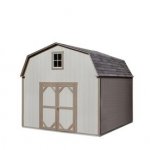
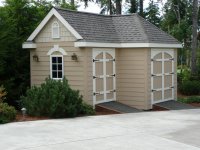
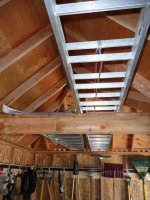
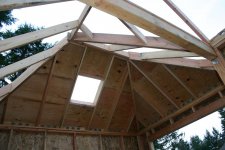
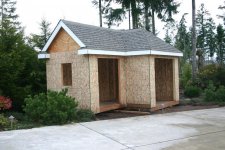
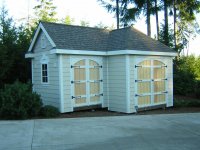
I'm looking for some help on it -wanting to build on my own from ground up. I'm thinking something like a 12x12 (size isn't set yet). Still looking for ideas on the layout and all, but I'm thinking something like one of the two below.

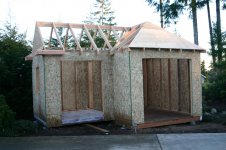
First thigns first - foundation! Should i lay concrete or just throw a wood base down? I've never layed concrete, so I'm not sure how hard it is for something this size, but I'll need to learn cuz we're adding a carport soon too! If you suggest concrete, give some advice PLEASE. If the shed is going to be 12x12, does the foundation need to be like 12 1/2 x 12 1/2 so theres a small lip (3 inches all the way around)? How thick? What type of concrete?

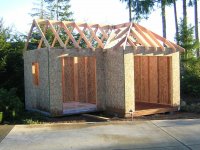
Second - Is it better to out your frame up and then concrete the frame in, or pour some concrete and then bolt the frame to the concrete?

Any suggestions on size, design on iside or out, materials to use, would all be greatly appreciated. This will be the first large projectI will be doing, so pictures will be taken for progress and braging rights!
 

Attachments

  • 095317600227lg.jpg
    095317600227lg.jpg
    6.5 KB · Views: 32
  • 095317601064lg.jpg
    095317601064lg.jpg
    6.5 KB · Views: 20
To avoid these ads, REGISTER NOW!

T1320T

Well-known member
Joined
Jun 16, 2010
Messages
162
Location
Indiana
Congrats on scoring a little garage space. I'm far from a concrete guru but you may want to think about installing anchor bolts in your concrete to fasten your new shed to.... if the shed enough frame to anchor to.
 

mmhouse

Well-known member
Joined
Aug 31, 2008
Messages
754
Location
Desert Southwest
I built mine on adjustable pier blocks so it can be leveled if necessary (not yet - 4 years) and could be moved if I ever wanted to. It's built to hold my utility trailer and garden tools in one side (10'x12') and power equipment in the other side (8'x8').
 

Attachments

  • DSCN1938.jpg
    DSCN1938.jpg
    157.4 KB · Views: 181
  • P1000537.jpg
    P1000537.jpg
    145.2 KB · Views: 178
  • P1000688.jpg
    P1000688.jpg
    147.7 KB · Views: 191
  • P1000694.jpg
    P1000694.jpg
    146.6 KB · Views: 157
Last edited:
OP
S

swedevil

Active member
Joined
Apr 12, 2010
Messages
43
I built mine on adjustable pier blocks so it can be leveled if necessary (not yet - 4 years) and could be moved if I ever wanted to. It's built to hold my utility trailer and garden tools in one side (10'x12') and power equipment in the other side (8'x8').

do you have more information on this one? Being that it would be hold mostly the wifes stuff (as the garage would then be fully mine!!) i think she would like a style like what you have there. I just don't think it looks good with a brick house! hmmm
 
OP
S

swedevil

Active member
Joined
Apr 12, 2010
Messages
43
I built a 12 by 16 at my old house, I did it modular style so I could take it down when I moved. I've yet to start putting it back up, but it is just stacked on the trailer waiting to be bolted back together ..

You can see some of the build here
http://s259.photobucket.com/albums/hh287/4StarCstms/Workshop/

that looks nice, but its WAY to big for what I'm thinking. Even the one above is to big, but would work cuz I tossed the idea of making two (one for storage of home stuff and one for storage of yard stuff).
 
OP
S

swedevil

Active member
Joined
Apr 12, 2010
Messages
43
Alright, that was easy, I'll use blocks rather then concrete. And I'm leaning towards the style that MMhouse posted. I really like that.

Is there a place online that you can get designs/plans or something?

What about electircity? Would you have to have a ground set up for this or could I run power lines from the current garage to that, since all it would require is a few lights.
 

Robertob

Banned
Joined
May 16, 2010
Messages
190
Location
Long Beach, CA
I built an 8x8 shed with my dad, you dont really need plans but if you look around online you can find some. Depending on how far it is you can string wire overhead for a light or two. Or dig a trench, all of that info is available online. We chose 8x8 so that two sheets of plywood would make an easy floor, though now plywood is so expensive I would use OSB.

We just built the floor out of 2x6 on 16 inch centers, 2x4 walls and rafters on 24 inch centers. 1/4 ply on the roof, shingles, cheap MDF siding. and a homeade door.
 
Last edited:

lupinsea

Well-known member
Joined
Mar 30, 2010
Messages
261
If this is to be something temporary. . . . why not just rent a storage unit for a few months during the build of your garage? There's a little hassle in packing up what you want to store and then the inconvenience of not having it "there" at your house. But you'd have to move the stuff anyways into a new shed on your property. Thisway it's just an intermediary step of putting into a truck first and driving to the storage place.

But a few months rent is going to be cheaper than a cheap storage shed. Especially if you're thinking of pouring a concrete floor.

And by renting you're not wasting time building a temporary storage unit, either. Just move your stuff into the rental unit and start building your garage.

And if you'll still have need for the additional storage after the garage is done, just build out a bit more garage. Heck, you can even subdivide the internal garage space and put in another exterior door so the crapstorage area is truely separate from the garage area.


Having said that, however, if you're still intent on a stand a lone storage unit for your yard figure out if it's going to be something temporary or permanent. And if temporary, how temporary?

If it's truly only for a few months you could either throw down some gravel and set up the shed kit on top of that with some stakes anchoring it down. Or you could build a wood floor on some pier blocks as mmhouse suggested above.

A concrete slab is going to be much more permanent. But here, too, how permanent. You could just pour a 4" thick slab on grade and be done with it. But ideally wood is separated 6-8" from grade. So for a bit more permanence you'd do a turned-down slab edge (the slab is 4" in the center but thickens to 8-10" or so at the edge). Might need a yard or two of structural fill to raise the floor up in the middle depending on site conditions.

Other considerations:

1. Access

Do you have direct access for the concrete truck to drop the concrete out of their chute on the back of the truck? The concrete trucks weigh 65,000+ lb. and need a firm road bed to keep from sinking in to your yard. And their chutes reach only about a 15 ft radius centered on the back of the truck.

If the truck can't drive directly up to the construction site then you probably have to set up a wheel barrow brigade. 2-3 wheel barrows (with 2-3 friends) shuttling the concrete from the truck to the pour site. And another 1-2 people helping to move the concrete around the form and screed it off.

2. Shape / Size = kit vs. custom build
The dimensions of the concrete foundation depend on the building that is going to be put on it. If you're buying a shed kit then you need to built it to the size of the kit. If you're coming up with your own design then you can make it any shape or size you want. . . just cut the wall lumber to fit the foundation. Typically, however, the outside face of the 2x studs line up with the outer edge of the foundation. The plywood / OSB wall sheathing that is installed next projects out from there.

For example: if it's a 12' x 12' foundation the wood stud framing will measure out 12' x 12'. And when your add the plywood/osb sheathing the dimensions increase to 12'-1" x 12'-1" (add 1/2" of sheathing per side). Add to that approximately 3/4" on each side for the thickness of the siding (depending on type of siding you're going with).

3. Cost
A poured concrete foundation is not cheap and will be more costly than a wood framed floor. So this expense area needs to be explored. Concrete ranges from $100 - $140 per cubic yard. If you buy from a ready mix truck they charge you for "missing" concrete if you order less than 9 cubic yards (9 cy). The missing cubic yards are called "short yards". Short yardage fees can range from $25-30. So, if you buy 2 cubic yard of concrete the charges would look like this:

2 cy x $100 / cy = $200

+

7 cy short yardage fee x $25 / short yard = $175

Total = $375 (for example)

For small amounts you can also look up short yard concrete specialist. These are a nitch concrete supplier specifically for 1-3 or 1-4 cubic yard orders. It cost more per cubic yard but you're not paying for the short yardage fee. So the bottom line is a lower cost for the smaller amounts of concrete. Plus their trucks are usually smaller and more maneuverable if you have tight site access. At about the 4-6 cubic yard range it's about a wash between the big ready mix trucks and any short yardage fees and the higher per-cubic-yard cost of the small load specialists.

One thing to look into, too, is that the small load specialist are probably more used to working with home owners and doing things on weekends. When I recently did the foundation work for my shed I talked to two ready mix places about a saturday delivery (since I work during the week, and so do my friends, er helpers). They said "maybe" for a saturday delivery. Depends on if they had enough other concrete going out that day to
make it worth while to bring in a weekend crew. This was too unpredictable so I went with the small yardage place that routinely schedules things on weekends for home owners. This way my friends could block out time to come over and help.

4. Estimating Concrete
It's a simple volume calculation to figure out concrete. . . .then add 10% waste factor for "who knows what" such as a lumpy ground. (better to have a little extra concrete than not enough. For example, 12' x 12' x 4" thick (.333 ft) = 48 cubic ft

48 cubic ft / 27 cf per cy = 1.8 cubic yards

1.8 cy x 10% = .18 cy waste factor

Total = 1.8 cy + .18 cy = 2 cy to order.

If you have a down turned edge, figure the area of the edge section and then multiply by the linear footage of the perimeter to get your volume.

5. Forming the Foundation
If it's a simple slab then you can do perimeter of 2x4's turned on edge to act as formwork and then pour the concrete in there. If you're doing a down turned edge then use 2x8's or 2x10 as appropriate for the thickness of the slab edge your going with. Now, a 2x4 isn't 4" thick so you'd hold it up off grade a little. To keep the concrete from oozing under the form just stuff some dirt at the base outside of the 2x4.

6. Anchoring the Foundation
I would use some 1/2" anchorbolts to tie the shed foundation into the concrete if you have a down turned edge (so there is enough embedment into the wet concrete). These could be wet set. Probably the easiest way to do it. Just jiggle the anchor bolts so the wet concrete will flow back around the anchor bolt.

Otherwise you could use some powder actuated nails. Or Tapcon concrete screws.
 

mmhouse

Well-known member
Joined
Aug 31, 2008
Messages
754
Location
Desert Southwest
do you have more information on this one? Being that it would be hold mostly the wifes stuff (as the garage would then be fully mine!!) i think she would like a style like what you have there. I just don't think it looks good with a brick house! hmmm

Sorry, there's no place to get a plan as I designed and built it myself. If you have any specific questions I'll me happy to answer them.

Quickly, for floor I used 4x6 treated beams (pier blocks set back about 18" from each end) with 2x6 treated joists 16" on center and 3/4" OSB T&G. Walls are 2x4 stud sheathed with 7/16" osb and hardiboard siding. Roof is 2x6 stick framed to get more storage height with 5/8" ply. Doors are 5/8" T-1-11 plywood siding with 5/4" trim. Got the hinges online and pulls from a blacksmith in Kentucky (found him online). Yes, it's overbuilt and not cheap.
 
Last edited:

nate379

Banned
Joined
Feb 2, 2009
Messages
7,279
Location
Palmer, AK
I would not say overbuilt. 2x6 is what I would consider min for a spanned floor like you have (vs being right on the ground or on skids)

The floor on mine is 2x8 12" O.C. and only 4ft spans between the skids. I figure if I had to I should be able to park a car in it.

Not done yet, but I have about $2000 into it so far. Will be another $1500 for trusses, roof sheating/roofing and the 2 doors.

Hoping to be able to keep the whole thing under $5000 all said and done.
 
Last edited:
OP
S

swedevil

Active member
Joined
Apr 12, 2010
Messages
43
I built an 8x8 shed with my dad, you dont really need plans but if you look around online you can find some. Depending on how far it is you can string wire overhead for a light or two. Or dig a trench, all of that info is available online. We chose 8x8 so that two sheets of plywood would make an easy floor, though now plywood is so expensive I would use OSB.

We just built the floor out of 2x6 on 16 inch centers, 2x4 walls and rafters on 24 inch centers. 1/4 ply on the roof, shingles, cheap MDF siding. and a homeade door.

I appreciate the input, but I want something that when people look back there, they wont say "ugh that looks like ****". So design plays as much a part as use for me - after all, wife has final approval...lol
 
OP
S

swedevil

Active member
Joined
Apr 12, 2010
Messages
43
Thats a heck of a lot of information lupinsea. Good information, but a lot of it is over my head. I think I'll stick with a wood/block foundation being that I don't know how to lay concrete and from reading up on it last night, it seems a little more difficult then I'm ready for at this time.

The building will be more permanant then temporary, and will be used to store garden tools on one side and 'storable' items on the other. This will leave the garage open to be used as a car storage/repair area and workshop.


@mmhouse - basically its one large storage with a wall down the middle to seperate the two sides?
 

mmhouse

Well-known member
Joined
Aug 31, 2008
Messages
754
Location
Desert Southwest
@mmhouse - basically its one large storage with a wall down the middle to seperate the two sides?

I left it open, but you could certainly frame a wall between the two sections. I just have a beam running there to tie the two sides together - it also provides a great place to lay my long ladders. You can see the beam in the photo below...

As you may notice from the earlier photos, there is also a step up to the smaller section. This was because the ground is sloped and I didn't want to have the one end way off the ground or have to dig below grade on the other end. On flat ground this wouldn't be necessary.

FYI, it's really nice to have the stick framed roof to open up the space above. No only can I store my ladders above but I don't have to worry about stuff hitting the bottom chord of the trusses when taking it in and out. It's definitely a lot more work to stick frame it though. Photo of ladder storage below....
 

Attachments

  • P1000691.jpg
    P1000691.jpg
    139.8 KB · Views: 66
  • P1000689.jpg
    P1000689.jpg
    142.1 KB · Views: 68
Last edited:

Jack Olsen

Super Moderator
Staff member
Joined
Mar 22, 2009
Messages
6,678
Location
Los Angeles
Mine was done very quickly and on the cheap. But the nice thing about building your own is that you can have it conform to whatever space you've got for it. I'm on a tiny 1/8-acre lot, so space is at a premium.

Shed_Final1237949295.jpg
 
OP
S

swedevil

Active member
Joined
Apr 12, 2010
Messages
43
Mine was done very quickly and on the cheap. But the nice thing about building your own is that you can have it conform to whatever space you've got for it. I'm on a tiny 1/8-acre lot, so space is at a premium.

Shed_Final1237949295.jpg
I like the way that looks, but something like that would be far less than waht I'm thinking. I do like the garbage storage, maybe i'll have to make something similar later down the road.

I left it open, but you could certainly frame a wall between the two sections. I just have a beam running there to tie the two sides together - it also provides a great place to lay my long ladders. You can see the beam in the photo below...

As you may notice from the earlier photos, there is also a step up to the smaller section. This was because the ground is sloped and I didn't want to have the one end way off the ground or have to dig below grade on the other end. On flat ground this wouldn't be necessary.

FYI, it's really nice to have the stick framed roof to open up the space above. No only can I store my ladders above but I don't have to worry about stuff hitting the bottom chord of the trusses when taking it in and out. It's definitely a lot more work to stick frame it though. Photo of ladder storage below....
The more photos and advice the better. the wife fell in love with your shed and has given me the OK to do it. Waht was the price range for that? You wouldn't happen to have templates or anything that you used would you?


I am using a set of plans from "Plans Now" and modified them to fit what I wanted. Gave me a good starting point.

Doing 5x10 against the back of the house. Just started last weekend and hope to post pictures as I go. Going a little slow with the 100+ temps we are having!!!!

Plans:

http://www.plansnow.com/gardenshed.html
I'll check that site out - thanks!
 
To avoid these ads, REGISTER NOW!

lupinsea

Well-known member
Joined
Mar 30, 2010
Messages
261
Thats a heck of a lot of information lupinsea. Good information, but a lot of it is over my head. I think I'll stick with a wood/block foundation being that I don't know how to lay concrete and from reading up on it last night, it seems a little more difficult then I'm ready for at this time.

The building will be more permanant then temporary, and will be used to store garden tools on one side and 'storable' items on the other. This will leave the garage open to be used as a car storage/repair area and workshop.

That sounds exactly like the plan I have for my shed and how it is to be used in conjunction with the garage to free up the garage for project workspace. I'm in the middle of framing it now after doing the excavation and foundation work earlier this summer. This was the first time I've done any concrete work beyond a concrete counter top for my bathroom and concrete windowsill for my kitchen.

There is a thread here on GJ about it.

Plus a bit more detailed write-ups on my website.
 

mmhouse

Well-known member
Joined
Aug 31, 2008
Messages
754
Location
Desert Southwest
The more photos and advice the better. the wife fell in love with your shed and has given me the OK to do it. Waht was the price range for that? You wouldn't happen to have templates or anything that you used would you?

Sorry, I should have warned you...the wives all love it and call it "cute." I caught a lot of grief the first time I posted it here and made mention of that - everyone who replied had to include the "cute" comment. :willy_nil

I don't have any drawings, templates or anything like that. It was pretty much a brown paper bag and figure it out as you go project. I did use this Journal of Light Construction book to help me figure out the roof framing...http://www.jlconline.com/cgi-bin/jlconline.storefront/EN/Product/SF499 .

I wouldn't suggest you tackle the stick framed roof unless you're pretty darn handy and patient. You could do trusses - you won't get the overhead storage utility but it would be much easier and quicker.

I kept very complete records on the build and I had just under $5,000 in materials. I did get some material discounts but I also built it when lumber prices were very high so that's probably a reasonable number.

A few progress photos follow....
 

Attachments

  • IMG_4372.jpg
    IMG_4372.jpg
    150.9 KB · Views: 59
  • IMG_4414.jpg
    IMG_4414.jpg
    140.2 KB · Views: 60
  • IMG_4391.jpg
    IMG_4391.jpg
    146.6 KB · Views: 55
  • DSCN2200.jpg
    DSCN2200.jpg
    150.6 KB · Views: 59
  • DSCN2104.jpg
    DSCN2104.jpg
    148.4 KB · Views: 53
  • DSCN1940.jpg
    DSCN1940.jpg
    158.7 KB · Views: 53
Last edited:

mmhouse

Well-known member
Joined
Aug 31, 2008
Messages
754
Location
Desert Southwest
And a few more...
 

Attachments

  • IMG_4480.jpg
    IMG_4480.jpg
    150.5 KB · Views: 45
  • DSCN2481.jpg
    DSCN2481.jpg
    147.3 KB · Views: 45
  • DSCN2486.jpg
    DSCN2486.jpg
    147.6 KB · Views: 43
  • P1000563.jpg
    P1000563.jpg
    143.7 KB · Views: 46
  • DSCN2524resize.jpg
    DSCN2524resize.jpg
    87.3 KB · Views: 50
Last edited:
OP
S

swedevil

Active member
Joined
Apr 12, 2010
Messages
43
The roof probably wont be a problem. I can figure things out pretty easily and have plenty of patience, plus my father-in-law is only a call away and he's great with that kind of stuff.

As far as it being 'cute', thats probably better. It'll give the wife something to brag about and show off while I secretly spend mroe then I should on the garage!

Like I said, any pics or info is greatly appreciated. i have a buddy who's pretty good with designs, so I'll ask him to draw something up based off this!

thanks for the info so far!
 

mmhouse

Well-known member
Joined
Aug 31, 2008
Messages
754
Location
Desert Southwest
I have more pics but I don't think they show anything more than the ones already posted. I'll look through them again though and post any that may be worthwhile.

One thing to keep in mind. Since the width of one end of the 'L' is 8' and one 10' on mine, the roof pitches have to be different in order to make the ridges match in height. This takes a little figuring or trial and error to make that happen but I think it looks much better than stepping the ridge down. The JLC book has some excellent tips on figuring angles, making templates and cutting the rafters.

Also, I kept my overhangs very small....only about 5-1/2" on the rafter tails to keep the doors as high as possible. With the steep pitch on the roof you loose door height very quickly if you bring the overhangs out very far.
 
Last edited:
OP
S

swedevil

Active member
Joined
Apr 12, 2010
Messages
43
I have more pics but I don't think they show anything more than the ones already posted. I'll look through them again though and post any that may be worthwhile.

One thing to keep in mind. Since the width of one end of the 'L' is 8' and one 10' on mine, the roof pitches have to be different in order to make the ridges match in height. This takes a little figuring or trial and error to make that happen but I think it looks much better than stepping the ridge down. The JLC book has some excellent tips on figuring angles, making templates and cutting the rafters.

Also, I kept my overhangs very small....only about 5-1/2" on the rafter tails to keep the doors as high as possible. With the steep pitch on the roof you loose door height very quickly if you bring the overhangs out very far.

After looking, I'm thinking one side 8'x8' and the other 8'x12' instead of 10'. I also did some claculations on costs. It seems that I would be able to pour a slab and build on there for roughly the same cost as the wood frame and floor. Reasoning is I can get the slab and a carport poured the same day to make it a 5yd truck load.

I noticed you cut round holes in the wood right below the roof. Is this for venting? If so, did you mesh over it or something to keep insects out?
 

JMURiz

Well-known member
Joined
Dec 6, 2005
Messages
1,483
Location
NoVA
Yep, doing concrete is great, if you can.

I did a concrete floor in mine then built from there once it dried.
I have a tiny 5277 sq ft lot too, so I had to do custom to make it work for me.

Granted I'm sure yours will be WAY bigger than my 35 sq/ft special ;)
http://www.914club.com/bbs2/index.php?act=attach&type=blogentry&id=148790
http://www.914club.com/bbs2/index.php?act=attach&type=blogentry&id=148791
http://www.914club.com/bbs2/index.php?act=attach&type=blogentry&id=148792

BTW I have since painted it to match my garage.
 

michel

Well-known member
Joined
Jul 9, 2009
Messages
230
Location
St-Joseph du lac Québec
Did that too build it instead of buying it, 14 by 14.
Dug 18 inches, 16 by 16 dropped some rocks for drainage (sorry dont know the term in english)
poured a slab 15 by 15and 6 inches thich ( yeah I know it's over kill) then the rest was basic construction.
Made sure the concrete slab was leveled with the concrete of the pool walkway.
Had a friend of mine installed the bricks and another do the roof and aluminium soffite and drains.


http://www.facebook.com/photo.php?pid=5466328&id=673449446&ref=fbx_album

http://www.facebook.com/photo.php?pid=5466327&id=673449446&ref=fbx_album

http://www.facebook.com/photo.php?pid=5466311&id=673449446&ref=fbx_album

http://www.facebook.com/photo.php?pid=580364&id=1032536543&ref=fbx_album

http://www.facebook.com/photo.php?pid=580365&id=1032536543&ref=fbx_album

And the finished product

http://www.facebook.com/photo.php?pid=5466309&id=673449446&ref=fbx_album

Nice project that keeps the garden stuff, snow blower etc and bikes out of the garage for the winter.
Next the door in the main enntrance of the house and the garage doors are black, I'll probably paint the door black to match.
I need paint practice anyway to prime, paint the car....one day I guess lol
 
Last edited:
OP
S

swedevil

Active member
Joined
Apr 12, 2010
Messages
43
Yep, doing concrete is great, if you can.

I did a concrete floor in mine then built from there once it dried.
I have a tiny 5277 sq ft lot too, so I had to do custom to make it work for me.

Granted I'm sure yours will be WAY bigger than my 35 sq/ft special ;)
http://www.914club.com/bbs2/index.php?act=attach&type=blogentry&id=148790
http://www.914club.com/bbs2/index.php?act=attach&type=blogentry&id=148791
http://www.914club.com/bbs2/index.php?act=attach&type=blogentry&id=148792

BTW I have since painted it to match my garage.


Much smaller then I'm going, but looks like you did good with the concrete slab. mind providing some advice on it? Maybe answering a few of the questions i posted here: http://www.garagejournal.com/forum/showthread.php?t=73046
 

JMURiz

Well-known member
Joined
Dec 6, 2005
Messages
1,483
Location
NoVA
We did it the hard way, just bags of concrete and a rented mixer.
My dad likes working with concrete, did some work with it while a kid, so he has a good handle on what to do. So I tried to learn some from him on this job.

For something large like a carport and large shed, I'd have someone that knows what they are doing at least help you if not do it all. They will have better tools for floating a large space (not just small hand floats that you can get by with on a tiny job like mine).
 

mmhouse

Well-known member
Joined
Aug 31, 2008
Messages
754
Location
Desert Southwest
I noticed you cut round holes in the wood right below the roof. Is this for venting? If so, did you mesh over it or something to keep insects out?

Those are pre-cut bird blocks that provide for venting. They come with the holes drilled and screen installed and are usually available from your local lumberyard pre-cut to 22-1/2" lengths. The decorative vent in the gable end is also functional. They help keep the interior temperature down in hot weather. I also used ridge vent.
 
Last edited:
OP
S

swedevil

Active member
Joined
Apr 12, 2010
Messages
43
We did it the hard way, just bags of concrete and a rented mixer.
My dad likes working with concrete, did some work with it while a kid, so he has a good handle on what to do. So I tried to learn some from him on this job.

For something large like a carport and large shed, I'd have someone that knows what they are doing at least help you if not do it all. They will have better tools for floating a large space (not just small hand floats that you can get by with on a tiny job like mine).
I was affraid of that. I'll be doing a Carport at the same time it looks like (to save on concrete pruchase and delivery fees. I'm just not that keen on paying someone $1600 to float and finish 16'x12' and 10'x20' slabs or concretes. Seems a bit high to me and I've never done concrete work...

Those are pre-cut bird blocks that provide for venting. They come with the holes drilled and screen installed and are usually available from your local lumberyard pre-cut to 22-1/2" lengths. The decorative vent in the gable end is also functional. They help keep the interior temperature down in hot weather. I also used ridge vent.

I'll definately have to consider venting - Louisiana doesn't offer the best cool weather selection!
 
OP
S

swedevil

Active member
Joined
Apr 12, 2010
Messages
43
Alright, so my brother-in-law came up and we hit the back yard. Figured that if I'm going to put the shed in, I need to clear rest of the back yard, fence it ALL in, level it and thne start from them.

When we bought it in March, the chain link fence came to the front of the detached garage which sits at what we were informed was the back of the property. Something about that just didn't sit right and no one seems to have EXACT measurements of the property. So we set out to find the property stakes (which there isn't one on the beck left - when looking from the house).
We did however find a burried barbed wire fence that has been there for forever. So we asked the neighbor about it and she said that that used to be the fence for the proeprty - so thats what we're using to justify where we go!

In the first few pics, you can see how much brush and trees there are behind the chain link fence.
DSCN0868-vi.jpg


DSCN0869-vi.jpg


Bed of the old truck before we really started
DSCN0870-vi.jpg


behind the chain link fence, there was chicken wire, we still haven't figured out why, but you can see where we started to take it down-
DSCN0871-vi.jpg


DSCN0872-vi.jpg


DSCN0873-vi.jpg


DSCN0874-vi.jpg


A buddy gave my brother-in-law 100' of chain link that he didn't need. That will help to stretch across the back of the property where the barbed wire fence is at.
DSCN0875-vi.jpg


This is the second load we removed, still about two more full loads back there, but for the most part its all cut down, just needs to be loaded up:
DSCN0876-vi.jpg


DSCN0877-vi.jpg


The property line actually goes to the bushes that you can see inbetween these two larger trees-
DSCN0878-vi.jpg


This is the left side (from back of house). The property goes about 10' past the chicken wire here-
DSCN0879-vi.jpg


This is the right side of the garage (right side from back of house view). You can see it's almost all cleared except for one 30' tree we cut down, cut into 2' sections, just haven't removed it yet.
DSCN0880-vi.jpg


the back corner in this shot is where the shed will eventually go:
DSCN0881-vi.jpg


barely visible is the 30' tree we still have to get out -
DSCN0882-vi.jpg
 

NUTTSGT

Super Moderator
Staff member
Joined
Sep 14, 2009
Messages
50,984
Location
Northern Central Ohio
Did that too build it instead of buying it, 14 by 14.
Dug 18 inches, 16 by 16 dropped some rocks for drainage (sorry dont know the term in english)
poured a slab 15 by 15and 6 inches thich ( yeah I know it's over kill) then the rest was basic construction.
Made sure the concrete slab was leveled with the concrete of the pool walkway.
Had a friend of mine installed the bricks and another do the roof and aluminium soffite and drains.


http://www.facebook.com/photo.php?pid=5466328&id=673449446&ref=fbx_album

http://www.facebook.com/photo.php?pid=5466327&id=673449446&ref=fbx_album

http://www.facebook.com/photo.php?pid=5466311&id=673449446&ref=fbx_album

http://www.facebook.com/photo.php?pid=580364&id=1032536543&ref=fbx_album

http://www.facebook.com/photo.php?pid=580365&id=1032536543&ref=fbx_album

And the finished product

http://www.facebook.com/photo.php?pid=5466309&id=673449446&ref=fbx_album

Nice project that keeps the garden stuff, snow blower etc and bikes out of the garage for the winter.
Next the door in the main enntrance of the house and the garage doors are black, I'll probably paint the door black to match.
I need paint practice anyway to prime, paint the car....one day I guess lol

You have to be a member of Facebook to view those.
 

Ryan_C

Well-known member
Joined
Jan 12, 2010
Messages
115
Location
IN
Sorry, I should have warned you...the wives all love it and call it "cute." I caught a lot of grief the first time I posted it here and made mention of that - everyone who replied had to include the "cute" comment. :willy_nil

I don't have any drawings, templates or anything like that. It was pretty much a brown paper bag and figure it out as you go project. I did use this Journal of Light Construction book to help me figure out the roof framing...http://www.jlconline.com/cgi-bin/jlconline.storefront/EN/Product/SF499 .

I wouldn't suggest you tackle the stick framed roof unless you're pretty darn handy and patient. You could do trusses - you won't get the overhead storage utility but it would be much easier and quicker.

I kept very complete records on the build and I had just under $5,000 in materials. I did get some material discounts but I also built it when lumber prices were very high so that's probably a reasonable number.

A few progress photos follow....

In that last picture you have attached in this reply, I really like the accented corners of the lower roof line. It really makes a difference. Can you show how this was done as far as 2x4s or really what the wrapped corner consists of?

Also, what is your degree of pitch on that roof? And in what direction do you have that skyward window facing?

Nice job everyone that shared their projects.
 
Last edited:

mmhouse

Well-known member
Joined
Aug 31, 2008
Messages
754
Location
Desert Southwest
In that last picture you have attached in this reply, I really like the accented corners of the lower roof line. It really makes a difference. Can you show how this was done as far as 2x4s or really what the wrapped corner consists of?

Also, what is your degree of pitch on that roof? And in what direction do you have that skyward window facing?

Nice job everyone that shared their projects.

Ryan...I have to admit I sort-of freelanced that roof corner detail and probably didn't do it right, but it turned out fine. You may be able to tell more from the photo below. I basically just took the 2x sub-fascia around the corner, took 2x nailers to the corners and then put plywood on the top. It involved some fancy beveling of the boards involved (top and ends) but, fortunately, it's all covered up with roofing. :)

The pitch is different on the two legs of the "L" because I wanted the ridge to be the same height on both. I think it's in the neighborhood of 8/12 to 9/12. The gable end is 8' at the base.

If the roof pitch is important to you let me know and I'll go measure. I can also take pics of the underside of the corner detail if that would help. Just let me know what you need.

The skylight faces south and a bit west.

FYI...I modified landscape lights for the exterior lighting and wired them up to my low voltage landscape lights. The come on an go off automatically with the driveway lights.
 

Attachments

  • IMG_4374.jpg
    IMG_4374.jpg
    144.7 KB · Views: 13
Last edited:
To avoid these ads, REGISTER NOW!
Top Bottom