To avoid these ads, REGISTER NOW!

Strut Channel and Hitch Receiver Workbench

ahaidet

Well-known member
Joined
Apr 25, 2008
Messages
148
Location
Akron, Ohio
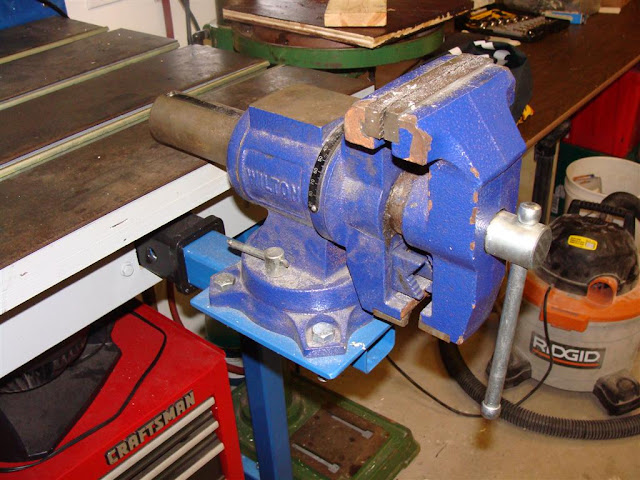
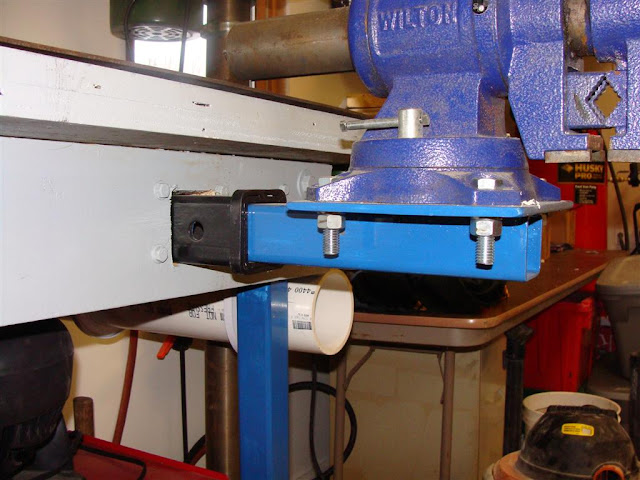
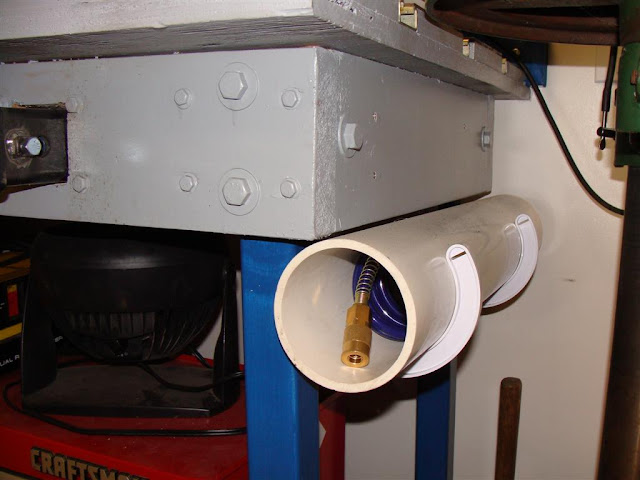
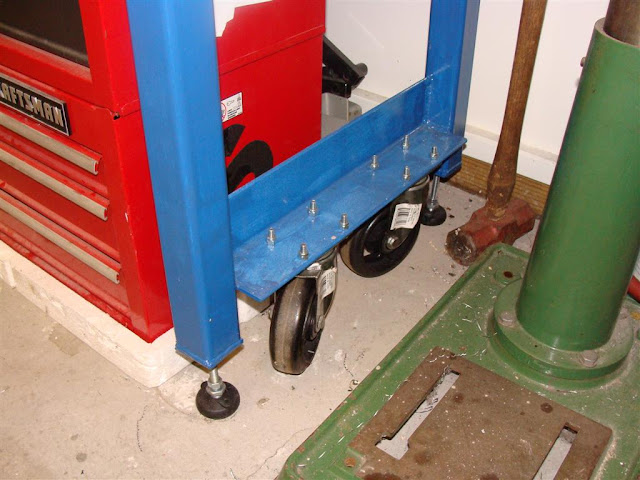
This is my workbench that I have nearly completed. Basically I wanted a bench that would be mobile as I have a small garage and as I get new tools and other items I am constantly rearranging things to make them fit. I knew I wanted it to be about 6 feet long to fit the space I had and not be too small. I also wanted it to have some features to make work go more smoothly. I wanted it to have the ability to hold any odd shaped work piece securely. It needed to be flexible in the types of work it could be used for as I do everything from wood work to metal fabrication and automotive wrenching. This is what I came up with to fit those needs:

downloadfile-7.jpeg


downloadfile-8.jpeg


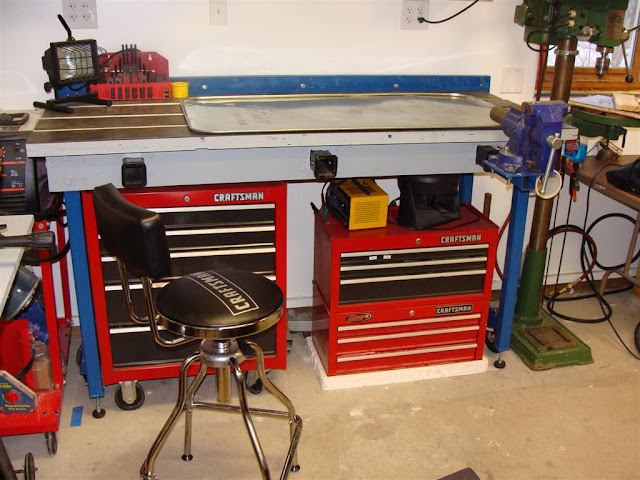
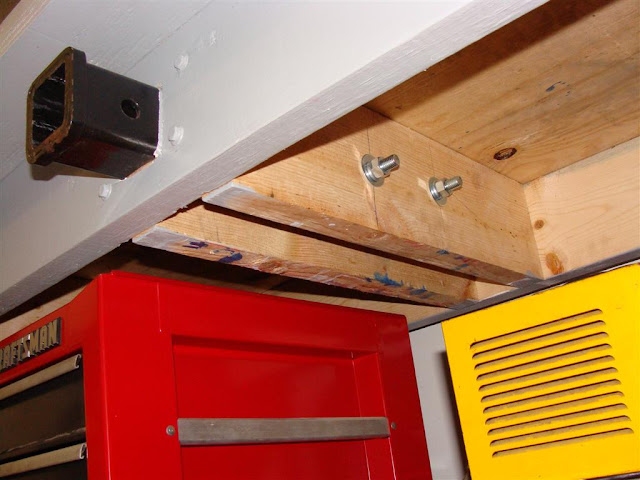
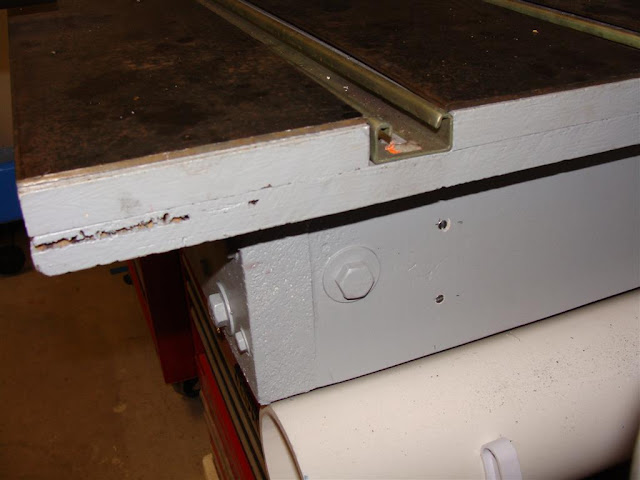
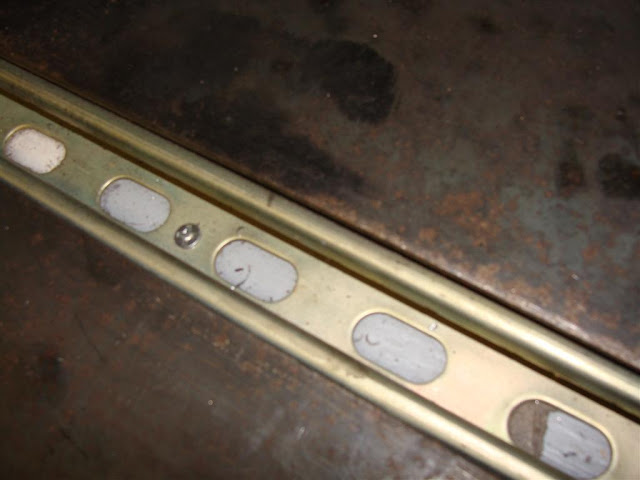
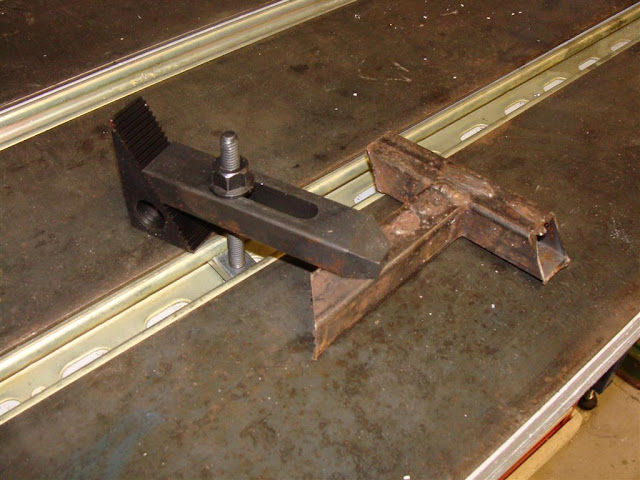
For work holding I wanted to be able to use T-Slots as I have always found this to be a good way to clamp things down for welding, gluing or just going to town with a wrench or hammer. But I didn’t want to spend big bucks on a T-Slot table. Instead I used Strut Channel commonly used in industrial settings for holding conduit, ducting, plumbing etc. It comes in many sizes and material types. There are many different adapters and brackets premade to attach to it. It also comes in a size that works well for this workbench as it’s roughly the same thickness as a piece of ¾” plywood. To make my top I then used 2x6 pine to frame the base, then a layer of ¾” plywood on top of that, next I cut strips of plywood to go between the sections of strut channel finally I bought some 1/8” steel to cover up the strips of plywood.

downloadfile-2.jpeg


downloadfile-3.jpeg


downloadfile-4.jpeg


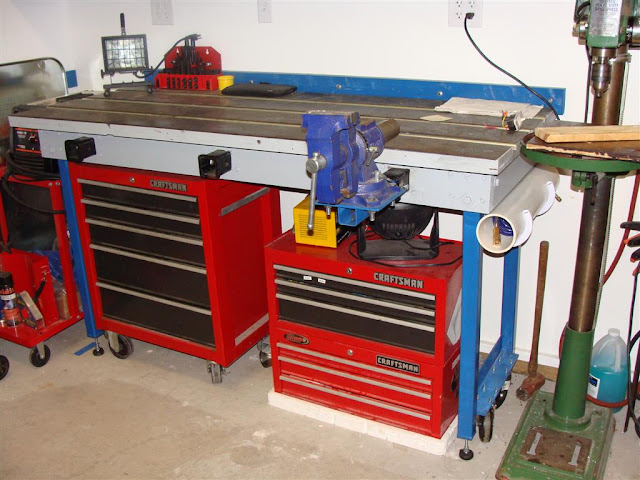
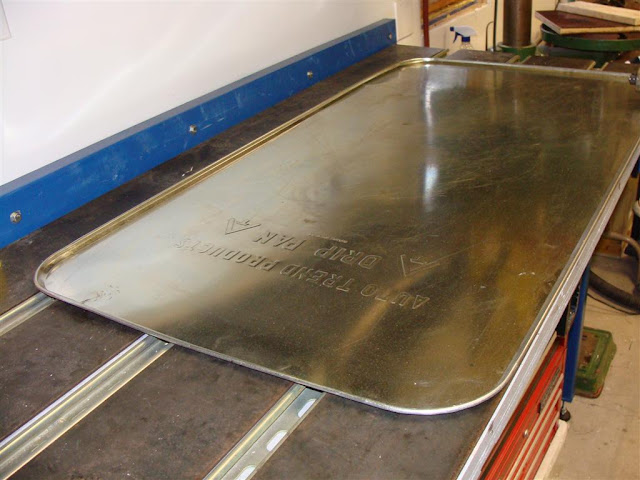
This top is great for clamping but has a few drawbacks. First the T-slot grooves can be awkward when you don’t want them. Second the slots can fill up with grease, swarf, saw dust etc. Third the metal top can be too harsh for some things and can scratch your work piece and does not have any give to help cushion a blow in the times you may want a gentler touch. To solve the some of these drawbacks I use a metal tray when working on something like a carb or transmission that might leak. This works well and is cheap to replace if it gets messed up.

downloadfile-6.jpeg


I also set a piece of plywood on top when I want something with give and that won’t scratch things. Finally a shop vac works great for cleaning out the slots. They sell covers for the strut channel but it snaps in really tight and is a pain to get back out. I bought a piece to try and make it work but I have not had time to tinker with it.
 
Last edited:
To avoid these ads, REGISTER NOW!
OP
A

ahaidet

Well-known member
Joined
Apr 25, 2008
Messages
148
Location
Akron, Ohio
Part 2 Hitch Receivers

Many of you have seen the hitch receivers used to hold vises and other shop equipment to give your work bench increased flexibility. Here is my implementation using Harbor Freight 18” hitch Receivers, some 2”x2” box tube and some hardware.

downloadfile-9.jpeg


downloadfile-19.jpeg


downloadfile-10.jpeg


downloadfile.jpeg


I simply framed the hitch receiver in between 2 2x6's. I then welded a 3/8-16 nut to the side of it so that I can tighten down onto whatever I have inserted. This has proven to be very stable and secure and I can really go to town cranking on it. I would like to eventually use a quick release bolt in that nut but I have not got around to ordering one.

I would envision future uses of the hitch receivers for holding a sheet metal brake/shear, maybe one for holding bikes, a grinder could be put on there (although my grinder is on a pedestal), other random uses.
 
OP
A

ahaidet

Well-known member
Joined
Apr 25, 2008
Messages
148
Location
Akron, Ohio
Part 3 Extras

Finally I came up with a way to store my recoil air hose by using a piece of PVC pipe. It works fairly well for keeping it off the floor and from getting kinked and tangled.

downloadfile-15.jpeg


To make the workbench both mobile and stable I came up with using both casters and threaded feet.

downloadfile-18.jpeg


To move the workbench I thread down the feet and it sets on the casters. To make it stable in its home position I lag bolted a 2x4 to the wall behind the workbench. The 2x4 sits just above the top height where the casters come off the ground. As I lift the bench up by threading the feet down it sandwiches the bench between the floor and the 2x4 and makes it very sturdy. I have used large breaker bars and pry bars on things in the vise and never once has the bench budged a 1/16". Yet if I need to move the bench to clean behind it I can. Without the bench being jacked up against the 2x4 it is not too hard to try and tip it if you get carried away with something heavy in the vise. So if I had the space to make it wider I would.
 

Furious D

Well-known member
Joined
Sep 27, 2009
Messages
191
Location
Central, IL
Brilliant Idea. Our welding tables at work use a system simular to uni-strut t-nuts to hold down the work. I never thought of incorporating that into a home bench
 

red92s

Well-known member
Joined
Dec 16, 2009
Messages
334
Like yourself I've been toying with the idea of a slotted table for a workbench top, but couldn't find something that was large enough while remaining affordable, and didn't weigh many many hundreds of pounds.

I think your solution is a great one and would work very well for a weekend warrior type of garage hobbyist. Seems like you could put a couple strips of wood or metal on the bottom of your drip pan that slip fit into the slots, just to keep it from shifting around when working on it.

Any concerns about welding on the table and getting too much heat into the wood below the steel surface? I guess you are mainly putting heat into the workpiece, not the table itself, but would it be alright if you needed to tack something to the top?
 
Last edited:

Jack Olsen

Super Moderator
Staff member
Joined
Mar 22, 2009
Messages
6,678
Location
Los Angeles
Awesome. The 'poor man's T-slot top' is great.

It makes me wonder if there would be something that could be used in place of the plywood that would be not flammable, would be 'hammer-able,' and would still be cheaper than steel. My first thought was that miracle board stuff that goes under tile in a shower stall -- but I've never worked with it, it might not hold up to impacts at all.
 
OP
A

ahaidet

Well-known member
Joined
Apr 25, 2008
Messages
148
Location
Akron, Ohio
Thats a good question regarding the fire proofing. I can't think of another ready made material off hand.

To get the plywood hot enough to be concerned I would think you would have to be welding to the steel top. If I am ever welding to the steel top most likely it would be just simple tack welds which probably would not get the metal hot enough for long enough to cause a problem. I think it might be rare at any rate for me to even need to tack weld anything to the top with the T-Slots there to hold stuff.

I suppose you could look for fire proof paint which might help.

Thanks for the praise.

Jack I really like your setup, very clean and useful at the same time which you don't always see together. Classy as well.
 

metal1313

Well-known member
Joined
Apr 28, 2009
Messages
3,416
Location
clinton NJ
it will singe the plywood lightly but with the steel on top of it it shouldnt be an issue really.

how are you holding down the steel? ive thought about doing something similar but the steel strips would bounce around i think. and good idea on the uni-strut. its stronger and cheaper than most t-slot
 

1Garageman

Well-known member
Joined
May 12, 2009
Messages
4,417
Location
Columbus, Ohio
I am going to look for some "T-slot grooves". I do a lot of wood working and could really use those. I assume I could just get them at Lowes or HD?
 

metal1313

Well-known member
Joined
Apr 28, 2009
Messages
3,416
Location
clinton NJ
i havent seen them there, the real t-slots that is, rockler has them, as does lee valley. what he used is different, but hd has it over near the electrical conduits. the only issue here is that the t-slot is much more accurate than the uni-strut. but the unistrut may be much more versitile.
 
OP
A

ahaidet

Well-known member
Joined
Apr 25, 2008
Messages
148
Location
Akron, Ohio
how are you holding down the steel? ive thought about doing something similar but the steel strips would bounce around i think. and good idea on the uni-strut. its stronger and cheaper than most t-slot

That’s one of the parts that is not finished. As of right now they are just sitting on there and for the most part they stay put. However I have a plan to weld "weld nuts" as McMaster Carr calls them to the bottom of the metal strips. Then drill a hole through the top and bolt it down from underneath. This should leave a clean top without bolt heads sticking up and make it very secure.

90611a350p1l.png


Here is a picture of the weld nut I purchased at McMaster.

Seems like it might be a chore lining up the weld nuts to the top to drill through the existing plywood. I have thought of making some kind of jig to do this but just have not come up with anything real solid. Any ideas?
 
Last edited:
OP
A

ahaidet

Well-known member
Joined
Apr 25, 2008
Messages
148
Location
Akron, Ohio
I am going to look for some "T-slot grooves". I do a lot of wood working and could really use those. I assume I could just get them at Lowes or HD?

i havent seen them there, the real t-slots that is, rockler has them, as does lee valley. what he used is different, but hd has it over near the electrical conduits. the only issue here is that the t-slot is much more accurate than the uni-strut. but the unistrut may be much more versitile.


Yeah I saw the ones that rockler and lee valley had. They were more expensive and were less versatile for my use. Also agree on the precision. T-Slots from the above supplierers are typically aluminum and likely much more precise.

I purchased my strut channel at Lowes $18 for 10 feet I believe. Right next to the conduit. McMaster carries it as well and has many different material choices (aluminum, stainless steel, painted.. etc) McMaster is more expensive plus you would have to pay shipping. (Although I was going to pick it up at McMaster as one of there distribution centers is about 25minutes from my house) Mine are just galvanized steel as that is the only option at Lowes.
 
To avoid these ads, REGISTER NOW!

red92s

Well-known member
Joined
Dec 16, 2009
Messages
334
Another potential candidate for the slot setup would be using 80/20 extrusions. It's available in lots of different profiles and there are boatloads of brackets and hardware designed to specifically fit in the channels. You can usually find straight lengths of the basic profiles for pretty cheap on Ebay as most of the industrial customers are after longer pieces. It probably no more functional or cost effective than the solution above . . . just throwing the idea out there.
 

Jack Olsen

Super Moderator
Staff member
Joined
Mar 22, 2009
Messages
6,678
Location
Los Angeles
90611a350p1l.png


Here is a picture of the weld nut I purchased at McMaster.

Seems like it might be a chore lining up the weld nuts to the top to drill through the existing plywood. I have thought of making some kind of jig to do this but just have not come up with anything real solid. Any ideas?
Weld them in place on the underside of the cover pieces, then use your thumb to put some graphite/chalk/carbon-build-up/toner/roofing-cement (or anything you have on hand that's sticky and black) right on the ring of the nut. Carefully set the piece in place, and it'll leave marks exactly where you need to drill.
 

jamesemery728

Well-known member
Joined
May 2, 2009
Messages
961
That’s one of the parts that is not finished. As of right now they are just sitting on there and for the most part they stay put. However I have a plan to weld "weld nuts" as McMaster Carr calls them to the bottom of the metal strips. Then drill a hole through the top and bolt it down from underneath. This should leave a clean top without bolt heads sticking up and make it very secure.

90611a350p1l.png


Here is a picture of the weld nut I purchased at McMaster.

Seems like it might be a chore lining up the weld nuts to the top to drill through the existing plywood. I have thought of making some kind of jig to do this but just have not come up with anything real solid. Any ideas?

Why not just drill holes in your metal strips, countersink the holes and use flat head wood screws to fasten the metal strips down to your wooden top. Countersink just enough so that the screws are flush with the top.
 

Zeke

Well-known member
Joined
Aug 13, 2009
Messages
17,176
Location
Long Beach CA, the sewer by the sea.
Awesome. The 'poor man's T-slot top' is great.

It makes me wonder if there would be something that could be used in place of the plywood that would be not flammable, would be 'hammer-able,' and would still be cheaper than steel. My first thought was that miracle board stuff that goes under tile in a shower stall -- but I've never worked with it, it might not hold up to impacts at all.

Yeah, good stuff in this thread. You gotta love the coiled air hose in the PVC tube!

AFA the backer board, I find it crumbles easily and will "pop" when hit with significant heat. For a non metallic surface that will take all kinds of punishment, I'd look to a Masonite type of material mounted on something very sturdy like 1 1/8" floor sheeting. It will burn, but not very well.

Use a heat shield made from a scrap sheet of Transite stone for welding on a flat surface. Covered with a sheet of copper is even better. Or, just the copper elevated on runners.
 
OP
A

ahaidet

Well-known member
Joined
Apr 25, 2008
Messages
148
Location
Akron, Ohio
Why not just drill holes in your metal strips, countersink the holes and use flat head wood screws to fasten the metal strips down to your wooden top. Countersink just enough so that the screws are flush with the top.


I suppose I like to be difficult...:headscrat

I was initially afraid that they might scratch things or get caught on my work piece. I imagine if they were all countersunk carefully so that they were level with the top this would be less of a problem.
 
OP
A

ahaidet

Well-known member
Joined
Apr 25, 2008
Messages
148
Location
Akron, Ohio
Weld them in place on the underside of the cover pieces, then use your thumb to put some graphite/chalk/carbon-build-up/toner/roofing-cement (or anything you have on hand that's sticky and black) right on the ring of the nut. Carefully set the piece in place, and it'll leave marks exactly where you need to drill.

Good call... I have a way of making things more difficult than they need to be. I even have some Dykem Blue on hand for such things.
 
OP
A

ahaidet

Well-known member
Joined
Apr 25, 2008
Messages
148
Location
Akron, Ohio
Yeah, good stuff in this thread. You gotta love the coiled air hose in the PVC tube!

Thanks for the compliments.

When I planned on storing the coiled hose in the PVC tube I had originally envisioned it just sliding back in when I was done. Over time the loops seem to get "stretched" into a larger OD than the original size. Which makes it not want to slide right back in. However if you twist your hand to sort of rewind the coil it shrinks the hose coil OD enough that it slides back in. I don't find that to be a problem and it keeps the hose out of harms way and neatly stored away.

I saw another storage method after I did this that would solve this problem. Instead of a tube they used a pole to slide the ID of the coil back on.
 

zimpala

Member
Joined
Feb 23, 2007
Messages
8
Location
Michigan
Why not drill the holes in your bench first? Then place the plates and mark thru the drilled holes from underneath onto the back of the plate. Flip plate over, weld nuts over marks.
 

The J

Well-known member
Joined
Mar 4, 2010
Messages
152
Second the slots can fill up with grease, swarf, saw dust etc.
They sell covers for the strut channel but it snaps in really tight and is a pain to get back out. I bought a piece to try and make it work but I have not had time to tinker with it.

How about just using a strip of 1/8" steel to cover the slots? Have it cut for 1/32" clearance on both sides so it will keep most of the 'stuff' out, while not being tight enough to be difficult to remove. It looks like the sides of the T-slot are at the same height as the wood, so the 1/8" steel will be flush when you lay it on top of the t-slot.

Maybe make the cover plate 1" longer than the bench so you have 1/2" overhang on each side, and then use a nut/bolt on each end to keep the cover plate from sliding out, while giving you something to grab to remove the cover plate.
 

Bigbandguy

Well-known member
Joined
Oct 18, 2014
Messages
1,168
Location
North Carolina
OK so this is an old thread. I was looking for ways to mount a buffer to be removable and this thread came up. There is so much pure genius here that I thought it deserved to be seen again. I am so stealing some of these ideas.
 

metalmagpie

Well-known member
Joined
Nov 1, 2011
Messages
798
Location
Seattle
I see you using clamps from a mill clamping set in your T-slots. Those clamps are made from tool steel and are capable of several hundred pounds of force. I worry about those wood screws holding down your strut pieces, i.e. is it strong enough?

I particularly like your design detail of using square nuts where you weld them to the receiver tube. I have always thought square nuts welded on much better than hex.

Good job!

metalmagpie
 
To avoid these ads, REGISTER NOW!
Top Bottom