To avoid these ads, REGISTER NOW!

Subfloor damage - throw in the towel and call a pro?

MINIz guy

Well-known member
Joined
Apr 24, 2013
Messages
206
Location
Philly
So I graduated college, got a house and started doing homeowner stuff. I've only worked on cars before, so everything is new to me.

Bought the house knowing there was a possible leak in the main bath. Took it apart, removed the old tub, vinyl tiles and underlayment. Yep...subfloor around the toilet looks no good.

Main%20Bath.jpg


IMG_0209.jpg


IMG_0207.jpg


As you can see, water damage at the corners of the tub and at the toilet flange. It looks like the damage goes under the wall (other side is the kitchen). Now, I've gotten this far, I could just get a toe kick saw and cut along the wall and replace the subfloor. I wouldn't get the advisable 12" around the damage removed though.

However, I want to do this "right" as my first bathroom remodel. Is it time to get a pro to pull out the kitchen counter, pull out the bottom sill of the wall, and get the subfloor replaced?
 
To avoid these ads, REGISTER NOW!

The Cobbler

Super Moderator
Staff member
Joined
Oct 24, 2013
Messages
25,967
Location
Niagara Region, Ontario, Canada
I would cut the OSB to the wall bottom plate, add some cleats to hold the new sub. cut out the bad around the toilet & replace . with plywood
not that hard, no need to remove the kitchen at this time IMO
 

ADSR

Well-known member
Joined
Jan 12, 2013
Messages
10,713
I would cut the OSB to the wall bottom plate, add some cleats to hold the new sub. cut out the bad around the toilet & replace . with plywood
not that hard, no need to remove the kitchen at this time IMO

Pretty much this.

Do it man, it's not rocket science. :thumbup:
 

Radix2

Well-known member
Joined
May 28, 2014
Messages
1,853
Location
the thumb!, MI
I don't know where the 12" around the damage cones from.

Either the wood is damaged/rotting or not. No reason to cut very far into the undamaged material. More important is to cut to a place where you can properly support your new material edges with blocking.
 

larry4406

Well-known member
Joined
Jan 27, 2006
Messages
19,562
Location
Northern Virginia
I think the above advise is spot on.

Replacement around the toilet flange may be a bit challenging to get a good fit to support the flange. Typically the flange has 4 large screws that anchor it to the subfloor with spacers underneath the flange equal to the finished floor thickness (for example, pipe spacers cut to 3/4" with the screws run thru the flange and thru the pipe spacer. 3/4" being the allowance for 1/2" concrete board and 1/4" ceramic"). The spacer thickness will change based on the actual finished floor allowance (1/4" for luan and vinyl, 1.25" for mud set ceramic floors, 3/4" for traditional hardwood, etc). The finished floor surface should run tight to the underside of the flange to ensure that the wax ring will obtain proper crush. The screws are necessary to secure the toilet.

You may end up putting your new subfloor in using two pieces with a seam along the centerline of the toilet. This lets you cut each piece with half circle cutouts so that the new floor can be tight to pipe and properly support the flange. Obviously, install blocking as needed and use PL400 or similar construction adhesive.

You have gone this far, I think you are more than capable of this.
 

red

Well-known member
Joined
Feb 20, 2009
Messages
721
Location
Hudson Valley, NY
Another fix for your toilet flange is to cut it off below the floor height and install a PVC coupling (like this http://www.homedepot.com/p/3-in-PVC-DWV-Coupling-C4801HD3/100343559 )

Then replace that OSB with Plywood that has the proper size hole in it for the toilet flange. Then glue a new flange into the coupling. Before installing the flange install your concrete tile backer board first and allow for your tile height as well. You'll need install your new tub BEFORE the concrete backer board, and the floor is typically tiled last so it's not damaged during the work on the tub area.

Most importantly PLUG the toilet flange hole to keep the sewer gas out of the house. Sewer gas is methane and can kill you in high enough concentration. :shocking:

Finally make sure you get a good seal with the new toilet so it doesn't create the same problem your fixing now. Ignoring leaks only creates more work down the road.
 
OP
M

MINIz guy

Well-known member
Joined
Apr 24, 2013
Messages
206
Location
Philly
Alright, sounds very promising then. I'm gong to try and see if I can cut to a joist underneath. Should be doable and I only need to add minimal bracing.

Understood on the flange too. It's plugged now but still smelly from the wood. I run the vent fan for a little when I get home, haven't had any issues. I want to do the Schluter orange tile underlayment I've seen a lot, may be easier and definitely more waterproof than before.


Sent from my iPhone using Tapatalk
 
OP
M

MINIz guy

Well-known member
Joined
Apr 24, 2013
Messages
206
Location
Philly
645b73fa5a76b94413bde48ed20631cb.jpg

Did a thing. Need to rerun the sewer drain as the flange was rusted out.

How do you guys do tub drains and overflows? The one on there is cockeyed... not sure how anything lined up. Very little room to adjust, thinking about just getting a flexible overflow and then everything should line up. Can't cut the p trap as there isn't any room left after the first remodel


Sent from my iPhone using Tapatalk
 

Attachments

  • 645b73fa5a76b94413bde48ed20631cb.jpg
    645b73fa5a76b94413bde48ed20631cb.jpg
    751.2 KB · Views: 0

Radix2

Well-known member
Joined
May 28, 2014
Messages
1,853
Location
the thumb!, MI
Looks great, just add some blocking between the joists before you put the floor back and it will be perfect.
 

The Cobbler

Super Moderator
Staff member
Joined
Oct 24, 2013
Messages
25,967
Location
Niagara Region, Ontario, Canada
good job. as far as the plumbing being **** eyed, the tub waste & overflow kits have a washer that is beveled so to speak so they don't necessarily need to be plumb to line up.
as stated , use some blocking to stiffen the edges of the joints .
 

ChaseDE

Well-known member
Joined
Aug 25, 2016
Messages
2,178
Location
Delaware
One thought..do you NEED a tub? Could do a cool walk in shower, glass doors....

Right. Around here at least lots of tubs are going bye bye and nice walk in showers are preferable....especially if you have a tub in another bathroom.
 
OP
M

MINIz guy

Well-known member
Joined
Apr 24, 2013
Messages
206
Location
Philly
Well, I need at least one tub for resale purposes. The other bathroom has a walk in shower...so sadly this has to be a tub.

I cut the blocking and the replacement subfloor today. Working on the plumbing next before I get the subfloor in.
 

Cairo94507

Well-known member
Joined
May 9, 2015
Messages
344
Location
Auburn, CA
Great first project. The only way to learn is to take it apart. If not certain about something Google it and watch a video. Take photos along the way (as you are) so when it comes time to sell you can show the quality of the repair.
 

matt_i

Well-known member
Joined
Mar 14, 2008
Messages
10,744
Location
SE Michigan
Just wanted to add this tangent. When you drywall back on the studs, should use green or purple rock instead of the standard white faced version as those are more moisture resistant. The purple adds another feature like mildew resistant as well iirc. Unless replacing with tile and that would be best backed by the cement-board.
 

rustyjames

Well-known member
Joined
Dec 28, 2008
Messages
1,077
Location
central nj
If you're doing a wet area you can use drywall but it would need to be covered with a membrane such as Kerdi. I prefer cement board with a liquid membrane such as Laticrete Hydroban.
 

Vantastic

Well-known member
Joined
Jan 1, 2015
Messages
364
Location
Penns Woods
You are doing great. I would call a plumber to do the toilet flange when you are done with the sub floor. It was what was leaking and fucked everything up.
 

rharman

Well-known member
Joined
Apr 22, 2012
Messages
8,902
Location
SoCal
Looks good. You've got this handled. As others mentioned, just be sure you have good support all around the new subfloor.

Absolutely do NOT use regular drywall. I'd not heard of the purple before but it sounds like a great solution. One step up from green.

Don't sweat it if you feel the need to call a plumber for part of it. Sometimes, the best tool is a credit card.
 

FullRaceMerc

Well-known member
Joined
Jan 9, 2015
Messages
3,869
Location
SoCal (SGV)
Looks great, just add some blocking between the joists before you put the floor back and it will be perfect.

I cut the blocking and the replacement subfloor today. Working on the plumbing next before I get the subfloor in.

Yeah, good blocking under the flange will help keep it from recurring. You want the toilet flange screws to hit blocking if possible. Toilets that move will always leak. And as mentioned above use plywood instead of OSB in that location.
 
To avoid these ads, REGISTER NOW!

larry4406

Well-known member
Joined
Jan 27, 2006
Messages
19,562
Location
Northern Virginia
On toilets I like using a 3x4 reducing elbow. Orient 4" up and stub above finished floor. After finished floor is done use a jamb saw cut pipe flush. Radius inner edge of pipe and now a closet flange will slip in and glue and be tight to the finished floor on the bottom of the flange and you can install the flange bolts. Wax ring will seal proper.
 

ddawg16

Well-known member
Joined
Jul 11, 2008
Messages
21,005
Location
S. California
It is looking good.

I would put plenty of blocking around the area of the flange. Personally, I like running a 2x12 between joists and cutting a hole in it for the pipe/flange.

But don't install the flange until the floor is done....and I mean DONE!...as in all tile. The Flange sits on top of the tile.
 

Attachments

  • IMG_1074.jpg
    IMG_1074.jpg
    141.6 KB · Views: 53

Marctrees

Well-known member
Joined
Mar 5, 2015
Messages
6,265
Location
TX/LA border - Toledo Bend
Miniz - GREAT cutout job in post #8.

See---- You did it.

No towel throwing in or Professionals needed.

You Da Man....

Ideally, block as said above, not to tight to interfere though w flange bell.

And Ply, better than OSB for sure.

Marc
 
Last edited:

Marctrees

Well-known member
Joined
Mar 5, 2015
Messages
6,265
Location
TX/LA border - Toledo Bend
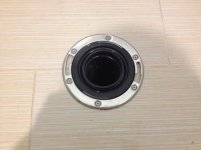
Actually though, I may be wrong, whats with that weird PVC fitting so high up to floor, w yet no flange?

Will the flange fitting bell work w that once finished level floor is installed?

It just looks so high.

Looks like a female fitting--- How did OP remove the old flange/ and bell cause it would have been solvent welded in?

Others more intimate w this situation will advise.

I may be mistaken here, just have some photos to reference. Marc
 
Last edited:

manwithtools

ALLIANCE MEMBER
Joined
Aug 24, 2015
Messages
14,103
Location
Lebanon, TN
Manw tools - Don't understand your meaning.

You agree? or disagree?

Was I inaccurate/ mistaken there? Marc

In case you can't tell, those are sad faces. I just don't like your tone. Regardless of where you believe something is made or who you think made it, turning it into racial degradation is wrong.
 
Last edited:
OP
M

MINIz guy

Well-known member
Joined
Apr 24, 2013
Messages
206
Location
Philly
a39c561b0d57a108e7e02951ebb8453d.jpg
88657edafbbd6ef5a8dc8ed519742164.jpg

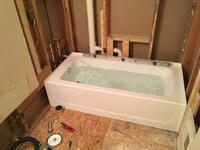
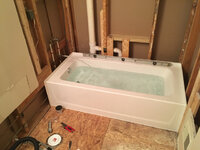
Not always good at taking photos and checking here :( . I did OSB and blocked where I cut. I'm right by a joist so that toilet isn't moving anywhere. I cut the pipe and did a new toilet flange, I'll get pictures tomorrow. The flange isn't screwed in yet, and I can still lift it a solid .75" so I can get time under it. My slope is well within the 3" per foot max so I'm good there.

Tub is also in and "level". It's 1/8" slanted toward the drain but it's good enough from what I can tell online. Going the cheap way with a 3pc surround and then accenting the edge with tile. Then I can bring it past the tub so no wall damage will occur if water splashes.

Pretty set on doing the Kerdi system for the accent and floors. Looks so easy and foolproof.


Sent from my iPhone using Tapatalk
 

Attachments

  • a39c561b0d57a108e7e02951ebb8453d.jpg
    a39c561b0d57a108e7e02951ebb8453d.jpg
    335.3 KB · Views: 0
  • 88657edafbbd6ef5a8dc8ed519742164.jpg
    88657edafbbd6ef5a8dc8ed519742164.jpg
    319.1 KB · Views: 0

FullRaceMerc

Well-known member
Joined
Jan 9, 2015
Messages
3,869
Location
SoCal (SGV)
Not always good at taking photos and checking here :( . I did OSB and blocked where I cut. I'm right by a joist so that toilet isn't moving anywhere. I cut the pipe and did a new toilet flange, I'll get pictures tomorrow. The flange isn't screwed in yet, and I can still lift it a solid .75" so I can get time under it. My slope is well within the 3" per foot max so I'm good there.
That's not correct. You need lumber on both sides for the flange to screw into. If you settle for one side only, the weight of a grown person leaning on the throne to do paperwork puts a tremendous amount of leverage on those screws. Over time they work loose if only one side is anchored into lumber. Look at what you just removed. No blocking under both sides of the flange & using OSB contributed to the original problem. In a few years you or the next guy will have to do it again if you leave it like that.
 
OP
M

MINIz guy

Well-known member
Joined
Apr 24, 2013
Messages
206
Location
Philly
Alright, looks like I'm throwing a 2x4 underneath the subfloor to box everything in. Good thing the mud room is unfinished so I have a clear shot at it.

Tore out more drywall today in preparation for tile. Still torn between cement backerboard or the Kerdi stuff for ease of installation. Test fit the surround and I don't like how the shelves stick into the tub, makes everything seem way too small.
 

ddawg16

Well-known member
Joined
Jul 11, 2008
Messages
21,005
Location
S. California
Alright, looks like I'm throwing a 2x4 underneath the subfloor to box everything in. Good thing the mud room is unfinished so I have a clear shot at it.

Tore out more drywall today in preparation for tile. Still torn between cement backerboard or the Kerdi stuff for ease of installation. Test fit the surround and I don't like how the shelves stick into the tub, makes everything seem way too small.

I looked at doing the Kerdi....the **** is expensive.

Even if you do Kerdi, you should use backerboard. If you don't use Kerdi, then you put tar paper behind the backerboard.

I spent a lot of time researching it. I'm in California, so I went with the traditional hot mop shower pan. Temps are pretty mild so a hot mop will last a long time. The houses in my neighborhood are over 60 years old and most still have the original hot mop shower pans.
 

F350

Well-known member
Joined
May 13, 2009
Messages
110
If you are doing tile...your flange will be too low and you will have to use a double wax seal.

Not really. Most toilets today are very shallow. It's better that the flange is flush with floor rather than on top of floor.

Even if it ends up too low, a double wax seal is a proper fix. A plumber would have done that.
 

ddurrett896

Well-known member
Joined
Mar 29, 2015
Messages
995
Location
VA
Going the cheap way with a 3pc surround and then accenting the edge with tile. Then I can bring it past the tub so no wall damage will occur if water splashes.

Pretty set on doing the Kerdi system for the accent and floors. Looks so easy and foolproof.

If you do a 3 piece, there is no need for Kerdi. The accent border will be outside of the tub area (in front of the shower door/curtain) and can be put direct to sheetrock.

For the floors, don't use Kerdi - use Ditra.
 
OP
M

MINIz guy

Well-known member
Joined
Apr 24, 2013
Messages
206
Location
Philly
Yep, you guys are all right. Got confused with all the terminology and brands. New plan anyway.

Test fit the surround, hated how the shelves jutted in. Made the tub feel claustrophobic. Doing tile walls with a large niche to make this work. Installing a backerboard and a liquid membrane on top, so no need for a vapor barrier behind. I can get this stuff this weekend at Lowes.

Doing Schluter Ditra for the floors still. I kept thinking Kerdi and Schluter were interchangable. Just gotta get over the hump of the bathtub.

I've read enough and watched enough YouTube videos on how to do this. So many differing opinions so I just picked the most readily available way for me. At least I'm not tearing out stuff anymore!
 

nut_buster2017

Active member
Joined
Jun 6, 2017
Messages
35
"Subfloor damage - throw in the towel and call a pro?"

Don't take this the wrong way, but the money you save doing it yourself will come in handy to pay for a pro to do it right.

Then again, finding the right "pro" can also be a challenge.
 

eddieK

Well-known member
Joined
Mar 2, 2017
Messages
695
Location
Nampa Idaho
Kinda late to this thread...I wonder though has anyone ever seen this?


Available in 3" or 4" ABS or PVC

Completely removes the need to block close to pipe on all sides.
 
OP
M

MINIz guy

Well-known member
Joined
Apr 24, 2013
Messages
206
Location
Philly
"Subfloor damage - throw in the towel and call a pro?"


Don't take this the wrong way, but the money you save doing it yourself will come in handy to pay for a pro to do it right.


Then again, finding the right "pro" can also be a challenge.


Wait... you're saying that I have to call a pro anyway since I installed it wrong? Sounds like I wasted money since I need a pro to come back and fix my hack job anyway


Sent from my iPhone using Tapatalk
 
To avoid these ads, REGISTER NOW!
Top Bottom