To avoid these ads, REGISTER NOW!

Suburban garage expansion planning/project

NelsonLt1

Active member
Joined
Aug 22, 2010
Messages
27
Location
Seabrook, TX
Hello all,

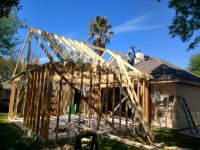
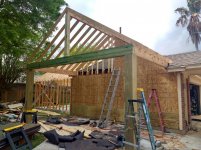
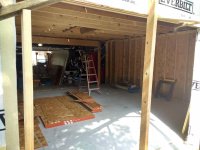
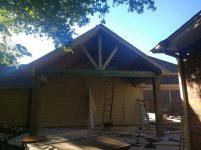
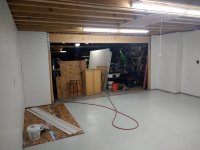
I have found myself in a home with the standard 90's era 20'deep x 24'wide hip roofed detached garage, and have quickly found the need to expand. :sad:

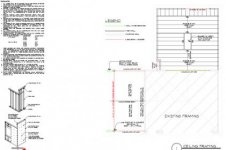
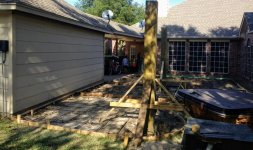
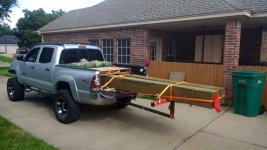
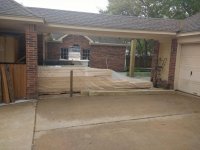
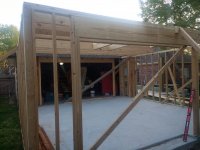
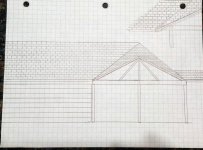
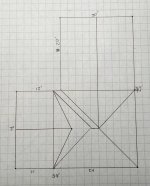
The plan is to add a three wall 20'x20' addition off the back with a gable roof line. In addition to that, we are wanting to add a 20'x10' open gable patio on the other side of the existing garage to add an outdoor living area.
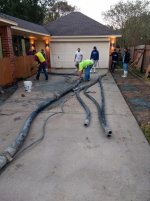
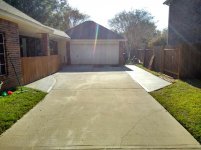
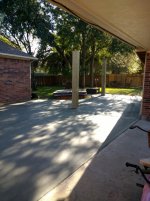
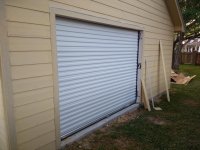
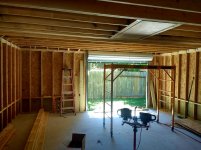
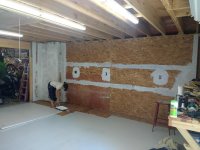
I have attached some preliminary sketches/doodles, but they are rather rudimentary; as well as some pictures of what is currently existing.

What are some user friendly programs(novice) for someone needing to try a few design options?
Also, any suggestions as to design are greatly appreciated!

Updates as to progress will be slow as we are just now in the planning stages.

Thanks for any insight that may be provided!

Luke
 

Attachments

  • garage picture from patio.jpg
    garage picture from patio.jpg
    117.1 KB · Views: 87
  • garage picture from back patio corner.jpg
    garage picture from back patio corner.jpg
    104.7 KB · Views: 81
  • garage picture from back.jpg
    garage picture from back.jpg
    115.6 KB · Views: 70
  • garage view from front.jpg
    garage view from front.jpg
    87 KB · Views: 70
  • garage view from patio.jpg
    garage view from patio.jpg
    135.8 KB · Views: 65
  • garage view from above.jpg
    garage view from above.jpg
    134.7 KB · Views: 67
To avoid these ads, REGISTER NOW!

Mavawreck

Well-known member
Joined
Jan 30, 2011
Messages
1,835
Location
Durham NC
Welcome! I lived in Clear Lake in the mid 90s to early 2000s, did a lot of sailing out of the Seabrook Sailing Club.

I recommend sketchup, found it really easy to use. I watched a few tutorial videos and went from there.
 
Last edited:

JohnnieMo

Well-known member
Joined
Nov 25, 2014
Messages
1,175
Location
Calgary, Alberta
I also used sketchup. It used to be free but I think you can only get free trials now. I recommend the 2015 version. You can. Look at my build thread for sample photos.

I did a similar project to you except I also lifted the original garage for height.
 
OP
N

NelsonLt1

Active member
Joined
Aug 22, 2010
Messages
27
Location
Seabrook, TX
Thank you guys for replies, & suggestion for sketch-up. I tried it out, but was a bit too inept/impatient to use it... Ended up having a drafter draw up some quick plans and had them stamped by the engineer. City & HOA approved everything, so I'm good to start building. It will be a slow process as I'm calling in a few favors for concrete and framing, and they have a few big jobs in the works.

I do need a few suggestions:
1. What do you recommend for outlet spacing & lighting (light duty garage)?
2. anything I should think about for ease of use while constructing?
3. Any issues you see with the plans/design?

Thanks,
Luke
 

Attachments

  • roof framing.jpg
    roof framing.jpg
    18.4 KB · Views: 18
  • foundation plan.jpg
    foundation plan.jpg
    18.1 KB · Views: 23
  • ceiling framing.jpg
    ceiling framing.jpg
    18.7 KB · Views: 33
OP
N

NelsonLt1

Active member
Joined
Aug 22, 2010
Messages
27
Location
Seabrook, TX
It has been a bit from my last post, but I finally had an opportunity to get a few guys in and pour the concrete for the expansion. Almost 27 yards of 3000psi concrete poured with only one little mishap when the hose from the pump truck blew a coupling.

Luke
 

Attachments

  • blown pump hose.jpg
    blown pump hose.jpg
    142 KB · Views: 110
  • driveway aprons.jpg
    driveway aprons.jpg
    144.2 KB · Views: 104
  • posts set & concrete poured.jpg
    posts set & concrete poured.jpg
    145.5 KB · Views: 104
  • rebar & set posts from house.jpg
    rebar & set posts from house.jpg
    149.9 KB · Views: 106
  • rebar & set posts.jpg
    rebar & set posts.jpg
    150.2 KB · Views: 99
  • garage slab prepour.jpg
    garage slab prepour.jpg
    152.3 KB · Views: 103

SuperCat

Well-known member
Joined
Jan 6, 2012
Messages
1,100
Location
Sacramento, CA
Wow, that looks really good, nice neat job by pros. Can't wait to see the construction of the expansion get started. Serious jealousy here, I can't expand in any direction, back of garage is my living room and fence/neighbor only a few feet away on the side. :sad: Go for it, post a bunch of pics, full steam ahead! :thumbup:
 
OP
N

NelsonLt1

Active member
Joined
Aug 22, 2010
Messages
27
Location
Seabrook, TX
Thanks, Supercat! I appreciate the encouragement.
What about extending forward? our neighbor is in the same boat as you, but they are working with an architect to bring the front out an extra 15' to fit his F250 & bay boat.

Yea, the only reason I agreed to buy this place was due to the ability to expand the garage & outdoor living area. Our last place was a beach house with a 1600 sqft garage, and downsizing to 480 has been difficult to say the least. This addition will put me at 880 foot total which should be workable space.
I should start the framing over the Christmas break.... I Hope. Waiting on my 15"x6"x20' treated Powers Beam for the open gable patio first.

Luke
 
OP
N

NelsonLt1

Active member
Joined
Aug 22, 2010
Messages
27
Location
Seabrook, TX
Here are a few more pictures of picking up the beams with my little Tacoma, the trailer was loaded with dirt at the time. Also a few more of the proccess of filling the forms and finishing them off. I went with a light broom & picture frame on the patio and driveway, and a smooth trowel on the garage. I'm pretty sure I'm going with PPG industrial epoxy on the garage floor, unless I find something I like better.
 

Attachments

  • rebar & posts.jpg
    rebar & posts.jpg
    147 KB · Views: 69
  • finished slab.jpg
    finished slab.jpg
    129.9 KB · Views: 70
  • filling slab.jpg
    filling slab.jpg
    133.5 KB · Views: 73
  • texturing patio.jpg
    texturing patio.jpg
    140.5 KB · Views: 78
  • Taco putting in work.jpg
    Taco putting in work.jpg
    83.6 KB · Views: 81
To avoid these ads, REGISTER NOW!

Motoman1100

Well-known member
Joined
Oct 2, 2014
Messages
443
Location
GA
Man I do like size of those post, they just look substantial like they'd outlast the house. Everything is looking great so far.
 
OP
N

NelsonLt1

Active member
Joined
Aug 22, 2010
Messages
27
Location
Seabrook, TX
Well, it has been a bit since I have had anything to add to this post, but I have finally made progress. The weather around the Houston area has been less than cooperative. We finally started the framing on Tuesday, and while we are a little behind, we have made some good progress. Taking a break for lunch now, and trying to decide the color for the floor. :eyecrazy:
Hope to have some more progress pictures over the next couple days.

Cheers,
Luke
 

Attachments

  • IMG_20180311_131615630 (1).jpg
    IMG_20180311_131615630 (1).jpg
    148.5 KB · Views: 80
  • IMG_20180313_121308518_HDR.jpg
    IMG_20180313_121308518_HDR.jpg
    148.6 KB · Views: 68
  • IMG_20180313_143856194.jpg
    IMG_20180313_143856194.jpg
    103.3 KB · Views: 63
  • IMG_20180314_080118658.jpg
    IMG_20180314_080118658.jpg
    147.6 KB · Views: 69
  • IMG_20180314_133202881.jpg
    IMG_20180314_133202881.jpg
    86.6 KB · Views: 64
  • IMG_20180314_133314106_HDR.jpg
    IMG_20180314_133314106_HDR.jpg
    161.6 KB · Views: 67
  • IMG_20180314_145406787.jpg
    IMG_20180314_145406787.jpg
    78.9 KB · Views: 59
OP
N

NelsonLt1

Active member
Joined
Aug 22, 2010
Messages
27
Location
Seabrook, TX
With spring break coming to a close (one of the great perks of working in education ), here are a few more pictures of the construction phase. I originally had one helper and quickly realized if I was going to get the exterior finished in 8 days I had to hire two more guys, as well as hire a small roofing crew to get things dried in.

Luke
 

Attachments

  • IMG_20180315_144002825.jpg
    IMG_20180315_144002825.jpg
    149.3 KB · Views: 61
  • IMG_20180316_133100146_HDR.jpg
    IMG_20180316_133100146_HDR.jpg
    156.3 KB · Views: 63
  • IMG_20180317_090008768.jpg
    IMG_20180317_090008768.jpg
    153.2 KB · Views: 60
  • IMG_20180318_153725436_HDR.jpg
    IMG_20180318_153725436_HDR.jpg
    158.8 KB · Views: 60
  • IMG_20180318_153851204_HDR.jpg
    IMG_20180318_153851204_HDR.jpg
    145.7 KB · Views: 58
  • IMG_20180320_174125489.jpg
    IMG_20180320_174125489.jpg
    148.8 KB · Views: 58
  • IMG_20180320_181811689.jpg
    IMG_20180320_181811689.jpg
    151.6 KB · Views: 54
OP
N

NelsonLt1

Active member
Joined
Aug 22, 2010
Messages
27
Location
Seabrook, TX
Finally finished up with most of the exterior. I have a few trim pieces to get up, then caulking & painting. I'm still undecided as to the ceiling covering; either T&G pine, or cedar fence boards with a half-lap cut into them. Whichever way, I will also carry it over to the breezeway ceiling.
Now I need to get my full layout of tools done so I can run the electrical and dry in.
Any recommendations on what to use on filling the joint & holes in the concrete with prior to grinding and epoxy coating?
 

Attachments

  • IMG_20180323_074836105.jpg
    IMG_20180323_074836105.jpg
    148.7 KB · Views: 39
  • IMG_20180330_142216504.jpg
    IMG_20180330_142216504.jpg
    150.5 KB · Views: 38
  • IMG_20180330_142230269_HDR.jpg
    IMG_20180330_142230269_HDR.jpg
    153.9 KB · Views: 37
  • IMG_20180330_142250720.jpg
    IMG_20180330_142250720.jpg
    153.2 KB · Views: 38
  • IMG_20180330_143233214_HDR.jpg
    IMG_20180330_143233214_HDR.jpg
    150.7 KB · Views: 40
  • IMG_20180330_143304623_HDR.jpg
    IMG_20180330_143304623_HDR.jpg
    157.7 KB · Views: 32

JohnnieMo

Well-known member
Joined
Nov 25, 2014
Messages
1,175
Location
Calgary, Alberta
Those are some serious rafters! You can park a car up there.

Why are you using plywood on the bottom sheeting for the walls? Is that a code thing for water resistance or something? I don't think I've seen that before.

I'm envious of your green grass. Mine is still white.

For flooring have you considered going with Swisstrax or Racedeck? I find it to be my favourite aspect of the new garage.
 
OP
N

NelsonLt1

Active member
Joined
Aug 22, 2010
Messages
27
Location
Seabrook, TX
Yea, they are a bit overboard, but they span 20' and had to be designed for WPI8. Even though I'm not technically in windstorm I.... The line stops about 200yds from our place.

Not code, though I believe it should be. I had my previous house needing the OSB sheathing replaced after 12 years due to decay. It is marine treated plywood; should be good for a while.

it is nice during the spring, but it was already 90 degrees this past weekend, so I'm guessing it will be brown by July.

I had, but a neighbor is the head rep for PPG industrial, and is giving me everything to do the epoxy. Also, I do some woodwork, and I was a bit worried about sawdust getting trapped and holding moisture/rotting.
 

JohnnieMo

Well-known member
Joined
Nov 25, 2014
Messages
1,175
Location
Calgary, Alberta
I had, but a neighbor is the head rep for PPG industrial, and is giving me everything to do the epoxy. Also, I do some woodwork, and I was a bit worried about sawdust getting trapped and holding moisture/rotting.

I had this exact concern also. I find that I can either **** up the dust with the vacuum, or just leave it till the once per year clean up. It sits down there and doesn't cause any trouble for me. In your heat I don't think rotting would be a problem.

If you have a line on epoxy, that is good too. It just needs more upkeep.
 
OP
N

NelsonLt1

Active member
Joined
Aug 22, 2010
Messages
27
Location
Seabrook, TX
Just a quick update on the progress of the garage. It has been slow going amidst a couple vacations, kids out of school, and breaking my ulner; Doctor's orders not to pick anything up over 5 lbs.

Anyway, now back into the swing of getting it done. I finished the electrical, and had the city do the electical/cover-up/final inspection.
I added six outlets, and three drops for lighting. I picked up the 8' strip lights out of the Lowe's clearance section for $19. Each with LED retrofit bulbs for $1.25 each. Seems to make for decent lighting for the price.
My neighbor, the PPG rep, dropped off all the supplies for the garage floor. Pretty straight forward process of etching, sealing, and epoxy top coat. I'll be putting one more coaton, as the first one has a few spots that went on thin.
I then hung OSB, and coated it with three coats of kilz primer. I still need to paint the baseboards/kickboards dark grey, and install after the final coat of flooring. It seems to help with light reflection quite a bit.
I also hung a few scavenged cabinets from a friend's kitchen remodel above the work bench.

Any suggestions for ideas are always welcome!

Luke
 

Attachments

  • IMG_20180628_195111527.jpg
    IMG_20180628_195111527.jpg
    70.7 KB · Views: 18
  • IMG_20180630_131937176.jpg
    IMG_20180630_131937176.jpg
    65 KB · Views: 16
  • IMG_20180630_132011411.jpg
    IMG_20180630_132011411.jpg
    147.4 KB · Views: 15
  • IMG_20180701_155811916.jpg
    IMG_20180701_155811916.jpg
    104.1 KB · Views: 14
  • IMG_20180711_122027039.jpg
    IMG_20180711_122027039.jpg
    146.3 KB · Views: 18
  • IMG_20180711_223954186.jpg
    IMG_20180711_223954186.jpg
    84.3 KB · Views: 20
  • IMG_20180711_224016275.jpg
    IMG_20180711_224016275.jpg
    119.3 KB · Views: 22
To avoid these ads, REGISTER NOW!
Top Bottom