To avoid these ads, REGISTER NOW!

Suggestions needed for garage flat roof edge

DGersic

Well-known member
Joined
Mar 12, 2017
Messages
6,475
Location
DeKalb, IL
I’m working on some repairs to my garage and have reached a point that I don’t know how to handle, so I’m looking for ideas and suggestions.

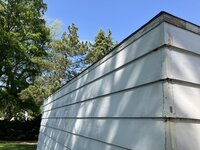
The building is 1950 vintage, with cedar siding and a “flat” roof. It’s not completely flat, it drops about 12” over the 22’ length. Along the front and sides, there is a raised flat border, about 8” wide. The roof drops within the border, so from the ground level it looks flat.

Ground level front:

IMG_4853.jpeg

Ground level side:

IMG_4854.jpeg

The siding is in good shape, but the pine trim along the top edge is shot. That part is easy, I’m going to replace the trim with PVC.

The problem is the transition from roof border to siding edge trim. There is a steel drip edge that is not flush with the roof border, so not really doing its job. The roof is torched down, and generally ok, except for the edge.

IMG_4851.jpeg
IMG_4850.jpeg
IMG_4852.jpeg
IMG_4849.jpeg

Without replacing the whole roof, I’m looking for a way to cap / top / cover the border with something and a drip edge to seal the edges and keep water on the outside.
 
To avoid these ads, REGISTER NOW!

inphx

Well-known member
Joined
Feb 23, 2012
Messages
1,307
Location
Phoenix/Scottsdale AZ
looks like tar paper at edge is loose enough to slip common home depot roof edge flashing under remains of that roofing , that should hide the blistering wood and route water away .

It's critical that that top side get sealed well after that because you don't want water getting under the flashing. I think the home depot Henry Elastomeric would get you some years of use.
 
OP
D

DGersic

Well-known member
Joined
Mar 12, 2017
Messages
6,475
Location
DeKalb, IL
It’s the sealing of the top edge. Elastomeric alone enough? Thinking I need something more positive holding it down.

Drip edge seems to come down about 1 1/2”. That’s actually more than I want, but I’ll see what I can get. Or maybe a few coils of aluminum and rent a brake for a half day.
 
OP
D

DGersic

Well-known member
Joined
Mar 12, 2017
Messages
6,475
Location
DeKalb, IL
looks like tar paper at edge is loose enough to slip common home depot roof edge flashing under remains of that roofing , that should hide the blistering wood and route water away .

It's critical that that top side get sealed well after that because you don't want water getting under the flashing. I think the home depot Henry Elastomeric would get you some years of use.

Which Henry Elastomeric are you thinking here? They have several.

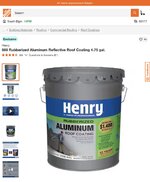
This one has the longest warranty (10 years):

IMG_4831.jpeg


I’ve been using Aluminized coatings on this roof, since the roofer recommended I do that to extend the life of it being almost flat, so this one may be good to do a new coat of the whole roof anyway:

IMG_4833.jpeg


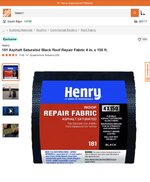
Would running a strip of this down the border to cover the edge first provide a useful help in sealing it?

IMG_4832.jpeg
 

BillK

Well-known member
Joined
Aug 24, 2006
Messages
9,449
Location
Beautiful Southern Maryland
I am not a roofer but I have done several with great results. I was always told to think like water. On the downhill side I would use regular drip edge and slide it under the roofing. But on the uphill side that you show in the picture I think I would use the same thing but put it on top of the roof edge so that it would direct the water over the roofing to the downhill side. If you try put the flashing under the roofing on the uphill side you will be totally depending on whatever sealer you use to keep the water out.

By the way is it leaking at all now ??

Here is how I would do the uphill side:
 

Attachments

  • roof edge.jpeg
    roof edge.jpeg
    1.1 MB · Views: 32

u2slow

Well-known member
Joined
Nov 20, 2011
Messages
3,649
Location
BC
I put down drip flashing, perimeter asphalt shingles, roll roofing on top. All gummed together with cold tar adhesive.
 

inphx

Well-known member
Joined
Feb 23, 2012
Messages
1,307
Location
Phoenix/Scottsdale AZ
Dunno about compatability top he aluminum coating. I'm not a roofer. Between my parents house and mine i made a few mistakes and in the end proper prep and that Henry white elastomeric product worked. I don't know about the asphalt tape, i used lowes: Gardner-0-5-ft-W-x-50-ft-L-25-sq-ft-Black-Roll-Roofing/1006803 it was like a fiberglass netting.

Do not underestimate prep - if you can power wash the roof before doing the Henry product.. it will adhere and deliver. Having dust, mud, loose material will fail over time (months). The product is good but the prep is needed.

A different poster said 'think like water" , yes try minimize any build up of a curb to retain a puddle of water.
 
OP
D

DGersic

Well-known member
Joined
Mar 12, 2017
Messages
6,475
Location
DeKalb, IL
I am not a roofer but I have done several with great results. I was always told to think like water. On the downhill side I would use regular drip edge and slide it under the roofing. But on the uphill side that you show in the picture I think I would use the same thing but put it on top of the roof edge so that it would direct the water over the roofing to the downhill side. If you try put the flashing under the roofing on the uphill side you will be totally depending on whatever sealer you use to keep the water out.

By the way is it leaking at all now ??

Here is how I would do the uphill side:

Bad camera angle. There is no uphill / downhill side. The border area is effectively flat and level.

It’s not leaking now, though it may have contributed to the destruction of the pine trim.
 
OP
D

DGersic

Well-known member
Joined
Mar 12, 2017
Messages
6,475
Location
DeKalb, IL
I thought you said "It’s not completely flat, it drops about 12” over the 22’ length ?????

The border is flat. The roof deck is slightly below the border at the front of the garage, a couple of inches, and drops 12” to the back of the garage. The roofing material starts at the front edge of the border, drapes down on to the roof deck, then continues to the back.

The border area is all I’m working on. Or, at least I hope that the border is all I’m working on. I don’t want to expand this to rereoofing the garage.
 
OP
D

DGersic

Well-known member
Joined
Mar 12, 2017
Messages
6,475
Location
DeKalb, IL
I thought you said "It’s not completely flat, it drops about 12” over the 22’ length ?????

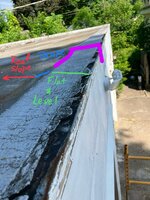
Maybe this helps illustrate better:

IMG_4849.jpeg

The roof surface (red) is fine. The draped area between the border and roof (blue) is also fine. I’m trying not to disturb those.

The (green) border area isn’t leaking, but that front edge is clearly bad. If I get some drip edge under the front, and nail it down, that should help. Then what? Slob some aluminized coating over the whole thing? Or put down some of that roofing patch roll, then slob coating over that?

Or is there a better way to seal this edge up?
 

gazza

Well-known member
Joined
Dec 24, 2009
Messages
364
Location
Melbourne Aust
Down under we would just use a folded sheet metal trim to cover vertical and horizontal edges, either galvanized, zinc alume or pre painted colour bond metal, folded to suit prior then a few screws and a little bit of silicon sealant to finish the job
 
OP
D

DGersic

Well-known member
Joined
Mar 12, 2017
Messages
6,475
Location
DeKalb, IL
This would be a very easy fix for me, I have sheet metal plus a 8' guillotine and 8' folder

I can rent a 10’ brake. Coils of aluminum come in 10’ lengths. No worries there.

Capping the border is an interesting thought. I may do it that way.
 
OP
D

DGersic

Well-known member
Joined
Mar 12, 2017
Messages
6,475
Location
DeKalb, IL
This.

I'd get some trim bent up and over:

IMG_4849~2.jpeg

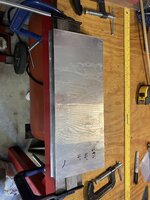
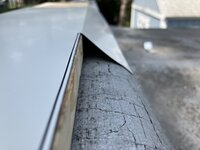
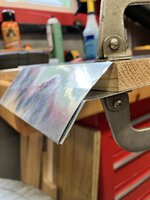
Working on this is next on my list here. I got out some scrap aluminum and my little HF brake to play with this idea.

IMG_5012.jpeg

I put a 1/4” drip edge on the front to direct water away from the surface.

IMG_5013.jpeg

Notes on where to bend.

IMG_5014.jpeg
IMG_5015.jpeg
IMG_5016.jpeg
IMG_5017.jpeg

I think it’ll work. I can make it in 10’ sections with a rented big brake later. I’m not thrilled with having to let it hang out so far from the edge, but the old steel flashing is nailed down and removing it seems more likely to creat more damage than I want to deal with. I might be able to hammer it down tighter to the new trim, once the old trim is removed.

Looking at the roof, I think I want to put a new coat of aluminized roofing paint down first. It’ll be easier to spread that and put the trim over it and I won’t have to deal with not painting up on to the trim edge creating a water trapping edge.

If I go this route, with aluminum (white) coil stock, what do I fasten it down with, and how to best seal those holes? I’m thinking roofing nails would hold it, but then what seals the nails?
 
To avoid these ads, REGISTER NOW!

PCustoms

Well-known member
Joined
Jul 23, 2011
Messages
23,684
Location
VT
Working on this is next on my list here. I got out some scrap aluminum and my little HF brake to play with this idea.

IMG_5012.jpeg

I put a 1/4” drip edge on the front to direct water away from the surface.

IMG_5013.jpeg

Notes on where to bend.

IMG_5014.jpeg
IMG_5015.jpeg
IMG_5016.jpeg
IMG_5017.jpeg

I think it’ll work. I can make it in 10’ sections with a rented big brake later. I’m not thrilled with having to let it hang out so far from the edge, but the old steel flashing is nailed down and removing it seems more likely to creat more damage than I want to deal with. I might be able to hammer it down tighter to the new trim, once the old trim is removed.

Looking at the roof, I think I want to put a new coat of aluminized roofing paint down first. It’ll be easier to spread that and put the trim over it and I won’t have to deal with not painting up on to the trim edge creating a water trapping edge.

If I go this route, with aluminum (white) coil stock, what do I fasten it down with, and how to best seal those holes? I’m thinking roofing nails would hold it, but then what seals the nails?

Can you go way lower on the front, to cover all the wood?
 
OP
D

DGersic

Well-known member
Joined
Mar 12, 2017
Messages
6,475
Location
DeKalb, IL
Well that works too.

What are you using? I want to do some trim on my porch, but damn, $$$.

Around the overhead door is 1x2 and brick mold. The drip edge above the door is a 1x4 ripped on a 20* angle. And inside edges are 3/8” planks and the door seals. Around the man door is 1x2, brick mold, and a 1x3 ripped on a 13* angle to make the drip edge.

IMG_5011.jpeg

Then, wrapped around the top edge will be this trim piece.

IMG_4870.jpeg


But with the fat edge up, reverse from what’s shown here.

I don’t want to hide the trim piece, hence the short front overhang on the proposed aluminum cap over the top of the wall.

With the new man door, this is probably $600 to $700. I haven’t added it up. Don’t really care, it looks much better than the rotted old pine trim, and will never rot again. My neighbor is kicking in part of the money, since the garage is half his, so that helps too.
 
OP
D

DGersic

Well-known member
Joined
Mar 12, 2017
Messages
6,475
Location
DeKalb, IL
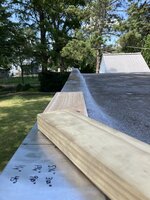
To better deal with the rough and uneven surface that is the roofing material, I think what I’m going to do is nail down some 1x6 boards. That will give be a solid and straight edge to work with.

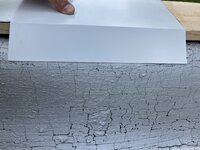
I made up a new prototype today, with the corner wrapped:

IMG_5038.jpegIMG_5039.jpeg

Now I’m trying to decide how to hold this flashing / cap in place. I don’t really want to puncture it with nails or screws, figuring that just makes new places that can leak later, and sealing a flat horizontal surface with a hole in it never lasts as well as not having a hole in the first place.

Reading the manufacturer hype on construction adhesives, Loctite PL Premium 3x Brown Polyurethane Interior/Exterior Construction Adhesive sounds like it may work well. Put down a zig zag bead, drop the flashing / cap in place, then press it down with a J roller.

Think that will work?
 

alwaysFlOoReD

Well-known member
Joined
Sep 24, 2013
Messages
2,441
Location
Airdrie, Alberta, Canada
Use 2*? and screw the face of the flashing. I would lay the 2* and pre-drill small holes thru into the roof. Pull up the 2* and caulk where the screw will go. Then lay the 2* down and screw it off. Then apply the flashing and face nail or screw. Don't forget to caulk the seams of the flashing. If you use pressure treated (PT) make sure to cover the wood with something to prevent the wood and flashing from touching each other, otherwise you will have corrosion eating holes within a year. Stainless or double dipped galvanized if using PT.
 
OP
D

DGersic

Well-known member
Joined
Mar 12, 2017
Messages
6,475
Location
DeKalb, IL
Use 2*? and screw the face of the flashing. I would lay the 2* and pre-drill small holes thru into the roof. Pull up the 2* and caulk where the screw will go. Then lay the 2* down and screw it off. Then apply the flashing and face nail or screw. Don't forget to caulk the seams of the flashing. If you use pressure treated (PT) make sure to cover the wood with something to prevent the wood and flashing from touching each other, otherwise you will have corrosion eating holes within a year. Stainless or double dipped galvanized if using PT.

2x lumber just makes this assembly taller.

Caulk under the lumber seems like a good idea.

Only nailing the face of the cap seems insufficient. That only holds down 2” of a 10” wide piece. That‘s what got me looking at adhesives.

Not using PT. This shouldn’t ever get wet. It’s just there to give the flashing some support.
 

alwaysFlOoReD

Well-known member
Joined
Sep 24, 2013
Messages
2,441
Location
Airdrie, Alberta, Canada
If you're going to face screw, it'd much easier to hit the center of 1.5" than 3/4".

I've installed thousands of feet of fascia (L shaped) up to 12" in width. Its held on with screws along the bottom L that is at most 1" wide. Fascia is fighting gravity. Your flashing is sitting on top. Glue only I think expansion/contraction of the metal will break it loose. I've seen movement up to 3/4" in 10' with fascia. Use both methods of attachment to be safe...
 
OP
D

DGersic

Well-known member
Joined
Mar 12, 2017
Messages
6,475
Location
DeKalb, IL
If you're going to face screw, it'd much easier to hit the center of 1.5" than 3/4".

I've installed thousands of feet of fascia (L shaped) up to 12" in width. It’s held on with screws along the bottom L that is at most 1" wide. Fascia is fighting gravity. Your flashing is sitting on top. Glue only I think expansion/contraction of the metal will break it loose. I've seen movement up to 3/4" in 10' with fascia. Use both methods of attachment to be safe...

Makes sense. I can hit 3/4”, just have to be careful. I have time.

Both nails and adhesive seems like a good idea. With this, I’m not concerned with gravity, but I am concerned about wind. The back side of it has nothing to attach it to, so there’s potential for it to be lifted off.
 

alwaysFlOoReD

Well-known member
Joined
Sep 24, 2013
Messages
2,441
Location
Airdrie, Alberta, Canada
So for the wind part...
Perhaps make a piece that screws to the wood that the flashing hooks to and face screw the opposite side. Kind of like the hangers used for gutter. This piece would be hidden under the flashing. You would use an open hem on the roof side to catch the new piece.
 
OP
D

DGersic

Well-known member
Joined
Mar 12, 2017
Messages
6,475
Location
DeKalb, IL
So for the wind part...
Perhaps make a piece that screws to the wood that the flashing hooks to and face screw the opposite side. Kind of like the hangers used for gutter. This piece would be hidden under the flashing. You would use an open hem on the roof side to catch the new piece.

I’ve been trying to, but I can’t envision this.

I’m starting with something like this, shown as a cutaway section, end on:

IMG_4884.jpeg

Drawing not to scale, but that’s the basic idea. On the front (left) is siding with trim. On the back, roof (right), is a flat roof with a torched down roofing material that comes up, unsupported, on to the top of this wall section.

I don’t have a name for this building roof design. I’d have called it a facade or something like one. The facade is U shaped, with the arms of the U forming the garage sides. Within the U, the essentially flat roof drops about 10” from front to back. The roofing is draped with the most gap at the front, because of how it has to lay in to the front corners. By the time it gets to the back of the garage, it’s pretty close to the underlying wood structure, with just the curve needed to change directions.

To this, I‘m planning to top it with 1x6 and an aluminum cap.

IMG_4885.jpeg

I can bond the aluminum on the front edge and the top. I can nail the front edge.

So now it’s the back edge that I’m looking at. I don’t want to find my cap blown off by any wind getting under that unsupported back edge. It will be angled down, as shown, and I’ll massage it to get it to follow the roof surface as closely as possible. There will be gaps between the edge of the aluminum and the roofing, though. Maybe that’s good enough?

Because the roofing material is unsupported, there’s nothing I can directly nail it to.

Are you suggesting some kind of bracket, through the roofing and in to the back of the facade structure? Like this

IMG_4886.jpeg

I don’t think I want to pierce the roofing material. Even if I can make something like this, and maybe angle it so that the hole in the roofing is above the hole in the flashing, it just seems like I would be inviting trouble with leaks as well as weakening the unsupported roofing by putting holes in it.

It may be that I’m overthinking this. There won’t be a lot of room for wind to get under there. The Loctite adhesive seems pretty strong, though I get your concern about the adhesive pulling loose due to thermal expansion.

The temperature swing I’ve seen here has been -30F to 115F. An online calculator shows

IMG_4888.jpeg

Less than 1/4” for a 150F temperature swing. That seems acceptable. But it’s a lot less than your reported 3/4”. What did it take to get that much growth from your fascia?
 

alwaysFlOoReD

Well-known member
Joined
Sep 24, 2013
Messages
2,441
Location
Airdrie, Alberta, Canada
Squeeze the bracket in dark blue between the 1x6 and the top of the wall end section, or nail into the end face like your doing on the front. That avoids penetrating into the roof. Also there would be a 150° hem, or return, of the green flashing that catches the end of the blue bracket.
As far as expansion goes, color of material may make the difference. I went by what I saw on the paint. Memory may be exaggerating slightly but 1/2" in 10' is what I remember seeing. You could do some type of slip seam such as done on commercial cladding.
 

Bert_

Well-known member
Joined
Dec 24, 2016
Messages
9,924
Location
NW Iowa
Not using PT. This shouldn’t ever get wet. It’s just there to give the flashing some support.

I don't care whether you use pressure treated or not. But if you think it's never going to get wet, you're dreaming. You're flashing will definitely help the situation but it's not perfect.

The way it's designed it's probably leaked from day one. The roof really needs to either wrap over the corner onto the wall or it should have a parapet wall.
 
OP
D

DGersic

Well-known member
Joined
Mar 12, 2017
Messages
6,475
Location
DeKalb, IL
I don't care whether you use pressure treated or not. But if you think it's never going to get wet, you're dreaming. You're flashing will definitely help the situation but it's not perfect.

The way it's designed it's probably leaked from day one. The roof really needs to either wrap over the corner onto the wall or it should have a parapet wall.

Fair point. It will, I guess, occasionally get wet. Water doesn’t normally flow uphill, so it won’t be getting very wet, and it won’t be staying wet for long. I don’t think wet is enough of a concern here to require pressure treated lumber.
 
OP
D

DGersic

Well-known member
Joined
Mar 12, 2017
Messages
6,475
Location
DeKalb, IL
Squeeze the bracket in dark blue between the 1x6 and the top of the wall end section, or nail into the end face like your doing on the front. That avoids penetrating into the roof. Also there would be a 150° hem, or return, of the green flashing that catches the end of the blue bracket.
As far as expansion goes, color of material may make the difference. I went by what I saw on the paint. Memory may be exaggerating slightly but 1/2" in 10' is what I remember seeing. You could do some type of slip seam such as done on commercial cladding.

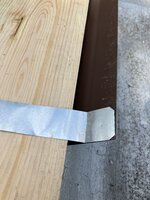
I messed around with this idea today.

IMG_5055.jpeg
IMG_5054.jpeg

I don’t think there’s enough room to drill this for attaching it without puncturing the roofing.

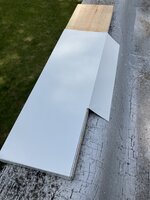
Looking at it today with this piece

IMG_5052.jpeg
IMG_5053.jpeg
IMG_5056.jpeg

I think I’m overthinking this. That edge isn’t going to let much, if any, wind under it. With the top bonded down, and the front bonded and nailed, it’s pretty well attached and won’t come off without a lot of effort. The aluminum gives up before the adhesive does.

Given that it isn’t leaking now, I don’t think this is going to leak. I think I’m going with it this way.
 

alwaysFlOoReD

Well-known member
Joined
Sep 24, 2013
Messages
2,441
Location
Airdrie, Alberta, Canada
I think you're right, the wind won't get under much if at all.
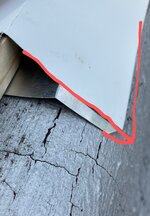
However, you didn't catch what I meant by a hem. The 150° bend on the end touching the roof. That would catch the lower piece and wouldn't need nail or screw. I tried to mark your pic to make my meaning clearer. Hope that is accomplished...
IMG_5054~3.jpeg
This way no glueing, its all mechanical fastening.
 
OP
D

DGersic

Well-known member
Joined
Mar 12, 2017
Messages
6,475
Location
DeKalb, IL
I think you're right, the wind won't get under much if at all.
However, you didn't catch what I meant by a hem. The 150° bend on the end touching the roof. That would catch the lower piece and wouldn't need nail or screw. I tried to mark your pic to make my meaning clearer. Hope that is accomplished...
IMG_5054~3.jpeg
This way no glueing, it’s all mechanical fastening.

Yeah, I got that idea too, just didn’t get something to show for it.
 
OP
D

DGersic

Well-known member
Joined
Mar 12, 2017
Messages
6,475
Location
DeKalb, IL
I think you're right, the wind won't get under much if at all.
However, you didn't catch what I meant by a hem. The 150° bend on the end touching the roof. That would catch the lower piece and wouldn't need nail or screw. I tried to mark your pic to make my meaning clearer. Hope that is accomplished...
IMG_5054~3.jpeg
This way no glueing, its all mechanical fastening.

IMG_5061.jpeg

Using flashing for the “bracket” doesn’t do much without having the bracket attached to the flashing. I did get some additional vertical stiffness by using thicker galvanized steel. If I was going to do this, I’d buy a bunch of Simpson strap brackets and rig up a jig to bend them so that they’d all be the same.
 
To avoid these ads, REGISTER NOW!
Top Bottom