To avoid these ads, REGISTER NOW!

T2's Garage Build

WAKman

Active member
Joined
Nov 8, 2019
Messages
42
Location
Washington
Welcome to my build thread. For as long as I can remember, my dream has been to build a large detached garage just the way I wanted it. My wife and I moved into our latest--and hopefully last--house in May, and thus began the long, arduous, and expensive permitting process.

Today we broke ground. Lily and Louise, our two corgis, were very interested.
 

Attachments

  • IMG_5202.jpg
    IMG_5202.jpg
    110.5 KB · Views: 186
  • IMG_5200.jpg
    IMG_5200.jpg
    140.8 KB · Views: 151
  • IMG_5194.jpg
    IMG_5194.jpg
    151.1 KB · Views: 148
Last edited:
To avoid these ads, REGISTER NOW!
OP
W

WAKman

Active member
Joined
Nov 8, 2019
Messages
42
Location
Washington
Some more photos. The dirt guy (as he refers to himself) was happy to find some good firm clay under a sandy top. Garage will be 24x34, with an additional 8x18 foot bumpout on the back for storage. Total square footage will be 960, just under the 1000 sq ft permitted by the local building codes for auxiliary buildings.
 

Attachments

  • IMG_0430.jpg
    IMG_0430.jpg
    154.8 KB · Views: 132
  • IMG_5407.jpg
    IMG_5407.jpg
    158.9 KB · Views: 123
  • IMG_5358.jpg
    IMG_5358.jpg
    158.6 KB · Views: 131
Last edited:
OP
W

WAKman

Active member
Joined
Nov 8, 2019
Messages
42
Location
Washington
Here are the elevations. The end with the bumpout is the end next to the trees that he is digging out in the photos.
 

Attachments

  • Terry Thomas Garage-SHT 2.pdf
    106.2 KB · Views: 66

ConCretin

Well-known member
Joined
Jan 20, 2011
Messages
3,378
Location
Central Maine
Congrats on getting your project started. Looks like a great garage.

I have a couple suggestions about your concrete slab design. Placing a layer of sand over your vapor barrier is rarely done anymore as it creates more problems than it solves. You might consider upgrading to a 15 mil vapor barrier - especially if you think you might apply a floor covering such as epoxy - and eliminate the sand course.

A six inch slab thick slab is unnecessary. Reducing the concrete to 4 or 5 inches thickness would save a few bucks.

Finally, the specified 2.1 wire mesh is quite light and will be more difficult to support. I'd consider going with a 2.9 wire but in any case make sure they provide the wire in sheets rather than rolls and support it at mid slab.

Take a look at my Guide to Floor slabs in the link below if you have a few minutes to kill.
 
OP
W

WAKman

Active member
Joined
Nov 8, 2019
Messages
42
Location
Washington
Congrats on getting your project started. Looks like a great garage.

I have a couple suggestions about your concrete slab design. Placing a layer of sand over your vapor barrier is rarely done anymore as it creates more problems than it solves. You might consider upgrading to a 15 mil vapor barrier - especially if you think you might apply a floor covering such as epoxy - and eliminate the sand course.

A six inch slab thick slab is unnecessary. Reducing the concrete to 4 or 5 inches thickness would save a few bucks.

Finally, the specified 2.1 wire mesh is quite light and will be more difficult to support. I'd consider going with a 2.9 wire but in any case make sure they provide the wire in sheets rather than rolls and support it at mid slab.

Take a look at my Guide to Floor slabs in the link below if you have a few minutes to kill.

This is exactly what is so valuable about posting here--the depth of knowledge is amazing. Appreciate your input--I'll share it with my builder. This is my first rodeo, so I'm all ears.

a question: mst people get their photos to oad full sized, whereas mine only come out as thumbnails. Couldn't find anything in the FAQs about this. Am I missing a box check or something?
 
OP
W

WAKman

Active member
Joined
Nov 8, 2019
Messages
42
Location
Washington
Here is where he ended up last night. The guy is really good, but more importantly, HE LET ME DRIVE THE DOZER!!! My wife, She Who Has Made Everything Possible, said I spent the day running around like a little kid.
 

Attachments

  • IMG_4201.jpg
    IMG_4201.jpg
    157 KB · Views: 113
  • IMG_8314.jpg
    IMG_8314.jpg
    157.2 KB · Views: 107
  • IMG_6879.jpg
    IMG_6879.jpg
    161.2 KB · Views: 105

lakeroadster

Well-known member
Joined
Jan 19, 2015
Messages
5,166
Location
Central Colorado
a question: mst people get their photos to oad full sized, whereas mine only come out as thumbnails. Couldn't find anything in the FAQs about this. Am I missing a box check or something?

After you load the photo's like you have been doing, drag the file up into the text.

Then put
behind the file name.

Then the photo will look like this

attachment.php


attachment.php
 

Attachments

  • Wakman.jpg
    Wakman.jpg
    110.5 KB · Views: 1,214
  • Wakman Script.jpg
    Wakman Script.jpg
    133.7 KB · Views: 1,217
Last edited:

lakeroadster

Well-known member
Joined
Jan 19, 2015
Messages
5,166
Location
Central Colorado
Finally, the specified 2.1 wire mesh is quite light and will be more difficult to support. I'd consider going with a 2.9 wire but in any case make sure they provide the wire in sheets rather than rolls and support it at mid slab.

This is exactly what is so valuable about posting here--the depth of knowledge is amazing. Appreciate your input--I'll share it with my builder. This is my first rodeo, so I'm all ears.

I'd suggest using concrete dobies to locate the wire mesh. They have wire ties to hold them in place. Also, the wire mesh sheets should be overlapped and then tied together using re-bar wire.

If you use sheets of 6 x 6-W2.9 x W2.9 wire mesh, and 3 inch tall dobies, the workers can walk on it and it will deform and then flex right back into position. The reason I mention this is your contractor will likely say he is just going to "pull up the mesh with a hoe as they pour the concrete"... and that never works. Then he'll say, those concrete dobies will get in the way and the guys walking on the mesh will just push it to the bottom anyway". Nope, not if you use 6 x 6-W2.9 x W2.9 mesh.

I used the 6 x 6-W2.9 x W2.9 and concrete dobies on the slab for my barn and they worked great. More data in my barn build thread below.

Ask them how they plan to compact the sub-grade... proper compaction of the sub grade is critical. When they are done it should be so hard that when you walk on it you'd think you were walking on concrete. If you can easily drive a wooden construction stake into it... it's not compacted enough.
 

Attachments

  • Dobie 003.jpg
    Dobie 003.jpg
    126.8 KB · Views: 102
  • Dobie 002.jpg
    Dobie 002.jpg
    152.9 KB · Views: 101
  • Dobie 000.jpg
    Dobie 000.jpg
    97 KB · Views: 98
OP
W

WAKman

Active member
Joined
Nov 8, 2019
Messages
42
Location
Washington
Thank you, Lakeroadster!

Finished up a little bit ago. The tripod, which sits about 4 feet high, gives a sense of scale.https://www.garagejournal.com/forum/attachment.php?attachmentid=951811&stc=1&d=1575152170[img]

[url]https://www.garagejournal.com/forum/attachment.php?attachmentid=951811&stc=1&d=1575140034[/url]
 

Attachments

  • IMG_5399.jpg
    IMG_5399.jpg
    157.9 KB · Views: 105
  • IMG_0153.jpg
    IMG_0153.jpg
    159 KB · Views: 105
  • IMG_3287.jpg
    IMG_3287.jpg
    159.4 KB · Views: 106
Last edited:

Jayman17

Well-known member
Joined
Feb 6, 2017
Messages
3,795
Location
Seattle, Wa
Hi, I like to see local guys building their shops, sub'd. :thumbup:
Thanks for posting, what area of WA are you in?

Jay
 
OP
W

WAKman

Active member
Joined
Nov 8, 2019
Messages
42
Location
Washington
Congrats on getting your project started. Looks like a great garage.

I have a couple suggestions about your concrete slab design. Placing a layer of sand over your vapor barrier is rarely done anymore as it creates more problems than it solves. You might consider upgrading to a 15 mil vapor barrier - especially if you think you might apply a floor covering such as epoxy - and eliminate the sand course.

A six inch slab thick slab is unnecessary. Reducing the concrete to 4 or 5 inches thickness would save a few bucks.

Finally, the specified 2.1 wire mesh is quite light and will be more difficult to support. I'd consider going with a 2.9 wire but in any case make sure they provide the wire in sheets rather than rolls and support it at mid slab.

Take a look at my Guide to Floor slabs in the link below if you have a few minutes to kill.

Well, Jim, I had a chance to look through your guide, as well as your epic build thread. Super interesting stuff.

I had planned on using a vapor barrier. Here in the Pac NW the ground can be damp (yes, it's true) and the water table can be high, but even down at the bottom of the hole, it appears we have really solid clay-like soil. Nonetheless, I plan on using the barrier, and your point on the need for it if using epoxy on the floor (as I will be) is well taken. I used to own a company that encapsulated crawl spaces, and we used a fiberglass-reinforced 20-mil vapor barrier that was plenty tough. One of its features was that once installed, you could use the crawlspace for storage. I think I'll grab a roll of that from the guy who bought my company. (I think we're still friends!)

I will be onsite during most of the construction, doing some of it myself (siding, insulation, drywall, doors, finish work) but hiring the big stuff out to pros. I plan to not only consult with GJ every step of the way for relevant info, but also to document my build for others to use.

Terry
 
OP
W

WAKman

Active member
Joined
Nov 8, 2019
Messages
42
Location
Washington
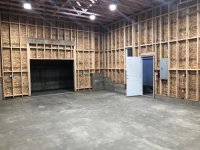
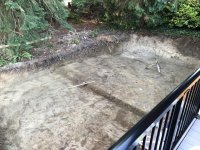
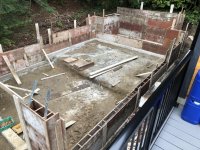
By design, I'm making as few decisions as possible about equipment placement and the like until I get the shell up and can better visualize what should go where. I have a Bend-Pak low-rise scissor lift, and I've always liked installs where people have put these in a shallow pit so that they are flush with the floor. If you put a lid on them, they can blend right into the floor when not in use, or can be used as a heavy-duty adjustable table, as well as used as a regular lift.

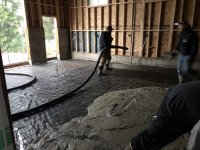
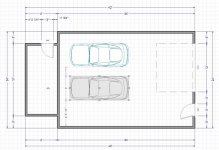
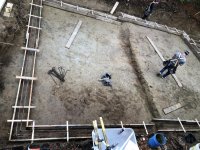
With the slab going in in the next week or so, I had to make a decision on where to place the lift so we could incorporate the it into the slab with forms, provisions for power and hydraulics, etc. I considered multiple configurations, and an online friend was even nice enough to create these CAD drawings from the dimensions to show possible configurations, complete with cool scale Porsche 911s. The darker shaded areas would represent where the scissor lift pit would go.

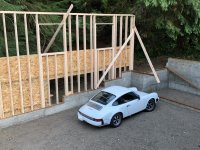
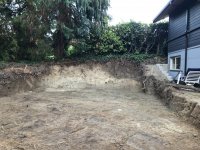
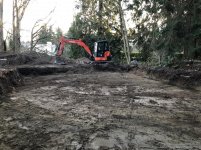
Well, after much thought and consternation, I decided not to dig the pit, and to continue to use the scissor lift as a movable above-ground appliance. Given that a decision at this point would be literally set in stone (well, concrete) I decided the risk was too large that I might regret the location chosen before any other equipment had been installed or any shop work flow established. So I decided to just punt on this for now.
 

Attachments

  • garage cad 1.jpg
    garage cad 1.jpg
    64.1 KB · Views: 80
  • Garage cad 2.jpg
    Garage cad 2.jpg
    63.6 KB · Views: 74
  • Garage cad 3.jpg
    Garage cad 3.jpg
    65.3 KB · Views: 70

Pluribus

Well-known member
Joined
Dec 16, 2012
Messages
2,143
Location
Skagit County, WA
Welcome from just north of you! Hope you can make some good progress before things get too wet; we've had a really dry spell here lately, which probably made your excavation a whole lot easier than it could have been.
 
OP
W

WAKman

Active member
Joined
Nov 8, 2019
Messages
42
Location
Washington
Welcome from just north of you! Hope you can make some good progress before things get too wet; we've had a really dry spell here lately, which probably made your excavation a whole lot easier than it could have been.

Howdy neighbor! Whereabouts?
 
OP
W

WAKman

Active member
Joined
Nov 8, 2019
Messages
42
Location
Washington
The foundation crew showed up early in the fog and began staking out the site and preparing to pour the walls. It was exciting to finally see things beginning to come together.
 

Attachments

  • IMG_7198.jpg
    IMG_7198.jpg
    149.4 KB · Views: 82
  • IMG_1178.jpg
    IMG_1178.jpg
    156.3 KB · Views: 82
  • IMG_8485.jpg
    IMG_8485.jpg
    156.7 KB · Views: 79
  • IMG_2525.jpg
    IMG_2525.jpg
    153.5 KB · Views: 89
OP
W

WAKman

Active member
Joined
Nov 8, 2019
Messages
42
Location
Washington
Today the foundation walls were added atop the footers. Here are the forms in place, awaiting inspection by the city, which came through and the fun began.
attachment.php
 

Attachments

  • IMG_3324.jpg
    IMG_3324.jpg
    159.4 KB · Views: 90
Last edited:
To avoid these ads, REGISTER NOW!

Pluribus

Well-known member
Joined
Dec 16, 2012
Messages
2,143
Location
Skagit County, WA
Howdy neighbor! Whereabouts?

Sorry to hear about the delayed schedule in your other thread. Have you decided on proceeding with closing in the structure or getting the slab poured first?

I'm east of Mount Vernon and wanting to build a shop also, but I'm a little worried about being able to get contractors right now.
 
OP
W

WAKman

Active member
Joined
Nov 8, 2019
Messages
42
Location
Washington
Sorry to hear about the delayed schedule in your other thread. Have you decided on proceeding with closing in the structure or getting the slab poured first?

I'm east of Mount Vernon and wanting to build a shop also, but I'm a little worried about being able to get contractors right now.

We're goin to close in the structure before pouring the slab.

Contractors are busy right now, but I like mine. PM if you want a recommendation.
 
OP
W

WAKman

Active member
Joined
Nov 8, 2019
Messages
42
Location
Washington
Took some time before the concrete set up last night to memorialize my relationship with She Who Makes It All Possible. Going on 39 years married, and this is definitely the best XMAS present she has given me.
attachment.php
 

Attachments

  • IMG_50441576715263.jpg
    IMG_50441576715263.jpg
    128.3 KB · Views: 682
OP
W

WAKman

Active member
Joined
Nov 8, 2019
Messages
42
Location
Washington
Today the crew removed the forms from the foundation walls. It all came out very nice--walls are straight, true, and plumb. Pretty happy so far. With the massive columns that run up each side of the garage door, this thing looks like it's not gonna go anywhere.
attachment.php


Here is the buck out for the man door that is opposite the entry door to the lower level of the house. The conduit will allow the main wiring from the house to enter under the slab.

attachment.php


Tomorrow the building crew will lay out the drainage pipes. We'll be adding some of them behind the 7-foot wall, as we'd like to avoid water problems at the cold joint where the retaining meets the slab.

I'm learning a lot as we go, and hope my experience are useful to others.
 
OP
W

WAKman

Active member
Joined
Nov 8, 2019
Messages
42
Location
Washington
Today's efforts centered around drainage and water con trol. For those unfamiliar with Seattle, we have approximately 11 months per year of rain, followed by a couple of weeks of intermittent sunshine. We call the latter "summer." Please folks--don't move here!
:)
My builder was concerned about the cold joint at the back end of the garage where it cuts into the hill, so we made sure to provide exterior escape routes. I'm beginning to appreciate just how much knowledge goes into a project like this, and am delighted to be learning so much new stuff.

attachment.php
 

Attachments

  • IMG_2219.jpg
    IMG_2219.jpg
    154.3 KB · Views: 59
  • IMG_2218.jpg
    IMG_2218.jpg
    151.2 KB · Views: 61
  • IMG_2231.jpg
    IMG_2231.jpg
    153.7 KB · Views: 60
  • IMG_2222.jpg
    IMG_2222.jpg
    159.8 KB · Views: 58
  • IMG_2226.jpg
    IMG_2226.jpg
    156.5 KB · Views: 62
  • IMG_2228.jpg
    IMG_2228.jpg
    152.6 KB · Views: 58
  • IMG_2220.jpg
    IMG_2220.jpg
    157.2 KB · Views: 667
OP
W

WAKman

Active member
Joined
Nov 8, 2019
Messages
42
Location
Washington
Making some cool progress over the last few days. New Year's day, took the main occupant out for a tour of her new digs. Wife caught the moment I did the Steve McQueen salute.


attachment.php
 

Attachments

  • IMG_2340.jpg
    IMG_2340.jpg
    157.3 KB · Views: 43
  • IMG_5453.jpg
    IMG_5453.jpg
    132.9 KB · Views: 612
  • IMG_1114.jpg
    IMG_1114.jpg
    148.9 KB · Views: 56
  • IMG_2218.jpg
    IMG_2218.jpg
    151.6 KB · Views: 54
  • IMG_9588.jpg
    IMG_9588.jpg
    160.4 KB · Views: 64
  • C2E2F75D-EEDA-4DA7-86E6-E2821746A80C.jpg
    C2E2F75D-EEDA-4DA7-86E6-E2821746A80C.jpg
    154 KB · Views: 51
  • C847CFF7-68D5-4CE2-94B0-E18E5086E2CE.jpg
    C847CFF7-68D5-4CE2-94B0-E18E5086E2CE.jpg
    155 KB · Views: 52

ConCretin

Well-known member
Joined
Jan 20, 2011
Messages
3,378
Location
Central Maine
That is a well thought out drain system for your gutters. Maybe I missed it but have you considered a foundation drain to deal with any subsurface water along the back wall? It looks like you have dampproofed the wall, which is fine but it isn't waterproofing. Subsurface drainage will reduce the likelihood of water intrusion through the wall and reduce the lateral load on the foundation from saturated soils.

Maybe I missed this too but I'm curious about the intent of the tall concrete walls flanking the overhead doors? seismic maybe?
 
Last edited:
OP
W

WAKman

Active member
Joined
Nov 8, 2019
Messages
42
Location
Washington
Looks like it's going to be a great garage/shop, especially if you keep it full of German goodness!

Thank you. My mind's eye is already envisioning a BMW 2002 hotrod, in Inka Orange, like the one my wife and I took on our honeymoon almost 40 years ago. Genevieve was her name, and she overheated at toll booth lines on the Connecticut Turnpike. So my new bride and I spent our first day of marital bliss shutting her off and rolling her forward in those lines. Knew right then she was a keeper. The wife; not Genevieve, though I wish I still had her but But I've owned something cool and German ever since.

That is a well thought out drain system for your gutters. Maybe I missed it but have you considered a foundation drain to deal with any subsurface water along the back wall? It looks like you have dampproofed the wall, which is fine but it isn't waterproofing. Subsurface drainage will reduce the likelihood of water intrusion through the wall and reduce the lateral load on the foundation from saturated soils.

Maybe I missed this too but I'm curious about the intent of the tall concrete walls flanking the overhead doors? seismic maybe?

We did consider a foundation drain back there, but the builder thought adding perforated PVC toward the base of the wall, plus the water management pipes near the top. Hope he's right. I don't really want to need a drain in there if I can help it, and will add a a sump pump if necessary.

Yes--the concrete walls at the front are for shear in seismic conditions. We're planning for the Big One out here, which might just give my garage water frontage.
 
OP
W

WAKman

Active member
Joined
Nov 8, 2019
Messages
42
Location
Washington
Significant progress since the last update, with the walls mostly framed in despite awful Seattle weather.
attachment.php


Man in photo is actual size. This garage will end up having the same enclosed volume as our entire house. Which in my book is just about right.

attachment.php
 

Attachments

  • IMG_5936.jpg
    IMG_5936.jpg
    155.2 KB · Views: 33
  • IMG_0250.jpg
    IMG_0250.jpg
    160.7 KB · Views: 37
  • IMG_9049.jpg
    IMG_9049.jpg
    160 KB · Views: 34
  • IMG_4796.jpg
    IMG_4796.jpg
    160.2 KB · Views: 32
  • IMG_5438.jpg
    IMG_5438.jpg
    158.3 KB · Views: 516
  • IMG_0337.jpg
    IMG_0337.jpg
    161.8 KB · Views: 516

Jayman17

Well-known member
Joined
Feb 6, 2017
Messages
3,795
Location
Seattle, Wa
Today's efforts centered around drainage and water con trol. For those unfamiliar with Seattle, we have approximately 11 months per year of rain, followed by a couple of weeks of intermittent sunshine. We call the latter "summer." Please folks--don't move here!
:)

:thumbup::thumbup: Yes, he's right please don't move here. :bounce:

Been awhile since I checked in, lots of progress and it's looking great. Just in time for the upcoming snow. :wtf:

BTW, I'm down in Seattle but I work up in Everett.

Jay
 
OP
W

WAKman

Active member
Joined
Nov 8, 2019
Messages
42
Location
Washington
Trusses arrived yesterday, and the first was placed this morning.

attachment.php

attachment.php


I'm happy that the garage is relatively invisible from the street, tucked down in a hole behind the front greenery. It was important to me not to interfere with any neighbor's view or even make too much change in the neighborhood, which has been here since WW2.

attachment.php
 

Attachments

  • IMG_3236.jpg
    IMG_3236.jpg
    155.9 KB · Views: 388
  • IMG_0389.jpg
    IMG_0389.jpg
    156.5 KB · Views: 390
  • IMG_7049.jpg
    IMG_7049.jpg
    153.7 KB · Views: 386
  • IMG_9884.jpg
    IMG_9884.jpg
    160.9 KB · Views: 40

Matt Johnson

Well-known member
Joined
May 2, 2014
Messages
59
Location
Washington State
I was thinking about your project today, while doing some yard work in this great Everett weather (Silver Lake area here).

I hope all is well!

Matt
 

Jayman17

Well-known member
Joined
Feb 6, 2017
Messages
3,795
Location
Seattle, Wa
Garage progress is looking good! I like the storage bump-out in the back.
That would be great place for hand sanitizer and TP! :lol_hitti
Thanks for the update.

Jay
 
OP
W

WAKman

Active member
Joined
Nov 8, 2019
Messages
42
Location
Washington
. . . and here we are today!

attachment.php
 

Attachments

  • IMG_6324.jpg
    IMG_6324.jpg
    151.9 KB · Views: 90
Last edited:

ODIS

Well-known member
Joined
Apr 30, 2012
Messages
2,110
Location
Pacific Northwest
Your garage space looks really nice. Will bet you are having some fun in there.

What are the plans going forward?

All the best,

Odis.
 
OP
W

WAKman

Active member
Joined
Nov 8, 2019
Messages
42
Location
Washington
Your garage space looks really nice. Will bet you are having some fun in there.

What are the plans going forward?

All the best,

Odis.

Hey Odis,

Well your garage build was one of the ones that inspired me!

Plans going forward are to a bit uncertain. I suspect that my employment will not survive COVID budget cuts, so I'll have a lot of time to fill up. Will continue building my Porsche 911 hotrod. (That will never be done.) After that, I'd love to build a BMW 2002 hotrod of some sort. In the meantime, I have a bunch of little car and truck projects to fill in the spaces.
 
To avoid these ads, REGISTER NOW!
Top Bottom