To avoid these ads, REGISTER NOW!

Tables and Mailbox

ahansom

Well-known member
Joined
Oct 3, 2021
Messages
53
Location
Santa Barbara
First post after being a long term follower.
Had some 3"x3" aluminum tubing at work that was being discarded. We got it for temporary sign posts a few years ago and never used it.
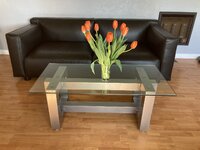
My wife suggested I make a coffee table and dinner table for our sons new house. After showing me a few pictures, this is what we came up with. I TIG welded one and spool gunned the other. Spool gun is way faster but really not as clean looking welds so the welds all got ground down. Powder-coating hid most of the sins.. Had enough left over to make a "chain" mailbox post.

66664469791__D8A76787-832F-4953-B015-585C668550D1.jpeg
 

Attachments

  • IMG_3502.jpeg
    IMG_3502.jpeg
    367.2 KB · Views: 107
  • IMG_3497.jpeg
    IMG_3497.jpeg
    573.3 KB · Views: 103
  • IMG_2794.jpeg
    IMG_2794.jpeg
    295.8 KB · Views: 117
To avoid these ads, REGISTER NOW!
OP
A

ahansom

Well-known member
Joined
Oct 3, 2021
Messages
53
Location
Santa Barbara
Thanks everyone
Actual build time wasn't that long. Cutting, notching and prepping went quickly since several pieces are the same length. Welding took a while longer. Each of the 12-45* joints has 12" of welding and 12" of grinding, the inset notches have 18" each. I would have never guessed over 216" of welding and grinding per table. Grinding was by far the hardest part. Doesn't take to heavy of a hand to leave a depression.
 
To avoid these ads, REGISTER NOW!
OP
A

ahansom

Well-known member
Joined
Oct 3, 2021
Messages
53
Location
Santa Barbara
Great first post- what else ya got? :thumbup:
Thank You
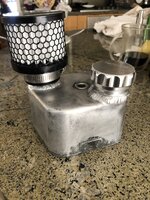
Did a few little projects on my sons old Dodge flatbed. Made some brackets for an auxiliary oil filter and coolant filter. Modified a valve cover for the oil return line and breather.
 

Attachments

  • IMG_1257.jpeg
    IMG_1257.jpeg
    443.2 KB · Views: 72
  • XPPJ8004.jpg
    XPPJ8004.jpg
    457.3 KB · Views: 64
  • IUDZ7079.jpg
    IUDZ7079.jpg
    436.8 KB · Views: 60
OP
A

ahansom

Well-known member
Joined
Oct 3, 2021
Messages
53
Location
Santa Barbara
Great first post- what else ya got? :thumbup:
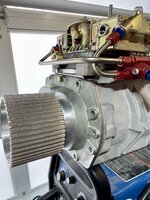
Most recent project was a coffee table. fabbed up some legs and a up and forward adapter to fit a large mouthed blower to a std sized fuel injector.
Hardest part was convincing my wife it looked good in the living room!!!
 

Attachments

  • IMG_3379.jpeg
    IMG_3379.jpeg
    363.6 KB · Views: 58
  • IMG_3371.jpeg
    IMG_3371.jpeg
    351.7 KB · Views: 50
  • IMG_3567.jpeg
    IMG_3567.jpeg
    377.8 KB · Views: 53
  • IMG_3739.jpeg
    IMG_3739.jpeg
    473.5 KB · Views: 50
Last edited:

PugetDude

ALLIANCE MEMBER
Joined
Mar 13, 2013
Messages
22,490
Location
Superstition Mountains, AZ
Thanks everyone
Actual build time wasn't that long. Cutting, notching and prepping went quickly since several pieces are the same length. Welding took a while longer. Each of the 12-45* joints has 12" of welding and 12" of grinding, the inset notches have 18" each. I would have never guessed over 216" of welding and grinding per table. Grinding was by far the hardest part. Doesn't take to heavy of a hand to leave a depression.
What did you use for grinding the alumium?
 
OP
A

ahansom

Well-known member
Joined
Oct 3, 2021
Messages
53
Location
Santa Barbara
Most recent project was a coffee table. Fabbed up some legs and a up and forward tilted adapter to fit a large mouthed blower to a std sized fuel injector.
Hardest part was convincing my wife it looked good in the living room!!!
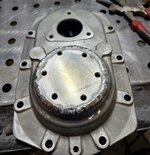
Started another blower table and needed a little fabrication and welding for the pulley mounting. Since this is for display only, there is no reason to use a real drive and snout on the blower. Old front covers from diesel blowers are fairly easy to source and modify. First thing i did was make a 3/16"x 3.5" disk with holes drilled and tapped for the pulley bolts. After cleaning up the front cover it was time to cut the nose off at approximately the same diameter as the disk. Welding the disk to the cover takes a little extra care because of the oil soaked aluminum. Easy enough if you go slow and let the contaminates burn off. A little flap disk followed by a fine finishing pad and its ready for powder coating.

IMG_4055.jpeg
IMG_4054.jpegIMG_4056.jpegIMG_4057.jpegIMG_4058.jpegIMG_4059.jpeg
 
Last edited:
To avoid these ads, REGISTER NOW!
Top Bottom