To avoid these ads, REGISTER NOW!

Teach me how to solid rivet

ryze33

Member
Joined
Nov 5, 2017
Messages
8
So, this is probably my first time posting. I lurk alot but never post, but I figure now is a good as time as ever.

My girlfriend (fiance) and I recently got engaged, and planning the wedding she decided she wants to do a "guest book" similar to this design
https://www.etsy.com/listing/475861...e=gallery&ga_search_query=&ref=sr_gallery-1-6

but instead of the wood, picture frame design, she likes the idea of doing a more industrial design.

I do alot of metal fab, and have a bunch of metal working tools, literally no woodworking tools.

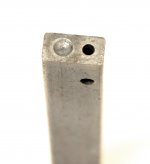
We are thinking of doing a metal frame, held together with solid brass rivets.
Problem is I have never done solid rivets.. Does any one have a good source for information to learn how to do solid rivets? Where to find the correct solid rivets?

The piece is obviously going to be for decoration only, I figure a piece of .05" sheet metal for the back panel, .125" thickness spacer, .22" plexiglass and, .125" frame. A total of .645" thickness, how important is it to the absolute correct length rivet?
How would you design it? where can I get the right rivets?
 
To avoid these ads, REGISTER NOW!

The Cobbler

Super Moderator
Staff member
Joined
Oct 24, 2013
Messages
25,927
Location
Niagara Region, Ontario, Canada
you might think about using brass binder bolts , put the slotted end to the back.
I'm working on a sort of similar project for a friend , going to use binder bolts instead of rivets .
might even use 2 of the female( non slotted) with a pc of threaded rod in the center and loctited & tightened together so there is no screwdriver slot .
 
OP
R

ryze33

Member
Joined
Nov 5, 2017
Messages
8
The Cobbler, I had to search for binder bolts, never heard that term before. And yes, that look would work perfectly. But part of me still wants to learn how to do the solid rivets.
Maybe I'll use that as a plan B. If I can do solid rivets how i'd like to
 

kelpaso1

MEMBER EMERITUS
Joined
Sep 28, 2009
Messages
3,962
Location
New Brunswick
Air hammer with a rivet tool and steel backer block. I skinned a dune buggy in my early days with 1/8 inch aluminum and solid rivets. Looked really cool like aviation high tech. Got lots of positive complements. The rivets come in all different colors too. Wish I had pics.
 

Alchymist

Well-known member
Joined
Mar 1, 2009
Messages
4,423
Location
Central PA
Rivet header and rivet block. Google those terms. Those and a hammer are all that's needed. With a one off job, air tools aren't needed.
 

matt_i

Well-known member
Joined
Mar 14, 2008
Messages
10,728
Location
SE Michigan
So I would try to mess around with a press, hydraulic would be best. One side could be machined, ball turning tool or (?) on one end, then basically smash the other end to make the upset.

If you used a tool like a cup on one side to support the machined part and a center-punch on the other it would make for an easy upset on the underside in the soft brass. I think you'd do well to use something like a dial indicator to get repeatable travel on the press once the process is dialed in.

I think for just a few you could use a c-clamp(s) to hold the actual parts together, it could also be made more sophisticated into a hold-down in the same press tool but apply the holding force with a die-spring set that ultimately displaces under the press load but then releases/springs back for the next cycle.

I think also for a framed/non-guided press you'd do well to build the punch into a bronze guide bushing for location, probably 3-4 diameters long.

Lots of text and I'm not sure if any of these ideas are making sense, a sketch would be better but I'm hot on another project at the moment!
 

AZ Pete

Well-known member
Joined
Aug 15, 2011
Messages
625
Location
Central Arizona
For the few you are using a ball peen hammer can get the job doe. Use brass rod cut to length for rivits


Sent from my iPad using Tapatalk
 

dogdog

Well-known member
Joined
Nov 15, 2011
Messages
12,711
This thread might be helpful to you...

If I remember anything from back in the days of my airframe classes... .


solid aluminium rivets are the easiest to do. but you still needed to get the right setter for the size of the rivet you are doing. The air hammer makes it easier. And you needed access to the back side....

Drill size matters so make sure you get the right drill size for the rivet you are using.

if you slant your setter and makes a dimple smile face, you can drill it out and pop the head off with a pin punch. then pucn the rest of the body through.


https://www.garagejournal.com/forum/showthread.php?t=172474
 

Bigblue&Goldie

Well-known member
Joined
Mar 12, 2009
Messages
10,680
Location
AZ
I rivet AK47 receivers using a hydraulic press and the appropriate bucking tools. Not hard to do, but you may run into some issues cracking the plexiglass if you overdo it. Copper or aluminum rivets will help as they are softer.
 

why worry

Well-known member
Joined
Oct 3, 2014
Messages
301
The trick is to not hit straight down on the rivet. Use a circular motion to crown the portion extending about 1/8" past the top surface. When hitting straight down it will expand the shaft thus potentially cracking the plexiglass.
Dave
 

theoldwizard1

Well-known member
Joined
Feb 22, 2011
Messages
43,205
Location
SE MI
The biggest issue with solid rivets is getting the EXACT correct rivet for the job ! Head, size and shape, material, diameter and length.
 

iajonesy

Well-known member
Joined
Feb 8, 2009
Messages
2,467
Location
Iowa
ryze33, you want to make sure you get soft (annealed) rivets for this project and keep the length to a minimum to make sure you don't crack your plexiglass. You could also over bore the holes in the plexi so the rivet would not expand out to the hole diameter. Do you want to use flush head or round head rivets. If you have an air hammer the rivets, rivet sets, and the bucking bar can be purchased cheaply on line. I could lone you the tools if that would work too.

Mike
 

jimgood

Well-known member
Joined
Aug 4, 2014
Messages
2,394
Location
Marshall, VA
The hardest part of solid rivets is not messing up the surface surrounding the rivet head. I have only done a couple of projects with solid copper rivets. I used an air hammer, dies and bucking bar. I think I got the tools from Aircraft Spruce.

The size of the die is important because it has to match the size of the rivet head. Too large and you get smiley faces surrounding the rivet on the face of the metal you're riveting. Too small and it will distort the rivet head. Even with the right size, you can still get smiley faces if you tilt the air hammer too much.

When you use air tools, the die that goes in the hammer matches the rivet head. The bucking bar is used behind the material on the end of the rivet to spread it.

Here's a tutorial on how to hand rivet copper nails into wood. The process is similar. The big difference is that this method uses the nail head on the back side and rounds the other end on the exposed (decorative side). So you'd need to be super careful with metal as wood is more forgiving. If you use traditional copper rivets, the head is already rounded and you smash the back end with the hammer. I don't know what the die is called for this method but it has to be a heavy piece of steel with a divot in it that you set onto the rivet head instead of the dolly that is used in the tutorial. If you choose this method, you should consider getting an upholstery hammer (something like this).
 

yaidunno

Well-known member
Joined
Feb 10, 2011
Messages
1,336
Location
WI
If your just doing perimeter rivets, there's no need to get an air gun and bucking bars. A squeezer will give 100% consistency and take out any guess work. My only concern would be your stack up height. If you tweaked the plexi and spacers to say .187 material, you should be able to make it work. The throat opening is usually 1-1/4", minus die thickness and your head height will give you the max rivet length. I can measure mine tonight if you go this route.

Different depth throats can also be purchased for a deeper reaching tool.

tatcorivetsqueezers.jpg


Aircraft spruce will have the squeezer, dies, and rivets for you. OAL of the rivet will be dependent on shank diameter.
 

2oolhound

Well-known member
Joined
Dec 18, 2010
Messages
5,918
Location
BC Canada
I've always used the small hand rivet sets I learned in school in the 60's. You can make these with a piece of steel bar, a drill and a die grinder. The rivet is cut to length, inserted through the material and then the material is compressed by placing the straight end of the rivet in the long hole drilled in the end of the set. Tapping it tight with the rivet head against something solid compresses the work. Then move the set to the round cavity and hammer a round head. The hole in the set should match the thickness of the rivets used.

attachment.php


attachment.php


attachment.php


attachment.php


attachment.php
 

Attachments

  • KennSm555 copy.jpg
    KennSm555 copy.jpg
    36.3 KB · Views: 769
  • RivetTool7872 copy.jpg
    RivetTool7872 copy.jpg
    136.3 KB · Views: 765
  • KennSm527 copy.jpg
    KennSm527 copy.jpg
    67.5 KB · Views: 762
  • KennSm532 copy.jpg
    KennSm532 copy.jpg
    50.7 KB · Views: 759
  • KennSm547 copy.jpg
    KennSm547 copy.jpg
    65.4 KB · Views: 763
OP
R

ryze33

Member
Joined
Nov 5, 2017
Messages
8
So much good info
Thank you all so much for the help. The rivets are just going to be brass or copper and the steel is going to brushed, going for that two tone look.
I'm going to do some tests with just a hammer and bucking block and see how it all turns out.
I will post pictures once I try it!
 

rsanter

Well-known member
Joined
Dec 22, 2007
Messages
18,521
Location
visalia ca
If your just doing perimeter rivets, there's no need to get an air gun and bucking bars. A squeezer will give 100% consistency and take out any guess work. My only concern would be your stack up height. If you tweaked the plexi and spacers to say .187 material, you should be able to make it work. The throat opening is usually 1-1/4", minus die thickness and your head height will give you the max rivet length. I can measure mine tonight if you go this route.

Different depth throats can also be purchased for a deeper reaching tool.

tatcorivetsqueezers.jpg


Aircraft spruce will have the squeezer, dies, and rivets for you. OAL of the rivet will be dependent on shank diameter.


But it’s much cheaper to use a bucking bar and a hammer or air hammer
 
To avoid these ads, REGISTER NOW!

machine_punk

Well-known member
Joined
May 14, 2011
Messages
2,540
Location
Napa Valley, California
Can’t believe Kev hasn’t jumped in yet.
His rivet thread
https://www.garagejournal.com/forum/showthread.php?t=172474

Ha! I'm not necessarily on GJ every day. I see that at least one person has already posted my "Solid Rivets 101" thread.

To the OP...where do you live (city and state). If you are near me (Napa Valley, North Bay Region in California), I'd be happy to help with the project.

If you REALLY want to learn to use solid rivets, then read through my thread.

I suspect the truth is that you really just want the look of solid rivets. For something you are going to mount on the wall and nobody will see the back, it would be a LOT easier to drill holes and glue in short, solid rivets, for the look. Yes, I know, it sounds like sacrilege, coming from me. But, buying the equipment and learning the skill for two dozen rivets is a little excessive...if you don't expect people to be inspecting the back of the project closely.

I see people all the time building 'industrial' furniture by welding everything together, then welding on fake rivet heads. While it grieves me deeply to see it done, most folks don't really want solid rivets...they want the 'look' of solid rivets. And VERY few people are willing to pay me the amount I charge to build commissioned items.

If you read through the Solid Rivets 101 thread and still have specific questions about your project, I'd be happy to try to answer them.

Solid Rivets 101:
https://www.garagejournal.com/forum/showthread.php?t=172474

The Aerodrome Studio:
https://www.garagejournal.com/forum/showthread.php?t=122188

View media item 37917
View media item 37915
View media item 13837


Kev
 

Attachments

  • Aero Wine Rack Topb.jpg
    Aero Wine Rack Topb.jpg
    112.6 KB · Views: 28
  • Aero Wine Rack Front b.jpg
    Aero Wine Rack Front b.jpg
    100.6 KB · Views: 33
  • IMG_2979 (800x596).jpg
    IMG_2979 (800x596).jpg
    41.6 KB · Views: 28
  • IMG_2978 (800x533).jpg
    IMG_2978 (800x533).jpg
    39.6 KB · Views: 34
  • IMG_2398 (533x800).jpg
    IMG_2398 (533x800).jpg
    34.7 KB · Views: 29
  • IMG_2349 (694x800).jpg
    IMG_2349 (694x800).jpg
    36.2 KB · Views: 31
Last edited:
Joined
Jun 30, 2011
Messages
1,080
Location
AZ
I'm a big fan of the industrial furniture look. never had the time orpatience to learn real riveting. I'd like to learn to though.

Anyway, I'm guilty of the faux rivet look on this cooler. All corner rivets are actually threaded bolts, the rest were faux rivets (heads only), that I tack welded from the backside.

I'll be reading through Machine Punk's threads.


This guy is a real rivethead dude. Here are his "faux rivets".
https://www.ballardforge.com/shop

Unslotted Truss Head Bolts -threaded bolt with rivet looking head
http://www.blacksmithbolt.com/store/Search.aspx?SearchTerms=truss head
 
Last edited:

2oolhound

Well-known member
Joined
Dec 18, 2010
Messages
5,918
Location
BC Canada
I'm a big fan of the industrial furniture look. never had the time orpatience to learn real riveting. I'd like to learn to though.

Anyway, I'm guilty of the faux rivet look on this cooler. All corner rivets are actually threaded bolts, the rest were faux rivets (heads only), that I tack welded from the backside.

I'll be reading through Machine Punk's threads.


This guy is a real rivethead dude. Here are his "faux rivets".
https://www.ballardforge.com/shop

Unslotted Truss Head Bolts -threaded bolt with rivet looking head
http://www.blacksmithbolt.com/store/Search.aspx?SearchTerms=truss head

Very cool web site, amazing work specially the bridges!
 

TheSasquatch

Well-known member
Joined
Jun 7, 2016
Messages
144
I learned to shoot solid rivets from my father and grandfather, both twa sheet metal mechanics. And I did structures work for a aircraft mro for 2 years prior to getting into hd diesel work. The best way to learn is practice. You can get the squeeze sets and they are pretty much impossible to mess up. Depending on the dia of the rivet you could just use a hammer and either a bucking bar or just your vice. If your going 4/32 or up I’d get a decent rivet gun and sets ( you can also use it for a air hammer so worth the investment ) the yard typically has cheap sets forsale, and a set of bucking bars and go for it. Rivets are cheap, knock a bunch in, watch some YouTube videos, and your golden.


Sent from my iPhone using Tapatalk
 

yaidunno

Well-known member
Joined
Feb 10, 2011
Messages
1,336
Location
WI
So for standard 1/8" rivets for aluminum work, would a 1x be ideal?

I would suggest at least a 2X for that size rivet. Most 2X guns are rated for 1/8" aluminum rivets. Keep in mind that the blows per minute also drop as the guns get larger. A larger gun will deform the rivet in less blows, giving you less opportunities to slip off.
 

iajonesy

Well-known member
Joined
Feb 8, 2009
Messages
2,467
Location
Iowa
When I was repairing aircraft for Uncle Sam, we always used 3x guns for everything. They are basically the same thing as the air hammers you see everywhere. You may have to get rivet sets to fit the bore of your air hammer. Most a/h's are .401 dia. bore. If you have an a/h you have a rivet gun.

Mike
 

TheSasquatch

Well-known member
Joined
Jun 7, 2016
Messages
144
When I was repairing aircraft for Uncle Sam, we always used 3x guns for everything. They are basically the same thing as the air hammers you see everywhere. You may have to get rivet sets to fit the bore of your air hammer. Most a/h's are .401 dia. bore. If you have an a/h you have a rivet gun.

Mike


Not exactly most cheap air hammers really only have 2 speeds on/off. With rivet guns you get a lot more trigger control than can allow you to lightly hit rather just kill it.


Sent from my iPhone using Tapatalk
 
OP
R

ryze33

Member
Joined
Nov 5, 2017
Messages
8
Machine_punk, I am going for the look on this particular project, but I always love learning new skills. I am not opposed to learning this the right way, but this particular project is not a structural item so it doesn't need to be perfect on the back either.

I am an auto mechanic, and have a air hammer capable of doing this, and I am comfortable buying the right tools to do the job.
However for this project, I may just do it by hand to get the feel of things before trying an air hammer
 

Interceptor

Well-known member
Joined
May 31, 2011
Messages
48
If you're patient you can pick up a nice used Roper Whitney Redi-set rivet squeezer for less than $100, and you'll have an heirloom quality tool that makes perfect rivet heads with little chance for error. It won't work for every application, but where it does work I can't imagine an easier way set rivets.
 

custombuild

Member
Joined
Jun 30, 2017
Messages
19
When I was repairing aircraft for Uncle Sam, we always used 3x guns for everything. They are basically the same thing as the air hammers you see everywhere. You may have to get rivet sets to fit the bore of your air hammer. Most a/h's are .401 dia. bore. If you have an a/h you have a rivet gun.

Mike

Agree 100%. I always use a 3x for anything sized 3,4,5, or 6 (3/32, 4/32, 5/32, 6/32 inch diameters). -6 is harder to do, but those are pretty rare for what I do (small aircraft).

A 1x or 2x gun just doesn't have enough impact force to set -4 or -5 rivets without first work hardening them. I dont' know what the stroke or force is on your air hammer, but I am fair certain that it does not have a "feathering" trigger. Would be wise to practice on some scrap first.

But, a gun takes some finesse. It is a lot easier to use a hand or pneumatic squeezer when you are first starting out. Good luck!
 
To avoid these ads, REGISTER NOW!
Top Bottom