

You are using an out of date browser. It may not display this or other websites correctly.
You should upgrade or use an alternative browser.
You should upgrade or use an alternative browser.
Teamchevy's Garage/Shop Build
- Thread starter Teamchevy
- Start date

Update for Nov 8
Electrical done!! My dad came by this morning after I installed the plugs & switches and gave me a hand while I put up the lighting. Another thing off the list! Oops, still have to wire in the compressor, as soon I can figure out to get if off the trailer and into the corner! Any ideas??
Dave

All Lights On:

View from the other end:

One row at a time, all on their own switches:


Outside Lights:

Compressor on Trailer:

Electrical done!! My dad came by this morning after I installed the plugs & switches and gave me a hand while I put up the lighting. Another thing off the list! Oops, still have to wire in the compressor, as soon I can figure out to get if off the trailer and into the corner!
Any ideas??Dave
All Lights On:
View from the other end:
One row at a time, all on their own switches:
Outside Lights:
Compressor on Trailer:
Update for Nov 9
Well, I didn't get the compressor off the trailer today. I do have some manpower coming over tomorrow morning, so with a Fridge dollie, we're going to manoeuver it off the trailer and into the corner.
I did put the Camaro in to see what it looks like in it's new home.
Dave


Well, I didn't get the compressor off the trailer today.
I do have some manpower coming over tomorrow morning, so with a Fridge dollie, we're going to manoeuver it off the trailer and into the corner.I did put the Camaro in to see what it looks like in it's new home.
Dave
787B
Well-known member
Re: Update for Nov 8
Looking good, Dave! Do you have, or can you borrow, a shop crane? I've unloaded any number of things from my truck by-myself with mine including the HF 13-drawer rolling cabinet and a 950 lb Snap-On mid-rise scissor lift. I know I've seen at least one other thread with an 80 gallon compressor unloaded from somebodies truck with a shop crane.
Oops, still have to wire in the compressor, as soon I can figure out to get if off the trailer and into the corner!
Looking good, Dave! Do you have, or can you borrow, a shop crane? I've unloaded any number of things from my truck by-myself with mine including the HF 13-drawer rolling cabinet and a 950 lb Snap-On mid-rise scissor lift. I know I've seen at least one other thread with an 80 gallon compressor unloaded from somebodies truck with a shop crane.
Keep
Well-known member
You can "walk" the compressor. Back the trailer as close to the location you want it. Then slightly tilt the compressor, just enough to take the weight off one foot, and walk it into the corner.
For the 80 gal you might want a buddy to help out.
This will only work if you have a ramp on the trailer!!
For the 80 gal you might want a buddy to help out.
This will only work if you have a ramp on the trailer!!
Last edited:
Looking good, Dave! Do you have, or can you borrow, a shop crane? I've unloaded any number of things from my truck by-myself with mine including the HF 13-drawer rolling cabinet and a 950 lb Snap-On mid-rise scissor lift. I know I've seen at least one other thread with an 80 gallon compressor unloaded from somebodies truck with a shop crane.
You can "walk" the compressor. Back the trailer as close to the location you want it. Then slightly tilt the compressor, just enough to take the weight off one foot, and walk it into the corner.
For the 80 gal you might want a buddy to help out.
Thanks for the suggestions guys, I'll see how it goes tomorrow!
Dave
Keep
Well-known member
BTW the shop looks great. Very jealous!
dcastine
Active member
Nice Camaro Dave - reminds me of my old '77 Z28 I had a few years back! Great cars - HAVE FUN BROTHER!!!
Update for Nov 10
Well, my uncle, his friend and a cousin came by today and we were able to get the compressor off the trailer. It wasn't as bad as I thought it would be. We walked it down the trailer, while it was hooked to the car, used a set of ramps and walked it to the floor, all on the skid. Used a dollie and moved close to the corner, took it off the skid and walked it into the corner. Used some tapcon screws and lagged it to the floor. Next up is to get power to it and run a line to test it!
Spent the rest of the day moving some tools and equipment in as well:

I know the walls aren't done and neither is the floor, but I've had stuff in boxes for quite awhile since we moved, I had to unload some of them and make the place look more lived in:

Dave
Well, my uncle, his friend and a cousin came by today and we were able to get the compressor off the trailer. It wasn't as bad as I thought it would be. We walked it down the trailer, while it was hooked to the car, used a set of ramps and walked it to the floor, all on the skid. Used a dollie and moved close to the corner, took it off the skid and walked it into the corner. Used some tapcon screws and lagged it to the floor. Next up is to get power to it and run a line to test it!
Spent the rest of the day moving some tools and equipment in as well:
I know the walls aren't done and neither is the floor, but I've had stuff in boxes for quite awhile since we moved, I had to unload some of them and make the place look more lived in:
Dave
red69ss
Well-known member
garage looks great and I really like the camaro. why did you put the compressor inside the shop verses outside? seems like it would be very loud when running, mine is.
zeebad1
Well-known member
Looking good Dave. I thought I saw you over here too.
You know that you're just going to have to move all that stuff to paint now!!
You know that you're just going to have to move all that stuff to paint now!!
787B
Well-known member
why did you put the compressor inside the shop verses outside? seems like it would be very loud when running, mine is.
Belt-driven aren't that loud, at least compared to oil-less. But it's still a valid question given that he's building from scratch. A dog house hanging off the back or side would have kept it out of the weather and the neighbors happy, while freeing floor space and ear space inside. Dave?
garage looks great and I really like the camaro. why did you put the compressor inside the shop verses outside? seems like it would be very loud when running, mine is.
Belt-driven aren't that loud, at least compared to oil-less. But it's still a valid question given that he's building from scratch. A dog house hanging off the back or side would have kept it out of the weather and the neighbors happy, while freeing floor space and ear space inside. Dave?
First, I guess I didn't do enough research here or really look into the location for the compressor. This is the first one I've owned. I've had a couple of comments on other sites as well about putting a pad outside and building a "doghouse" for it due to the noise it'll make. Something I guess future builders can take to heart when designing from scratch. I'm surprised how many people comment on the noise factor, but aren't they wearing hearing protection? I'd think if you're using a die grinder you would wear some ear plugs at least? I can still move it outside in the spring if I find it too noisy. I was thinking about closing it in with soundproof insulation in the walls and a vent for fresh air. We'll see how it goes. I appreciate the feedback though!
Dave
Looking good Dave. I thought I saw you over here too.
You know that you're just going to have to move all that stuff to paint now!!
Thanks. I know, I know, I just didn't have the time to paint this week and I have to move all of my stuff from the house garage so we can park the daily drivers in it for the winter. My stuff has been packed away for over a year and I had to made it a little homey! I'm leaving the rest for after I get the paint done, so I think I can work with what I have!
Dave
Hit-By-Thunder
Well-known member
Thank you Dave for the pictures!!!!
I am building a 24X24 with 9' 6" ceiling. I too have a pilke of pictures. I will start a thread soon. We started pretty much the same day as you too. I built it all myself other than the concrete work. I want to start a thread sooooo bad but want all the pictures together.
sooooo sooooo glad you are posting pictures, please keep them coming
from another "local" a few provinces to the west, Alberta
Rob/HBT
Thank you Dave for the pictures!!!!
I am building a 24X24 with 9' 6" ceiling. I too have a pilke of pictures. I will start a thread soon. We started pretty much the same day as you too. I built it all myself other than the concrete work. I want to start a thread sooooo bad but want all the pictures together.
sooooo sooooo glad you are posting pictures, please keep them coming
from another "local" a few provinces to the west, Alberta
Rob/HBT
Hey Rob,
Thanks for posting. Let me know when you have your thread started, I'd like see yours built!
Dave
Update for Nov 14
Well, I have been doing a few other things since the last update. I finally wired up the compressor and tested it out, so that's off the list. I still need to hook up the filter & regulator, but I have to get some more fittings and hose. I may run some pipe so I can drain off the moisture as well. I raked and seeded three sides around the garage and back to the house. Then I had to re-wire the dryer in the house. When the panel was re-worked, we found that somone had installed the dryer using #12, not #10 as required, so I did that on Friday, bit of a pain in the ****, but it's done now. On Saturday I added some metal studs to frame and drywall the opening of the re-worked electrical panel in the house so I can put new doors on it. A neighbor gave me a metal cupboard he was going to toss, so I'll clean it up, paint it and store some tools in it. Last vacation day today, back to work tomorrow. But at least I can go to the garage after work and start having some fun soon!!
Dave
Compressor tied in

Regulator & Filter

A friend's water trap, something I may do next week
Seeded yard

"New" Cupboard


Well, I have been doing a few other things since the last update. I finally wired up the compressor and tested it out, so that's off the list. I still need to hook up the filter & regulator, but I have to get some more fittings and hose. I may run some pipe so I can drain off the moisture as well. I raked and seeded three sides around the garage and back to the house. Then I had to re-wire the dryer in the house. When the panel was re-worked, we found that somone had installed the dryer using #12, not #10 as required, so I did that on Friday, bit of a pain in the ****, but it's done now. On Saturday I added some metal studs to frame and drywall the opening of the re-worked electrical panel in the house so I can put new doors on it. A neighbor gave me a metal cupboard he was going to toss, so I'll clean it up, paint it and store some tools in it. Last vacation day today, back to work tomorrow.
But at least I can go to the garage after work and start having some fun soon!!Dave
Compressor tied in
Regulator & Filter
A friend's water trap, something I may do next week
Seeded yard
"New" Cupboard
scott37300
Well-known member
The only concern I would have with the water trap you posted would be when the water collects on the first down pipe and the up pipe(the U section in the middle) it would sit in the bottom with no where to go unless the air blows it all the way up the U?
Garage is looking good.
Garage is looking good.
The only concern I would have with the water trap you posted would be when the water collects on the first down pipe and the up pipe(the U section in the middle) it would sit in the bottom with no where to go unless the air blows it all the way up the U?
Garage is looking good.
Good catch! I think you're right! A second valve would let you drain it off that leg as well.
Dave
Hit-By-Thunder
Well-known member
that is a sweet cupboard!!!!!! clean it up and it will make a sweet "flammables" locker.
me too, I'm with Scott on the water trap
seeding the yard????? We are sitting at a balmy -12C with a stiff breeze and a skiff of snow on the ground and I have to go hook up my outside electrical. Then call for a rough in inspection on the electrical. brrrrrrr
Rob/HBT
me too, I'm with Scott on the water trap
seeding the yard????? We are sitting at a balmy -12C with a stiff breeze and a skiff of snow on the ground and I have to go hook up my outside electrical. Then call for a rough in inspection on the electrical. brrrrrrr
Rob/HBT

that is a sweet cupboard!!!!!! clean it up and it will make a sweet "flammables" locker.
me too, I'm with Scott on the water trap
seeding the yard????? We are sitting at a balmy -12C with a stiff breeze and a skiff of snow on the ground and I have to go hook up my outside electrical. Then call for a rough in inspection on the electrical. brrrrrrr
Rob/HBT
I took advantage of it being unusually warm, was up to 12C on Friday & Saturday, so I raked and threw down some seed! I'm afraid some of your weather will be here soon than I want it to be!

Dave
I like your idea for lighting. I am going with the same sized garage and one of my "must have's" is proper lighting. My current 2 car garage has the standard 2 light bulbs so any evening or door-down work always leave me with dark zones under the car , even with portable light sources.
Are you just using a standard 3 knob light switch ? That's how I pictured doing mine, turn on only as many as I need at any one time.
Are you just using a standard 3 knob light switch ? That's how I pictured doing mine, turn on only as many as I need at any one time.
I like your idea for lighting. I am going with the same sized garage and one of my "must have's" is proper lighting. My current 2 car garage has the standard 2 light bulbs so any evening or door-down work always leave me with dark zones under the car , even with portable light sources.
Are you just using a standard 3 knob light switch ? That's how I pictured doing mine, turn on only as many as I need at any one time.
I'll try to get a picture for you later! The first 2 rows are on a single pole switch. The third row is on 2 three way switches, one at the pedestrian door and the other over at the garage door. The two above the work bench on on one single pole switch. They're also positioned slight forward so when the hood of the vehicle is open, it should still throw light under the hood.
Dave
q20v
Well-known member
Hey Dave,
I just read through your build thread and your garage looks great! Right now I have a 20x20 garage in Ottawa but for my next house I will want a garage almost exactly the same as yours. The only thing I'd do differently is either build an enclosure for the compressor, or have a small extension added during build for it.
I just painted my OSB walls white, red, black, and grey. I used Behr exterior Matt finish paint, and I found that priming is a must!! I primed before painting the white, and still needed several coats (like 4 or 5). Maybe 2 coats of primer would have helped.. I don't know.
What thickness is your OSB? I LOVE the fact that I can screw anything anywhere (you know what I mean!).
Maybe I missed it, but are you planning to cover the floors with anything?
Again, your garage looks awesome and keep the pictures coming!
Barry
Hit-By-Thunder
Well-known member
They're also positioned slight forward so when the hood of the vehicle is open, it should still throw light under the hood.
Dave
Dave, great minds think alike
 what I did (am doing) was 2, 8' track lights in each bay with 4 heads on each pointing under the hood. I pulled the truck in (longest vehicle) propped the hood open, got up on the step ladder and followed the line on the hood to the ceiling. This is where the tracks are mounted. The heads hang down about 6" so it will be even better.
 PM me your e-mail, I'll send you some build pictures if you want
Rob/HBT
Hey Dave,
I just read through your build thread and your garage looks great! Right now I have a 20x20 garage in Ottawa but for my next house I will want a garage almost exactly the same as yours. The only thing I'd do differently is either build an enclosure for the compressor, or have a small extension added during build for it.
I just painted my OSB walls white, red, black, and grey. I used Behr exterior Matt finish paint, and I found that priming is a must!! I primed before painting the white, and still needed several coats (like 4 or 5). Maybe 2 coats of primer would have helped.. I don't know.
What thickness is your OSB? I LOVE the fact that I can screw anything anywhere (you know what I mean!).
Maybe I missed it, but are you planning to cover the floors with anything?
Again, your garage looks awesome and keep the pictures coming!
Barry
Thanks Barry!
Still not quite sure what to do with the floors. Unfortunately, I've already started moving stuff in as the weather is changing and I need to get things moved around. Hopefully painting in the spring, thanks for the tips!!
Dave
People are suggesting placing the compressor outside to save space/lower noise levels. Is this really an option in a cold climate like we have in Canada ?
I guess it's an option, if you plan for it. I understand some people want it outside, up here I guess you could insulate it, but I think it still needs fresh air. I figure that I'll be wearing hearing protection for the most part, while using grinders and such, unless it's painting I guess!
Dave
Dave, great minds think alike
PM me your e-mail, I'll send you some build pictures if you want
Rob/HBT
PM Sent
Dave
Chev. P.U. Guy.
Active member
- Joined
- Mar 18, 2008
- Messages
- 28
I thought this garage looked familiar. I have been watching your progress on VCCA Chat II, and was going to suggest you post It on Garage Journal and here you are! I must of missed It here. Looks great, nice job.
Richard
Richard
I thought this garage looked familiar. I have been watching your progress on VCCA Chat II, and was going to suggest you post It on Garage Journal and here you are! I must of missed It here. Looks great, nice job.
Richard
Thanks Richard!! And welcome to The Garage Journal!
Dave
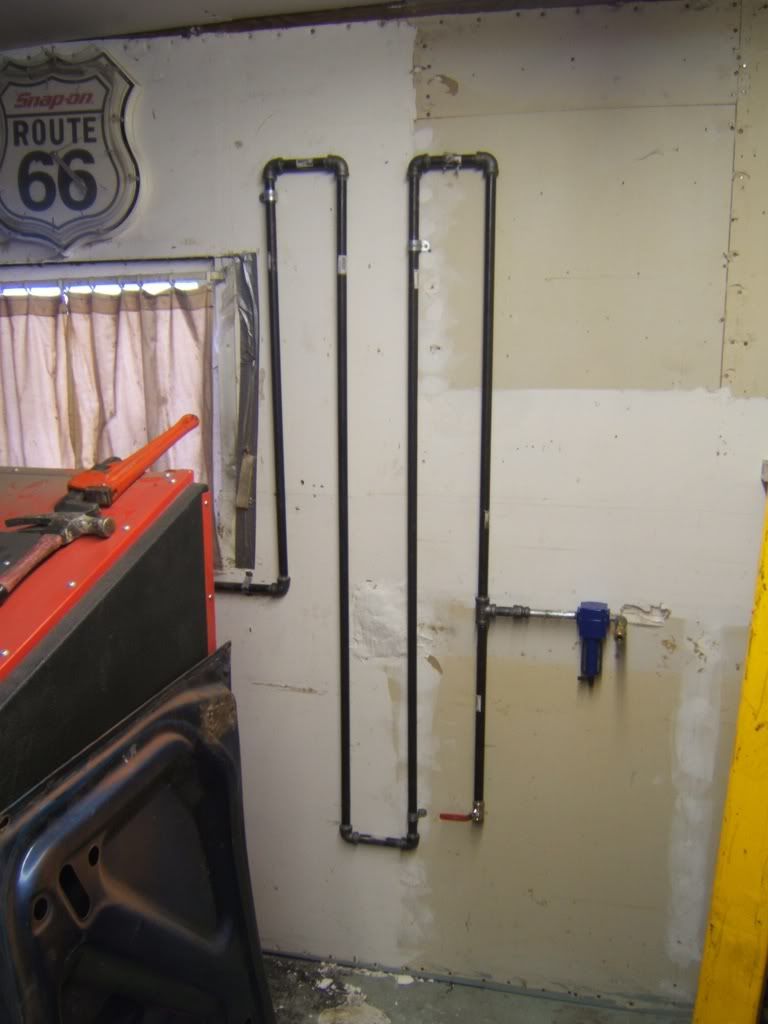
Update for Nov 20
Well, it took a couple of trips back & forth to the hardware store, but I have my airline plumbed to the compressor. Had a couple of air leaks, but after a few turns with the pipe wrench, they're gone. Now...what's next...yeah, get the fittings installed on some air tools so I can try them out!!
Dave
Some guy installing the pipe (she didn't tell me she had the camera ready!):

Compressor end:

The whole run, about 18 ft total:

The business end!:

Well, it took a couple of trips back & forth to the hardware store, but I have my airline plumbed to the compressor. Had a couple of air leaks, but after a few turns with the pipe wrench, they're gone. Now...what's next...yeah, get the fittings installed on some air tools so I can try them out!!
Dave
Some guy installing the pipe (she didn't tell me she had the camera ready!):
Compressor end:
The whole run, about 18 ft total:
The business end!:
scott37300
Well-known member
The air system looks nice, what size pipe did you use and what kind of flexible hose from the compressor to the pipe?