To avoid these ads, REGISTER NOW!

Texas ManBarn

bluegoose972

Well-known member
Joined
Apr 24, 2019
Messages
76
Location
Belton, TX
Finally jumped in with both feet and started the construction of my ManBarn. Have wanted one for a long time, working out of a two car garage for the last 25 years.

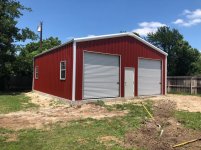
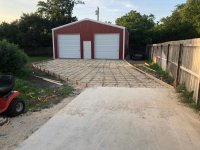
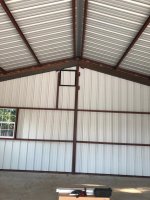
Will track the progress. First part was the preparations. Picked out a 30'x35'x12' tall Weld-Up building with 2 ea 10'x10' doors, 3'x7' entry door, and four 3'x4' windows.

Started off picking out brown and tan, similar to my neighbors. Then I started reading about how dark colors absorb heat combined with wanting something different. Was driving on a back road and saw a red and white barn and "ManBarn" instantly hit. So, changed the color scheme to Red and White.

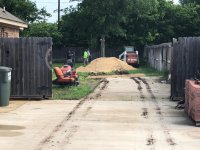
Have an aerobic sewer system in the back yard that happens to be exactly in the wrong place for my building. And also had a 30 ft tall tree....my only tree, exactly where I wanted the shop. Both needed attention.

The tree was the easy part as I made a deal with the foundation contractor to remove it for $500.

I studied my engineered sewer layout and figured pretty quickly that this wasn't going to be an easy fix. Would require a complete new layout, moving everything to the other side of the yard. Drew up my thoughts and sent it to the engineer that provided the original drawing. He said "That looks great....Shouldn't take me more than a few minutes to draw it up and I'll cut you a deal...Half price!". Only $275!!!!!!! A few minutes for $275???? Arggghhh. But I showed up and he handed me a complete package with CAD drawing, his licence number, and the paperwork for the county. He also gave me a name of a contractor he recommended.

Off to the county I go. They looked at the document and said "Great, this should be easy. We will only need to charge half for a modification and inspection. That will be $225!!!!!!! There seems to be a racket here! LOL

Well, $500 later, I have an approved redesign and feel comfortable ordering my building and scheduling the contactors (sewer and foundation).
 
To avoid these ads, REGISTER NOW!
OP
B

bluegoose972

Well-known member
Joined
Apr 24, 2019
Messages
76
Location
Belton, TX
Foundation contractor arrived and I quickly figured out my double gate wasn't large enough for trucks to back in for the crusher screenings delivery or concrete. So, out comes a section of fence to be fixed later. They attacked the tree first and after two hours, it was on the ground and cut up into manageable pieces. These guys were awesome and fast. Took out the tree, graded the pad, formed up the edges, dug perimeter and cross trenches, and set rebar in a day. Poured the second day and stripped forms that afternoon before leaving. Very nice job.
 

Attachments

  • First Day.jpg
    First Day.jpg
    155.9 KB · Views: 291
OP
B

bluegoose972

Well-known member
Joined
Apr 24, 2019
Messages
76
Location
Belton, TX
As soon as the slab was completed, I needed to get the gate reconstructed. Definite needs to be wider than 10 ft to allow for trucks to back in without catching mirrors on posts. Widened to 13 ft total using "Adjust-A-Gate" products that I ordered on Amazon. Worked fairly well, but next time I will just buy and weld up steel tubing to the size I want. Was a full day from start to finish working by myself, but turned out much better than the old sagging unit.

**UPDATE** Well, had a wind storm and while the gate held up fine by itself, I opened up the gate to check on the building and the wind slammed it shut, bending the latch assembly and the rod that holds the second gate in place. Surprisingly, the light gauge frame didn't have any issues and the fix is pretty easy. Chalk one up for Adjust-A-Gate products.
 

Attachments

  • Gate Rebuild.jpg
    Gate Rebuild.jpg
    153.4 KB · Views: 298
OP
B

bluegoose972

Well-known member
Joined
Apr 24, 2019
Messages
76
Location
Belton, TX
The neighborhood drainage plan, or lack there of, involves water running from backyard to backyard. Luckily, I'm on the top side of the hill and get only a couple of houses of water. Poor guys at the end of the street get the worst of it. But looking at my survey plat, the drainage easement is at the back 10' of the property, yet the grading has it running through the middle. That means that either the water runs across my concrete driveway between the gate and the ManBarn or it get's rerouted? I chose to reroute to the drainage easement. But there is 12" of native earth/rock that needs to come out in the shape of a V-ditch before they start the building construction.

Speaking with one of my superintendents, he let's me know they have a small loader rented that won't be used over the weekend. Perfect. Friday afternoon comes around and he shows up with a flatbed trailer and the loader.....wait. That's not a loader, that's a mini-excavator! ****, I haven't ran an excavator in over 20 years.

Looking at the thing that evening, nervous about the next morning, I send a text to my neighbor that says "If you hear a loud crash, it's our fence and I will fix it! If you feel a large crash, it's your house and I have insurance. If I crash into your bedroom, well, it's been nice knowing you!" He didn't find that nearly as funny as I did.

Next day I'm up at 6am, but know it's too early. So I wait and drink some coffee. 7:15, I can't take it any more and head out. Fire up the mini-excavator and think "That doesn't sound too loud" Put it in gear and the backup alarm (that works when ever it moves, BTW) goes off with a piercing chirping sound. Oh well, it's 7:30am now....Everyone should be up, right?

Well, believe it or not, I didn't hit the fence or the slab, but I was very careful and slow. Took me 5 hours to do what someone else could have done in an hour, but I was happy. Even dug a trench to install a water line out to the shop for a faucet.

On my way to the store for waterline parts, I see my neighbor. He walks over and says "Really? 7:30am Really?" and laughs. I said "Wait, your bedroom is on the other side of the house!" He agreed and said "It wasn't the equipment that woke me up...It was my daughter screaming across the house "WHY IS A TRUCK BACKING UP NEXT TO MY WINDOW OVER AND OVER!" He followed up with "You might want to avoid Hailey for the day...she's pretty pissed at you!" LMAO

Well, that evening as I'm sitting in my rocking chair, having a much deserved beer, another neighbor texts me and says "Hey, is that a backhoe in your back yard?" Well, he needed about 100 ft of trench dug so he could install power to his shop. Explained that I'm not very good at running this thing. He says "Oh, it's wide open and clear...You'll be fine". Well, the next day I walk the mini-excavator down after church and into his back yard. First thing he says is "Ok, reach past my satelite dish, through the gate, and start the trench next to my house." I gave him one of those "Are you kidding me looks!" He wasn't....but he assured me everything was clear. Second scoop, here comes an irrigation line. He simply says "Oh, didn't know that was there!" Five feet later, here comes coax cables and my heart about stops. He says "I THINK those are my old cables, but let me check." A few minutes later..."Yep, we still have TV, so those must be the old ones!" And five more feet and ANOTHER irrigation line. He just looks down and says "Hmmm...Definitely didn't think that was there!" This guy is killing me. But no other damage and we completed the trench, then installed the conduit and backfilled, track walking the soil back into the trench. Still took 3 hours, but was nice to help him out.
 

Attachments

  • Excavator.jpg
    Excavator.jpg
    153.9 KB · Views: 237
OP
B

bluegoose972

Well-known member
Joined
Apr 24, 2019
Messages
76
Location
Belton, TX
The building "boys" started construction. These guys are nice, but really laid back. I figured this would be a week job, so was a little shocked when they figured a week for the framing and a week for the sheeting. Figured they were just padding the schedule....Under commit, over achieve. Nope!

They would show up at 9am and leave at 3pm each day. Just laid back good old boys, meaning no harm! LOL They did a nice job and always had a smile on their face and never complained about anything. And used up all of two weeks to put the shop together.

In contrast, another neighbor put up a 16'x60'x14' shop at the end of the street. They started on the foundation on a Thursday, after my guys had already been working on the frame for three days, poured on Saturday, and had the building completed by Wednesday night of the following week. Spray foam guy shot foam on Thursday and Friday. Basically one week, start to finish including the slab. I made sure to point this out to them a few times!
 

Attachments

  • Structure.jpg
    Structure.jpg
    154.4 KB · Views: 247
  • Building Done.jpg
    Building Done.jpg
    151.2 KB · Views: 289
OP
B

bluegoose972

Well-known member
Joined
Apr 24, 2019
Messages
76
Location
Belton, TX
Sanitary Sewer contractor showed up on a Saturday. Had to trench in 240 lf of new irrigation line for the system and install four heads, abandoning the old system in place.

I had laid out my grass sprinkler lines, to the best of my knowledge. We successfully missed most of the sprinkler lines, but did hit one that took a turn I wasn't expecting. Guess I can't complain about my neighbor any more! LOL

Needless to say, that is completed and just need the inspection. Yard is a mess and still have to trench in the electrical service. But making progress day by day.
 
OP
B

bluegoose972

Well-known member
Joined
Apr 24, 2019
Messages
76
Location
Belton, TX
Time to close the gaps in the concrete now that the sanitary sewer lines are completed. Called my flatwork contractor back out. He formed it up quickly, but it was really hot here in Texas and decided to wait and pour the following day. Will be good to have an all-weather slab to access the shop so I can start working inside. Of course, it's blazing hot inside right now without any type of insulation.
 

Attachments

  • Slab Ready to Pour.jpg
    Slab Ready to Pour.jpg
    151.6 KB · Views: 249
OP
B

bluegoose972

Well-known member
Joined
Apr 24, 2019
Messages
76
Location
Belton, TX
My wife has been a really good sport with my ManBarn. But the back flower beds were in horrible shape. Weeds were every bit of 24" tall and you couldn't see the bark mulch any more. Well, last Saturday, called in a couple of local guys from Craigslist and we tackled the flowerbeds after we struck a deal on the price. I jumped in and worked right beside them, much to their shock. They said "You're paying us..why are you working?" Explained that it's good exercise and the sooner we get done, the sooner I can have a beer! That was enough for them. Well, four hours later, we had fifteen 50 gal trash bags filled with weeds and trimmings from the shrubs. Now just need seven yards of bark mulch to be delivered this week and they will be back next weekend to finish. But already looks so much better and as they say "Happy Wife, Happy Life!"
 

Attachments

  • Flower Beds 1.jpg
    Flower Beds 1.jpg
    151.9 KB · Views: 250
  • Flower Beds 2.jpg
    Flower Beds 2.jpg
    155.2 KB · Views: 231
OP
B

bluegoose972

Well-known member
Joined
Apr 24, 2019
Messages
76
Location
Belton, TX
Ok, now that I'm caught up on my posts, I'll try to get more pictures and be real time in my posting. What's coming still:

1) Install bark mulch in flower beds close to house;
2) Railroad ties and sprinkler system along shop;
3) Backfill against shop and slab at entrance;
4) Complete landscaping around shop;
5) Place rock surface next to shop for trailer;
6) Install brick sidewalk out to shop from house;
7) Install 125 amp service from house to shop;
8) Install exhaust fan in gable;
9) Weld on tabs for OSB installation;
10) Frame up support for OSB installation;
11) Install closed cell spray foam on walls/ceiling;
12) Frame up storage room;
13) Install epoxy coating on floor;
14) Install lighting and fans;
15) Install electrical 115/230 around shop;
16) Install wiring for stereo speakers;
17) Install OSB on walls;
18) Prime and Paint OSB;
19) Finish electrical receptacles.
20) Install stereo and speakers;
21) Construct new work bench;
22) Move in!

Whew, writing that out shows how much work I have in front of me! But really excited about the vision I have in my mind.
 

QwikKotaTx

Well-known member
Joined
Aug 10, 2013
Messages
967
Location
Seabrook, TX
Looking good so far. Good call on the concrete delay. My Dad and I poured a small pool and patio in August one time. It was awful. It set really fast.

Stupid question: why did you not have the septic system moved before building construction began, was the old not underneath?

Sent from my SM-G900V using Tapatalk
 
OP
B

bluegoose972

Well-known member
Joined
Apr 24, 2019
Messages
76
Location
Belton, TX
Actually misspelled that QuikKotaTx. My septic system is Aerobic...as in sprinklers after water has been treated distribute onto lawn. I plugged off the old heads and we abandoned the system in place. The only reason I didn't relocate first was timing. The septic contractor was backed up four weeks and the slab and building guys were available immediately, so I jumped on it.
 
OP
B

bluegoose972

Well-known member
Joined
Apr 24, 2019
Messages
76
Location
Belton, TX
Ok, still making some progress.

The walls have three perlines (2"x6") with the bottom two installed horizontally and the top one mounted vertically. Therefore, I don't have anything to anchor my OSB to on the top currently. There was some left over perlin, so I cut it into 6" sections and welded it to either the bottom of the upper perlin or to the truss beams so that now I have something to anchor the OSB onto that is in line with the bottom two rows of perlins.

You can see the added sections on the top of the beams in the photo.

Once the tabs were added, I focused on building a frame to mount my exhaust fan. Using 2"x2" angle, I constructed a frame and welded in bolts so that I can easily install the fan from the inside of the shop. Have trim pieces to go around the hole, once I cut it out, but for now just leaving it as-is.
 

Attachments

  • IMG_0867.jpg
    IMG_0867.jpg
    115.9 KB · Views: 165
OP
B

bluegoose972

Well-known member
Joined
Apr 24, 2019
Messages
76
Location
Belton, TX
And we have insulation!

Had a company come up from Austin to spray 2" of closed cell insulation on the walls and ceiling. Debated about what to use for a long time, but finally pulled the trigger on this. And what a huge difference. The last couple of days, it's be in the mid 90's. The west wall (Red in color) has been absorbing all the sunlight and is extremely hot to touch, nearly unbearable. If you stood within 3 ft of the wall, you could actually feel the heat coming off the wall, like a heater.

Now, there is absolutely no heat coming from the foam. Laying your hand on it, it feels like ambient temperature, yet I know the outside metal skin is extremely hot. Very happy with the decision, but it wasn't cheap.
 

Attachments

  • IMG_0869.jpg
    IMG_0869.jpg
    151.5 KB · Views: 225
OP
B

bluegoose972

Well-known member
Joined
Apr 24, 2019
Messages
76
Location
Belton, TX
Electrician showed up today to trench in the service. Spent a couple of hours digging up irrigation lines last night and found most, but some I couldn't. Should be interesting to see how badly things get torn up! Definitely one step closer. Hoping that framing will start this weekend and then I can start pulling wire inside shop.
 

BitDrive

Active member
Joined
Jan 11, 2019
Messages
32
Location
Land of Lincoln
And we have insulation!

Had a company come up from Austin to spray 2" of closed cell insulation on the walls and ceiling. Debated about what to use for a long time, but finally pulled the trigger on this. And what a huge difference...

Looks great, if you decide to put an ignition barrier paint on it, I recommend and personally used DC315 on mine for peace of mind (available in white, gray and black).
 
To avoid these ads, REGISTER NOW!

TMcCay

Well-known member
Joined
Jun 5, 2011
Messages
1,057
Location
SW. Oklahoma
Great progress! Will be a really nice place to work out of once your finished. Are you going with any A/C and heat?
 
OP
B

bluegoose972

Well-known member
Joined
Apr 24, 2019
Messages
76
Location
Belton, TX
BitDrive - I will most likely take you up on that. The foam is a yellowish color and from what I'm told, will become a darker color over time. Nothing bad, but not really the color I would prefer. When I get ready to paint the OSB, I will probably shoot the ceiling also with something like the DC315 in white or grey.
 
OP
B

bluegoose972

Well-known member
Joined
Apr 24, 2019
Messages
76
Location
Belton, TX
TMcCay - Yes, going to install a Mr Cool DIY 24k BTU Mini Split. Would be nice to have it now, but need to get all the framing and electrical done first. If that unit isn't enough during the peak summers, will add a secondary window unit. But for 75% of the year, the mini split should do the trick. My plan is to build an 8'x10' room in the middle of the back wall with a work area with my bench on the left and the work working area to the right of the room. The room will have storage and an attic stair so I can store things on top as necessary. The mini split will be installed on the face of the front of the room so it will be more centrally located in the shop for maximum efficiency.
 
OP
B

bluegoose972

Well-known member
Joined
Apr 24, 2019
Messages
76
Location
Belton, TX
Two steps forward, one step back.

Looks like my "electrician" isn't one afterall. He pulled in the service wiring, but didn't include a ground for the subpanel. Then he ran a wire from the frame to the neutral bus and said "building is grounded". At least the service wire is in a conduit, so just need to pull it out, add a ground wire, and pull it back through. It's about the solution, not the problem!
 
OP
B

bluegoose972

Well-known member
Joined
Apr 24, 2019
Messages
76
Location
Belton, TX
Been working on the framing last weekend and this week. The heat is really tough after work. But working in the shade of the shop is barible compared to working out in the sunshine. Would love to have a fan going, but using the power cord to run the drill and cutoff saw and concerned about overloading the circuit since I'm a 100 ft from the house and plug.

Still need to frame around the windows, add some support framing for the upper sheathing, and build my storage room. Once that is done, I can start on the wiring and begin preparations for the floor treatment.
 

Attachments

  • Framing.jpg
    Framing.jpg
    152.6 KB · Views: 188
  • Framing 2.jpg
    Framing 2.jpg
    152.3 KB · Views: 164

amkluttz

Well-known member
Joined
Sep 8, 2014
Messages
279
Location
Concord, NC
Are there no long term concerns over having to replace an exterior panel and losing your spray foam insulation?
 
OP
B

bluegoose972

Well-known member
Joined
Apr 24, 2019
Messages
76
Location
Belton, TX
Nope, no long term concerns at all. If a plane falls out of the sky or a meteor hits, I probably have bigger problems. LOL I have spray foam in my house and it works great too. There is always a chance something could happen and I will just deal with it. But I think the concern is really over thinking things. Looking at the panels, if I had to replace a couple, it really wouldn't be that big of an issue.

Pull off the interior sheathing. With a little measuring, locate the vertical joint line between panels. Using a sharp knife and taking my time, cut up and down the vertical joint to expose it. Actually, a wire wheel on a drill would probably work the best...just messy. Yes, this will take some time, but not more than a few hours, worst case. Unscrew the panels from the perlin's. Then just bust out the panels that need to be replaced. Probably a bigger issue matching the weathered paint on the outside. And if you're just going to replace the whole wall, then things are even easier.

Not sure how I could lose the foam. It really did alot for tightening up the sheathing to the structural steel. Now, instead of sounding like an echo chamber, this are very quiet inside. Really happy with my decision and would highly recommend it.
 

amkluttz

Well-known member
Joined
Sep 8, 2014
Messages
279
Location
Concord, NC
Nope, no long term concerns at all. If a plane falls out of the sky or a meteor hits, I probably have bigger problems. LOL I have spray foam in my house and it works great too. There is always a chance something could happen and I will just deal with it. But I think the concern is really over thinking things. Looking at the panels, if I had to replace a couple, it really wouldn't be that big of an issue.

Pull off the interior sheathing. With a little measuring, locate the vertical joint line between panels. Using a sharp knife and taking my time, cut up and down the vertical joint to expose it. Actually, a wire wheel on a drill would probably work the best...just messy. Yes, this will take some time, but not more than a few hours, worst case. Unscrew the panels from the perlin's. Then just bust out the panels that need to be replaced. Probably a bigger issue matching the weathered paint on the outside. And if you're just going to replace the whole wall, then things are even easier.

Not sure how I could lose the foam. It really did alot for tightening up the sheathing to the structural steel. Now, instead of sounding like an echo chamber, this are very quiet inside. Really happy with my decision and would highly recommend it.

I was just curious. I would assume that the foam bonds pretty well to the panel. I've heard nothing but good things about spray foam and I'm sure you'll be happy with it. Aren't painted metal panels warranted for something like 40 years anyway?

The build looks great, keep up the good work!
 

Bronson

Well-known member
Joined
Aug 2, 2011
Messages
12,676
Location
Texas panhandle
Thank you for not calling it a "Man Cave"!:thumbup:

I have a 30x40x12 Mueller building with closed cell foam. The installer painted it white after it cured.
You will never regret the foam.
Great looking build!:thumbup:
 
OP
B

bluegoose972

Well-known member
Joined
Apr 24, 2019
Messages
76
Location
Belton, TX
Ok, made some progress. Need some pictures, but completed all of the inside framing on the walls, constructed a storage room along with a loft area for storage. Room and loft are 9'x10'. Storage room will also double as compressor room in the future.

Yesterday I started on the wiring. Installed all of the boxes and ran all of the circuits, except for the ceiling fans and overhead lights. Have decided that I'm going to cover the ceiling in tin, either galvanized (used) or white (new). So, lights and such will have to wait until then.

Now that the wiring is done, the electrician that is going to do the final hookups and checks is about 1.5 weeks out. That means I will probably epoxy coat the floor next weekend. My 1,000 sf kit arrived last week from one of the vendors. Want to get the epoxy on the floor before I put sheeting up on the walls.

Will take and post some pictures tonight.
 
OP
B

bluegoose972

Well-known member
Joined
Apr 24, 2019
Messages
76
Location
Belton, TX
Been awhile since I updated. Finished all the wiring and then with some help of a few guys from work, we covered all the walls in OSB. I tried doing it myself, but quickly discovered that I'm not as young as I used to be and this was going to take me months if I didn't get any help. LOL

After that, hired a few more guys from work and rented a scaffold. It was a long 10 hour day, but we shot five gallons of primer, then five gallons of grey paint on the walls and ceiling. Turned out really good.

We replaced our roof at work, so I was able to acquired a significant quantity of aluminum sheeting in 8 ft sheets. Going to cut it down to roughly 40" and use it as a waynescote around the bottom. Going for a color them of silver, black and orange. My favorite sports team is the Raiders (Silver and black) and my college and high school colors were orange and black. So, painted the walls and ceiling grey, then I will paint an orange stripe around the room. The waynescoating is silver in color and it will have black stained 1x4 trim on the top and bottom. Sounds good in my head, but will have to wait and see.

Also, if you notice the center room is partially covered in barnwood paneling. To break things up, I'm covering that portion and the portion to the left, which will be my work bench area, with old wood look. Just the old barn wood is really expensive right now, but the paneling is only about $1/sf. So, going for it.
 

Attachments

  • IMG_1121.jpg
    IMG_1121.jpg
    152.7 KB · Views: 153
  • IMG_1120.jpg
    IMG_1120.jpg
    153.2 KB · Views: 157
  • IMG_1118.jpg
    IMG_1118.jpg
    157.7 KB · Views: 152
  • IMG_1116.jpg
    IMG_1116.jpg
    155.3 KB · Views: 169
OP
B

bluegoose972

Well-known member
Joined
Apr 24, 2019
Messages
76
Location
Belton, TX
Well, frustrating day. One of those two steps forward, on step backwards. Had the electrician over to install the lights and that part went fine. Not sure what I expected, but feels dim during the day, but looks great at night. Ceiling fans, a much different story. First one went up with no problem, but the second has a severe clicking sound. Needless to say, spent extra hours messing with it to finally give up and say I needed a new fan.
 

Unruh

Well-known member
Joined
Aug 12, 2017
Messages
1,431
Location
Silverdale, Washington
That center room is a nice touch and those built in’s are great. I always get really jealous of these sort of buildings because I would love to put something like this on my place.
 
OP
B

bluegoose972

Well-known member
Joined
Apr 24, 2019
Messages
76
Location
Belton, TX
Well, had a really productive weekend. Installed the TV and used a Powerline Ethernet Adapter to bring internet into the shop...worked perfectly. Installed a new fan after the last one had a clicking sound. Finished installation of the mini-split with the help of my daughter. And finished hanging the barnwood paneling. Next on the list is to paint an orange stripe around bottom of grey walls and then to epoxy coat the floor.
 

Attachments

  • Barnwood 1.jpg
    Barnwood 1.jpg
    155.7 KB · Views: 159
  • Barnwood 2.jpg
    Barnwood 2.jpg
    154.3 KB · Views: 138
  • Barnwood 3.jpg
    Barnwood 3.jpg
    155 KB · Views: 142
OP
B

bluegoose972

Well-known member
Joined
Apr 24, 2019
Messages
76
Location
Belton, TX
Well, I needed some color and decided to stick with my theme of my favorite mascots. I've always been a Raider's fan, so that is where the silver/grey came from. Going to have black trim pieces to complete the combo. But I went to Oregon State and they had the same colors as my high school, Orange and Black. So, what is a guy supposed to do about adding some color to his shop?

Bottom will get a black bottom of wall will be covered in aluminum wanscote from recycled roofing that will be bordered top (Bottom of orange stripe) and bottom (at floor) with black trim pieces. I think it will pop.
 

Attachments

  • Orange Stripe 2.jpg
    Orange Stripe 2.jpg
    146.7 KB · Views: 97
  • Orange Stripe 1.jpg
    Orange Stripe 1.jpg
    152.2 KB · Views: 101
OP
B

bluegoose972

Well-known member
Joined
Apr 24, 2019
Messages
76
Location
Belton, TX
Last two weekends were dedicated to the floors. Weekend before last, I tackled the acid etching. Didn't go nearly as easy as I thought it would. First, I didn't dilute the 31% muriatic acid, so it was very strong when applied. Looking back, probably should have diluted it some. The fumes were really strong, even with ceiling fans going, doors and windows open. The paper mask wasn't cutting it, so switched to a high quality mask with charcoal type filters and that made all the difference. Once the floor was hit with acid, I followed up with a baking soda water to neutralize everything before pressure washing the slab.

Here is where the challenge starts. I had kept the slab moist during acid and application of the baking soda and the slab rinsed off nicely, but as you can see from the picture, there was a white residue covering the entire slab. And once it was wet, you couldn't see it so it was nearly impossible to get off with a normal pressure washer since you can't see what your removing. Luckily, I had purchased a rotary head I had purchased awhile back and attacked the slab.

After the first pass, I let it dry for a couple of hours and it looked like a striped tiger. Between going too fast and not getting enough removed and doing my best to overlap, I still missed several locations.

Needless to say, it took three times with the rotary head to get the white residue removed. Then I left everything alone and let it dry for a week.

Last weekend, we attacked the floor with the Polyurea. I purchased the two coat system from a vendor from this site (Justin at garageflooringllc.com). The girls and I sectioned off the room into five areas to match up with the five gallons of polyurea per coat. We also seperated the paint chips into five bags for distribution. For distribution, I have been holding onto a plastic container that had pepperoni in it and drilled several holes in the top. The container was exactly the right size to hold 1/5 of the paint chips, or enough for 200 sf. I ended up drilling more holes across the entire top to aid in distribution.

I had one girl painting the perimeter while I did the roller work. My other daughter, the artist, was focused on paint flake distribution and I had full faith she would do a good job, which she did. Both girls worked really hard and didn't really take a single break for 2.5 hours until the job was done.

Once the bottom coat/chips were dry after about four hours, I applied the clear coat. This is a pain since you can't see where you start and stop. I just had to do my best and go over the area multiple times with overlapping passes to make sure I ended up with good coverage.

Really happy with the final product.
 

Attachments

  • Acid Etch.jpg
    Acid Etch.jpg
    115.2 KB · Views: 72
  • Paint Chip Distribution.jpg
    Paint Chip Distribution.jpg
    111.3 KB · Views: 81
  • Floor 1.jpg
    Floor 1.jpg
    147.9 KB · Views: 88
  • Floor 2.jpg
    Floor 2.jpg
    149.2 KB · Views: 95
To avoid these ads, REGISTER NOW!
Top Bottom