To avoid these ads, REGISTER NOW!

Between 265 & 485 SQ/FT The 12-Gauge Garage

Workspaces sized between 265 and 485 squarefeet.

shopnut

Well-known member
Joined
Feb 22, 2006
Messages
4,237
Location
Florida
withsink.jpg
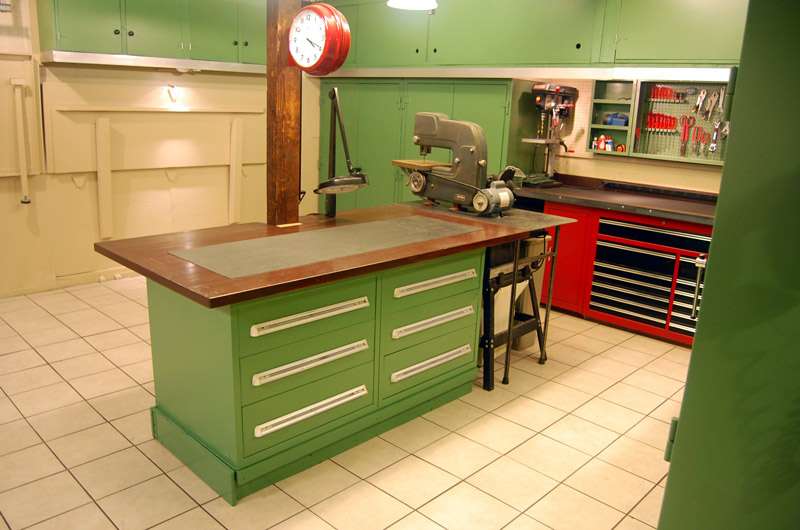
Jack - as always, nice work going on in your shop.

Just a suggestion since I finished up my sink install this weekend...

This may be a moot point because of the way your counter apparently will hang over the base cabinet by several inches, but I tried my sink for a week without a toe-kick (the toe recess at the floor) and found myself constantly kicking the panel below the sink. So I added a 4" deep recess making it MUCH more comfortable to stand at.

Sink-Nook-121.JPG Sink-Nook-150.JPG

Just thought I would throw this out there for you to consider, before you got too far along with your project.
 
To avoid these ads, REGISTER NOW!
OP
J

Jack Olsen

Super Moderator
Staff member
Joined
Mar 22, 2009
Messages
6,678
Location
Los Angeles
That's a very good point. I'd assumed that the big forward lip would make that a non-issue. But now I'm going to put it back together and test it with my stomach all the way to the edge. I agree about the lack of a toe kick being annoying. On my island-style bench, I went back in and took out material so I wouldn't kick it.

finishednocar.jpg
 
OP
J

Jack Olsen

Super Moderator
Staff member
Joined
Mar 22, 2009
Messages
6,678
Location
Los Angeles
This is the space it's going in.

oldmess.jpg


Today I got just enough time to work out whether I had all the scrap pieces I'd need for the smaller shelf section. And while I was there, I also re-did the curve on the top piece. I think this is better.

bettercurve.jpg
 
OP
J

Jack Olsen

Super Moderator
Staff member
Joined
Mar 22, 2009
Messages
6,678
Location
Los Angeles
Trying to make a little pit of progress every day -- even when there isn't much time. I welded on a face piece along the curve. The 3"x1/8" aluminum trim will attach to this 1"x1/8" piece.

faceunderpiece.jpg
 

fringeofinsanity

Well-known member
Joined
Nov 24, 2010
Messages
223
Location
Elgin, IL
Jack Jack Jack

yer KILLIN' me man!

Just as I scored a bunch of kitchen cabinets for free and getting reading to tear them out so I can paint'em and then get them installed(see, told ya I was insprired) I come here and find this!:bowdown:

Nice job man, I'm diggin' the curve actually.
 

e-tek

Well-known member
Joined
Dec 19, 2007
Messages
10,690
Location
Saskatoon, SK
That's gonna look good Jack.
I was just noticing the wood facing you have at the retractable air hose. If you put some SS finish instead, it'd really set off that Industrial Green!!
Keep up the good work - if your sink turns out anything like Shopnuts, it'll be georgeous!
 

Dan in Pasadena

Well-known member
Joined
Feb 18, 2009
Messages
13,141
Location
Pasadena, CA
Looking good Jack. I like the "re-curve" better than the original.

Under that curve there appears to be a lot of potentially dead space. Maybe you can make some use of that space by adding a curved cabinet under there that would follow the counter top above. It looks like you've got chemicals in there now (when the photo was taken). The curved cabinet would keep "little hands" out of those chemicals and hide them as well as paper towels, scrub brushes, etc. Maybe making the door(s) for the cabinet would be easier with a few layers of laminated 1/8" plywood than with the heavy gauge steel and; once painted "Olsen-green", no one will ever know the difference!
 

hvychve

Member
Joined
Dec 19, 2010
Messages
15
Location
sunny cali
screw the kitchen table, you can eat right there on the floor, god for bid , if that car ever leaks oil. THATS TIDY.....
 
OP
J

Jack Olsen

Super Moderator
Staff member
Joined
Mar 22, 2009
Messages
6,678
Location
Los Angeles
Thanks, guys. I made some more progress on the sink area today. Here's a refresher on where it started (with the new sink sitting on top of the old one):

startingpointsinklr.jpg


Today, all that got pulled out:

gutted.jpg


Here's the bench pushed into place:

benched.jpg


I clamped on a small piece of the aluminum trim to get an idea of what it will look like.

That's metal dust all over the floor. I had to do lots of cutting of the bench itself to conform to the Mickey Mouse water and electrical stuff that's been slapped into (and on top of) this wall, which was once the exterior side of a free-standing building and is now an interior wall.


Here's a view through the door, so you can see more clearly why it needed to be such an odd shape.

doorview.jpg


There will be a shallower cabinet to the right of the big one under the bench top. And the whole thing will be painted. For the paint, I'm thinking of not using green -- but instead the tan wall color (not the yellow you see in these pictures).
 

NUTTSGT

Super Moderator
Staff member
Joined
Sep 14, 2009
Messages
50,984
Location
Northern Central Ohio
Another great J.O.B. Jack Olsen Build.


Question for you Jack. I thought your green was one color but in post #464, it appears to be different than I thought it was. Is the color more of a pale Mediterranean green or more of a John Deere green?
 

bchee

Well-known member
Joined
Aug 20, 2007
Messages
6,148
Location
Texas
Jack have you tried to get GJ mentioned on tv somehow?

Maybe in one scene, 2 guys would be talking and in the background there would be a computer with GJ on the screen.
 

Nighttrain

Well-known member
Joined
Aug 6, 2009
Messages
2,682
Location
Dripping Springs, Tx
For the paint, I'm thinking of not using green -- but instead the tan wall color (not the yellow you see in these pictures"""


Are we hearing you right on this?? Or is that just to see if were reading your post? What is the plan for the top metal? Have you ever tried or though about those swirly patterns that are all in rows on bare metal? Not sure what the technique is called but I believe its done with a wire wheel brush.

Looking good!
 

Dan in Pasadena

Well-known member
Joined
Feb 18, 2009
Messages
13,141
Location
Pasadena, CA
I was teasing about the green. Keep using it, it totally sets the tone for your garage. It's how we know its a Genuine Jack Olsen garage improvement!
 

kerryt1

Well-known member
Joined
Feb 12, 2009
Messages
324
Location
Oklahoma
Have you ever tried or though about those swirly patterns that are all in rows on bare metal? Not sure what the technique is called but I believe its done with a wire wheel brush.

"Engine turned" is what that finish is called, FYI.
 
To avoid these ads, REGISTER NOW!

kpc655

Active member
Joined
Nov 22, 2010
Messages
34
awesome work, love the porsche, and the sink! around here there are some great deals on used shop equipment due to all the shops going under.
 

Hemihead2

ALLIANCE MEMBER
Joined
Feb 16, 2010
Messages
136
Location
Auburn, CA
Quote:
Originally Posted by Nighttrain
....those swirly patterns that are all in rows on bare metal....

For whatever it's worth, the French call those swirly patterns (and any other type of repetitive ornamental pattern) - guilloche.
I like 'engine turned' better.
 

Omphaloskeptic

Well-known member
Joined
Oct 11, 2008
Messages
2,346
Location
Ultima Ratio, Wa.
Jack,

It's really a pleasure to see the results of your design skills! Thanks for taking us along for the ride.

Not to push any ideas upon you, but I'm kinda expecting the shop door to be fab'd out of a couple of those stout cabinet doors (painted 'Jack Green' of course)! :bounce: I mean just for continuity's sake - and Black Beauty would be as safe as being parked in Fort Knox!:bounce:
 
OP
J

Jack Olsen

Super Moderator
Staff member
Joined
Mar 22, 2009
Messages
6,678
Location
Los Angeles
That texture is cool. But one of my rules of thumb (rule of thumbs?) is to do surfaces in a way that can easily be touched up when I slam a piece of something into it and leave a big mark. I don't know if that pattern would be 'patch-able.'

I made a small amount of progress today. I welded in the subframe that supports the bench top and cut the holes for the sink. I also started the frame for the shallow cabinet on the right. Still got to do the shelves and the doors.

The whole thing is still a very long way from pretty. But it'll get there before too much longer.

sinkhole.jpg


longwayfromhome.jpg
 
OP
J

Jack Olsen

Super Moderator
Staff member
Joined
Mar 22, 2009
Messages
6,678
Location
Los Angeles
Well, we'll see. I had the laundry-tub sized one for six years, and never liked it. I've always used a plastic tub or for solvent and parts. The old sink just ended up with scrapers and half-clean paintbrushes sitting down inside it.

The new bench will allow me to jump to a bigger size sink pretty easily if I need it -- just a little more cutting.

Part of the plan is that there's going to be a pretty significant backsplash on this one when it's done. Messier work should still clean up pretty easily.

I continued cutting up the carcass of the old 72" cabinet today and tacked together the shallow cabinet.

sidecab.jpg
 

Magic Mike

Active member
Joined
Dec 23, 2010
Messages
31
Location
Florida
Just wanted to say (now that i can post) that your garage is amazing and love the porsche! Been reading along for some time now.
 
OP
J

Jack Olsen

Super Moderator
Staff member
Joined
Mar 22, 2009
Messages
6,678
Location
Los Angeles
Thanks. I finished the locking mechanism for the shallow cabinet.

handlek.jpg


Then I pre-bent the piece of aluminum trim.

bent.jpg


Then I epoxied it into place.

clamps.jpg


Can you ever have too many clamps? No, you can never have too many clamps. :)

The piece of steel sitting up where the backsplash will go is just a piece of steel sitting there. The actual backsplash will go up 36" above the counter and wrap around on both sides. (At least, that's my current plan.)
 

NUTTSGT

Super Moderator
Staff member
Joined
Sep 14, 2009
Messages
50,984
Location
Northern Central Ohio
clamps.jpg


Can you ever have too many clamps? No, you can never have too many clamps. :)


ha ha ha I looked at the picture and was thinking, "Man, I know Jack has more clamps than that." Then I read your comment. :lol_hitti


BTW, before anybody else says it, your sink is in backwards in the one pic, but we know it doesn't matter, just pointing out the obvious. Looks good Jack :beer:
 

28HopUp

Well-known member
Joined
Mar 16, 2010
Messages
295
Location
Lowcountry SC
The sink area is going to look fantastic! Your shallow cabinet really sets the area off nicely. Seeing how your man-door opens, the sink area will be the first thing people will see (if the garage door is closed) as they walk in. Very nice!
 

JAckal

Well-known member
Joined
Oct 4, 2009
Messages
66
Location
Nw Arkansas
Jack,

That looks great!!!!!!!!!! I haven't read all of the pages on this thread, yet.

Can you tell me what color of green you have on all of the cabinets?

That is fantastic. I have run a lot of machines made in Europe that have a similar color and nobody could ever give me a name for it, and it isn't in the standard color charts.


Looks fantastic, and thanks.

From one Jack to another.

Jackal
 

kbuhagiar

Well-known member
Joined
Dec 27, 2005
Messages
1,750
Location
Escondido, CA
Hello Jack,

On behalf of all of your fellow Garage Junkies who have gotten hours of enjoyment from your garage adventures...

Merry Christmas!

Now go enjoy some time with your lovely (and patient) wife and the little guy! :beer:
 
OP
J

Jack Olsen

Super Moderator
Staff member
Joined
Mar 22, 2009
Messages
6,678
Location
Los Angeles
Thanks, guys.

Jack ..... out of curiosity .... do you draw any of these plans out in advance .... or do you design "on the fly"?
For better or worse, I'm not really any good at visualizing something before I make it. I keep promising to teach myself that Google Sketchup program, but I haven't gotten around to it yet.

I get a general idea in my head and then make it up as I go. In the case of this sink and bench area, I knew I wanted to use the big cabinet to make more storage. And it was apparent that the bench top would have to conform to the shape of the part of the garage with the door. But I'm still making my mind up about what's going to go above the bench line. I took the clamps off the aluminum trim this morning and started to have an idea about an upper row of bookshelves that would help give this piece of the garage a kind of 'cave' look -- which I think might look cool. But we'll see.

The good thing about improvising with 1/8" steel is that you can re-weld your mistakes. The bad thing about it (as I learned with the curve of the bench top) is that it's pretty difficult and time consuming to cut through 1/8" thick steel. The curve was cut with an ordinary jigsaw and three now-dead blades.

But it's not really a choice for me. I know when I like the way something looks. But I'm not a good enough designer to be able to plan exactly that result when I start.

Can you tell me what color of green you have on all of the cabinets?l

Hey, Jack. I think there must have been a somewhat standard kind of green used in the 1960s in industrial applications. This color comes close to my memory of one that was used in the plant my father worked in when I was really young. But I could be way off. It's a discontinued Sears Weatherbeater exterior color called 'Tarragon.' My local hardware store is able to mix it for me even though it's not officially available any more.

Now go enjoy some time with your lovely (and patient) wife and the little guy! :beer:
I did, and that meant the adhesive had time to set. Here's the sink with its facing piece of trim.

trim.jpg
 
Last edited:

Dan in Pasadena

Well-known member
Joined
Feb 18, 2009
Messages
13,141
Location
Pasadena, CA
Hi Jack,
If you've answered this before, my apologies: Do you just **** up the steel on the cabinet, then stitch weld it, or do you use those little HF clips that set a gap between the panels you're butting together?

What is the final depth of the shallow cabinet? I assume this will be for cleaners, Scotch-Brite pads, brushes, etc?

Finally, will the counter top be painted or are you thinking of something like a vinyl sheet product, the "coin" pattern flooring stuff, etc?
 
To avoid these ads, REGISTER NOW!
Top Bottom