To avoid these ads, REGISTER NOW!

Between 265 & 485 SQ/FT The 12-Gauge Garage

Workspaces sized between 265 and 485 squarefeet.
OP
J

Jack Olsen

Super Moderator
Staff member
Joined
Mar 22, 2009
Messages
6,678
Location
Los Angeles
Thanks, guys. I have the roller bracket (and yes, it's a Coxreel). It will be installed into an opening in the fake drawer front. It's actually just-barely visible (in profile) in the picture. I'd previously used a piece of square tubing to extend the arm that holds it so it would open through some lumber next to my old bench. I'm planning on a similar setup this time, but I'm fabricating a different type/length of extension.
 
To avoid these ads, REGISTER NOW!

Postsedan

Well-known member
Joined
Feb 1, 2008
Messages
77
Location
Elmhurst, IL
Love your ideas, I have similiar ones....must be because we are both from the Chicago area....I bet you miss our Chicago water Jack.

Keep up the great work :thumbup:

Dan
 

Wingnut65

Well-known member
Joined
Apr 21, 2010
Messages
3,170
Location
Tampa Bay, FL
Workbench progress looks great. And that hidden hose reel, very creative! Can't wait to see what you steal from TB66 for your place. I have the same image as inspiration to borrow from.

That stool looks great. It is just like the ones I used in my first office when we worked off drafting boards. I might just have to find one for my place now that I see how they look brand new. Nice work on the restore! It is probably the only shop stool with leather from a Porsche interior!
 

jim bremner

Active member
Joined
Mar 8, 2006
Messages
30
Location
l.a
I have a maple top that I damage while charging batteries on it. It left some pretty nasty deep burn marks. I sanded the clear coat off and stained it walnut. It didn't cover the damage but helped hide it. I'm looking for the right drawyers to use for a tool box under it. I have an old cabinet that has 3 3/4" tall drawyers that are made out of 3/4 plywood. They've been used for 30 years and have some nice wear on them. I'll paint them the funky green like Jack's or stain them Walnut. I'll post pics soon.
 

shopnut

Well-known member
Joined
Feb 22, 2006
Messages
4,237
Location
Florida
Hey Jack - maybe you already worked through all this in your head, but I have a suggestion for you on your hose reel.

Sometimes the smallest things, if repeated enough, can start bugging a guy. For me, I could see a pulled-out hose hanging in front of my cabinet being a nuisance everytime I want something out of those drawers. And I'm guessing, being the efficient worker you are, you plan to store the air tools near the air hose outlet. So at the very least, you might consider locating the roller fairlead as far left as possible on that fake panel, Maybe even aim it out to the left at an angle if you usually use it over by the car. Or maybe a small hook to hold it out of the way of the drawers once pulled out. (Or forget about it completely if you're a more tolerant guy than me :))

BTW, thanks for giving your opinion on the aluminum material for my rafters. I had my doubts that it would work, otherwise I would have bought some already. I guess there's always the possibility of gluing the thin material to some paneling or masonite and then attaching that to the beam.
 
OP
J

Jack Olsen

Super Moderator
Staff member
Joined
Mar 22, 2009
Messages
6,678
Location
Los Angeles
Thanks, guys.

Postsedan, there's a lot I miss about the Chicago area. But then, if I went back, there'd be a lot I missed about Los Angeles. As it happens, many of my good friends from Libertyville High School are still my good friends out here. A lot of us moved out here back in the late eighties.

Shopnut, I am going to have the outlet over to the left side. I don't think it being out will interfere too much, since I almost always keep it retracted. But we'll see.

On the aluminum, I think it stretches when they roll it, somewhat. So even adhering it down to hardboard might not work. I think thicker stuff would do the trick, but then you lose the economical advantage of using a mass-produced product.

I did some painting this morning. Gloss red on the cabinet exteriors; flat black on the door faces, and a semigloss gray/bronze for the handles. Here's the first cabinet getting put into position. There will be trim along the base, but I'm close to having a bench again. :)

paintpreview.jpg
 
OP
J

Jack Olsen

Super Moderator
Staff member
Joined
Mar 22, 2009
Messages
6,678
Location
Los Angeles
Yeah, the bench is replacing the one I made with the (shallower) Harbor Freight box, which I'd painted to match my Craftsman toolboxes. So it made sense (to me, at least) to paint this setup to match the toolbox, too -- since I'll be using these drawers for tool storage.

Here's the old bench:

15201115.jpg


And here's where things stand right now with the new one. I'll be staining the top the same brown as the old one. Then I'll finish up the drawer face that will have the air line. Then there's trim down below.

Up above, there are going to be some small bench top drawers -- and maybe some small shelves on either side of them. There will be a new vise and my drill press. I'm going to move my magnifying light over and work on the task lighting above the bench, too.

Still a long way to go. But I can see the broad strokes of it, now.

fittedtop.jpg
 
Last edited:

bad_idea

Well-known member
Joined
Jun 11, 2011
Messages
4,332
Location
Pasquotank, NC
bench looks good Jack. are you OCD enough to be bothered by the bases of the bench being different? one side has 1x2 square tube legs while the other has 1x6 channel feet (all sizes are approx from my perspective). I think it might drive me batty if it were mine. all kidding aside, great looking work Jack. One day I will have to get some skills welding sheet metal. I am still having trouble with heat control.
 

bhclark

Well-known member
Joined
Aug 20, 2011
Messages
418
Location
OHIO
bad_idea....I think the feet will be hidden by the trim he plans on installing.

Looks great Jack!
 

thomask

Well-known member
Joined
May 28, 2009
Messages
354
Location
Sunshine State
Hey JACK: Happy New Year, nice work on the new bench and cabinets, you seem to have a knack for making things better than original. I am thinking in the future with that neat shop maybe you could start a restoration of your CJ Jeep.

Hey not trying to spend your money (LOL) but that would be a neat project to follow with your skills on display. The "12 gauge Jeep".

My grandkids love riding in my 85 CJ and they wonder if I am crazy when I call her Nelly Belle!
 

Attachments

  • Labor Day 2010 279.jpg
    Labor Day 2010 279.jpg
    151.9 KB · Views: 65
Last edited:
OP
J

Jack Olsen

Super Moderator
Staff member
Joined
Mar 22, 2009
Messages
6,678
Location
Los Angeles
fittedtop.jpg


bench looks good Jack. are you OCD enough to be bothered by the bases of the bench being different? one side has 1x2 square tube legs while the other has 1x6 channel feet (all sizes are approx from my perspective). I think it might drive me batty if it were mine. all kidding aside, great looking work Jack. One day I will have to get some skills welding sheet metal. I am still having trouble with heat control.

Ha! It's a mix of 1x2 16ga rectangle tubing and 1/4" thick 2"x2" L-stock. It's whatever I had lying around. Both those legs -- and the other section I had to extend up -- were both made of scavenged pieces from the cabinet itself (and also some rusty stuff lying on a rack on the side of the house).

And I also hope to one day be able to weld sheet metal. I tried **** welding together the pieces of 20ga sheet for this and the results were awful. I got burn-through, heat warping, boogery welds -- every bad outcome you could imagine. I might have to concoct some kind of storage bin thing on the side of the cabinet near where my right knee will be to cover up the terrible, perforated and puckered results of my first stab at sheet metal welding. :shocking:

The only thing that makes me look like I have any skills at all is that my botched work is hidden in the shadows of the new bench top. :)

And thomask, the CJ and a restoration are a great idea. I'm hoping the thing will hold together until my son is 11 or 12 so that we can make it a father-son project. Actually, I'm hoping that the old straight six gives up the ghost sometime sooner than that, since I think it would be fun to put a V8 in the thing for a little more umph. (I could tow a boat with it, for example -- like you.) But then, yes, the 12-gauge treatment for the '83. I've been punishing it since I bought it in '93, and it deserves better. :)
 
Last edited:

Omphaloskeptic

Well-known member
Joined
Oct 11, 2008
Messages
2,346
Location
Ultima Ratio, Wa.
Jack, I'm looking forward to seeing yet another J.O.G.'s innovative re-use of storage products. Will the face plate of the hose reel be flush or recessed to keep the nozzle out of the way? What did you use to cushion the feet of the cabinets?

Very nice re-furb on the drafting stool; all that's missing is a cup-holder and a heated seat! lol
 
OP
J

Jack Olsen

Super Moderator
Staff member
Joined
Mar 22, 2009
Messages
6,678
Location
Los Angeles
See, that's how this forum can help. The cup-holder joke got me thinking -- and I just ordered a mug warmer, which I think is going to get built in to a shelf near the seat.
 

Squankum

Well-known member
Joined
Mar 28, 2011
Messages
7,690
Location
Southeast
A V-8 for the Jeep... a Porsche V-8?

Wait, I've got it! A slant six! A 3.6 liter air cooled six... slanted. Might not have the torque characteristics for the application... of course, there is always the turbo option.

Oil pan... scavenging... could get interesting...
 

mdbeck1

Well-known member
Joined
Mar 7, 2010
Messages
2,297
Location
Norman, OK
A V-8 for the Jeep... a Porsche V-8?

Wait, I've got it! A slant six! A 3.6 liter air cooled six... slanted. Might not have the torque characteristics for the application... of course, there is always the turbo option.

Oil pan... scavenging... could get interesting...

Nah.... Jack, you need to go with a V-6. Some of the older jeeps came with them and there is a LOT of information. Take a look over at earlycj5.com (I think that's the url) and check around. The V-6's have plenty of pep for what you need.

:thumbup:
 

BigAl62

Well-known member
Joined
Apr 18, 2011
Messages
2,286
Location
suburbs of Chicago
All your inline 6 needs is fuel injection and headers. Mopar makes a fuel injection conversion kit for the old 4.2 liter 6s and Clifford Research makes all kinds of hop up stuff for 6 cylinder engines. Those inline 6s can make lots of torque and horsepower!
 

Red Leader

Well-known member
Joined
May 15, 2011
Messages
2,689
Location
Denver, CO
Excellent looking bench Jack, and a fun project I'm sure:thumbup:

I know all about flaws hidden behind things:)

Its really neat to see you work with both wood and metal. Right now, I can old do stuff with wood. I see all the cool metal projects and it makes me want to dive head first into metalworking.

must remember budget...must remember budget...
 

babaso

New member
Joined
Jan 5, 2012
Messages
1
Location
Miami, FL
The old-fashioned bulbs were ten bucks each. That's crazy, in this guy's opinion. But it's not half as crazy as $1,500 lamps. :)

Hi Jack, first post here but I have read all 82 pages of the thread on your garage....it took me a while. Amazing work to say the least.

Quick questions, where did you pick up that light bulb and what wattage is it?

Thanks and looking forward to more of your great projects! :thumbup:
 
To avoid these ads, REGISTER NOW!
OP
J

Jack Olsen

Super Moderator
Staff member
Joined
Mar 22, 2009
Messages
6,678
Location
Los Angeles
Thanks for the Jeep ideas, guys. When it's time to go to work on the Jeep, I'm going to rely on the Garage Journal brain trust.

Thanks, Red Leader. Metal always seems easier and cheaper, to me. But I doubt that's actually true. I guess a lot of it has to do with where you're more comfortable.

And thanks for making it through the full length of the thread, babaso

Here's a link to the 40W bulb.

5_37_604_2-134014.jpg
 
Last edited:

tinbender 66

Well-known member
Joined
Mar 23, 2011
Messages
2,294
Location
Western Washington State
See. I said it would be the cat's meow and so it is. Even if it's not done yet.

And thanks for the honorable mention:).

Question: I was looking on Ikea's website at countertops and I can't quite decipher the Scandihoovian names they use. Do you know what they called yours? I see a couple of those in my near future. The "local" Ikea store is about 80 miles away so I'd like to call ahead and make sure they have what I need.
 

bacarl

Well-known member
Joined
Sep 16, 2011
Messages
72
Location
SE Michigan
Great work on the bench! I'm always blown away by your ability to hack up these cabinets and create something new to your own specs. So cool.

I have a 6-drawer Equipto that I'm building into a bench but I'm sad to say (although not surprised) that yours is progressing infinitely faster than mine.

I believe you've said that you only stain your wood bench tops to match one another, correct? That Ikea top comes with some sort of treatment or varnish, doesn't it? Are you simply staining it for color? My bench will incorporate a butcher block top as well which has been sanded clean, so I'm assuming I need some kind of sealant or varnish for the raw wood. Would be interested to know how you treat your wooden tops and how they hold up.
 

kpc655

Active member
Joined
Nov 22, 2010
Messages
34
looks great! i like the ikea work surface. i never would have thought of them!
 
OP
J

Jack Olsen

Super Moderator
Staff member
Joined
Mar 22, 2009
Messages
6,678
Location
Los Angeles
Thanks, guys. bacarl, Ikea treats the butcher block with some kind of protective oil. They warn that if you want to put on a finish you should sand it first. And they also include instructions for periodic re-oilings to keep the wood from absorbing stuff. I'm not up for four-times-a-year maintenance, so I just stain and varnish these things. The added bonus is that the benches don't become a patchwork of different colors.

Like most everyone, I make decent progress when I've got the time to work. All weekend and today, I've had (and have) work stuff going pretty much around the clock. So the bench is sitting half-finished, and probably will look exactly the same for at least the next 24 hours.

But the key is not to give up. :)
 

widerberg

Well-known member
Joined
Feb 15, 2007
Messages
245
Location
Down South
Love the chair, Jack! So much so that I just hunted one down and, after a quick Make an Offer on eBay, it's now en route. Can't wait to get it into my garage. :)
 

zip95864

Well-known member
Joined
Jul 25, 2011
Messages
281
Location
Sacramento CA
All right. I found the little clicker for the camera. So here's a quick re-creation of the father-son car repair.

garageteamb.jpg


He's actually pretty good with a screwdriver -- considering he's two. Of course, I might be biased.

garageteamf.jpg


Here's the wheel. The sleeve came loose from where it seats itself -- it was just a compression fit. So we ground it down and then Dad welded it.

weldedwheel.jpg


Did I miss it, where'd you get that kids car? Awesome.

edit: think I found it link
 
Last edited:
OP
J

Jack Olsen

Super Moderator
Staff member
Joined
Mar 22, 2009
Messages
6,678
Location
Los Angeles
That's it. My only modification was a Porsche badge -- so his car matched mine.

(If you look around, I think you can get it for less than that though.)
 
OP
J

Jack Olsen

Super Moderator
Staff member
Joined
Mar 22, 2009
Messages
6,678
Location
Los Angeles
Thanks.

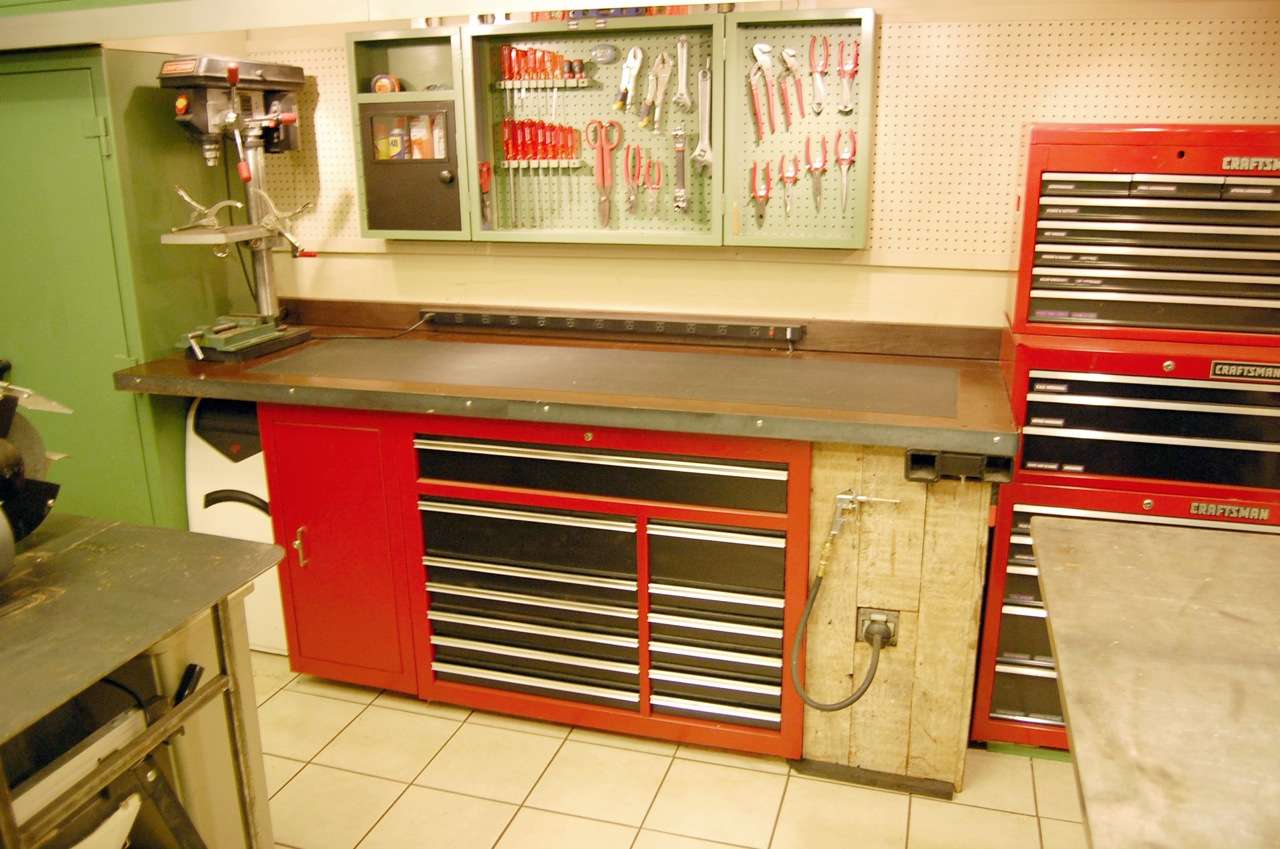
Today I got a little bit of time to work on the bench. Still a ways to go, though.

Some of it involved a lot of effort and not much you'd notice. The cabinet with the pegboard was 2" off center (the old bench wasn't centered), so I had to take everything off of it and re-hang it.

At the same time, I cut a hole in the wall. I'm adding some small drawers, and I can use the space behind the plywood.

movethecabinet.jpg


The drawer unit came with three rows of drawers. I cut it down to two.

drawers.jpg


And to fit the remaining drawers in that space I had to come up with a fix for the studs, which (oddly) are set at 20" on center. So I cut into the unit.

studs.jpg


Then I used the metal blade on the table saw to belt cut 2" out of four of the drawers.

beltcut.jpg


I still have some welding (and painting) to do.

shortiesy.jpg


I welded in the face for the false drawer and added an extension for the opening piece.

airlineb.jpg


I also used a jig saw to trim the edges of the butcher block. The goal is to be able to push in the chair without having it stick out into the walking space in the garage.

trimmedblock.jpg


This picture is fuzzy, but it gives you an idea of how it's coming together. I'm going to try and get some more of the painting done tomorrow.

fuzzy.jpg
 

bacarl

Well-known member
Joined
Sep 16, 2011
Messages
72
Location
SE Michigan
I can use the space behind the plywood...
I'd say that's taking "use all available space" too far, but it's just too damn smart! Very impressive example of resourcefulness.

Nice work with the small drawer unit too, more impressive work. Why did you cut the hole so much larger than the unit? I have to assume you have something clever planned, otherwise you'd have cut the hole just large enough?
 

Dan in Pasadena

Well-known member
Joined
Feb 18, 2009
Messages
13,131
Location
Pasadena, CA
Jack,
NOT criticizing, but I'm wondering if you considered cutting the studs and putting in a header above the space? Then you could have kept the full depth of the drawers and not had to do the cutting/welding/painting. It might be an optical illusion but it looks like the full three rows od drawers MIGHT have fit between the cabinet ad bench top. Any reason you didn't want all three?
 

Hemihead2

ALLIANCE MEMBER
Joined
Feb 16, 2010
Messages
136
Location
Auburn, CA
Lookin' good, Jack. I really like the inset of the bench top for the chair and how the faceplate looks with the airline poking out.
 

CCMullen

Active member
Joined
Dec 6, 2011
Messages
35
Jack,

I just saw your awesome garage on page 40 of Family Handyman February 2012 edition. Congratulations on Consumers' Choice: Best Garage!
 
OP
J

Jack Olsen

Super Moderator
Staff member
Joined
Mar 22, 2009
Messages
6,678
Location
Los Angeles
Thanks, guys. Here's a cell phone picture of where it is right now:

previewxko.jpg


Stain is on, but no varnish. Still no backsplash, bench-top drawers or the electrical strips. Some of the lower trim is sitting in place, but it hasn't been attached yet.

But it's starting to look like the finished product.

I'd say that's taking "use all available space" too far, but it's just too damn smart! Very impressive example of resourcefulness.

Nice work with the small drawer unit too, more impressive work. Why did you cut the hole so much larger than the unit? I have to assume you have something clever planned, otherwise you'd have cut the hole just large enough?

Well, I had something clever in mind, but it didn't pan out. I cut out room for an extending-arm-type magnifying lamp to fit above the drawer. But in testing it, it just didn't function the way I'd hoped for. So I'm probably going to just drill a hole for my magnifying light.

NOT criticizing, but I'm wondering if you considered cutting the studs and putting in a header above the space? Then you could have kept the full depth of the drawers and not had to do the cutting/welding/painting. It might be an optical illusion but it looks like the full three rows of drawers MIGHT have fit between the cabinet ad bench top. Any reason you didn't want all three?
That was my original plan. But discovering that the studs were not standard lumber sizes and not spaced in a modern way led me to decide that four shorter drawers would make more sense.

I thought three rows of the little drawers was going to be too much, no matter what the room situation was. I want these to kind of take over for my 'junk drawer,' and also hold some things I need frequently -- kind of the drawer equivalent of pegboard. We'll see if it leads to more organization or less.

I didn't know the Family Handyman was out. Remember, the grand prize winner (selected by the editors) was also a Garage Journal member -- his handle on the forum is Sundowner. So it was kind of a Garage Journal sweep. :)
 
Last edited:

GirlnAgarage

Well-known member
Joined
Jan 21, 2011
Messages
4,668
Location
Texas
Looks like an inviting place to work :thumbup:

Jack, don't know if now's the time to bring this up, but when it's time for you and your family to move how much of the place are you going to deconstruct? :spit:

Ok, you don't really have to answer that. It won't matter 'til then :beer:
 
To avoid these ads, REGISTER NOW!
Top Bottom