kippieland
Well-known member
Looks great! Love the new desk.


So much for re-sale.")


I hate the smell of Simple Green, but it does cut through the nasty stuff.

Thanks.
And even though no one could argue this garage needs more exposure, it's on the Hemmings Blog today.

 A little "Bro-mance" forming here? "Not that there's anything wrong with it..."
The car's paint is chipped from too many track days, but it's like looking at the woman you married 30 years ago -- uou will always see the thing you fell in love with.

Jack, you're a writer now too?
Very eloquent. Reminded me of my first truck.
 Although I feel no guilt for poaching some of your very clever ideas, I cannot, in good conscience steal your paint color! I think I will paint the lower 4 ft of my walls and all my equipment with a hammer finish enamel by Masterchem(the Kilz people)It is called Rust Cap and I love Mid Green.I used to be a machine mechanic in a knitting mill years ago and all the Swiss machines were painted with this stuff.What do you guys think?http://www.masterchem.com/masterchem/v/index.jsp?vgnextoid=abbfe31ef7ba0210VgnVCM1000008c05d103RCRD
Resale value? Those kinds of Craftsman tool chests? Aw, c'mon, you just bought those to put tools in. The world doesn't clamor for them, never will. Not that they're not perfectly cromulent chests! They hold the tools, and they're not junky.
Great value. I've got a stack of CM Griplatch from Craigslist, slightly used, half price, similar deal. Not superluxe, but such a value!
I like it!
1) I wish I'd done electric better before I started. That's my biggest regret -- and something I plan to address some day. 2) I missed out on a cool Buffalo drill press that I still wish I had. But I cheaped out during the bidding. Other than that, not much.Jack (and others who have recently redone a garage):
In looking back on the various "builds" in your garage - let me ask you some questions:
1. What would you have "NOT" done? What did you do that you wish you had not done?
2. If you had a bigger budget - what additional work would you have done?
Jack: I think your stone chips will compare very well to this guys lucky escape... Saw the track name and made me think of you. Hope the Porsche lives on for many more years...


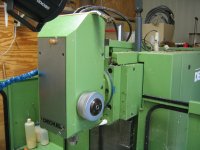
Hey Jack, I just love the green that you chose for your garage!
That was just how I remembered the color...not exact, but I like the hammered effect.Here is your colorThe typical Swiss machine green is Ral 6011 (called Reseda Green)
Albert from Switzerland

 I'm a very distinguished member. That's just one of many things...............


Jack this is really late info but you could have just beaten the aluminium over the forms without cutting the metal...I've formed some pretty nice things by just softening the aluminum and hitting it with a block covered with a strip of thick leather. Try it !Ha!
I'll tell you, working with this foam insulation stuff is a LOT easier than what I did with the previous wing. It was my first metal fabrication ever, pretty much. I was in way over my head, without any kind of model or instructions. But finally got it finished -- and it still works, five years later.
I started with a wooden buck I made from a print-out of the airfoil I wanted to use.


On the topic of garages, you'll see that five years ago I just had to set up a little temporary bench next to the car under its canopy. At the time, the garage was so stuffed with storage and other **** that there was no room at all to work in it (much less park a car).
You can't go wrong with that Porsche for pictures.. it fits all the boxes. Nice shapes/curves. Wheels that fit correctly into their guards and wheels that have a decent 'dish'...the ride height is also to correct proportions. It's a Porsche but it sits at the stance all decent cars should. good one!Thanks, TravisT.
And A_Pmech, I agree that Strong Hold cabinets would be the perfect match for your shop. It's too bad (and I say it with mixed feelings, of course) that you don't have a huge, dying aerospace industry nearby.
I wrote post 1735 after a just-about-perfect day in the garage -- one of those afternoons where you get through everything on your list and each task takes just a little less time as you thought it would.
Sometimes, of course, things go the opposite way...
Two days after that perfect day, I went out to the garage to finish up two simple things. I wanted to do one more test to see why my Cylinder Head Temp gauge was not giving me readings all of the time. I was able to get it work by connecting it directly to the thermocouple that fits under the spark plug. But then when I tried a second time, it didn't work. And I couldn't figure out why the line running to the gauge from the engine bay was causing a problem -- my multimeter was showing the circuit was good. I finally decided to run 12V through the line to see what the multimeter would make of that, and -- naturally -- did it without disconnecting the CHT gauge, which only uses 12V for the light (the gauge itself uses no power). Now, I'm not positive if that sudden dose of electricity was what finally killed the thing or not. But it went from failing intermittently to failing 100% of the time -- dead. And the replacement was $45.
Then I moved on to something even simpler, switching the cameras around that I use for the track-day recording. The one that I attach to the base of the rear view mirror kept going off kilter. So I tightened it down -- and then saw that the neck of the mirror was moving in the base. It looked like the mirror assembly was a press fit between two piece of pot metal.
No problem, I've got a welder. And even though it's the wrong tool for this kind of crappy metal, I figured 1) it's out of sight, blocked by the mirror itself, and 2) I've got grinders and some paint. The plan was just to fuse the two pieces and then grind away the evidence.
So this day was going from merely one where things didn't go the way you'd hoped to one where I ended up wondering if maybe I was a lot less intelligent than I'd ever thought. First, I tried welding it in the car, with fiberglass blankets to protect from burns. That was stupid, and it was pretty clear pretty soon that that wasn't going to work. So I decided I'd take the mirror off and put it in a vise. It came off with the pressure from a razor blade underneath it. No problem. And I happened to have an extra pack of the rear-view mirror glue, so I was going to be able to put it back on without losing the time of a trip to the parts store.
About the time I'd welded and ground and had the fitting snap loose again for probably the third time, I made my big 'I'm such an idiot' discovery: there in the neck of the thing was the set screw that tightens the neck down into the base. Of course, by the time I discovered it there, I'd already boogered the whole assembly up with some terrible pot-metal-melting welds, but I'd also cooked the set screw so it no longer even turned.
No matter, I got it so it was stiff, at least -- just not very pretty.
Glued it on. Waited a few minutes for it to really set -- and then saw that I was right back where I started, with the camera still crooked. By this point, I guess I was getting angry -- because I 'adjusted' the clamp that holds the camera with enough force to -- you're maybe guessing it...
...crack the freakin' windshield.
Just that kind of morning.
There's no real silver lining to be found in breaking your own windshield. I tried to convince myself that it had two pretty gnarly stone chips and enough sand-blasting from track use to merit replacement. But still, I would have rather replaced it on my own schedule.
But I got a new one put in today. It was cheap enough that I also replaced the one in my Jeep, which I'd cracked almost 8 years ago while hauling wheels and tires for the race car. It's nice to have that fixed, finally. And to also know I really got my money's worth out of that original-to-1983 windshield.
But I'm still mad about the Porsche windshield.
But what are you going to do? After the guy put the new glass in, I cleaned it off, put on a new sun visor piece, and took it out for a spin before lunch -- with the camera finally level and where I wanted it. Here are a few still pictures I took while I was out:
You'll notice a nice and clean windshield on the thing.
It's not necessary for your response and it makes for a lot of unnecessary scrolling. Just a pet peeve, TIA.