Thanks!
How does that cordless Rigid tool work out?
It worked fine. The smaller size of the cordless circular saw meant I was able to cut all eight of the pillar assemblies in place, and it went through all of them with no problem -- plenty of charge left on the battery when the job was done.
Where did you get those lights??
I don't comment much but I have been following your thread for a couple of years. Incredible, simply incredible!!! I'm borrowing your sunshade idea for my pergola. Sometimes the sun is just too much, even in Chicago.
Thanks. Remember to figure for snow load in Chicago -- which probably means making the shade removable for the colder months. There are kits for grommets.
The lights are just Japanese style spheres, although they're made out of vinyl instead of paper. The light fixtures inside are outdoor pieces from Lowe's. Here's a link to where I got the $7 spheres:
http://www.paperlanternstore.com/20whnyla.html
Hi Jack,
I like the perimeter "troughs" with the impatiens - very attractive and an excellent choice for this cool shaded area. Did you (will you) plumb in some drip lines? I'd suggest it if you haven't. I'm sure water would be easy to add if you T a small valve off your hose bib below the deck. Also, if you put them on a timer you'll rarely have to think of them.
Anyway, everything is looking great. Keep plugging and when you get all the lights working please post a couple photos of it in the evening.
Thanks, Dan. As I was putting them in, I realized this is the first time I've planted flowers since I was a kid. It's hard on the back! I've got the pieces for a drip system sitting in a box right now, which will attach to the existing timer-controlled valve that used to irrigate the back yard. It should be pretty easy to install. But we'll see.
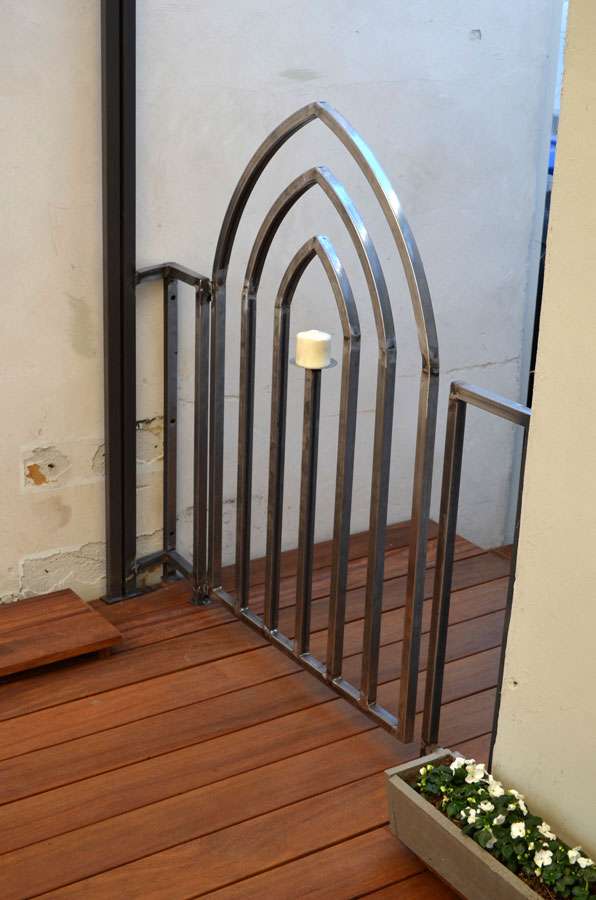
Love the gate. An idea to throw just to go around the wiring problems. If you mount a small 12VDC battery on the gate with a small solar panel you shouldn't have to worry about the wiring being in a mobile environment. I guess you could also do it with a 3V battery as well.
A 3V battery seems like the most straightforward way to do it. But wiring it into the larger system (there are going to be 'sconce' type candles on the pillars and a sort of candelabra thing on one wall) will allow me to run the whole setup off a motion detector or timer. I think subjecting a slender wire with 3V running through it should be acceptable, even with the movement at the hinge point.
Jack did you build the planters? my wife has been asking me to build her some. just wondering on the details.
They were as simple as construction gets. I used a length of 2x4 for the base, and used a table saw to angle one side in the course of making it narrower.
Then I used my go-to lumber selection for this project -- $2-per piece cedar fence pickets -- for the sides. I screwed lengths of cedar to each side of the 2x4, and used my miter saw to cut end pieces that matched the angle I'd ripped into the 2x4. I cut some extra pieces in the same shape to insert inside the trough to keep the shape of the whole thing more consistent, since the cedar is not consistently straight.
Here's a picture that shows the shape of the end caps and also a 2x4 with a line drawn on the side to show how I added an angle as I ran it through the table saw:
The 2x4 I actually used was pressure-treated, and I used a spray on sealer for the edge I cut. I also made each planter water tight with roofing caulk and drilled drainage holes before I planted the flowers.


")

 The reason I mentioned designing is that Store Bought just isn't good enough for THIS garage. I am in awe
 of what you have been able to do with this space. thanks for sharing all these stolen ideas not you, us
 I'm not sure how the Fed's will feel about that
 As always, nice work Jack. That awning is awesome!!


 You'll be glad you did.