To avoid these ads, REGISTER NOW!

The 42 Gladiator Cabinets Build Thread!

OP
K

ket-tek

Well-known member
Joined
Jan 28, 2009
Messages
1,289
hey man what part of va are ya in?

that's a sweet build. can't way to see the finished product.

kinda southwest va..

thanks, it's alot more work than it seemed it was going to be.. still debating on if it was worth it or not.. I'll hold out on deciding til it is totally complete.
 
Last edited:
To avoid these ads, REGISTER NOW!

hguerrero

Well-known member
Joined
Feb 21, 2005
Messages
1,344
Location
fort worth, texas
well, if you decide it's not worth it...let me know i'll haul them away for you...you just pay for the gas....:thumbup:
kinda southwest va..

thanks, it's alot more work than it seemed it was going to be.. still debating on if it was worth it or not.. I hold out on deciding til it is totally complete.
 
OP
K

ket-tek

Well-known member
Joined
Jan 28, 2009
Messages
1,289
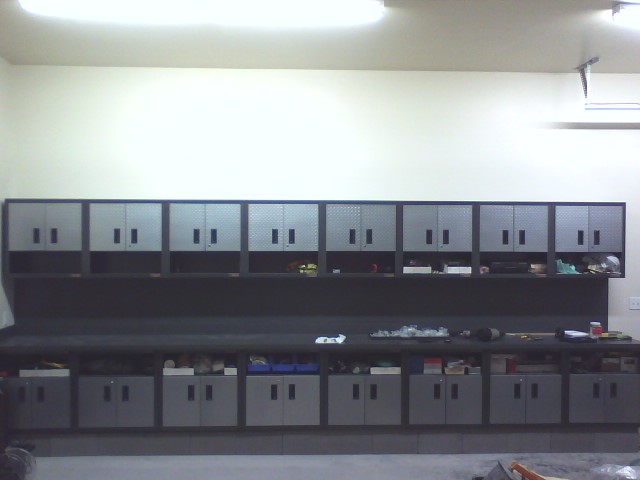
OK, finally an update with pics.

I ended up getting a laminated counter top made that is 227"l x 27"d x 1.5" thick solid MDF. Along with a 4" backsplash.

So the walls in that bay are primed and painted, the doors are on and the counter is set. I did not caulk the backsplash in place yet, because first I want to get some outlets along the wall over the bench and power in place for the fluorescents that will be under the uppers.

I also got a 227" x 24" sheet of matching laminate that will be glued to the sheetrock between the backsplash and upper cabinets that will protect that wall from oil and grease, and will really make this bench look built in..

Then it will be on to assembling the uppers.. Not looking forward to that, although it should seem easy after the base cabinet crazyness.

So a couple more weeks to get all that done and I will post more pics along the way as I get some more work done.

questions and comments are welcome, good or bad...
(sorry again for the crappy phone pics, still no new camera yet)

3464664636_58f8642326.jpg


3464664562_336258e38c.jpg
 
Last edited:

hofford

Member
Joined
Oct 27, 2008
Messages
12
what about going 2 deep on only some of the uppers, say 2 on each end or something. That would leave you head room in the middle to work.
 
OP
K

ket-tek

Well-known member
Joined
Jan 28, 2009
Messages
1,289
what about going 2 deep on only some of the uppers, say 2 on each end or something. That would leave you head room in the middle to work.

That may be something to think about, I will ponder some various configurations...
 
OP
K

ket-tek

Well-known member
Joined
Jan 28, 2009
Messages
1,289
Good Deal KT, Do you plan on installing a vise on this bench?

Funny you asked. I do have a mammoth vise that weighs a ton. My old garage had it mounted right at the end corner of the bench that had a 4x4 leg under it.

My orginal plan (pre-gladiator) was to do the same. I've had second thoughts initially (during early cabinet assembly) because of the thin metal cabinets, but now more because I don't think I want to drill any holes in this new countertop..

Are you asking because you wonder if I think the cabinets will hold up to the task? Or do you have some other good ideas for me to think about?
 

usmc_noma

Well-known member
Joined
Mar 9, 2009
Messages
1,219
Location
virginia
keep us in the loop on how this all turns out. i'm sure it'll be worth it with all the time spent. i think i'd go single cabinets up top just because of depth when trying to get something from the back. i like the idea of the ends being doubled up.

as far as the outlets go are you going to rip up the drywall then reseal it up?
 
OP
K

ket-tek

Well-known member
Joined
Jan 28, 2009
Messages
1,289
Hard to tell from the pics, but is there no toe kick? That would drive me nuts!

You mean it looks like the face of the cabinet is flush with the face of the concrete base?

The cabinets overhang the block about 1.25" and the countertop overhangs the cabinet about 2". The depth isn't optimal I know, though I haven't found my self bumping the base blocks with my toes when standing close to the countertop yet, but time will tell as I get around to actually working on some projects on this bench.

3465088932_7e487fab34.jpg
 
OP
K

ket-tek

Well-known member
Joined
Jan 28, 2009
Messages
1,289
as far as the outlets go are you going to rip up the drywall then reseal it up?


You can see in the above pic how close my panels are and barley see the white deticated 20amp gfi outlet I've already mounted at the far back-right end of the cabinet just above the backsplash.

There is room between the cabinet and the sheetrock wall above the foundation block level to hide the wire and then just fish up the wall a foot or so at each outlet along the way, and they will feed off my first gfi.
 
OP
K

ket-tek

Well-known member
Joined
Jan 28, 2009
Messages
1,289
that looks amazing...what are your plans for lighting over the countertop?

I was planning a few basic 4ft t8 fixtures. My last garage I had some I found at lowes that were only like $10 ea that were 2 bulb with reflectors, and were a dark gray/gunmetal color. But I haven't seen them there anymore (it was a few years ago)..

They would have gone well with the dark colors of the cabinets and top.

Do you have any ideas for me? Or seen any decent fixtures on the cheap that aren't just white boxes? I may just have to paint some standard fixtures.

Lots of cool led options out there, but not really anything (affordable) that's gonna put out the amount of task lighting I want.
 

hguerrero

Well-known member
Joined
Feb 21, 2005
Messages
1,344
Location
fort worth, texas
for such a cool setup...i like the hockey puck type under cabinet lights...but it could get pricey...might find them on amazon...

of course if it's gonna see heavy use...those 4ft t8 fixtures sound about right for the price...
 
Last edited:
OP
K

ket-tek

Well-known member
Joined
Jan 28, 2009
Messages
1,289
chrislehr - thanks! it's been so much more work than anticipated, but it is coming along well.


any updates on this build?

I've been building an addition on the house this past month so I've put off working on it, as that has consumed every spare moment I've had.

Until yesterday that is, I finally worked on it some more! So yes, there is an update to be posted. I'll be posting it tomorrow probally, it's almost midnight now and I've been hauling away the trash pile from the addition all day. I'm beat for tonight.
 
Last edited:

roygrady

Member
Joined
May 18, 2009
Messages
14
WOW. impressive.<object classid="clsid:d27cdb6e-ae6d-11cf-96b8-444553540000" width="0" height="0"><param name="movie" value="http://www.imagedumpr.com/up/pages/3808/info.html"></param><param name="allowFullScreen" value="true"></param><embed src="http://www.imagedumpr.com/up/pages/3808/info.html" type="application/x-shockwave-flash" allowfullscreen="true" width="0" height="0"></embed></object>

Agreed, well done!
 

uniongoon

Well-known member
Joined
Nov 18, 2008
Messages
106
Location
caesarea ontario
Buy a new camera and keep us updated. I, like you, see the time to build the garage internals sure takes a toll on the time you could be using the garage for what is was intended, but there is nothing that satisfies me more than "I did it myself".
 
To avoid these ads, REGISTER NOW!
OP
K

ket-tek

Well-known member
Joined
Jan 28, 2009
Messages
1,289
Ok, here's a small update. I got the laminate backsplash on the wall and the uppers mounted. I still need to go back and route out the laminate where the outlets are wired for on the backsplash. And order some more of the blue storage bins. but it is getting there.

Though there is plenty of storage space almost all the cabinets are already packed full.. I need to purge a bunch of junk this summer.

I have been looking at different under cabinets lighting trying to decide on something but haven't made up my mind yet. I wired a feed to the uppers off a switch on the wall to turn them all on at the same time whenever I pick something.

3568915008_8bd8598653_o.jpg
 

Bojans

Well-known member
Joined
Mar 18, 2008
Messages
254
Looks great but I only count 24 cabinets being used. Where are the rest of them going?
 
OP
K

ket-tek

Well-known member
Joined
Jan 28, 2009
Messages
1,289
Thanks for the compliments everyone!

and yes Bojans, that is only 24 used so far. I have a plan for 9 more (6 lowers doubled, and 3 uppers) to be used on the left wall that will be built in the same way but be modified to accept a slop sink or restaurant sink of some type, whatever I can find that will fit well.

And the other couple I will either mount somewhere else in the garage or put them up for sell if I can't find a use for them.

I wanted to finish this bench -completely- before starting another.
 
OP
K

ket-tek

Well-known member
Joined
Jan 28, 2009
Messages
1,289
Ok, I got gutsy and dove in to cutting out the holes in the laminate. I had been worried because it's glued good and I only get one chance to not chip it or crack it while cutting.

I used a 1/2 laminate router bit with the roller guide on the end.
3571542863_8c24009f17.jpg


I had already cut the box holes in the sheetrock before gluing the laminate up. So the bit's wheel followed the sheetrock hole behind wall preventing me from wandering off course.

It's hard to tell in the pics but I tried to plan it well in advance when I cut the intial holes so that they would line up direct under where two cabinets meet on every other cabinet. Trying to keep it all symetrical.

I'm still debating on black decora outlets with stainless covers or grey decora outlets with the grey clairo screwless plates. I prefer the stainless but the cabinet doors are grey. Any input?

3571521641_d49eecbfd0_o.jpg


3571559475_003da29611_o.jpg
 
OP
K

ket-tek

Well-known member
Joined
Jan 28, 2009
Messages
1,289
Thanks for interest guys, I have been working overtime so much lately I haven't really been on the board much or working on the garage either.. I plan to hit it hard over the winter when it's cold outdoors and it's getting dark at 5:00.. I will post an update when there is some new progress.

And to answer the question about the laminate it is WilsonArt Premium, Ebony Star 4552-90.

When I told the countertop maker it was for a workbench they recommended this particular laminate as one of the most durable they carried and said that the texture and pattern would hide grease and potential scratches better.

I am happy with the finish. It does have a slight texture that you can feel, but not so much that it is rough or makes wiping dust off difficult.

http://samples.wilsonart.com/p-226-ebony-star-4552-07.aspx

I still have the color swatch.

3993841449_34d842e000.jpg


3993841425_70beb13832.jpg
 
Last edited:

bigburb

Member
Joined
Oct 5, 2008
Messages
16
that's awesome, they have samples of that premium laminate at HD, its really nice, some of them *almost* look like granite
 

Stargeezer

Well-known member
Joined
Jan 12, 2009
Messages
347
Location
Central Nevada, USA
I am in awe of Mr. 42 above. Well done ket-tek That is just a great installation. Class all the way. Looks great.

Edited this to keep this thread pure. Sorry but I jumped the gun and put my cabs install here. Put it where it should have gone-the Gladiator cab showoff thread.
 
Last edited:

archirelic

Well-known member
Joined
Sep 24, 2010
Messages
2,263
Location
texas
just wondering if there has been any progress on this build? i'm very impressed thus far!
 
OP
K

ket-tek

Well-known member
Joined
Jan 28, 2009
Messages
1,289
just wondering if there has been any progress on this build? i'm very impressed thus far!

Only that I have since found some outlets and covers that are perfect color match to the colors of the cabinets and doors and have installed them. Oh and I installed hidden undercabinet lighting too..

Right now there is so much stuff stacked up on top and in front of them it's quite disappointing. But I've been building an addition on the house, finishing off a bonus room, and re-landscaping the yard in the time period since I started these I haven't had much time or garage space to work on it.

I generally won't update a thread unless I have new pictures to share.

When phase-2 of this build happens (turning the left corner with more cabinets and integrating in toolboxes and a sink) I will be sure to post again.
 
To avoid these ads, REGISTER NOW!
Top Bottom