
You are using an out of date browser. It may not display this or other websites correctly.
You should upgrade or use an alternative browser.
You should upgrade or use an alternative browser.
The 5 Stitches Garage.
- Thread starter taumac
- Start date
sean Buick 76
Well-known member
Looking good all around, best wishes this holiday season! Great work this year.
1/2 Cup
Member Emeritus
Gerard, all the best to you and yours for Christmas and the new year...
I would like to take a moment to wish all my friends and their families a Merry Christmas, Happy Holidays, Feliz Navidad and a Happy New Year. Please, take some time this holiday to put the tools down ( just for few days) and make some memories with your family. Our families deal with our obsession in our garage so please take the time to show them some love.
The New Year is close upon us also so like take the time to thank all of you for following and your friendship over the past year. You are the guys that get me out there in the garage and make me challenge myself to come up with new ideas. I wishing all of you end of 2016 on a high note and great things in 2017.
Sincerely Gerard
jon72vega
Well-known member
Gerard,
Just dropping by to say MERRY CHRISTMAS!
Just dropping by to say MERRY CHRISTMAS!
I'm just making the rounds and wishing the fine folks here on the Garage Journal a very happy and joyous holiday season. And I hope the New Year brings you more of what you seek in this life, and less of what you don't.
I'm looking forward to more updates from everyone here in 2017. YOU are what makes this forum so great, so keep sharing, helping, and supporting each other.
I'm looking forward to more updates from everyone here in 2017. YOU are what makes this forum so great, so keep sharing, helping, and supporting each other.
shortykorte
Well-known member
While we sit at home with family and friends, I know your are busy helping Santa deliver dreams and wishes today. I thank you and Sue for your hospitality and look forward to many more visits. I'm really glad painting won't be involved. ")
May your Christmas be peaceful and filled with love and the New Year be a time of rebirth.
May your Christmas be peaceful and filled with love and the New Year be a time of rebirth.
While we sit at home with family and friends, I know your are busy helping Santa deliver dreams and wishes today. I thank you and Sue for your hospitality and look forward to many more visits. I'm really glad painting won't be involved.
May your Christmas be peaceful and filled with love and the New Year be a time of rebirth.
I'm just making the rounds and wishing the fine folks here on the Garage Journal a very happy and joyous holiday season. And I hope the New Year brings you more of what you seek in this life, and less of what you don't.
I'm looking forward to more updates from everyone here in 2017. YOU are what makes this forum so great, so keep sharing, helping, and supporting each other.
Thanks guys! Hope you guys had a good Christmas.
Well, it's a Monday and I'm off work so wife and I decided to run to Webster Flea market. This is the place where I tend to find stuff when I'll not looking for it. Today, when looking I didn't seem to find much of anything to pull the trigger on. I saw tons of people that bought Craftsman from the holiday sales and marked them up. Saw a couple of nice vises and where way over priced. I did see one of these...

No, I'm not starting WOC V2 but I always seem to find a Craftsman box there. LOL
I told everyone I wanted to shop at Sears this year. Family usually gets me gift cards to somewhere like Home Depot, Lowes or Sears so I decided I wanted some new tools from Sears. I go through my tools and see want, need, or just something I want. I also got to see what's broken and that I can exchange out from sears. I
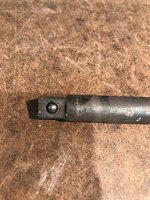
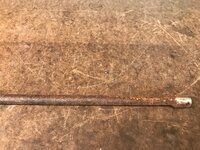
went through my stuff and had some long 3/8 extensions that where broken. Oh man yes I can exchange a Craftsman extension but this one is 1940 1950 vintage. I can't do that so I decided to fix it.
Here's where I started.

The ball was stuck and spring seem to be gone. So I drilled a whole on backside.

Them I punch a drift punch and tap it out. Well that didn't work so bring out the flame. I heated it up with propane torch and took punch and finally got damn ball out. I cannibalized a no name extension for the spring and ball. I used same technique to remove other but didn't work as well. I ended up grinding down the extension to remove the ball and spring.
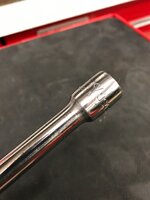
After it was all said and done it still looked in sorry shape.

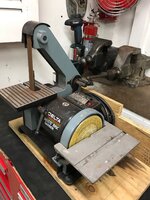
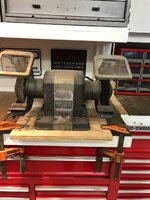
So got out the block grinder.

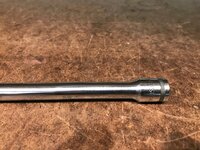
Wire wheel on one side buffer on the other. After run down with 150 sandpaper and wire wheel it looked like this.

After a little on buffing wheel it it came out looking great.


Feeling damn good about how others came out I decided to do the Husky. Now this one was in really bad shape.

This time instead of holding 150 grit paper in my hand and use a drill to spin it I decided to use my mini belt disc sander combo.

After some wire wheel and belt sander it came out looking like this.

This one didn't polish up as good but much better than it was before.


It was a good day and felt great to work in the shop verses work on the shop. Couple hours of zen time in the shop and I got a little dirty.

I must say I love those block grinders. Its is a 1969 1/3 hp I picked up and never did a thing to.

Its ran for over hour or more straight without turning it off, no vibration, and never got blogged down even it being a 1/3 hp. What a great grinder.
No, I'm not starting WOC V2 but I always seem to find a Craftsman box there. LOL
I told everyone I wanted to shop at Sears this year. Family usually gets me gift cards to somewhere like Home Depot, Lowes or Sears so I decided I wanted some new tools from Sears. I go through my tools and see want, need, or just something I want. I also got to see what's broken and that I can exchange out from sears. I
went through my stuff and had some long 3/8 extensions that where broken. Oh man yes I can exchange a Craftsman extension but this one is 1940 1950 vintage. I can't do that so I decided to fix it.
Here's where I started.
The ball was stuck and spring seem to be gone. So I drilled a whole on backside.
Them I punch a drift punch and tap it out. Well that didn't work so bring out the flame. I heated it up with propane torch and took punch and finally got damn ball out. I cannibalized a no name extension for the spring and ball. I used same technique to remove other but didn't work as well. I ended up grinding down the extension to remove the ball and spring.
After it was all said and done it still looked in sorry shape.
So got out the block grinder.
Wire wheel on one side buffer on the other. After run down with 150 sandpaper and wire wheel it looked like this.
After a little on buffing wheel it it came out looking great.
Feeling damn good about how others came out I decided to do the Husky. Now this one was in really bad shape.
This time instead of holding 150 grit paper in my hand and use a drill to spin it I decided to use my mini belt disc sander combo.
After some wire wheel and belt sander it came out looking like this.
This one didn't polish up as good but much better than it was before.
It was a good day and felt great to work in the shop verses work on the shop. Couple hours of zen time in the shop and I got a little dirty.
I must say I love those block grinders. Its is a 1969 1/3 hp I picked up and never did a thing to.
Its ran for over hour or more straight without turning it off, no vibration, and never got blogged down even it being a 1/3 hp. What a great grinder.
Attachments
-
 6413711c637a049300c064d9abb1f8ce.jpg590.1 KB · Views: 1
 -
 e11ffdabce8b50f06920060f5fa4b41d.jpg723.6 KB · Views: 1
 -
 453598641daacb38b040a98b4212689e.jpg713.9 KB · Views: 1
 -
 6d5494e583fb77987ffd834df7e0dd8e.jpg697.6 KB · Views: 1
 -
 1f16d0f34cb3fcbb10e5f888818ba64f.jpg575 KB · Views: 1
 -
 e8f3b0510706d2834ed23435e5c1ad1e.jpg646.3 KB · Views: 1
 -
 ea3cc1209e7048054cea47eca3488a34.jpg357.5 KB · Views: 1
 -
 cd2c8d066b4521dd619049eb514e1afc.jpg400.8 KB · Views: 1
 -
 aea4dd2514ae4fb08a974421a4b1140a.jpg687.7 KB · Views: 1
 -
 74f1118472f3ef900c6b6ef153f58598.jpg441.4 KB · Views: 1
 -
 9dc4d7c6422b54cb24fbd903484870fd.jpg819.8 KB · Views: 1
 -
 562d4bbae87bc34c1fac9b6b1ec5e855.jpg616.6 KB · Views: 1
 -
 2bc5d7facec23d28aed940f18a882c76.jpg666.4 KB · Views: 1
 -
 cd92f3b541b54253d9c3e63450a3abf6.jpg656.4 KB · Views: 1
 -
 624b43441827370ba726fbe11b833b6a.jpg621.6 KB · Views: 1
 -
 7c1730567cf5a451df1ce0310d9941ed.jpg612.1 KB · Views: 1
 -
 504234de3d400be1ed06cb14b14c90a4.jpg370.5 KB · Views: 1
Craptain
Well-known member
Great work Gerard. Did you remove the chrome from the extensions? They polished up well in any case.
My block grinder used to do similar service but needs bearings now.
Sent from my SM-G900T using Tapatalk
My block grinder used to do similar service but needs bearings now.
Sent from my SM-G900T using Tapatalk
Great work Gerard. Did you remove the chrome from the extensions? They polished up well in any case.
My block grinder used to do similar service but needs bearings now.
Sent from my SM-G900T using Tapatalk
Thanks! Well the vintage Craftsman I don't think it was ever chrome but the Husky I believe was. It was so rusted and pitted it wasn't being saved. My 2 grinders I never took apart but seem to run well. I did plan on taking them apart and giving them a paint job and learned about the new info plates I can do. The paint no issue but plates I don't have the computer or printer to make the stickers. I really haven't looked into it. Right not they look ugly but the work well.
HSpencer
ALLIANCE MEMBER
Gerard
Good job on the restores. I like the Cman top box you photographed. Looking at it, I am sure it would restore well, and would come out supersharp with some "time" investment.
That was one of my favorite top boxes in that era. Looks like your keeping busy!!
Best Regards
Herb
Good job on the restores. I like the Cman top box you photographed. Looking at it, I am sure it would restore well, and would come out supersharp with some "time" investment.
That was one of my favorite top boxes in that era. Looks like your keeping busy!!
Best Regards
Herb
Gerard
Good job on the restores. I like the Cman top box you photographed. Looking at it, I am sure it would restore well, and would come out supersharp with some "time" investment.
That was one of my favorite top boxes in that era. Looks like your keeping busy!!
Best Regards
Herb
Thanks Herb! I could agree with you more. Those are just great looking chest and imo one of best looking ever made besides the Craftsman Hertiage series that came before those.
Those resto's where very satisfying to do. Turn something shot into something decent. I plan to turn my Dayton grinder into my buffer and do more small project like that.
dlcwent
Member Emeritus
Wow Gerard, you did those justice. You know that Craftsman extension isn't going to like it much in a HF box. Maybe that should come home with me????

shortykorte
Well-known member
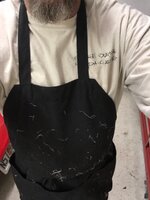
Nice apron. We always knew you wore the apron in the family. 
I expect to see that block grinder taken apart by the end of the week.
Great job on the resto. It is therapeutic to take some ugly and within minutes the beauty shines through.
I expect to see that block grinder taken apart by the end of the week.
Great job on the resto. It is therapeutic to take some ugly and within minutes the beauty shines through.
Nice apron. We always knew you wore the apron in the family.
I expect to see that block grinder taken apart by the end of the week.
Great job on the resto. It is therapeutic to take some ugly and within minutes the beauty shines through.
I always said I wear the shorts in the family not the apron. Using the buffer is dirty work and couldn't mess up my Florida Garage Life shirt now could I? I worn it the Webster so I was representing the FC while tool hunting. [emoji482]
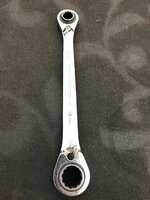
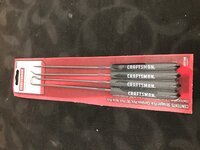
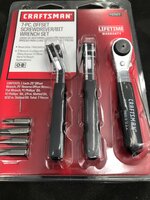
Well today was slow day at work so got sent home early. I can't complain at all. Worked less than 2 hours and getting paid for 4. They have to pay you for 4 if go in and get sent home. The weather is beautiful out and went by Sears on way home to spend some of my gift cards from Christmas. Here's what I got today.


Spent $183 but all stuff I've been eyeballing for awhile now. I like buying Craftsman stuff because they had same set of ratcheting wrenches in Gearwrench for $10 less but they don't warranty Gearwrench at Sears. I still have a ratcheting quad wrench for Gearwrench I need to get fixed or replaced. Its a great little wrench.
I bought in at Sears but said I have to get ahold of Gearwrench. I tend to but stuff from Sears so I can go in and say "Hey, Give me another one of these".
Attachments
-
 785900ccace72beb44b7facd6f299693.jpg827 KB · Views: 1
 -
 fd272cc0cfce8018c5be23015d88d90a.jpg645.2 KB · Views: 1
 -
 3cde9353a24e2864f9b842fac012671b.jpg617.9 KB · Views: 1
 -
 a5e1d29fb540d95557b15325591b02af.jpg546.3 KB · Views: 1
 -
 f35a730c013a56d3c229f95eb267ee42.jpg616.2 KB · Views: 1
 -
 c16fb132c16ff076528a3e48765f2a2c.jpg606.6 KB · Views: 1
cbacres
Well-known member
GERARDED
You heard it here first, the word of 2016
I was having a off forum conversation with Gerard and Shorty about my shop when asked "I thought you were setting up your Listas with a frame". I replied that's true, I was going to set them up that way before I Gerarded my layout, meaning I've changed it a few times and not even done. I'm sure a lot of you understand where I came up with this, G is a master of layout (changes), and attempted changes in my shop.
It's all in honor of the WOC creator and the dude with the ever fluid layout scheme, I mean plans, the one and only Taumac.
So join us with your use of this new word
Happy New Year and let's see where we end up with our shop layouts in 2017
Last edited:
Grumblebum
Well-known member
Lol, yep CB great word.
GERARDED
You heard it here first, the word of 2016
I was having a off forum conversation with Gerard and Shorty about my shop when asked "I thought you were setting up your Listas with a frame". I replied that's true, I was going to set them up that way before I Gerarded my layout, meaning I've changed it a few times and not even done. I'm sure a lot of you understand where I came up with this, G is a master of layout (changes), and attempted changes in my shop.
It's all in honor of the WOC creator and the dude with the ever fluid layout scheme, I mean plans, the one and only Taumac.
So join us with your use of this new word
Happy New Year and let's see where we end up with our shop layouts in 2017
CB, Thanks man. I so happy that I can help you with your shop in one way or another. LOL.
Yep, I'm probably the only one that has changed his garage or thought about changing his garage more than his underwear. LOL. Times are a changing and now I'm changing my garage less and focusing on helping others. LOL.
I'm really happy that we get to have those off forum conversations. If we had those off forum conversations on my thread it would get deleted and probably Craig, Shorty and I would get banned permanently in less than 24 hours. LOL.
2017 is gonna be the year of actually finishing projects and finalizing 2 layouts and maybe I've even use that "P" word. I mean PATINA not PAINT. I got a reputation of being a non-painter to uphold.
Last edited:
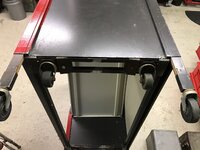
Well, today was a good day of QST even if it didn't go as plan. After yesterday not having a vise bolted down or place to work thought I would take a swing at the mobile bench. I have a work top to make or should say modify the one I made for it. Before that I wanted to see about lowering it. Its currently about 36" tall and wanted to see how low I could make it. This is current caster setup.

This slides into this channel.

The caster is a pin style caster.


I figure I can do something to lower it at least 2 1/2 inches or lose the red part.

I had this old dollie so tried using it. I like this cause of way I could change out caster. So decided to cut apart and recess in bottom of table.

Here's how a caster gets installed.

I just got in bottom and didn't want to cut the table any. This is back C channel that I didn't want to cut into.

Here's the casters installed.

I got some in action shots of welding table and A/V cart.


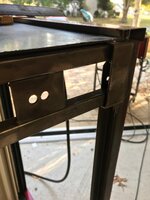
After all was said and done i lowered it 2 1/2 inches to work top height of 33 3/4. I wish it was around 30 but unless I remove casters that not happening. Here's how tall compared to me.

I lowered it but think its a little unstable because I moved the caster so far in. Here's the new verse old.

Well that's Attempt 1. Attempt 2 will be using original pin casters I got plan in place which is what I should have done with Attempt 1. I tried that dolly cause it does have the ability to quickly mount other size casters. When I got it it dolley it had 6in casters. Hell I can take casters off my HF44 and use them in the work bench now if wanted. I'll work on it some more.
I did suffer a injury to a tool today. My overworked 4 1/2 grinder took a fall and busting out the handle again.


The aluminum rod fix worked good but I made my own handles for both my grinders.

I got sick of breaking the plastic ones unfortunately these don't brake if thy hit the ground. They break the grinder.

I might be able to fix it again.

This slides into this channel.
The caster is a pin style caster.
I figure I can do something to lower it at least 2 1/2 inches or lose the red part.
I had this old dollie so tried using it. I like this cause of way I could change out caster. So decided to cut apart and recess in bottom of table.
Here's how a caster gets installed.
I just got in bottom and didn't want to cut the table any. This is back C channel that I didn't want to cut into.
Here's the casters installed.
I got some in action shots of welding table and A/V cart.
After all was said and done i lowered it 2 1/2 inches to work top height of 33 3/4. I wish it was around 30 but unless I remove casters that not happening. Here's how tall compared to me.
I lowered it but think its a little unstable because I moved the caster so far in. Here's the new verse old.
Well that's Attempt 1. Attempt 2 will be using original pin casters I got plan in place which is what I should have done with Attempt 1. I tried that dolly cause it does have the ability to quickly mount other size casters. When I got it it dolley it had 6in casters. Hell I can take casters off my HF44 and use them in the work bench now if wanted. I'll work on it some more.
I did suffer a injury to a tool today. My overworked 4 1/2 grinder took a fall and busting out the handle again.
The aluminum rod fix worked good but I made my own handles for both my grinders.
I got sick of breaking the plastic ones unfortunately these don't brake if thy hit the ground. They break the grinder.
I might be able to fix it again.
Attachments
-
 e08f52c2e6406c4ad4139b94237411ff.jpg392.6 KB · Views: 1
 -
 67db2d18c2e46d99c9acf07e3a2aaa82.jpg448 KB · Views: 1
 -
 a8aa8090b87719c210af99f47faa06a3.jpg451.4 KB · Views: 1
 -
 64dd422893818add47801076889736d7.jpg530.1 KB · Views: 1
 -
 9493a43bcd29ba36614f74358ab886ea.jpg948.7 KB · Views: 1
 -
 0e64008f47beffc7fc835722232ce917.jpg925.5 KB · Views: 1
 -
 7afacb6f76b6be3ba0cfa072f3814c99.jpg397.3 KB · Views: 1
 -
 f338df28fac833d3a0226cdb5b604606.jpg473 KB · Views: 1
 -
 64794a531232faf25e2e16a133ebf5e1.jpg491.8 KB · Views: 1
 -
 1c4a1190a591ad9749ebabdc2a15ee45.jpg388 KB · Views: 1
 -
 3dac64d8215aff190b7abf4c21c9d5c6.jpg588.3 KB · Views: 1
 -
 72e95ec17f6f58617985ef08f4c9221f.jpg331.5 KB · Views: 1
 -
 34b020a5ab8ee984972082e4fa34c6e6.jpg640 KB · Views: 1
 -
 63183e9cb3c50000866f1290a32d35a0.jpg501.7 KB · Views: 1
 -
 7b562880011e0d98e45f1cf247fea210.jpg711.3 KB · Views: 1
 -
 1b095c4be46ed8e44f2d556c570e5e86.jpg718.1 KB · Views: 1
 -
 a31f80cb0c8bd5d9ebe3ebd3b2fecc0f.jpg594.6 KB · Views: 1
 -
 9d5a2c263b9ed12baa645847d524f885.jpg602.3 KB · Views: 1
rmalkow2
Well-known member
You've had a really productive few days there. Making, breaking, improving, buying. Pretty cool getting all that accomplished. Some very nice tools new from Sears to help fill up those HF boxes.
The saving of those vintage extensions came out very good. I'll have to try that grind, sand and buff approach on a few crusty old ones that I have.
The saving of those vintage extensions came out very good. I'll have to try that grind, sand and buff approach on a few crusty old ones that I have.
rixtrix1
Well-known member
Looks like you've had a good bit of QST and shopping done. Congrats!
1/2 Cup
Member Emeritus
Hey Gerard you an Vieux have a lot in common..
You've had a really productive few days there. Making, breaking, improving, buying. Pretty cool getting all that accomplished. Some very nice tools new from Sears to help fill up those HF boxes.
The saving of those vintage extensions came out very good. I'll have to try that grind, sand and buff approach on a few crusty old ones that I have.
Yep, any shop time is good times. I been eyeballing the Max Access kit for awhile. Its works well so far.
Looks like you've had a good bit of QST and shopping done. Congrats!
I've been trying to get out there and work a little when I can. I got much to do on the welding table and mobile bench. Its getting there just don't want to get too involved and mess up while garage. I like parking in there. LOL
Last edited:
I had a good productive New Years Eve and New Years Day in the garage. Yesterday I manage to fix my caster issue on the MB.
I decided to make own retainers to hold the original pin style casters.

I'm using a allthread coupler and a washer. Well, before I went through making them I take to use the originals. They where welded together and no real way on using a cutoff wheel to cut the weld.

So I decided to take a chisel and bang the hell out of it until welds broke. Well they broke


I grinder down the welds and welded a washer as a stopper and painted.


Then I cleaned up the casters.

I thought I could keep the old casters mounting system but it interfere with new lower casters. So they got cut off. Lucky I didn't weld them it places I couldn't cut the welds.

At the end of the day I threw the top I made for it on top.

I decided to make own retainers to hold the original pin style casters.
I'm using a allthread coupler and a washer. Well, before I went through making them I take to use the originals. They where welded together and no real way on using a cutoff wheel to cut the weld.
So I decided to take a chisel and bang the hell out of it until welds broke. Well they broke
I grinder down the welds and welded a washer as a stopper and painted.
Then I cleaned up the casters.
I thought I could keep the old casters mounting system but it interfere with new lower casters. So they got cut off. Lucky I didn't weld them it places I couldn't cut the welds.
At the end of the day I threw the top I made for it on top.
Attachments
-
 724c1d55ead96102cbc27524340bfb41.jpg484.9 KB · Views: 1
 -
 487ea430c8e9e4f1c9ec4a1144e2428b.jpg576.2 KB · Views: 1
 -
 625309466da5f9bf0dde6987bdc6e5db.jpg290.5 KB · Views: 1
 -
 d9eb3c9acfe0d51e7654fd1786d96b81.jpg530.8 KB · Views: 1
 -
 be1d1a3870387bcafc9791ea8bad980f.jpg441.9 KB · Views: 1
 -
 564458871326285d14fdd03e26102ce1.jpg522.8 KB · Views: 1
 -
 5780c4a9ddd359859b3b2438bae0e2bb.jpg540.2 KB · Views: 1
 -
 ca6a3a8e195e3bf1443dbc388e5b4660.jpg635.5 KB · Views: 1
 -
 0f64f33c2628d1f56ac25717813b12fd.jpg323.6 KB · Views: 1
 -
 a0718cdb4d103192702d46f447a1e7cb.jpg642.1 KB · Views: 1
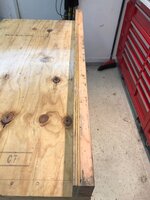
New Years Day started off with a little surprise. Usually I never glue and screw my wood projects together unless I know that's the way they gonna stay. Sometimes I put stuff together to see if gonna work then make changes if needed the put them together permanently. I guess I was done with the top cause I guess glued and screwed it together.

This ***** because I wanted to cut it down. I wanted a 2in overhand on each side and front but back flush with the back. Right now I decided to just cut the back off. At this point top is

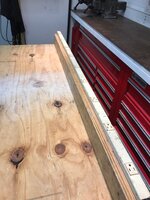
I wanted a backstop or back splash to keep stuff rolling off the back so added the back 2x4 and plywood i cut off the back.


Now I'm torn about this cause having a backsplash is nice but really like having a flat table. Like when I need to cut a place of plywood or work on something bigger than the top than the backsplash would be in the way. Would be nice to have a removable backsplash... yeah that would be great. Well I thought of even a better idea.


Yep I hinged the backsplash so when I want a flat table I just flip I down.

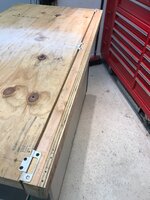
I also discussed before that I want all items to have electric and logging so I added the old strip bar I had cut down to even 54in. I mounted on the backsplash at first but then decided to mount it on top.

The reason I did it this way is when in the hinged down position I wouldn't be walking into the plug.


Now for a vise. Right now I still decided to use my BCV ( Big Chinese Vise).


I real happy with the progress so far and got so many ideas to add to this. I got casters right which adds more stability and best of both worlds with the top. Maybe tomorrow I get some more done on it.
This ***** because I wanted to cut it down. I wanted a 2in overhand on each side and front but back flush with the back. Right now I decided to just cut the back off. At this point top is
I wanted a backstop or back splash to keep stuff rolling off the back so added the back 2x4 and plywood i cut off the back.
Now I'm torn about this cause having a backsplash is nice but really like having a flat table. Like when I need to cut a place of plywood or work on something bigger than the top than the backsplash would be in the way. Would be nice to have a removable backsplash... yeah that would be great. Well I thought of even a better idea.
Yep I hinged the backsplash so when I want a flat table I just flip I down.
I also discussed before that I want all items to have electric and logging so I added the old strip bar I had cut down to even 54in. I mounted on the backsplash at first but then decided to mount it on top.
The reason I did it this way is when in the hinged down position I wouldn't be walking into the plug.
Now for a vise. Right now I still decided to use my BCV ( Big Chinese Vise).
I real happy with the progress so far and got so many ideas to add to this. I got casters right which adds more stability and best of both worlds with the top. Maybe tomorrow I get some more done on it.
Attachments
-
 8decd6a0d7538e4e510d0434ba3ce410.jpg521.9 KB · Views: 1
 -
 9e260f6b86bfd89ef9c4c4da30328a83.jpg590.4 KB · Views: 1
 -
 13aa74a2d351f1745157d30bf927d2f9.jpg635.5 KB · Views: 1
 -
 4fbc72035586c2f1de94fb71d8964419.jpg489.1 KB · Views: 1
 -
 f44362577823fe546454b47417a8c030.jpg510.6 KB · Views: 1
 -
 35636b2944427b828a8797c70dea7850.jpg515.7 KB · Views: 1
 -
 6758f0045984d62d02e80928b6752ba3.jpg515.7 KB · Views: 1
 -
 4b2673a85afd99c9e0502038e41b3d4c.jpg528.3 KB · Views: 2
 -
 4d912a7626ac49abc33e80bbd373d94d.jpg382.5 KB · Views: 1
 -
 aaaa89afbdf9f4e6bfaf1dca39658aa6.jpg534.6 KB · Views: 2
 -
 f643661af7c28f36c41b8b576f08bd83.jpg599 KB · Views: 2
 -
 f0ccd6dd7b9c5337d3a9c7b09aa706b7.jpg471.3 KB · Views: 1
cbacres
Well-known member
New Years Day started off with a little surprise. Usually I never glue and screw my wood projects together unless I know that's the way they gonna stay. Sometimes I put stuff together to see if gonna work then make changes if needed the put them together permanently. I guess I was done with the top cause I guess glued and screwed it together.
This ***** because I wanted to cut it down. I wanted a 2in overhand on each side and front but back flush with the back. Right now I decided to just cut the back off. At this point top is
I wanted a backstop or back splash to keep stuff rolling off the back so added the back 2x4 and plywood i cut off the back.
Now I'm torn about this cause having a backsplash is nice but really like having a flat table. Like when I need to cut a place of plywood or work on something bigger than the top than the backsplash would be in the way. Would be nice to have a removable backsplash... yeah that would be great. Well I thought of even a better idea.
Yep I hinged the backsplash so when I want a flat table I just flip I down.

I also discussed before that I want all items to have electric and logging so I added the old strip bar I had cut down to even 54in. I mounted on the backsplash at first but then decided to mount it on top.
The reason I did it this way is when in the hinged down position I wouldn't be walking into the plug.
Now for a vise. Right now I still decided to use my BCV ( Big Chinese Vise).
I real happy with the progress so far and got so many ideas to add to this. I got casters right which adds more stability and best of both worlds with the top. Maybe tomorrow I get some more done on it.


Glad to see you are moving on this bench. Good idea on the flip back splash. Can you recess the hinges so if you want to use as a table they won't be in the way?
Attachments
-
 4b2673a85afd99c9e0502038e41b3d4c.jpg265.4 KB · Views: 1
 -
 13aa74a2d351f1745157d30bf927d2f9.jpg323.5 KB · Views: 1
 -
 4fbc72035586c2f1de94fb71d8964419.jpg239.1 KB · Views: 1
 -
 f44362577823fe546454b47417a8c030.jpg262.1 KB · Views: 1
 -
 35636b2944427b828a8797c70dea7850.jpg258.9 KB · Views: 1
 -
 6758f0045984d62d02e80928b6752ba3.jpg258.9 KB · Views: 2
 -
 4d912a7626ac49abc33e80bbd373d94d.jpg193.4 KB · Views: 1
 -
 aaaa89afbdf9f4e6bfaf1dca39658aa6.jpg268.7 KB · Views: 2
 -
 f643661af7c28f36c41b8b576f08bd83.jpg302.7 KB · Views: 2
 -
 f0ccd6dd7b9c5337d3a9c7b09aa706b7.jpg230.1 KB · Views: 1
 -
 9e260f6b86bfd89ef9c4c4da30328a83.jpg301.1 KB · Views: 2
 -
 8decd6a0d7538e4e510d0434ba3ce410.jpg262.3 KB · Views: 2
rmalkow2
Well-known member
Nice work on the bench and innovating the top designer with backsplash and power strip. Does the backsplash lock in place when in the up position? Maybe it tends to hold itself upright well enough without it.
Grumblebum
Well-known member
Man you have really Gerarded the MB, great job.
So this year so far you have painted, and glued & screwed.
Keep rolling with that I say.
Cheers GB
So this year so far you have painted, and glued & screwed.
Keep rolling with that I say.
Cheers GB
Glad to see you are moving on this bench. Good idea on the flip back splash. Can you recess the hinges so if you want to use as a table they won't be in the way?
Thanks, I can do that. I had a box of old door hinges somewhere around here that I can't find. I'm not sure if used them up and my dad needed them but those only ones I could had on hand at the moment. I'll probably mortise the new ones in.
Nice work on the bench and innovating the top designer with backsplash and power strip. Does the backsplash lock in place when in the up position? Maybe it tends to hold itself upright well enough without it.
Thanks. Right now it holding itself up. I haven't thought of how I want to lock it in place yet. It will be up against a wall when on the work wall or House 2 fab wall so that would keep it in place. More future drinking and staring at it and I'll think of something.