
You are using an out of date browser. It may not display this or other websites correctly.
You should upgrade or use an alternative browser.
You should upgrade or use an alternative browser.
The 5 Stitches Garage.
- Thread starter taumac
- Start date

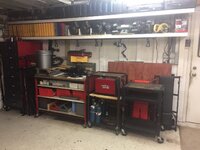
Guys I can honestly say that really having loads of fun as of late. I've had that wall set up in a certain way since I joined the GJ. Here a old ago pic of it and You can see the start of the Wall of Craftsman.

And the desk entertainment area from back then.

Pretty cool to see it turned into this.


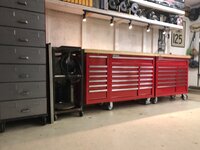
Current state.


For years upon years I did the Wall of Craftsman. I believe once I sold it and got the 3 of the 44's on the back it really opened up possibilities for actually having a working area. Even in its current state of one 44 parked in front of the others and WW in a state of totally disarray as it sits at 915 am 1/2/17 it works shockingly.

Its really hard to put into words or explain but my Garage Life has been great lately. I think 2017 is starting off great and its gonna be a good year. [emoji482]
And the desk entertainment area from back then.
Pretty cool to see it turned into this.
Current state.
For years upon years I did the Wall of Craftsman. I believe once I sold it and got the 3 of the 44's on the back it really opened up possibilities for actually having a working area. Even in its current state of one 44 parked in front of the others and WW in a state of totally disarray as it sits at 915 am 1/2/17 it works shockingly.
Its really hard to put into words or explain but my Garage Life has been great lately. I think 2017 is starting off great and its gonna be a good year. [emoji482]
Attachments
-
 7bb94e1ac1411da5793f4514b4d532c5.jpg644.3 KB · Views: 0
 -
 1ca7c065778fbed411ae604d640a214a.jpg434.4 KB · Views: 0
 -
 da7af6439bed9621ae0b73e43d219c6c.jpg557.8 KB · Views: 0
 -
 8c43b53966701a6a0fd728db0632be44.jpg242.7 KB · Views: 0
 -
 533f0b30744d43b2d0c00c6d7ba83065.jpg546.4 KB · Views: 0
 -
 fcbd936d8e9d908a3b8ae5c987f02f7e.jpg525.6 KB · Views: 0
 -
 9185e37193e43275ac5a76d067c35520.jpg148.4 KB · Views: 0
 -
 7542bb0d5ec18a7ea531733db0ba2a62.jpg108.7 KB · Views: 0
cbacres
Well-known member
Thanks, I can do that. I had a box of old door hinges somewhere around here that I can't find. I'm not sure if used them up and my dad needed them but those only ones I could had on hand at the moment. I'll probably mortise the new ones in.
What! Mr OCD can't find something in his shop?

I hate that when you have certain stuff for so long and can't remember if got rid of, used or it's truly missing. Wait another ten years
What! Mr OCD can't find something in his shop?
I hate that when you have certain stuff for so long and can't remember if got rid of, used or it's truly missing. Wait another ten years
Well, last time I had them I remember father needed some and then I cleaned out totes. They where in a box with some old door handles and deadbolts I swapped from the house. I throw the box out during the clean up so thinking I tossed whatever I had left.
1/2 Cup
Member Emeritus
Gerard, top stuff.
Regards
Regards
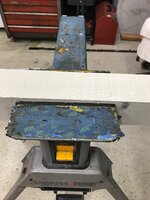
Well, had a semi productive day today. I had to run to the toy stores today for a new mailbox and post. The old one rotten out and think neighbor finished it off by bumping it with lawnmower. I think this is rotten.

I got new with couple of coats of paint on it. I painted to match the body color of house.

I even used the one of paint brushes the crew gave to me at the gathering.

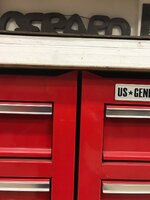
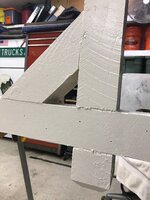
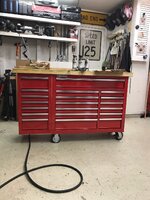
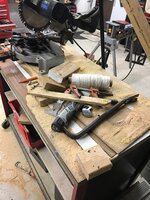
I also started another project today. I have bunch of scrap wood I've been been trying to deal with. Some are going to been vise plates or mounting plates for tools. I dealt with I big piece with the MB now to my rolling HF44. I'm also make this a prototype for House B.

I started by cutting down 3/4 plywood to 2 1/2 strips. This is padding the top out.

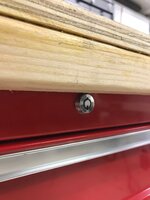
The 3/4 ply just clears the hump where the side hooks on to the 44. I lucked out with the 44 having factory holes already in top of the box.

The problem is the side doesn't.

I'm not sure if I will drill matching holes in the side cabinet top just yet. I then started making a top for it. I have 2 pieces of plywood laying around. One from the WOC and one from shorty. Either are 60 to 64 inches I need for the top so I reglueed the top back together from the WOC. I actually kept the cut off from when I went from 3 bottom rollers to 2 when I moved the drill press to the end. So glued up the padding.

The glued top back together.

The top is really big right now. I'm not sure what size I'm gonna make it and overhangs I with have. I'll let everything set up overnight and think about it more.
I got new with couple of coats of paint on it. I painted to match the body color of house.
I even used the one of paint brushes the crew gave to me at the gathering.
I also started another project today. I have bunch of scrap wood I've been been trying to deal with. Some are going to been vise plates or mounting plates for tools. I dealt with I big piece with the MB now to my rolling HF44. I'm also make this a prototype for House B.
I started by cutting down 3/4 plywood to 2 1/2 strips. This is padding the top out.
The 3/4 ply just clears the hump where the side hooks on to the 44. I lucked out with the 44 having factory holes already in top of the box.
The problem is the side doesn't.
I'm not sure if I will drill matching holes in the side cabinet top just yet. I then started making a top for it. I have 2 pieces of plywood laying around. One from the WOC and one from shorty. Either are 60 to 64 inches I need for the top so I reglueed the top back together from the WOC. I actually kept the cut off from when I went from 3 bottom rollers to 2 when I moved the drill press to the end. So glued up the padding.
The glued top back together.
The top is really big right now. I'm not sure what size I'm gonna make it and overhangs I with have. I'll let everything set up overnight and think about it more.
Attachments
-
 6266dac476e0527c5456d29d58c3c7b1.jpg665.5 KB · Views: 0
 -
 dbb0b32d07f94ce158eaf348e6485cf9.jpg457.8 KB · Views: 0
 -
 8944b0844aa225e2c3aeaa14a675d3dc.jpg641.6 KB · Views: 0
 -
 f8cc4861b04d9e4d31e2d3ef8cc6c996.jpg532.2 KB · Views: 0
 -
 db2e48742bfaf4251d7c8eaea24cc5af.jpg673.5 KB · Views: 0
 -
 32714ca2b64c20ad2d77a16a01945952.jpg486 KB · Views: 0
 -
 1f8142819422bb7f00fe4b77d175fe33.jpg491.8 KB · Views: 0
 -
 efbd5cef1ad2e95117fbc435235a5fb5.jpg661.6 KB · Views: 0
 -
 9508c21a92d0c05e865a7e540649c450.jpg670.9 KB · Views: 0
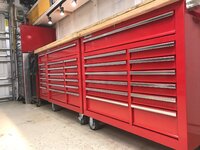
I spent pass 2 working on few things. I cut the mobile HF44 top down and glued on left, right and front overhangs. I only had 1 2x4x8 laying around so cut it down the middle and that was front overhang I'm going with.


Since this will be rolled around and if I fix the detents on this box the drawers can open. I will be dealing with access to locks at later date.
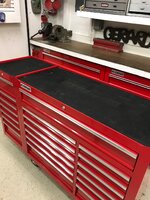
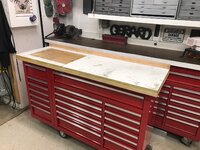
I decided that this top is made to match the rest of the tops at the 5 Stitches Garage now I decided to keep the detail on the front edge. When I move to House B I'll pad the others out like this and make new tops for all of them.

The HF bench.

The MB.

The HF MB

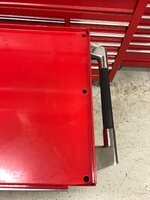
Right now top sits at 62 1/2 by 22 with 1 3/4 inch over in front just shy of 2 1/4 in back. I might cut back more at later date. Right now the HFMB is getting parked in front of the HF bench. This backsplash is temporary until decided on few other addition to the HFMB. Its now acting as a rub rail to help park the HFMB.

With straight casters so far away I had to deal with swing on the *** end.

I hit the back boxes few times moving this on out so this will help me not the damage anything anymore. This is other reason I might cut back flush.

With all the work needing done on the Work Wall with the tall cabinet, welding table, a/v cart and the MB I have no idea if the HFMB will still fit. It did with no overhangs on the MB and the welding table/cart but now with 7" of overhangs on MB and 4" on the welding table ( once I cut steel top to size), did nothing yet to AV cart for a work top so I'm doubting it will fit. Now I'm thinking WW would work better without it. I guess that's TBD at later date. I have to keep reminding myself I'm laying out for House B so not everything not going to work in House A. It a work in progress and seems to go going in right direction as planned.
Since this will be rolled around and if I fix the detents on this box the drawers can open. I will be dealing with access to locks at later date.
I decided that this top is made to match the rest of the tops at the 5 Stitches Garage now I decided to keep the detail on the front edge. When I move to House B I'll pad the others out like this and make new tops for all of them.
The HF bench.
The MB.
The HF MB
Right now top sits at 62 1/2 by 22 with 1 3/4 inch over in front just shy of 2 1/4 in back. I might cut back more at later date. Right now the HFMB is getting parked in front of the HF bench. This backsplash is temporary until decided on few other addition to the HFMB. Its now acting as a rub rail to help park the HFMB.
With straight casters so far away I had to deal with swing on the *** end.
I hit the back boxes few times moving this on out so this will help me not the damage anything anymore. This is other reason I might cut back flush.
With all the work needing done on the Work Wall with the tall cabinet, welding table, a/v cart and the MB I have no idea if the HFMB will still fit. It did with no overhangs on the MB and the welding table/cart but now with 7" of overhangs on MB and 4" on the welding table ( once I cut steel top to size), did nothing yet to AV cart for a work top so I'm doubting it will fit. Now I'm thinking WW would work better without it. I guess that's TBD at later date. I have to keep reminding myself I'm laying out for House B so not everything not going to work in House A. It a work in progress and seems to go going in right direction as planned.
Attachments
-
 837b951235a6986c983f6d466bad06f0.jpg422.5 KB · Views: 0
 -
 5f8ecf969afef46bf064a4ffe646a7cf.jpg521.1 KB · Views: 0
 -
 d6c6df647939cef791f4b30a404dcc5d.jpg476.4 KB · Views: 0
 -
 eeb929a68bda731e58a3bf05ca22d838.jpg496.3 KB · Views: 0
 -
 d151d2f6b33a6569b492caa22c01a22e.jpg406.5 KB · Views: 0
 -
 47f10005bec2eb3abc60bdf797e2a03a.jpg439.2 KB · Views: 0
 -
 c7103555e6668535900c4d4ed36f2eaf.jpg673.5 KB · Views: 0
 -
 df7bce8350bfd6715c3d5a494da3635b.jpg381.3 KB · Views: 0
 -
 d8bea34e5f7de019e09b912c46fc49b5.jpg577.4 KB · Views: 0
 -
 262d1164a82ca8f80c9a68f4392d74b7.jpg632.5 KB · Views: 0
On 1/5/2017 I can say that I painted multiple times already this year. New mailbox has few coats of paint and numbers also had few coats. Actually, there's more to this story. I put second coat of paint on new post. After this I decided to relay the numbers out and make nail holes to mark out numbers. After this I chalked the mailbox and put final paint on it.

I will have to touch up where it's been it jaw horse. I guess also time for new layer of protective blue tape. LOL.

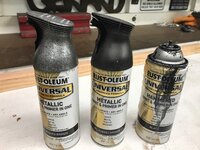
Well it was time to re paint the numbers and had a mechanical malfunction with few paint cans. Yes, you read that right I had malfunctioning paint cans.

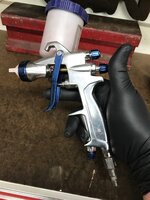
I wanted to use the black but top seemed to be clogged. So I took on off the bronze one and same issue. Then I tried the pewter one and same issue. Air coming out no paint. WTF!!! So I take the org black top and use some acetone to clean it. Nothing. I run some air though it and I can feel it at top so not clogged. Still WTF!!! So I do something think I turn it upside down and F@CLING paint starts dropping out. WTF. So in trash in goes stinking up the garage as it empties the can out in my trashcan. So I figured since the aluminum trim is bronze on my house that I will paint the numbers bronze. I go now to use the bronze and now the bronze won't work same issue as the black. Now here's the strange part if I flip the can't upside down it's braid like it would if it was right side up WTF!!! I spray the numbers bronze but then put aside to dry overnight. I plan to come home tonight and install the numbers on the mailbox post. Sometime during the day I realize I have two accent colors on my house. One is the bronze aluminum around my windows and the lumen them on the front garage and black for my black front door, black roof, and black shutters. So now I'm going to have a parchment color post, bronze numbers and a black mailbox. I decide to come home and paint the numbers black instead of painting a brand new mailbox bronze. I get my small spray gun out since seems to be only painting item that works besides a roller and paint the numbers.

For paint I mixed some acetone in this old can of satin black.

I have no idea how old this paint is but it is the same paint I used on my BCV and it's held up very well. This pic is for the paint nazi and my friend Shorty.

I will have to touch up where it's been it jaw horse. I guess also time for new layer of protective blue tape. LOL.
Well it was time to re paint the numbers and had a mechanical malfunction with few paint cans. Yes, you read that right I had malfunctioning paint cans.
I wanted to use the black but top seemed to be clogged. So I took on off the bronze one and same issue. Then I tried the pewter one and same issue. Air coming out no paint. WTF!!! So I take the org black top and use some acetone to clean it. Nothing. I run some air though it and I can feel it at top so not clogged. Still WTF!!! So I do something think I turn it upside down and F@CLING paint starts dropping out. WTF. So in trash in goes stinking up the garage as it empties the can out in my trashcan. So I figured since the aluminum trim is bronze on my house that I will paint the numbers bronze. I go now to use the bronze and now the bronze won't work same issue as the black. Now here's the strange part if I flip the can't upside down it's braid like it would if it was right side up WTF!!! I spray the numbers bronze but then put aside to dry overnight. I plan to come home tonight and install the numbers on the mailbox post. Sometime during the day I realize I have two accent colors on my house. One is the bronze aluminum around my windows and the lumen them on the front garage and black for my black front door, black roof, and black shutters. So now I'm going to have a parchment color post, bronze numbers and a black mailbox. I decide to come home and paint the numbers black instead of painting a brand new mailbox bronze. I get my small spray gun out since seems to be only painting item that works besides a roller and paint the numbers.
For paint I mixed some acetone in this old can of satin black.
I have no idea how old this paint is but it is the same paint I used on my BCV and it's held up very well. This pic is for the paint nazi and my friend Shorty.
Attachments
-
 086ac4fc49ae157f04259d62ec256c2e.jpg566 KB · Views: 0
 -
 9870aeb24e32eeb2cbfc462338443624.jpg581.3 KB · Views: 0
 -
 668b7fddd3a7297c6c8f3fbef558b079.jpg488.9 KB · Views: 0
 -
 373df47acfe09e448e1cb85fb8328fa1.jpg579 KB · Views: 0
 -
 20dfab459e74130c3ef3702fc92764e9.jpg522.4 KB · Views: 0
 -
 dda06fe622227ca4b6c57d4fb3d49808.jpg404.7 KB · Views: 0
The other day I thought I was losing my marbles.
Ok, you guys can stop laughing now!!!
Ok,
GUYS!!!!
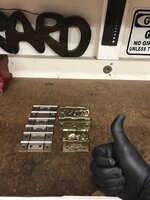
Ok,I knew I had door hinges around this place somewhere I just knew it but where the F@CK ARE THEY??? Mr, Organized hoarder can't find his ****. WTF!!'
I went to look for something in the WOC 9D tonight and BAM there they where. They where exactly where they where suppose to be. Third drawer down from the top.
The 9D cabinet was suppose to be my overflow cabinet for nut,bolt, and misc items that didn't get stored in the yellow totes on shelf on the the WW. I still haven't emptied it but they were where they was suppose to be although the was only 3 layouts ago. LOL. Think I'm going to use the silver ones on backsplash of MB.

Ok, you guys can stop laughing now!!!
Ok,
GUYS!!!!
Ok,I knew I had door hinges around this place somewhere I just knew it but where the F@CK ARE THEY??? Mr, Organized hoarder can't find his ****. WTF!!'
I went to look for something in the WOC 9D tonight and BAM there they where. They where exactly where they where suppose to be. Third drawer down from the top.
The 9D cabinet was suppose to be my overflow cabinet for nut,bolt, and misc items that didn't get stored in the yellow totes on shelf on the the WW. I still haven't emptied it but they were where they was suppose to be although the was only 3 layouts ago. LOL. Think I'm going to use the silver ones on backsplash of MB.
Attachments

Grumblebum
Well-known member
Two thumbs up.
Dan almost got a bonus draw of stuff in the 9D.
I hate when spray cans do that, especially for the money they cost.
What are the chances you can commandeer your in-laws garage now so we can see the plan for garage 2.0 come to life. Lol.
GB
Dan almost got a bonus draw of stuff in the 9D.
I hate when spray cans do that, especially for the money they cost.
What are the chances you can commandeer your in-laws garage now so we can see the plan for garage 2.0 come to life. Lol.
GB
HCNDM
Well-known member
The spray can issue is annoying. I believe it happens because a thin layer of paint in the can starts bonding and floats to the top. It then clogs the nozzle inlet inside the can for fluids but not for gasses. Kinda like the skin that forms on hot milk.
Holding the can upside down causes the film to float up to the bottom allowing some paint out again. But rattle cans don't paint upside down well at all so that doesn't solve the problem either.
I have been told that after use a can should be held upside down and sprayed a few times till mostly gas comes out. This should clear the lines and nozzle some so no paint dries up in there. Whilst I feel this does help it's certainly no end all and my mileage has varied.
Niels
Sent from my iPhone using Tapatalk
speedfreek1210
Well-known member
I store my spray cans upside down to help keep that from happening. Sometimes it helps, sometimes it doesn't.
Sent from my iPhone using Tapatalk Pro
Sent from my iPhone using Tapatalk Pro
Bob Heine
ALLIANCE MEMBER
Gerard, If you're cheap (and not too bright) you can save the paint in the can (and make a mess) by relieving the pressure in the can while holding it upside down. When the pressure is gone, drill out the plastic ****** (by hand) and drain the paint into a can.
If you have a little money (and are smart) just throw the spray bomb out.
If you have a little money (and are smart) just throw the spray bomb out.
rmalkow2
Well-known member
Gerard, If you're cheap (and not too bright) you can save the paint in the can (and make a mess) by relieving the pressure in the can while holding it upside down. When the pressure is gone, drill out the plastic ****** (by hand) and drain the paint into a can.
If you have a little money (and are smart) just throw the spray bomb out.
Normally I pretend to be smart and pretend to have money and just throw the old can away and buy a new one. But now it seems like a worthy challenge one day to salvage the paint out of a spray can and then spray it with a small gun just to see if it can be done successfully.
Two thumbs up.
Dan almost got a bonus draw of stuff in the 9D.
I hate when spray cans do that, especially for the money they cost.
What are the chances you can commandeer your in-laws garage now so we can see the plan for garage 2.0 come to life. Lol.
GB
Well, Dan might get a full box full of stuff if don't empty it. LOL. I honestly never had a issue with those paint cans. Of course cheap can with the crappy nozzles yes never seems to work for to long.
As much as I would like to take over my FIL garage I just can't. When he moved in he set it up his way. Now he's almost completely blind and doesn't use it much but he still goes out there to sit and tinker. Its the only thing he has left and I'm not going to take that away from him.
We just know someday that will be our house and garage so I just do what I can here to prepare for the day when it comes. Honestly, just selling the WOC and buying 44's has made big difference here. Making the MB has thrown a wrench in work wall. It was to be tall cabinet, welding table, 2 44's and side on Work Wall. As everyone know a layouts change here and even if one eventually gets parked. I just park it in front of the others so I can put everything else on the Work Wall ( tall cabinet, welding table, AV cart, MB, and the IKEA cart). Its going to easier to move one item plus honestly I've been actually rolling it around a lot.

Attachments
The spray can issue is annoying. I believe it happens because a thin layer of paint in the can starts bonding and floats to the top. It then clogs the nozzle inlet inside the can for fluids but not for gasses. Kinda like the skin that forms on hot milk.
Holding the can upside down causes the film to float up to the bottom allowing some paint out again. But rattle cans don't paint upside down well at all so that doesn't solve the problem either.
I have been told that after use a can should be held upside down and sprayed a few times till mostly gas comes out. This should clear the lines and nozzle some so no paint dries up in there. Whilst I feel this does help it's certainly no end all and my mileage has varied.
Niels
Sent from my iPhone using Tapatalk
I usually do that and I might not cleared it before I put it away last time. No I didn't spray well upside down. Ton of paint shoot out when pulled the trigger but if easy on trigger didn't come out to bad. Lesson learned to be more careful with $7.00 paint cans.
I store my spray cans upside down to help keep that from happening. Sometimes it helps, sometimes it doesn't.
Sent from my iPhone using Tapatalk Pro
I've heard that before usually with latex paint before never seem to practice it. In theory it would work. Might be hard with these because shape of top but definitely worth a try. Thanks.
Gerard, If you're cheap (and not too bright) you can save the paint in the can (and make a mess) by relieving the pressure in the can while holding it upside down. When the pressure is gone, drill out the plastic ****** (by hand) and drain the paint into a can.
If you have a little money (and are smart) just throw the spray bomb out.
I heard of that... I think I tried once with not a happy ending. I not made of money but not worth hassle to save a half used spray can of paint. I'm king of unpainted projects and have to give Shorty something to get on me about. LMAO.
Bob Heine
ALLIANCE MEMBER
Gerard, I've only done that routine once and it was because a new, never used (sat on the shelf for some number of years) and full spray bomb wouldn't work. Rather than drive to the store, I tried the hand drill routine (1/16" hex-drive drill bit) and poured the paint into the detail gun (like yours). It saved me a trip and my curse-filled rant stayed in the garage.I heard of that... I think I tried once with not a happy ending. I not made of money but not worth hassle to save a half used spray can of paint. I'm king of unpainted projects and have to give Shorty something to get on me about. LMAO.
dwysywd
Well-known member
love the new "verb"... gerarded!
Sent from my quanset hut facsimile machine
Sent from my quanset hut facsimile machine
1/2 Cup
Member Emeritus
love the new "verb"... gerarded!
Sent from my quanset hut facsimile machine
Endorsed..

Duker
Well-known member
What the heck? I have not stopped by for awhile so starting at the latest posts and I see Gerard was painting?? Did the world invert while I was on vacation? .....I think I was just Gerarded......
Sent from my iPad using Tapatalk
Sent from my iPad using Tapatalk
shortykorte
Well-known member
What the heck? I have not stopped by for awhile so starting at the latest posts and I see Gerard was painting?? Did the world invert while I was on vacation? .....I think I was just Gerarded......
Sent from my iPad using Tapatalk
Lmao
Miracles never cease!
rmalkow2
Well-known member
It's sort of like reverse 5 Stitches Garage, where there is no WOC and, every new project gets 2 coats of paint.
Lots of good progress going on down there. Maybe it will inspire me to get off my …...
Lots of good progress going on down there. Maybe it will inspire me to get off my …...
cbacres
Well-known member
It's sort of like reverse 5 Stitches Garage, where there is no WOC and, every new project gets 2 coats of paint.
Lots of good progress going on down there. Maybe it will inspire me to get off my …...
Now that's funny " reverse and everything gets two coats of paint" . I first thought the problem with the paint cans was G forgot how to use one based on the unpainted things in his garage .

What the heck? I have not stopped by for awhile so starting at the latest posts and I see Gerard was painting?? Did the world invert while I was on vacation? .....I think I was just Gerarded......
Sent from my iPad using Tapatalk
Yep, it was sort of a New Years resolution or I finally caved to peer pressure....
It's sort of like reverse 5 Stitches Garage, where there is no WOC and, every new project gets 2 coats of paint.
Lots of good progress going on down there. Maybe it will inspire me to get off my …...
HEY HEY HEY NOW.... let's not push things. Starting slow with one coat of paint.
There's been forward progress and only 3 layout changes so far.... this weekend. LOL
krcoomer
Well-known member
I've heard that before usually with latex paint before never seem to practice it. In theory it would work. Might be hard with these because shape of top but definitely worth a try. Thanks.
I store my spray cans (paint and lubricants, cleaners, etc) in 6 pack holders. It makes it easier to sort them and they don't roll around so much when I have to take them on the road. You could store the oddball shaped heads upside down this way.
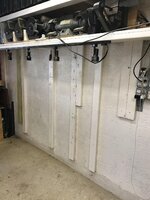
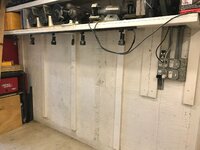
Well, as I said I be GERARDED... The MB bench was a really nice idea in theory but as much as I wanted to use it on the WW Its cause issues with whole garage layout. So I started to revamp my layout once again. I actually went with a layout I originally planned. I started by tearing out extra studs I put up for the WOC.


After 2 days of a mess.

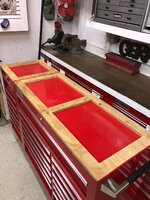
I ended up with this as new layout for the WW.


The right one has its own top which I made with same idea with the HFMB. The left is the HFMB just rolled in place. Now everything besides the AV cart has a home. That's small and I can put that about anywhere. Got more to do as secure tops, some sort of surface for top and yes paint. Don't worry I'll revisit the mobile bench soon...
After 2 days of a mess.
I ended up with this as new layout for the WW.
The right one has its own top which I made with same idea with the HFMB. The left is the HFMB just rolled in place. Now everything besides the AV cart has a home. That's small and I can put that about anywhere. Got more to do as secure tops, some sort of surface for top and yes paint. Don't worry I'll revisit the mobile bench soon...
Attachments
-
 f9801c73c23f7e7616e66287f6121642.jpg585.3 KB · Views: 0
 -
 d97bb546fff7ee7c5bff019dbe5d30ce.jpg531.9 KB · Views: 0
 -
 3c45c9a9fc7f1652eef2c2d24355bd75.jpg527.3 KB · Views: 0
 -
 9a66c988daab91cabea9dc37193ad8a6.jpg607.8 KB · Views: 0
 -
 420f85ef68ba810c0c6c11f0a20ef2f4.jpg441.6 KB · Views: 0
 -
 a934b50edd0975b4882daaa39fe3fcd9.jpg740.3 KB · Views: 0
Last edited:
Grumblebum
Well-known member
Looks good G. Wondering if you can get your hands on some aluminium angle ? Maybe 2" X 1-1/2" X 1/8" (just guessing the front edge thickness in the pics). Router out 1/8" so it sits flush on the top of the benches.
GB
GB
rmalkow2
Well-known member
That makes for a very neat and tidy layout with the length just right to reach to the door.
Looks good G. Wondering if you can get your hands on some aluminium angle ? Maybe 2" X 1-1/2" X 1/8" (just guessing the front edge thickness in the pics). Router out 1/8" so it sits flush on the top of the benches.
GB
That's a good idea. These tops are just something I threw together from all the extra wood had laying around. Since I made this padding I can put whatever surface I want for the top material.

I thought of making own tops from 2x4, premade butcher block and even aluminum. These are test subjects so I can try out ideas. I mostly kept front edge the same to match others in garage. I still have to make the hole for my UMS universal mounting idea so wonder how that will work if do the aluminum front edge. It might help in that case. A lot of ideas to explore.
Attachments

That makes for a very neat and tidy layout with the length just right to reach to the door.
Thank you. This look definitely pleases my OCD. Sometimes things work out and sometimes I fail. Well, I wanted the option to move these boxes out and set up a work area when needed. This layout still least give me the option to do so even if not set up that way daily.
dlcwent
Member Emeritus
Stopped in to see all the forward progress you've been making. PAINT. Never though I be seeing that. I like where you're going with the top on the new boxes.
I'm sorting out the details with the wife, we're trying to nail down a date that works for both of us. I'll be in touch as soon as I know for certain. She's got to arrange for co-workers to cover for her while we're gone.
I'm sorting out the details with the wife, we're trying to nail down a date that works for both of us. I'll be in touch as soon as I know for certain. She's got to arrange for co-workers to cover for her while we're gone.
Stopped in to see all the forward progress you've been making. PAINT. Never though I be seeing that. I like where you're going with the top on the new boxes.
I'm sorting out the details with the wife, we're trying to nail down a date that works for both of us. I'll be in touch as soon as I know for certain. She's got to arrange for co-workers to cover for her while we're gone.
Thanks Dan. I've think I got a handle on things. I don't know why I just can't do what everyone else does and does roll them in place and use them. Oh yeah I know why because that would be easy. LOL. We all know I can't do things the easy way.
Good to hear on the trip. Very much looking forward to the visit and meeting you.