
You are using an out of date browser. It may not display this or other websites correctly.
You should upgrade or use an alternative browser.
You should upgrade or use an alternative browser.
The 5 Stitches Garage.
- Thread starter taumac
- Start date
What's going on Taumac? Are you missing the WOC. I can send you a picture...
No humidity and they haven't been shoved around since they landed here. The WOC is finally at peace.
Hey Dan. Thanks for stopping by. I do miss them but I’m been real happy with the new layout. I’ve been so happy that nothing has been rolled around the garage. I know right can you even imagine? I had to go outside and check the house number see if I was in the right garage. LOL
Well guys not much been going in the garage lately and just little things here and there.
I finally tidy up this corner and got the wires all tucked away.

I been working on the HF wall alittle. I think I’m doing 1 vise per bench and on machinist chest. I moved some stuff around and stared some. This is what it looks like it current form.


It’s odd having chest behind vise but it gives me one side completely open and a place to put electric on other.
I finally tidy up this corner and got the wires all tucked away.
I been working on the HF wall alittle. I think I’m doing 1 vise per bench and on machinist chest. I moved some stuff around and stared some. This is what it looks like it current form.
It’s odd having chest behind vise but it gives me one side completely open and a place to put electric on other.
I did manage to pick up few new items.
View attachment 780134View attachment 780135
It’s nice wooden box that’s pretty well made. I always wanted to take old piece and make rustic piece of furniture so this will be for the house.
I got couple of wrench’s to fill my collection of pipe wrench collection. A few raised panel craftsman breaker bars did too.

Now here’s my newest toy that found it way home. I been looking and staring...... and felt I needed something.


It’s a great 3 drawer Mac box. I got it with the other Florida enablers at a auction as a lot of 14 other boxes. Now after Craftsman this style has to be my favorite. It’s just something about it I just always liked. I did say I “might” get a vintage stack well this “might” be start of it.
I actually not sure in what manner I will use it just as of yet but I needed something between a machinist chest and huge chest for small items. Will just see how I’ll use it.
View attachment 780134View attachment 780135
It’s nice wooden box that’s pretty well made. I always wanted to take old piece and make rustic piece of furniture so this will be for the house.
I got couple of wrench’s to fill my collection of pipe wrench collection. A few raised panel craftsman breaker bars did too.
Now here’s my newest toy that found it way home. I been looking and staring...... and felt I needed something.
It’s a great 3 drawer Mac box. I got it with the other Florida enablers at a auction as a lot of 14 other boxes. Now after Craftsman this style has to be my favorite. It’s just something about it I just always liked. I did say I “might” get a vintage stack well this “might” be start of it.
I actually not sure in what manner I will use it just as of yet but I needed something between a machinist chest and huge chest for small items. Will just see how I’ll use it.
cbacres
Well-known member
Now here’s my newest toy that found it way home. I been looking and staring...... and felt I needed something.
It’s a great 3 drawer Mac box. I got it with the other Florida enablers at a auction as a lot of 14 other boxes. Now after Craftsman this style has to be my favorite. It’s just something about it I just always liked. I did say I “might” get a vintage stack well this “might” be start of it.
I actually not sure in what manner I will use it just as of yet but I needed something between a machinist chest and huge chest for small items. Will just see how I’ll use it.[/QUOTE]
Might our a$$. Check back in a year from know
1/2 Cup
Member Emeritus
Well guys not much been going in the garage lately and just little things here and there.
I finally tidy up this corner and got the wires all tucked away.
I been working on the HF wall alittle. I think I’m doing 1 vise per bench and on machinist chest. I moved some stuff around and stared some. This is what it looks like it current form.
It’s odd having chest behind vise but it gives me one side completely open and a place to put electric on other.
Gerard, your shop is looking great..

Craptain
Well-known member
I did say I “might” get a vintage stack well this “might” be start of it.
.
Might our a$$. Check back in a year from know[emoji38]_hitti[emoji38]_hitti[/QUOTE]
Ha! If Sue lets him.
Sent from my SM-G930T using Tapatalk
Last edited:
rmalkow2
Well-known member
The wall of HF is looking very tidy. That Mac box is nice looking and I think its the chrome handles that give it a better look.
shortykorte
Well-known member
The corner sure would look nice with a fresh coat of light grey paint.
Nice Mac you stole I mean got. lol
Sent from my iPhone using Tapatalk
Nice Mac you stole I mean got. lol
Sent from my iPhone using Tapatalk

Gerard, your shop is looking great..
Thank you very much. I just thought about it other day and thought it would only be about 6 months to a year to finish things up. It’s been taking a little longer than I planned but haven’t been spending a lot of time in the shop lately.
Some updates on trailer. To date we resealed roof, replaced all subfloors, replaced top floor, replaced water heater. We started going through the recaulking the entire exterior. For anybody whose done this knows what a PAIN IN THE F@CKING @SS. What has made this worse is PO used silicone. We have to remove all the old silicone first then recaulk. This past week and weekend we hit it pretty hard and the heat hit us just as hard.
So far we got 2 sides completely done and the front done. We talking every seam, light, window basically every penetration in the camper.


I also went through and replaced all rusted screws with new and painted ones I couldn’t replace. The news ones I didn’t get a pic of. I be really happy when this resealing is all complete so can move on to more fun projects.
So far we got 2 sides completely done and the front done. We talking every seam, light, window basically every penetration in the camper.
I also went through and replaced all rusted screws with new and painted ones I couldn’t replace. The news ones I didn’t get a pic of. I be really happy when this resealing is all complete so can move on to more fun projects.
Last edited:
Craptain
Well-known member
Your post has been up for a day and I am first to comment. Amazing.
Congrats on the progress. Keep it up and it will be ready for Flywheelers. [emoji106][emoji106]
Sent from my SM-G930T using Tapatalk
Congrats on the progress. Keep it up and it will be ready for Flywheelers. [emoji106][emoji106]
Sent from my SM-G930T using Tapatalk
It’s all ready to go. The trip in May was real first complete test of everything and all went well. We needed to go through and take all the old silicone off and redo it the proper way and doing it the way we did just ensures peace of mind that we redid everything and it will be good for the next couple years. Now we can get on to some of the fun projects that I want to do on the trailer. It’s just like a boat there’s always going to be something to do with it. We taking it up to Homosassa July 13 for the weekend. I’m trying to use it at least every other month. I also still have to do my upgrading on the truck but it was really important to us to get the camper re-sealed and polished up.
JCQuick
Well-known member
Dang that looks good
rmalkow2
Well-known member
Peace of mind that it's fixed and done right is a valuable thing. Happy travels!
Grumblebum
Well-known member
looks like new G, well done.
GB
GB
zmotorsports
ALLIANCE MEMBER
Nice job recaulking the trailer Gerard. I completely understand what a PITA it is. Unfortunately it is a necessary PITA as water intrusion will kill an RV in a hurry.
rmalkow2
Well-known member
Gerard,
I finally found the perfect use for that old Ford wrench you sent me awhile back. It has become a unique trunk latch handle for the roadster. Welded to the end of a bolt that I ground to a square shape that operates the latch. Cleaned to up and gave a coat of silver paint for a little contrast to the black car body. I had the car at our annual show at work today and it got more than a few people looking at it.
Thanks again.
Bob
Last edited:
Dang that looks good
looks like new G, well done.
GB
Peace of mind that it's fixed and done right is a valuable thing. Happy travels!
Thanks guys. I tell you it’s a lot of really small things that seemingly take a long time to complete. It’s really good piece of mind now knowing that part for now is done.
Sent from my iPhone using Garage Journal
Nice job recaulking the trailer Gerard. I completely understand what a PITA it is. Unfortunately it is a necessary PITA as water intrusion will kill an RV in a hurry.
I truly glad you understand that hassle. It look at campers all the time now especially travel trailers and I can see delamination of figerglass. I still thing about all the products out there that there isn’t products that could make any sort of camper more water right for a longer period of time. I still have one area I need to address. We reseller all the marker lights but still getting water behind the lenses and causing issues with the bulbs working. My next idea instead of changing out all the lights is to change bulbs to led and completely silicone the covers on. They are a clip on style lens cover and have a form gasket around the bulb to seal it.
Gerard,
I finally found the perfect use for that old Ford wrench you sent me awhile back. It has become a unique trunk latch handle for the roadster. Welded to the endow a bolt that I ground to a square shape that operates the latch. Cleaned to up and gave a coat of silver paint for a little contrast to the black car body. I had the car at our annual show at work today and it got more than a few people looking at it.
Thanks again.
Bob
That’s awesome Bob!!! [emoji482]
Sent from my iPhone using Garage Journal
Craptain
Well-known member
Try looking at boat products. We make it a priority to keep the water on the outside.
LED's are a good idea, but take a look at boat trailer lights. They have to be watertight.
Sent from my SM-G930T using Tapatalk
LED's are a good idea, but take a look at boat trailer lights. They have to be watertight.
Sent from my SM-G930T using Tapatalk
Well.... this heat down here it not only getting to me but also all my equipment.....
We took camper out for the weekend to Homosassa 2 weeks ago. I did my pre trip inspection few days early before going away on trip and noticed coolant was low. I refilled it and made a note to keep eye on it. I check it night before and smelled coolant but didn’t see a leak. I take extra coolant with me and go away for weekend. Sunday we hitching up and I see it start leaked from somewhere. Top it off and drive home with camper..... slowly.
I run around looking for a pressure tester because this radiator isn’t a cheap radiator. Apparently, there’s a pre 08/2006 and post 08/2006 radiator for my truck. There’s also a big price difference too.

Even though my truck is a 2007 it was made 05/06. I wanted a pressure tester just because it’s useful tool and seems like always have issues with these plastic end radiators. I ended up getting one from HF for $89. I was just gonna use my buddies snap on tester but needed a $24 adapter for small cap.

I ended up finding the leak and yep it was the radiator. I got one from O’Reillys for $235 plus 2 $21 a gallon Ford coolant and transmission coolant quick connectors tools. I changed the radiator and this was to date the worse ever radiator to change out. There was a lot of cursing and wishing bad things against the Ford engineers would designed this whole assembly. They sandwiched the radiator and condenser in the plastic holder and dropped into place when car was built. The problem is separating everything without damaging the condenser and there is no room to move anything. I could change a normal radiator out in under a hour with no problem.... This took 4 or 5 hours. Ugggghhhh
I spent I guessing about $450 to replace the radiator.
We took camper out for the weekend to Homosassa 2 weeks ago. I did my pre trip inspection few days early before going away on trip and noticed coolant was low. I refilled it and made a note to keep eye on it. I check it night before and smelled coolant but didn’t see a leak. I take extra coolant with me and go away for weekend. Sunday we hitching up and I see it start leaked from somewhere. Top it off and drive home with camper..... slowly.
I run around looking for a pressure tester because this radiator isn’t a cheap radiator. Apparently, there’s a pre 08/2006 and post 08/2006 radiator for my truck. There’s also a big price difference too.
Even though my truck is a 2007 it was made 05/06. I wanted a pressure tester just because it’s useful tool and seems like always have issues with these plastic end radiators. I ended up getting one from HF for $89. I was just gonna use my buddies snap on tester but needed a $24 adapter for small cap.
I ended up finding the leak and yep it was the radiator. I got one from O’Reillys for $235 plus 2 $21 a gallon Ford coolant and transmission coolant quick connectors tools. I changed the radiator and this was to date the worse ever radiator to change out. There was a lot of cursing and wishing bad things against the Ford engineers would designed this whole assembly. They sandwiched the radiator and condenser in the plastic holder and dropped into place when car was built. The problem is separating everything without damaging the condenser and there is no room to move anything. I could change a normal radiator out in under a hour with no problem.... This took 4 or 5 hours. Ugggghhhh
I spent I guessing about $450 to replace the radiator.
Attachments


Now if spending a $450 wasn’t enough...... it gets better. This past Saturday the A/C isn’t cooling in the house. It’s been really hot and humid and most we can expect is about 15 to 20 degrees less then the outdoor temperatures. So usually having my AC set to 78 isn’t a problem but it only cooling to 84 and at night maybe 80. I keep eye on temperature and decide to call our AC guy. He comes out on Sunday and problem isn’t showing itself but he thinks it’s the condenser fan because it’s running warm. Later that night motor getting hot and shutting off then compressor over heating shutting down. I call the guy and say it’s gonna need a new fan and says we can do it tomorrow between 7pm Sunday and 10am Monday something happen.

It blew plug out of compressor. So job went from $250 to I have NO F@CKING clue. Knowing the guy owner found issues with the current system in ducting, plenums, and rust starting to be issues on coils we made the decision to just have everything replaced. Price $4500.
They can’t install unit until Wednesday so this should be fun. Wife got home and found it to be 92 in the house and only have ceiling fans to use. I go to my dads to pick up 2 windows units he bought years ago for hurricanes but never used them or taken out of the box. I fire up one and works fine but other isn’t working. We ended up taking it apart and finding corroded fuse after hour or so.
We fix the unit and get them over to my house and install them in the bedroom. After cooling down the bedroom is 70 the kitchen and living room is 85. At least can sleep and get dress in AC.
After we installed window units me and dad had to empty the attic. Apparently the location wasn’t up the code and needed room to work. So we emptied the entire attic of everything.

It’s amazing how much we had up there. Today the new unit was installed and they did good job.


I guess even outside unit wasn’t up to code. Unit has to be 12” away from house and I know my old unit was 6” if unlucky. It’s bad lighting but here’s new unit.

You can definitely see difference between old location and new by vent pipe.


You can see storage space opened up with the move.

I’m not 100% happy on condescend line but everything else I’m happy with. New compressor, new air handler, new line set, a lot of ducts replaced new thermostat and 2 years service and 10 year warranty.
Now everything out of the attic and new AC installed my new plan is to put down a proper floor to store things up in my attic. Over the years it’s been patch work of pieces of plywood. I always said when it gets cool I do it and know how that works. It never happens and it’s out of sight out of out of mind. So this weekend me and dad me be putting a proper floor down plus with extra fluorescent fixtures laying around I add some lighting too.
Well it’s been a $5000 week around the 5 Stitches.... and hoping I have no another surprises anytime soon.
It blew plug out of compressor. So job went from $250 to I have NO F@CKING clue. Knowing the guy owner found issues with the current system in ducting, plenums, and rust starting to be issues on coils we made the decision to just have everything replaced. Price $4500.
They can’t install unit until Wednesday so this should be fun. Wife got home and found it to be 92 in the house and only have ceiling fans to use. I go to my dads to pick up 2 windows units he bought years ago for hurricanes but never used them or taken out of the box. I fire up one and works fine but other isn’t working. We ended up taking it apart and finding corroded fuse after hour or so.
We fix the unit and get them over to my house and install them in the bedroom. After cooling down the bedroom is 70 the kitchen and living room is 85. At least can sleep and get dress in AC.
After we installed window units me and dad had to empty the attic. Apparently the location wasn’t up the code and needed room to work. So we emptied the entire attic of everything.
It’s amazing how much we had up there. Today the new unit was installed and they did good job.
I guess even outside unit wasn’t up to code. Unit has to be 12” away from house and I know my old unit was 6” if unlucky. It’s bad lighting but here’s new unit.
You can definitely see difference between old location and new by vent pipe.
You can see storage space opened up with the move.
I’m not 100% happy on condescend line but everything else I’m happy with. New compressor, new air handler, new line set, a lot of ducts replaced new thermostat and 2 years service and 10 year warranty.
Now everything out of the attic and new AC installed my new plan is to put down a proper floor to store things up in my attic. Over the years it’s been patch work of pieces of plywood. I always said when it gets cool I do it and know how that works. It never happens and it’s out of sight out of out of mind. So this weekend me and dad me be putting a proper floor down plus with extra fluorescent fixtures laying around I add some lighting too.
Well it’s been a $5000 week around the 5 Stitches.... and hoping I have no another surprises anytime soon.
Attachments
-
 11c5ddb01ccbc230f928f64e74453cb3.jpg324.9 KB · Views: 0
 -
 18f28870140a6c1e6e2c4bb3d6d76f0a.jpg307.6 KB · Views: 0
 -
 f89fe78ab1346221e63aebde5a1aae77.jpg397.1 KB · Views: 0
 -
 286eaf57b03a293a8ce3942bd9fb9434.jpg443.3 KB · Views: 0
 -
 83496d935e6ccfa6ac3be59f1ec59020.jpg456 KB · Views: 0
 -
 b202cda510bcd75c4f685f108c6e902c.jpg464.3 KB · Views: 0
 -
 b44b2c0611ec137d44533badf8a802ef.jpg415.6 KB · Views: 0
 -
 d10932390ff5a442744155e5be247a82.jpg296.3 KB · Views: 0
Bob Heine
ALLIANCE MEMBER
Gerard, replaced my A/C system last year. Installed a Ruud that looks a lot like yours. If you are going to be up there, throw a few bales or bats of insulation down before installing plywood. If you can get to the garage section, put some down there as well. Even if you don't put one of those window units in there, the insulation will retain the morning cool quite a bit longer.
zmotorsports
ALLIANCE MEMBER
I truly glad you understand that hassle. It look at campers all the time now especially travel trailers and I can see delamination of figerglass. I still thing about all the products out there that there isn’t products that could make any sort of camper more water right for a longer period of time. I still have one area I need to address. We reseller all the marker lights but still getting water behind the lenses and causing issues with the bulbs working. My next idea instead of changing out all the lights is to change bulbs to led and completely silicone the covers on. They are a clip on style lens cover and have a form gasket around the bulb to seal it.
Gerard, I too had issues on my previous two motorhomes with water infiltrating in behind the running/marker lights. I have found that besides using the rubber gasket when installing that I run a bead of Dow Corning 999A in clear above the top edge of the light thus preventing any water from funning down behind the backing plate of the light. This still allows easy removal of the snap on lense cover. I started doing this on our last coach and it has worked well. The 999A holds up very well to the UV and will not break down or have to be replaced as quickly as some others that I have tried. I also used the 999A in black around my windshield in the same manner as a preventive measure and his has held up well.
I recently switched over the LED running/marker lights and when I got it back from the paint shop I went around the top of them and sealed with the 999A to prevent future water intrusion.
Just wanted to pass along some information that may be helpful on keeping water out of our RV's.
RedVise
Well-known member
So job went from $250 to I have NO F@CKING clue. Price $4500.
Yep, that's exactly what my NO F@CKING clue AC issue cost.
Brian
Gerard, replaced my A/C system last year. Installed a Ruud that looks a lot like yours. If you are going to be up there, throw a few bales or bats of insulation down before installing plywood. If you can get to the garage section, put some down there as well. Even if you don't put one of those window units in there, the insulation will retain the morning cool quite a bit longer.
I’m planning on throwing some insulation down before I put the boards down. I would want to do that now before I put all the stuff back in the attic the insulation is in as thick as it really should be. My ideas is to sleepers down perpendicular to the trusses and put 2 x 4‘ pieces of plywood down so if I need to I can get underneath each panel and those will run parallel with the trusses. The window units were my fathers and we brought him back to his house.
Gerard, I too had issues on my previous two motorhomes with water infiltrating in behind the running/marker lights. I have found that besides using the rubber gasket when installing that I run a bead of Dow Corning 999A in clear above the top edge of the light thus preventing any water from funning down behind the backing plate of the light. This still allows easy removal of the snap on lense cover. I started doing this on our last coach and it has worked well. The 999A holds up very well to the UV and will not break down or have to be replaced as quickly as some others that I have tried. I also used the 999A in black around my windshield in the same manner as a preventive measure and his has held up well.
I recently switched over the LED running/marker lights and when I got it back from the paint shop I went around the top of them and sealed with the 999A to prevent future water intrusion.
Just wanted to pass along some information that may be helpful on keeping water out of our RV's.
I can’t think of the name of the stuff but it comes in a big roll of tape. A resembles plumbers putty and a ribbon form and that goes behind the marker lights and you trim around it and then I ran a bead of chalking around the backing plate. My original thought was to change out to all brand new LED fixtures but I think it’s just gonna be easier for me this to change out two LED bulbs. I pulled off the front porch light and it was a real mess to clean up the old putty that sealed it. I figured it would be just easier for me just to change the bulbs out than to drill anymore holes in my camper or go through process of rewiring lights. At least that’s my thoughts at the moment.
I need to do some work on the electrical system putting all of it in spilt loom and metal enclosure box at front After that I plan to replace tongue and all the stabilizer jacks with 2500 or 5000 scissor lift jacks.
rmalkow2
Well-known member
I went through the same thing with my AC replacement 2 years ago. Starts out as a simple inspection and one failure leads to another which leads to that $4500 bill which is pretty universal by the way. That's what mine cost. If I had fixed the old one it was at least $2500 before they tore into it and then it would only be good till the next leak because of age of my old one it was still using the wrong refrigerant. If it ever leaked again they would not be able to fix it so like you I just popped for the new system. Hopefully it will last you many years to come and keep the house cool.
As a frustrated Ford Engineer I feel your pain about the radiator. I too have to pay for the goofy designs we seem to produce in vehicles. I'm in the middle of it and the high cost of parts makes no sense to me either.
As a frustrated Ford Engineer I feel your pain about the radiator. I too have to pay for the goofy designs we seem to produce in vehicles. I'm in the middle of it and the high cost of parts makes no sense to me either.
I went through the same thing with my AC replacement 2 years ago. Starts out as a simple inspection and one failure leads to another which leads to that $4500 bill which is pretty universal by the way. That's what mine cost. If I had fixed the old one it was at least $2500 before they tore into it and then it would only be good till the next leak because of age of my old one it was still using the wrong refrigerant. If it ever leaked again they would not be able to fix it so like you I just popped for the new system. Hopefully it will last you many years to come and keep the house cool.
As a frustrated Ford Engineer I feel your pain about the radiator. I too have to pay for the goofy designs we seem to produce in vehicles. I'm in the middle of it and the high cost of parts makes no sense to me either.
That’s way I felt with my AC. Once start changing parts how long better next issue happens.
As always being a Ford I always thought Ford imo where pretty straight forward. This Sport Trac has be kicking my *** so far. A broken ac distribution arm cost me a lot of time to fix having to remove entire dash and dash cover and then radiator. In Fords defense this Sport Trac is a different animal from from the trucks ive owned before. It a learning experience
zmotorsports
ALLIANCE MEMBER
I can’t think of the name of the stuff but it comes in a big roll of tape. A resembles plumbers putty and a ribbon form and that goes behind the marker lights and you trim around it and then I ran a bead of chalking around the backing plate.
I think what you are referring to is called butyl tape. It is what is used under vents and around windows as well. Gooey like putty and you tear or cut off what you need and then tighten down the component. Whatever oozes out you just trim back. It works well but usually in conjunction with either Dicor self leveling on roof or flat surfaces or some form of sealant/caulking on vertical surfaces.
Sounds like you may have found a combination that is working for you.
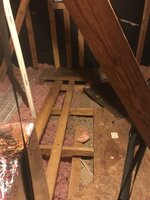
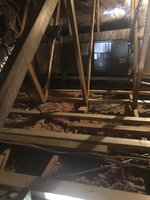
Well couldn’t pick a better time to have an AC unit go down then I decide to do something really smart and that is to install a floor in my attic. I started by removing everything from the attic to have the AC system brought up to current code. Then I put 20 2x4 down perpendicular to the truss system as sleepers.


And this is all the new section I gain by moving the AC system.

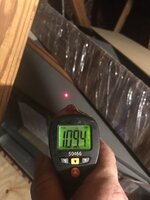
Highest temps in the attic yesterday.


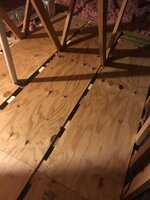
Today we went to Lowe’s and bought five sheets of half-inch plywood along with yesterday putting down three sheets of half-inch plywood


I still have to do some modification to the drip pan overflow pipe because some of the sleepers fell in the way and the new line run underneath the floor to the the drip through garage ceiling.
It was a ton of work in hot attic temperatures and couldn’t get it done without help from my dad. It’s one of those projects that’s out of site out of mind until you go up in attic. New AC system and new floor in attic. We both taking few days off from doing anything. So thing during the week I’ll start cleaning up the mess and sorting attic stuff but right now I’m not getting off couch. LOL
And this is all the new section I gain by moving the AC system.
Highest temps in the attic yesterday.
Today we went to Lowe’s and bought five sheets of half-inch plywood along with yesterday putting down three sheets of half-inch plywood
I still have to do some modification to the drip pan overflow pipe because some of the sleepers fell in the way and the new line run underneath the floor to the the drip through garage ceiling.
It was a ton of work in hot attic temperatures and couldn’t get it done without help from my dad. It’s one of those projects that’s out of site out of mind until you go up in attic. New AC system and new floor in attic. We both taking few days off from doing anything. So thing during the week I’ll start cleaning up the mess and sorting attic stuff but right now I’m not getting off couch. LOL
Attachments
-
 30152f1234b774bce044f8d6b153b6bd.jpg296.1 KB · Views: 0
 -
 528c6b6062755040a12840eba9cf8b35.jpg342.8 KB · Views: 0
 -
 4f17addd8ec2937be69b5cefd34512cd.jpg320.9 KB · Views: 0
 -
 0ab08d5ceeea5e9c736a59509560e34d.jpg238.5 KB · Views: 0
 -
 15ca0e5050afc8716fa107bfc730e4f3.jpg199.7 KB · Views: 0
 -
 75613467f28769bd5cb23703e0db1a06.jpg323.8 KB · Views: 0
 -
 7f8995da6dfe5af4bba8ebfcc06d6619.jpg321.2 KB · Views: 0
 -
 e1caff5318a52eea0967fd017b66dba8.jpg300.5 KB · Views: 2
Grumblebum
Well-known member
Good work G.
That's getting a bit toasty up in the ceiling
Cheers GB
That's getting a bit toasty up in the ceiling
Cheers GB
shortykorte
Well-known member
The extra space will definitely allow you to have the attic better organized. Can I ask why there's gaps in the flooring. Looks like a tripping hazard, let's the heat pass to the insulation easier and isn't typical GJ workmanship. 
The extra space will definitely allow you to have the attic better organized. Can I ask why there's gaps in the flooring. Looks like a tripping hazard, let's the heat pass to the insulation easier and isn't typical GJ workmanship.
The sleepers run perpendicular to the trusses and the plywood boards on parallel with the trusses. The 2x4 are like 24” apart or less so didn’t need to run them on top of trusses. All the support for plywood comes from the 2x4. The 2x4 also act like a channel for any wires running along top of trusses already. I also made them only 4’ long so easier to pull board in case need to get underneath that section.
Last edited: