To avoid these ads, REGISTER NOW!

The ADD Garage.

Simplytodd

Well-known member
Joined
Jan 4, 2014
Messages
148
Location
Houston
I figured it’s time to start a thread about my garage now that I have gotten to a point where I am able to work on things other than just shop related stuff. By no means am I even close to finishing it. I have come to a realization that it will never be done. Part of that is the fact that I can’t stay on task for very long. I tend to jump around between projects and hobbies. Hence the name ADD Garage. It drives my wife nuts that I will have 7-8 different things going at once with all of them in varying stages of completion. It’s also the fact that as I use the shop and the equipment that is in it or more items are added it will probably require rearranging or building of new items to accommodate the new equipment or hobbies. Anyway on to pictures.
 
To avoid these ads, REGISTER NOW!
OP
S

Simplytodd

Well-known member
Joined
Jan 4, 2014
Messages
148
Location
Houston
Looks like I started construction on March 21, 2016. Luckily my father in laws friend let us borrow the telehandler for free and his helper for a few days while we got the columns and perlins set. After that we were on our own. If I would have had to rented the telehandler it might of been just as cost effective to have somebody erect the building for me. It took us about three weeks to get the building dried in. c5cf65d40f5bee876b577586322b6492.jpg
5afd56c48b07c9efd5c04a10014d996b.jpg


A few later on after it was dried in and I got the doors in.

d556fcfb32adbe78235ab7eb276d132d.jpg
d86c559e0a173200f55fa91ac826655d.jpg


Further along after the mezzanine, lights, framing the office and starting to put the plywood walls up.

f975507be31e4b469f36358a0c3b3fb3.jpg
38e3381c5ed8583ed42625862b1ab517.jpg
0515139a45312e9ba3135c2af5ce87cc.jpg


Sent from my iPhone using Tapatalk
 

Attachments

  • c5cf65d40f5bee876b577586322b6492.jpg
    c5cf65d40f5bee876b577586322b6492.jpg
    39.1 KB · Views: 0
  • d86c559e0a173200f55fa91ac826655d.jpg
    d86c559e0a173200f55fa91ac826655d.jpg
    32.4 KB · Views: 0
  • 5afd56c48b07c9efd5c04a10014d996b.jpg
    5afd56c48b07c9efd5c04a10014d996b.jpg
    41.4 KB · Views: 0
  • f975507be31e4b469f36358a0c3b3fb3.jpg
    f975507be31e4b469f36358a0c3b3fb3.jpg
    34.5 KB · Views: 0
  • 38e3381c5ed8583ed42625862b1ab517.jpg
    38e3381c5ed8583ed42625862b1ab517.jpg
    30.6 KB · Views: 0
  • 0515139a45312e9ba3135c2af5ce87cc.jpg
    0515139a45312e9ba3135c2af5ce87cc.jpg
    31.1 KB · Views: 0
  • d556fcfb32adbe78235ab7eb276d132d.jpg
    d556fcfb32adbe78235ab7eb276d132d.jpg
    33.9 KB · Views: 0
To avoid these ads, REGISTER NOW!
OP
S

Simplytodd

Well-known member
Joined
Jan 4, 2014
Messages
148
Location
Houston
Worked on a project I have been putting off for a while. I wanted to build a Bluetooth speaker a while back so I started looking at designs. Found a speaker design by a guy named Paul Carmody that got really good reviews and the price was right around $100 for all the components minus the speaker boxes. His original design was for some bookshelf speakers but I had seen other guys builds using the same speakers combined into a single unit. I decided that was the route I was going to go with the addition of a Bluetooth module. So I purchased all of the components built the crossovers and lost interest. That was two years ago. Last week I decided it’s time to build the speakers. I changed the design back to bookshelf speakers minus the Bluetooth module. These are going to go in my office in the shop so I have something to listen to when I am working on things in the A/C.

Started with glueing the panels up then ripping them to size. I’m using walnut for the case and mdf for the motor board. 31118c2cde1840ce9180dcd2c36d8c49.jpg


Flush mounted the tweeter using a couple of forstner bits and a few through holes for the tuned port and speaker terminal on the back.

2a163481529707defba2df68b0e545cf.jpg
cdd2dced3b079bdf7d786bf99c912d38.jpg


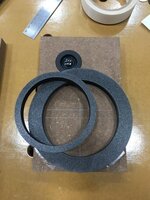
After that printed up a router template ring with a removable inner ring so I could have both a through hole and flush mount the woofer.

21b21d674ed7d695544b0047205aa91a.jpg

128d2f209b01f452bcd273fc3bb0a17c.jpg
4cb187101ecc64c0120247907945fffc.jpg


Mounted the crossover using threaded inserts and some standoffs to get the crossover up off the bottom of the case. Dominoed all the case sides to lock everything in place once its assembled and checked the fit with the speaker motor board.

9a9e0439cf9fc1b3a98671652687aa0e.jpg


I got the fronts and backs painted today as well. Waiting for those to dry and then it’s final assembly and glue up tomorrow. After that time to sand and danish oil. Build the speaker grills and I should have some nice sounding speakers.


Sent from my iPhone using Tapatalk
 

Attachments

  • 9a9e0439cf9fc1b3a98671652687aa0e.jpg
    9a9e0439cf9fc1b3a98671652687aa0e.jpg
    25.4 KB · Views: 0
  • 4cb187101ecc64c0120247907945fffc.jpg
    4cb187101ecc64c0120247907945fffc.jpg
    27.2 KB · Views: 0
  • 128d2f209b01f452bcd273fc3bb0a17c.jpg
    128d2f209b01f452bcd273fc3bb0a17c.jpg
    31.3 KB · Views: 0
  • 21b21d674ed7d695544b0047205aa91a.jpg
    21b21d674ed7d695544b0047205aa91a.jpg
    27.9 KB · Views: 0
  • cdd2dced3b079bdf7d786bf99c912d38.jpg
    cdd2dced3b079bdf7d786bf99c912d38.jpg
    29.5 KB · Views: 0
  • 2a163481529707defba2df68b0e545cf.jpg
    2a163481529707defba2df68b0e545cf.jpg
    20.3 KB · Views: 0
  • 31118c2cde1840ce9180dcd2c36d8c49.jpg
    31118c2cde1840ce9180dcd2c36d8c49.jpg
    25.1 KB · Views: 0
To avoid these ads, REGISTER NOW!
Top Bottom