To avoid these ads, REGISTER NOW!
Status
Not open for further replies.
To avoid these ads, REGISTER NOW!
OP
R

Ryan

Administrator
Staff member
Joined
Jan 26, 2006
Messages
5,731
Location
Texas/Hawaii
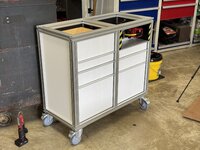
In an effort to avoid building drawer boxes... Man, I hate building drawer boxes... I decided to spend way too much time making up and painting some aluminum edge banding for the power center:

1-2.jpg

It looks way more important than it is... Which I sort of dig...
 

HogDude

Well-known member
Joined
Dec 25, 2020
Messages
229
Location
Nebraska
In an effort to avoid building drawer boxes... Man, I hate building drawer boxes... I decided to spend way too much time making up and painting some aluminum edge banding for the power center:

1-2.jpg

It looks way more important than it is... Which I sort of dig...
Exactly! I mean, you're the one who has to look at it. Might as well look sharp.
 

catalytic

Well-known member
Joined
Jul 16, 2011
Messages
636
Location
Boston, Los Angeles, Cleveland
Can agree, never once regretted the decision to use quality casters but definitely regret the poor caster choices I've made. Also, bigger is usually better (don't even notice rough flooring then).
^^This, but do note that bigger swivel casters swivel a lot further underneath (=tipsier) than little swivel casters in general.

My personal rule is to spec casters so that any one caster can hold the entire weight of the machine that sits on top (instead of 1/4 the weight). Took a few near-misses to learn that lesson.

Usually that means poly-on-iron or poly-on-steel (= strong but non-marking and a tiny bit of cushioning) but there are exceptions that have other materials and still have good weight rating.

Another thing to look into for some applications is retractable/leveling casters. You get smaller wheels, but you flip a lever and then your box/machine is sitting on rubber feet and rock solid.
 

Jgaz

Well-known member
Joined
Dec 16, 2016
Messages
1,701
Location
AZ
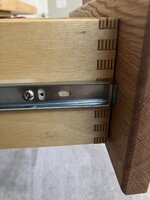
That screw hole is ******* you off... Isn't it?

Nice drawers :)
Haha, no. I really hadn’t noticed it until I took the picture.

I think it was a screw hole to allow adjustment to set the slide height.
Once I got the drawer working well I put screws in the holes that weren’t slotted.
I struggle sometimes to install slides. Maybe I don‘t do it often enough.

Thanks
 
To avoid these ads, REGISTER NOW!

Odessaboots

Member
Joined
May 31, 2020
Messages
11
Location
Arroyo Grande, CA
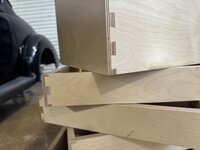
Drawer boxes are done dude… thank god.

IMG_1042.jpeg
How on earth do you get your dovetails in BB so clean!? I assume you are using a router jig?
I just spent way too long in the shop frustrated by tearout, cracked edges, splintering etc. using the Incra LS on my table.
I tried everything: sandwiching between sacrificial boards, all sorts of speeds/feeds, etc.

Any tips?
 
OP
R

Ryan

Administrator
Staff member
Joined
Jan 26, 2006
Messages
5,731
Location
Texas/Hawaii
How on earth do you get your dovetails in BB so clean!? I assume you are using a router jig?
I just spent way too long in the shop frustrated by tearout, cracked edges, splintering etc. using the Incra LS on my table.
I tried everything: sandwiching between sacrificial boards, all sorts of speeds/feeds, etc.

Any tips?

I struggled as well. I finally found success with a new bit and instead of using sacrificial boards, I used painters tape. Also, it helps to score your cut lines with a razor blade if you can.
 
OP
R

Ryan

Administrator
Staff member
Joined
Jan 26, 2006
Messages
5,731
Location
Texas/Hawaii
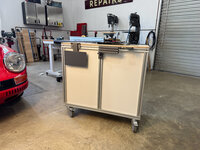
Hell, I don’t think I’ve laid a greasy finger on this cursed contraption in damn near nine months. Building those godforsaken drawer boxes broke my spirit—sucked the juice right outta me like a mosquito on mescaline. But today, under the sick light of a new kind of madness, I clawed my way back in. Slapped those drawer slides home with the precision of a hungover surgeon, jammed the boxes into place, and somehow cobbled together drawer faces that don’t look like a schizophrenic beaver built ’em. Progress, goddammit.

IMG_2448.jpeg
 
OP
R

Ryan

Administrator
Staff member
Joined
Jan 26, 2006
Messages
5,731
Location
Texas/Hawaii
Which laser Ryan? It will open a whole new chapter in creativity!
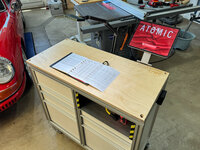
X-Tool sent over a P2S for review—a 55W CO2 laser, if I’m not mistaken.

Full disclosure: I have zero experience with lasers. None. I unboxed the thing, plugged it in, launched the software like I knew what the hell I was doing, slapped the Atomic logo into place, selected the default Birch ply settings, and let it rip. That was it. Stupid easy.

Yeah, I’ve got a lot to learn—test arrays to run, settings to tweak, all that—but damn… they’ve made getting started almost idiot-proof.
 

manwithtools

ALLIANCE MEMBER
Joined
Aug 24, 2015
Messages
14,071
Location
Lebanon, TN
Yes, the new lasers are very user friendly compared to twenty years ago or even ten. 55 watts is an awesome size, you can do some real work with that compared to 40 watts in my Glowforge. I'm sure you'll share your review, looking forward to it.
 
OP
R

Ryan

Administrator
Staff member
Joined
Jan 26, 2006
Messages
5,731
Location
Texas/Hawaii
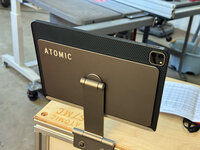
Behold—the latest in Atomic Technology: a work light and iPad mount/charger, both running off Milwaukee M18 power like some kind of red-lithium-fueled fever dream.

The iPad’s there for service manuals and digital wizardry. The light? Well, that’s because I’m basically blind in low light and tired of fumbling in the shadows.

original.jpg

Best part? Both fold neatly out of the way when not in use—clean, efficient, and just a little absurd.

folded.jpg

Also, used the laser again. This time on anodized aluminum.

laser.jpg
 

Odessaboots

Member
Joined
May 31, 2020
Messages
11
Location
Arroyo Grande, CA
Work light and armature spec please!

Also, can you post more details about the electrical setup? It looks like you've mounted an M18 remote adapter that wires into an M18 battery attached to the inverter, with a duplex receptable wired to a plug, plugged into the inverter?
 
Last edited:
OP
R

Ryan

Administrator
Staff member
Joined
Jan 26, 2006
Messages
5,731
Location
Texas/Hawaii
Work light and armature spec please!

Also, can you post more details about the electrical setup? It looks like you've mounted an M18 remote adapter that wires into an M18 battery attached to the inverter, with a duplex receptable wired to a plug, plugged into the inverter?

I’m making a video with full details, but it’s an m18 inverter with a 3D printed battery relocator… inverter wired to plugs… light and iPad charger to the inverters built in 12v supply.
 

Outlawmws

Well-known member
Joined
Aug 9, 2011
Messages
39,314
Location
The Badlands
From what I know, cataracts are not too difficult to fix. My dad had his lenses replaced in his 80s... the result was excellent; he didn't need glasses any more except for close up work.

True statement, I got mine done about 2-3 years back and one of my HS buds did last year. same result and he is shooting competitively, and winning at sporting clays.
 

kaymccampbell

Well-known member
Joined
Feb 27, 2015
Messages
29,603
Location
Upstate New York
God. I hope not.
Cause that blind in low light and fumbling in shadows is me, and I've got 'young' cataracts. Used to be able to work in my shop on a cloudy day with no lights, and now it's operating theatre lighting or I quit. Even that is becoming a bit dim.
 

F-22

Well-known member
Joined
Jan 23, 2022
Messages
1,830
Recently found out there's a few companies offering laser tube cutting. Really tempted to try making something like this now, just out of thin wall stainless steel tubing. The laser cutters are really cool, they cut out all the holes very precisely and the wedges for the bends.
 
Status
Not open for further replies.
To avoid these ads, REGISTER NOW!
Top Bottom