To avoid these ads, REGISTER NOW!

The Barn Project

tstaude

Well-known member
Joined
Mar 28, 2013
Messages
2,324
Location
SE Wisconsin
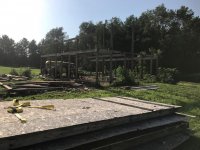
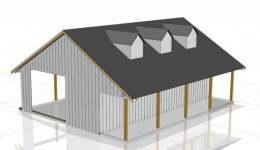
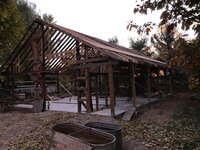
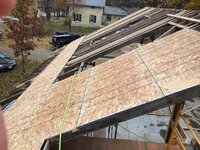
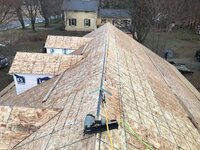
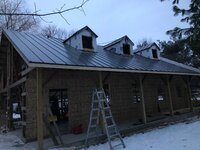
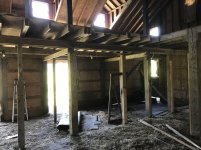
I am about to get started on my next big project- dismantling and rebuilding a barn! It's not a traditional barn, but built in the late 1990's as post frame and rafter construction. This is definitely the biggest building project I will probably ever take on but the end result will be awesome!
This came up on FB marketplace as free, my wife said to make contact and we ended up being the luck ones to get it for FREE! Of course there will be some costs with getting it down and a ton of work, but well worth it.
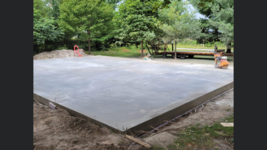
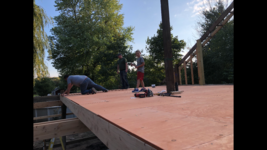
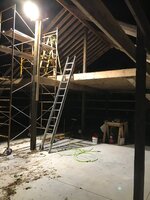
The building is 40' wide and 33' deep, I'll be building it in front of my existing garage and joining the two together separated by a wall. Right now it has a large hay loft which will help for the first stage of dismantling.
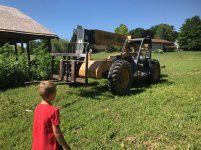
To get started I am going to have a roofer remove the roof then get going on everything else with the help of friends and family.
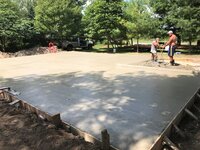
As of right now I am hoping to have everything taken down and transported by the end of June.
 

Attachments

  • Barn.jpg
    Barn.jpg
    20.1 KB · Views: 667
  • IMG_3312.jpg
    IMG_3312.jpg
    151.1 KB · Views: 828
  • IMG_3313.jpg
    IMG_3313.jpg
    153.9 KB · Views: 744
  • IMG_3316.jpg
    IMG_3316.jpg
    154.9 KB · Views: 729
  • IMG_3317.jpg
    IMG_3317.jpg
    159.1 KB · Views: 712
Last edited:
To avoid these ads, REGISTER NOW!

snipes

Active member
Joined
Dec 24, 2009
Messages
27
Wow that barn is awesome. Keeping it dry during storage rebuilding will be a challenge? Good luck!
 

FANTM58

Well-known member
Joined
Feb 21, 2015
Messages
575
Location
Brighton, Co
nice score,, take tons of pictures and videos. label everything, take your time measuring
everything out and drawing a good as built plan !!
 
OP
T

tstaude

Well-known member
Joined
Mar 28, 2013
Messages
2,324
Location
SE Wisconsin
I have off on Friday and will be doing nothing but labeling, measuring, and a little cleanup to get started. I figure I will do this all with no crew so I can concentrate and take the time to make a good drawing.
This building is definitely unique and will fit right in at our property, we have an old brick farmhouse built around 1870 when the original owner returned from the Civil War.

Had a guy I know give me a ballpark at $8500 for 4" concrete, having one other friend quote it as well.
 

yeldogt

Well-known member
Joined
Jan 2, 2012
Messages
18,184
I redid an old timber frame barn from the 1860 -- just the frame and some of the siding.

It was a lot of work.

That looks like a pole building -- what's locking the larger timbers together?
 
OP
T

tstaude

Well-known member
Joined
Mar 28, 2013
Messages
2,324
Location
SE Wisconsin
It is a post frame setup, the rafters are nailed at the top and hurricane clipped at the bottom. The ridge beam (looks like 2x12's) rests on a notch at the top of the 5 center posts.
Almost all of the 6x6 posts are 10' on center which helps keep things simple.
All of the loft is auxiliary structure that just rests on top plates. That will get trimmed back and reoriented anyway.
 
OP
T

tstaude

Well-known member
Joined
Mar 28, 2013
Messages
2,324
Location
SE Wisconsin
I spent a day out there gutting electric, cleaning it out and removing some remnants of siding. All that and I am still excited.

Talked to a few friends and now I have a 40' flatbed at my disposal.
I can rent a telehandler for $250 a day

with all that in mind- I am thinking of not having the roof torn off and lifting off sections, just take the shingles off later. What says the brain trust here?

8 holes/ four places to runs straps through and around the rafters and pick up each piece. I am thinking they are about 1000# per piece 8' x 20'.
 

XJSuperman

Well-known member
Joined
Jan 26, 2018
Messages
3,086
Location
Central Iowa
Might be nice to the land owners and remove shingles later where you can make the mess on your own property, if you have a choice there. It would also speed the process of getting the building out of their way.

Telehandler is perfect for the job. Those barnwood builder fellas move half a building roof at a shot with one. Smaller pieces is safer, but I might try a bigger chunk depending on the day's conditions.
 
OP
T

tstaude

Well-known member
Joined
Mar 28, 2013
Messages
2,324
Location
SE Wisconsin
My roofer ended up coming in last week and clearing the whole roof, dormers and taking away all of the materials. I think this is for the best so I don't have to mess with it.

Now that the roof is clear, we marked out where the sections will be cut, next weekend we will mark, cut, and brace. Ended up being 12 sections total.

I am going to nail blocks in between all of the rafters where they stay together to keep the stability for each panel. Also I am going to add cleats/supports on top of the OSB for added support and help with climbing around.

Any opinions on straps vs chains for lifting?
 

XJSuperman

Well-known member
Joined
Jan 26, 2018
Messages
3,086
Location
Central Iowa
Straps are industry standard I think. I suppose in a project like this it depends what you have and what condition its in. I'd personally prefer straps. Lifting slings would be best.
 
OP
T

tstaude

Well-known member
Joined
Mar 28, 2013
Messages
2,324
Location
SE Wisconsin
Whew it has been a busy summer! We had this all taken down about 3 weeks ago, and I have one trail load of material left to pick up. My driveway now looks like a lumber yard!

For the day that we took almost everything down with the telehandler, there were 3-4 of us at any given time and it was not too bad. We ended up using straps for lifting and a rope off the corner to guide onto the trailer.

The project has been pretty awesome so far, learning a lot and can't wait to get started putting it back up!

I had a guy quote 5"x33'x40' concrete with radiant tubes at ~$8k, so quite reasonable there. Now I just have to figure out if I want to tackle the metal roofing. I'll cross that bridge when I get there.
 

Attachments

  • IMG_3488.jpg
    IMG_3488.jpg
    157.7 KB · Views: 523
  • IMG_3486.jpg
    IMG_3486.jpg
    159.5 KB · Views: 493
  • IMG_3484.jpg
    IMG_3484.jpg
    151.1 KB · Views: 460
  • IMG_3481.jpg
    IMG_3481.jpg
    154 KB · Views: 446
  • IMG_3478.jpg
    IMG_3478.jpg
    153.8 KB · Views: 435
OP
T

tstaude

Well-known member
Joined
Mar 28, 2013
Messages
2,324
Location
SE Wisconsin
Yesterday I scored 20 Simpson strong ties (ABU66Z) for $150!
these go for $35 each at HD
I am making it a personal goal to buy as much material second hand as possible. There seems to be a lot of deals to be had on new and like new materials.

For now though I am still de-nailing the last of the timbers and 2x's while catching up on some other things around the house.

Next items to find are some energy efficient windows and doors.
 

rburke65

Well-known member
Joined
Nov 10, 2007
Messages
12,349
Location
Canfield, Ohio
The deals are out there if you shop and wait. Take more photos than you think you’ll need...plenty of notes....plenty labels.
 
OP
T

tstaude

Well-known member
Joined
Mar 28, 2013
Messages
2,324
Location
SE Wisconsin
I can feel spring and summer coming on! I have been slowly but surely sketching the barn in CAD land to get an idea of how everything will lay out.

The biggest trouble I am having is that first I will have a two post lift, then eventually a 4 post lift (possibly one with a caster kit).

Is having these two in line with one over head door going to be the end of the world? Probably not as the 4 post would get used a lot less.

I attached a few pictures of what I have sketched up for a layout. the three light gray circles in the middle will be 6x6 posts. No moving those as far as I can tell. Also there will be a loft right at these posts beneath the dormers.

The porch area will face out to the road and provide some good shade in the summer.

https://www.garagejournal.com/forum/attachment.php?attachmentid=1108919&stc=1&d=1615483442
attachment.php
 

Attachments

  • Top View 2 lifts in line.PNG
    Top View 2 lifts in line.PNG
    11.3 KB · Views: 329
  • Corner View.jpg
    Corner View.jpg
    19.4 KB · Views: 1,434
Last edited:
OP
T

tstaude

Well-known member
Joined
Mar 28, 2013
Messages
2,324
Location
SE Wisconsin
It's getting pretty real, had my first concrete guy did a no show. Was able to quickly get another guy in to get started. My dad and I will be laying insulation and tubes over the weekend and the concrete will be poured next week!
 

Attachments

  • Slab Forms.jpg
    Slab Forms.jpg
    604.8 KB · Views: 315
OP
T

tstaude

Well-known member
Joined
Mar 28, 2013
Messages
2,324
Location
SE Wisconsin
My son and I laid out the foam on Friday and my dad came over to help layout the tubes on Saturday, it actually went pretty quick. we did 4 zones and left two areas clear for potentially two 2-post lifts.
 

Attachments

  • Radiant Tubes.png
    Radiant Tubes.png
    3.5 MB · Views: 305
To avoid these ads, REGISTER NOW!
OP
T

tstaude

Well-known member
Joined
Mar 28, 2013
Messages
2,324
Location
SE Wisconsin
Here we go! Concrete was poured Friday and cut on Saturday.
This weekend I will be setting up my end wall to get all my heights dialed in, maybe have a side wall up if every goes right.
I do still need to insulate around the slab before he back fills.
 

Attachments

  • Concrete Pour 2.jpg
    Concrete Pour 2.jpg
    514.1 KB · Views: 255
  • Concrete Finished.png
    Concrete Finished.png
    2.6 MB · Views: 271

andyvh1959

Well-known member
Joined
Feb 15, 2020
Messages
2,590
Location
Green Bay WI
Quite the score, good for you! Yet another build I have to watch.

Back in 97 I bought a 26x40 stick framed/trussed garage, and moved it from Appleton to Brillion to build my garage addition. I hired a guy to strip off the roof, stack the plywood and trusses in piles, and then marked the wall sections into 10' or 12' sections and stack them. I borrowed a friends 3/4 ton pickup and rented a tandem axle car trailer to move the pieces. I actually loaded and moved the sections, trusses and plywood by myself, about six loads. I'd just park the trailer alongside the stacks of wall sections and flip them over onto the trailer. Lots of muscle work, but back when I was 38 it was a good bit easier. All made a nice six car garage when I was done a year later.
 
OP
T

tstaude

Well-known member
Joined
Mar 28, 2013
Messages
2,324
Location
SE Wisconsin
we got a little farther over the long weekend. Both the end walls completely laid out and assembled. Most of the post brackets are in place, had to drill a few anchors.
We went to lift the wall on Sunday, it was too long for two wall jacks. The center was lifted over a foot and the ends were still on the ground. I found another pair of jacks for $150 and picked them up, we will attempt the lift again on Saturday with all 4 jacks.
 

Attachments

  • Barn West Wall.jpg
    Barn West Wall.jpg
    360.6 KB · Views: 296
OP
T

tstaude

Well-known member
Joined
Mar 28, 2013
Messages
2,324
Location
SE Wisconsin
We were able to get the walls raised up this weekend, both end walls are done as well as the porch framing and rear wall.
The end walls were difficult, they were 20' tall and 34' wide but we were able to get them up in one piece!
I didn't get any other good pictures before the sun went down last night, but it is really starting to take shape.
 

Attachments

  • Barn Wall Raising.png
    Barn Wall Raising.png
    1.9 MB · Views: 297
OP
T

tstaude

Well-known member
Joined
Mar 28, 2013
Messages
2,324
Location
SE Wisconsin
The barn project continues, everything is still coming along slowly but surely.
Two weeks ago we squared everything up and made sure our braces were all good, nothing was out of square or level by more than a half inch! We trued it all up and everything is within an 1/8 in every direction.
Saturday we put up all the floor joists for the 29x 18 second floor, still have to figure out what to do for stairs.
Yesterday I took off work and we were able to get all the sheathing on the second floor.
Lots of work but so far so good.
 

Attachments

  • Barn Walls.jpg
    Barn Walls.jpg
    447.7 KB · Views: 255
  • Second Floor Joists.jpg
    Second Floor Joists.jpg
    444 KB · Views: 231
  • Second Floor Plywood.png
    Second Floor Plywood.png
    2.4 MB · Views: 284

rburke65

Well-known member
Joined
Nov 10, 2007
Messages
12,349
Location
Canfield, Ohio
Great job! Sure makes you feel good about yourself when you take on a project like this and it comes out like you expected….even though there were others that had theirBJg doubts. Well done my friend!
 
OP
T

tstaude

Well-known member
Joined
Mar 28, 2013
Messages
2,324
Location
SE Wisconsin
Great job! Sure makes you feel good about yourself when you take on a project like this and it comes out like you expected….even though there were others that had theirBJg doubts. Well done my friend!
This is an interesting project, I like doing things a little differently. I could have easily bought a kit and done it that way... but that's not how I run my life.

It is a really polarizing topic, I either get a 'hell yeah' or a confused and glazed over look.
 
OP
T

tstaude

Well-known member
Joined
Mar 28, 2013
Messages
2,324
Location
SE Wisconsin
Still hammering away at the barn, Friday I took all of the roof panels apart that were remaining and got the rafters ready for install on Friday. That was the most nails I have ever pulled in a day, probably 30# or more.
Saturday my dad and I got 20+ rafters in place along with one of the 24' ridge boards. We did the easy side first because we could reach everything from a Baker Scaffold or a 7' ladder.
Next weekend I am hoping we can finish off the rafters, i'll be renting an indoor scissor lift for the weekend to get the wide open side done.
 

Attachments

  • Rafters.jpg
    Rafters.jpg
    319.1 KB · Views: 248
OP
T

tstaude

Well-known member
Joined
Mar 28, 2013
Messages
2,324
Location
SE Wisconsin
The barn is now 90% framed in, just have the one front wall and windows to frame in but everything else is set. It was definitely some work to get that 48' ridge to stay in line and not wander away!
Two weeks ago we rented a scissor lift to nail in the rafters and bolt in the ties on the open side.
This weekend we finished framing in the porch ceiling and got the first row of 5/8" osb up there, that was tricky keeping them all squared up and in a perfect line. Now to get all that roof sheathing up there!
 

Attachments

  • Barn OSB.jpg
    Barn OSB.jpg
    526.2 KB · Views: 233
OP
T

tstaude

Well-known member
Joined
Mar 28, 2013
Messages
2,324
Location
SE Wisconsin
Saturday I spent all day on the roof putting up OSB, went with 5/8" for a little extra rigidity.
The front side is over half done, ran out of energy and day light. Man being on the roof will wear you out, that was probably the hardest part yet.
How about that 48' ridge, still cant believe how straight I was able to get it!
 

Attachments

  • Ridge.jpg
    Ridge.jpg
    387 KB · Views: 192
  • Front Sheathing.jpg
    Front Sheathing.jpg
    616.7 KB · Views: 218

JEFFREYWisconsin

Well-known member
Joined
Oct 9, 2021
Messages
380
This is a ton of work. I applaud you taking it on! It looks outstanding so far.

It makes me tired just reading the thread!
 
OP
T

tstaude

Well-known member
Joined
Mar 28, 2013
Messages
2,324
Location
SE Wisconsin
Probably the hardest part is that I am paying cash as I go for everything, doing side work on week nights and working on the barn weekends.
When it's all done next year I will not owe anyone a dime.
 
OP
T

tstaude

Well-known member
Joined
Mar 28, 2013
Messages
2,324
Location
SE Wisconsin
Thanksgiving weekend was pretty productive, my dad and I put new OSB on all 3 dormers Thursday and Friday, then did some more framing and measuring to make sure we were all set.
Saturday my BIL and I finished off all the sheathing on the front side, then we brought in the heavy equipment and got those dormers up, easy as 1-2-3!
Sunday was a bit more lax, just put up a few more sheets on the back side and did a little housekeeping.
 

Attachments

  • Dormer 1.jpg
    Dormer 1.jpg
    532.6 KB · Views: 165
  • Dormer 2.jpg
    Dormer 2.jpg
    464.5 KB · Views: 158
  • Dormer 3.jpg
    Dormer 3.jpg
    557.9 KB · Views: 196
OP
T

tstaude

Well-known member
Joined
Mar 28, 2013
Messages
2,324
Location
SE Wisconsin
Lots of progress since my last post.
Two weeks ago I was able to wrap up the OSB on the roof, that was a lot of work putting up 60# sheets by hand!
Not to mention, never really liked heights...but I put on a harness and got it done!

Yesterday I had off so we finished off framing the front wall and got it almost totally sheathed, all the windows and the door are cut in and I just have a 1' strip across the top to install.
 

Attachments

  • Barn Font Wall.jpg
    Barn Font Wall.jpg
    422.7 KB · Views: 164
  • Barn Roof.jpg
    Barn Roof.jpg
    623.1 KB · Views: 185
OP
T

tstaude

Well-known member
Joined
Mar 28, 2013
Messages
2,324
Location
SE Wisconsin
Had a little gap over the holidays, but last Friday the roofer was able to finish up the whole thing (3 days total).
It really looks great with all the steel up there!

Also this past weekend we took a little adventure down to Kansas City to pick up some glass garage doors that were formerly in a Chevy dealer. They are not in perfect shape but will look great when cleaned up! We will probably be painting the outside portion Black to go with the theme and the inside portion will be the brushed extruded aluminum.
They look similar to the pictures but all the panels are glass. My wife was pretty hot to go this route so we will see how it goes. The pair of 10x10 doors was $2k, this would be $12-13k new so this was the only chance at the glass doors for the shop.
 

Attachments

  • Barn Roof N.jpg
    Barn Roof N.jpg
    327.8 KB · Views: 145
  • Garage Door.PNG
    Garage Door.PNG
    133.2 KB · Views: 214
To avoid these ads, REGISTER NOW!
Top Bottom