
You are using an out of date browser. It may not display this or other websites correctly.
You should upgrade or use an alternative browser.
You should upgrade or use an alternative browser.
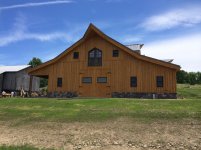
The Chicken Coop
- Thread starter Rlastr
- Start date
Worsedog
Well-known member
How about bi-fold hanger type doors with the appropriate wood on the inside and outside to maintain the barn door look when closed?
That's funny - I was just looking at that design online. I was worried the tracks would be an eye sore and when the doors are open too. There is another 11' of space above the 14' doors (just looks funny in my mind when open). But I'm open to this design.
Thanks!
Thanks!


Time for the slab. If you notice the drain and water lines plumbed for a bar, it is missing the conduit for electric. I was not onsite during the pour and when my builder emailed me this picture I freaked! Luck would have it I called within 5 minutes of cure time and the workers hopped back into the pour to install a conduit…


I raised the concrete wall to 3' to keep the wood out of the mud, water and snow - I also wanted to add field stone to the base to match the old barn. My builder insisted on covering the concrete with foam board to protect during construction. The concrete is a minimum of 4" thick in low bay and over 6" in the high bay (for heavy equipment).


vekster
Well-known member
Incredible shop you have there.
Thanks for posting the pictures.
Sent from my iPhone using Tapatalk
Thanks for posting the pictures.
Sent from my iPhone using Tapatalk
madoc1
Well-known member
amazing! where are you located?
jim
jim
amazing! where are you located?
jim
80 miles south of Buffalo NY


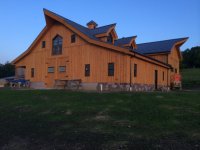
The need for blocks along the high bay wall was needed for the board and batten siding coming next. Also standing seam roof was a nightmare! I had two different roofing contractors start working then pulled no-shows. As winter approached all roofing stopped till spring (many water stains).


Last visit to the farm for the winter and only one goal this weekend - finish the boiler work for the floor heat!!!
Well we finished the plumbing around 8:00pm Saturday night and started filling the system. Long story short, at 3:00 am in the morning we finally called it a night after patching four leaks and struggling to purge the air in the lines (not easy for some beginners). The next morning we finished the black pipe and started the boiler.......it worked perfectly")
Now another long winter to plan the next phase, interior. Bar and cabinets, spa like bathroom with a steam shower, tounge and groove wood walls, wood shop and finally metal fab shop. I can't wait for spring...

Well we finished the plumbing around 8:00pm Saturday night and started filling the system. Long story short, at 3:00 am in the morning we finally called it a night after patching four leaks and struggling to purge the air in the lines (not easy for some beginners). The next morning we finished the black pipe and started the boiler.......it worked perfectly
Now another long winter to plan the next phase, interior. Bar and cabinets, spa like bathroom with a steam shower, tounge and groove wood walls, wood shop and finally metal fab shop. I can't wait for spring...


I found a product called Smarthings that monitors my shop while I'm away - sends me text messeges if something's wrong. I have motion sensors, temp readings (very imprortant if boiler fails!), moister sensor and door sensors. You can view all these via the web or smartphone ap! Very cool.
Also logged on the other day to see first snow - and the inside monitors show it's nice and toasty 68 degrees inside

Also logged on the other day to see first snow - and the inside monitors show it's nice and toasty 68 degrees inside
madoc1
Well-known member
are you a snowbird? where do you go? love the coup! did you get the 14' doors working?
jim
jim
madoc1
Well-known member
grew up in Houston-west side. can't help on the engineer, but you will have all winter to figure it out.
jim
jim
I'm pleased to report that the boiler is up and running and maintaining a very constant temp. This was a big concern as this shop is located in a rural area with heavy snow fall and frigid temp...
Now for the question of the day - how to set up the shop next year when the snow melts? Here is a shot showing the area for the wood shop. What do you guys think??? The highbay area will be for the metal shop (truck and trailer storage in winter).

Now for the question of the day - how to set up the shop next year when the snow melts? Here is a shot showing the area for the wood shop. What do you guys think??? The highbay area will be for the metal shop (truck and trailer storage in winter).
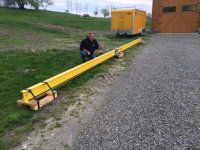
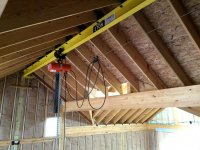
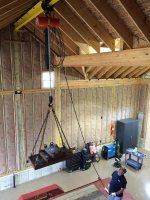
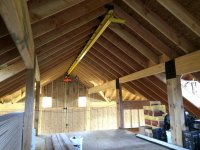
Now that the snow is gone it's time to build again! This weekend I installed the 32' long 8" I beam to handle the 2 ton electric hoist.
Attachments

vekster
Well-known member
Nice hoist.
Keep the pics coming.
Awesome shop.
Sent from my iPhone using Tapatalk
Keep the pics coming.
Awesome shop.
Sent from my iPhone using Tapatalk
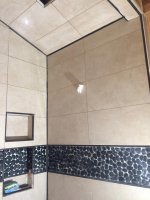
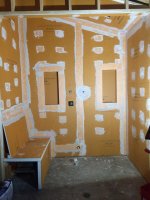
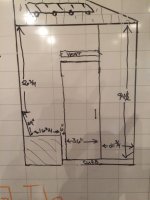
This summer will include building out the bathroom, hanging the tongue and groove wood walls and trimming with antique barn wood. The bathroom design incorporates 8' x 4' x 11' tall enclosed steam shower (rain shower head, wall mounted high flow head and a hand held wand spray to keep anyone soaked! The steam generator is oversized with LED lights, blue tooth speaker and aroma therapy steam spout.
Attachments
We need some items for the our creature comforts… Ice machine, kegerator, coffee maker, etc.
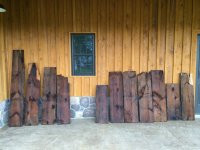
Here is also a picture of some of the old barn wood pressure washed and ready for install.
Here is also a picture of some of the old barn wood pressure washed and ready for install.
Attachments


95riosnake
Well-known member
This is one of the most beautiful garages I've ever seen. The overall aesthetics are incredible and I really love the complex spaces inside. Nothing wrong with big, open buildings with one large space, but I think the way this structure provides separate rooms is perfection. You have great taste Rlastr. I saved many of your pics in my Garage Inspiration folder on my computer that I will be using to help me decide on final build plans for a detached shop at our new house in a few years. (We close on Sept. 4th so I have a while to wait before I can afford to build my dream shop).