To avoid these ads, REGISTER NOW!

The Everything 3D Printer Thread

To avoid these ads, REGISTER NOW!

Cruzan80

Well-known member
Joined
Jul 22, 2015
Messages
4,166
Location
Denver, CO
Probably going to order a X1 carbon for our HS STEM lab soon. Any "must-have" spares or accessories to have on hand? Plan on running this hard as a workhorse.
 

MadeByMiller

Well-known member
Joined
Dec 29, 2018
Messages
1,230
Location
Rapid City, SD
Probably going to order a X1 carbon for our HS STEM lab soon. Any "must-have" spares or accessories to have on hand? Plan on running this hard as a workhorse.
These Honeybadger build plates are a must in my opinion. Glue stick is lame, the Honeybadger being PEI doesn't require glue stick. It's dual sided, so I run PETG on the textured side and PLA on the smooth side. If you print PETG on the smooth side, I would use Windex or hairspray to keep it from sticking too hard. Other than that, I've not done anything besides clean the carbon rods and lube the leadscrews once in the 560 hours of print time so far. I do highly recommend the Hydra AMS mod if you plan on sourcing filament from manufacturers outside of Bambu Lab.
 

MadeByMiller

Well-known member
Joined
Dec 29, 2018
Messages
1,230
Location
Rapid City, SD
Waiting on Prusa to approve the packaging photos I sent them of the XL so they will send me a shipping label for return. In what's become typical Prusa behavior, they aren't in any hurry to respond to my email.
OAJHndoyOBVPWDYxm0s3MJg=w873-h1552-s-no?authuser=0.jpg

Their process and packaging for return shipping is pretty clever though. They sent me the return box and packaging, so all of the original boxes my machine shipped in (as an unassembled kit) were taken to recycling today. The big container of oversized gummy bears gave me a good chuckle when I initially unboxed the machine.
 

Cruzan80

Well-known member
Joined
Jul 22, 2015
Messages
4,166
Location
Denver, CO
These Honeybadger build plates are a must in my opinion. Glue stick is lame, the Honeybadger being PEI doesn't require glue stick. It's dual sided, so I run PETG on the textured side and PLA on the smooth side. If you print PETG on the smooth side, I would use Windex or hairspray to keep it from sticking too hard. Other than that, I've not done anything besides clean the carbon rods and lube the leadscrews once in the 560 hours of print time so far. I do highly recommend the Hydra AMS mod if you plan on sourcing filament from manufacturers outside of Bambu Lab.
Any particular reason for the Honeybadger over Bambu's Textured PEI plate? Thinking I could put it inside one order from Bambu and be simpler. Most of what we are running is PLA, some (small amount) ABS and maybe getting into more "exotic" ones as we move forward. Plan on running other filament that isn't Bambu, so thanks for the tip on the Hydra mod. The filament rolls I have been using do have black plastic for the roll, so it seemed like they should be fine.

Right now we have a couple of Raise 3D that are working well enough, just think the print speed may make this the gamechanger for us.
 

MadeByMiller

Well-known member
Joined
Dec 29, 2018
Messages
1,230
Location
Rapid City, SD
Any particular reason for the Honeybadger over Bambu's Textured PEI plate? Thinking I could put it inside one order from Bambu and be simpler. Most of what we are running is PLA, some (small amount) ABS and maybe getting into more "exotic" ones as we move forward. Plan on running other filament that isn't Bambu, so thanks for the tip on the Hydra mod. The filament rolls I have been using do have black plastic for the roll, so it seemed like they should be fine.

Right now we have a couple of Raise 3D that are working well enough, just think the print speed may make this the gamechanger for us.
I don't like or recommend using a textured build plate for PLA, it just doesn't adhere well enough to be reliable in my experience. That's why it's great for PETG, which tends to stick too aggressively to a smooth sheet. I have the Bambu textured sheet and have used it for PETG, and it's just fine of course. The Honeybadger is more convenient because you can print PLA on the smooth side without glue stick (glue stick is atleast recommended if not required on the Bambu Cool Plate that comes with the machine) and when I'm printing PETG I can just flip the build plate over to the textured side.
 

Cruzan80

Well-known member
Joined
Jul 22, 2015
Messages
4,166
Location
Denver, CO
Gotcha. Yes, was not going planning on using the textured for the PLA. Wonder what the Honeybadger did different for the smooth side, that you don't feel the need for any gluestick/hairspray/etc, compared to the Bambu.

Not questioning your results, just wondering out loud.
 

MadeByMiller

Well-known member
Joined
Dec 29, 2018
Messages
1,230
Location
Rapid City, SD
Gotcha. Yes, was not going planning on using the textured for the PLA. Wonder what the Honeybadger did different for the smooth side, that you don't feel the need for any gluestick/hairspray/etc, compared to the Bambu.

Not questioning your results, just wondering out loud.
Sure. So my understanding is that Bambu Lab created the Cool Plate in order to reduce chamber temperatures for printing PLA since it's an enclosed machine. I'm not exactly sure what the actual material of the Cool Plate is, but it's a consumable sticker that every so often you have to peel off of the spring steel build sheet and replace. It allows you to only heat the bed to 35-45C and thus reduce chamber temperatures, but to promote both adhesion and part removal glue stick is necessary.

High chamber temps can be an issue with printing PLA as the filament can become soft prior to reaching the extruder gears and cause feeding issues. I've never experienced any issues printing with PLA and the heat bed set to 70C and the door/glass lid closed, but I know that some folks have depending on the ambient temp of the room and the formula of PLA they're using.

With the Honeybadger build sheet being PEI and not whatever the Cool Plate material is, you can print PLA directly on to the smooth side without glue stick and not worry about damaging the build sheet or having trouble removing the part. This is identical to using a Prusa smooth PEI sheet if you're familiar. If you want to stick strictly to Bambu products, you could get the Bambu High Temperature Plate which would enable you to print PLA directly onto the sheet with no glue stick, just like the Honeybadger.

So, after saying all of that, the advantage of the Honeybadger is that it's dual sided. You only have to buy one build sheet to do the job of both the Bambu Textured and High Temp plates.

Side note, I use the High Temp bed type setting in the slicer when I use the smooth side of the Honeybadger plate and the Textured PEI bed type setting when I used the textured side.
 

Cruzan80

Well-known member
Joined
Jul 22, 2015
Messages
4,166
Location
Denver, CO
Gotcha. I didn't realize there was a cool plate vs the high template for the Bambu. Makes more sense now. Was thinking it had the equivalent of the high temp already on there.
 

zanyad

ALLIANCE MEMBER
Joined
Apr 26, 2018
Messages
2,756
Location
NE Ohio

ER70S-2

Well-known member
Joined
Jan 2, 2015
Messages
797
That makes these things look even better.

I like stupid cheap! I can easily forget the cost of the tool I bought to do it with.

You can make 50-100 smallish parts with one 1000g roll of filament that costs around $20 (depending on exact part size, infill density, perimeters, etc). Some of my biggest parts still only use about a fifth to a half a roll. The filament cost is so low that it's almost not even worth thinking about.

Exotic filaments like carbon fiber reinforced polycarbonate is more expensive, but you tend to only use that stuff when you really need it, so one roll lasts a while (at least for me).
 

HPRifleman

Member Emeritus
Joined
Nov 18, 2019
Messages
767
Location
Wayne, IL
I have an air compressor that was missing a silencer. I also have a silencer that doesn't have threads that match the compressor.
gj_171.JPG

So I designed an adapter that would allow using the larger thread of the silencer with the smaller threads of the compressor.
gj_172.jpg

The design also has a smooth transition from the silencer into the compressor intake as shown in this cross-section.
gj_173.jpg

I printed two copies of this part. Each was printed at 180° because I wanted to see how the same dimensions in CAD will vary based on whether they were formed against support material. There were certainly differences.
gj_174.JPG

I sized the male and female ends of the adapter to zero engagement with the threads. Instead, I used teflon tape to make the fit between parts. Here is the finished product.
gj_175.JPG
 

BobLon

ALLIANCE MEMBER
Joined
Apr 19, 2017
Messages
141
Location
Florida
I printed two copies of this part. Each was printed at 180° because I wanted to see how the same dimensions in CAD will vary based on whether they were formed against support material. There were certainly differences.
gj_174.JPG

New to 3D printing Is this a flavor of Nylon?
Thanks.
BobL.
 

jayz66ragtop

Well-known member
Joined
Sep 11, 2009
Messages
1,521
Location
SoCal
Guess I never posted the final result. I know it could be better but after all the issues with the filament I was just happy to not waste anymore time or filament. It took three tries to get it right, first time was a failure because I didn't catch what the slicer was warning me about when it said "Error: 177 non-manifold edges" and said sure, go ahead and fix it. Well, apparently along the way sometime playing in Fusion 360 the slot where the plug goes got separated from the body of the object and so the Bambu slicer got confused. When it "fixed" it, it that part a solid piece and I did not notice it because in the slicer it was still red just not a hole anymore. The second attempt was my fault because I was playing with the layer height, made both the layer height and the first layer height .4mm which caused the brim to not adhere to the plate well. That was not apparent until around 10 hours into the print it decided to not adhere at all anymore and ruined the print. At that point I took what I got, yes it could be improved with some adjustments and using a sharp knife to clean out some of the strings. Also noted the bottom screw hole is useless because it's blocked by the connector port but three screws is plenty with using drywall anchors.

Was at the dealership for service on my F150 and showed our salesman who just bought a Mach E GT and he thought it was awesome and I should sell them on Etsy. To do that I'd want to adjust the settings so the surface is smoother and some other minor tweaks. I dunno, the slice said it's about $8 in filament but not sure how much it actually was.

20230930_165605.jpg20230930_165556.jpg
 
Last edited:

HPRifleman

Member Emeritus
Joined
Nov 18, 2019
Messages
767
Location
Wayne, IL
New to 3D printing Is this a flavor of Nylon?
Thanks.
BobL.
It's actually a combination of two different materials that, when combined into one, give properties similar to ABS. The materials are in liquid form and get sprayed in droplets similar to an inkjet paper printer. Then, each layer is cured with UV light. This give the advantage of being very smooth on non-supported surfaces. This is not only aesthetically pleasing but provides a good surface for sliding parts.
 

Bodj Built

Well-known member
Joined
Feb 3, 2016
Messages
1,165
Location
Moorpark, CA
Hey everyone,

I personally have a Flashforge Adventure 3, and it works great for my small stuff at home. No issues, incredibly easy slicer and setup.

I am a highschool teacher (physics), and the classroom next to mine is the computer graphic arts lab. The old teacher in that room bought an Ultimaker 2+ quite a few years ago. Since she left 3 or so years ago, the printer has been sitting. The new teacher has never used it, so I figured I'd bring it to my room so I can make things with the kids.

Anyways, the printer has an SD card in it's slot with some files that come stock from Ultimaker, and some that are apparently uploaded by students from years past. Those files print great. Zero problems.

Fast forward to my files. I'm making a desktop catapult (that I've drawn to compete with my students' popsicle stick catapults they're currently making), and I cannot get a single thing to print properly. There are two or three big issues. One, the printer head isn't automatically heating up prior to printing - I have to manually preheat it. Two, the prints start in random locations. I can jog the head to the center of the bed and it'll print from there, but it won't print in the center if I place the part in the center on the slicer (Cura). Three, and this is the biggest issue, it won't print on the print bed. There is a 1-2" gap between the nozzle and bed. I have to pause the printer, jog the bed up, and then print.

I'm totally at a loss here. I've never messed with G code, and would hope I don't have to manually modify the code each time I do a print. My Flashforge is very much push the button and walk away. Any thoughts?
 

kaymccampbell

Well-known member
Joined
Feb 27, 2015
Messages
29,417
Location
Upstate New York
Hey everyone,

I personally have a Flashforge Adventure 3, and it works great for my small stuff at home. No issues, incredibly easy slicer and setup.

I am a highschool teacher (physics), and the classroom next to mine is the computer graphic arts lab. The old teacher in that room bought an Ultimaker 2+ quite a few years ago. Since she left 3 or so years ago, the printer has been sitting. The new teacher has never used it, so I figured I'd bring it to my room so I can make things with the kids.

Anyways, the printer has an SD card in it's slot with some files that come stock from Ultimaker, and some that are apparently uploaded by students from years past. Those files print great. Zero problems.

Fast forward to my files. I'm making a desktop catapult (that I've drawn to compete with my students' popsicle stick catapults they're currently making), and I cannot get a single thing to print properly. There are two or three big issues. One, the printer head isn't automatically heating up prior to printing - I have to manually preheat it. Two, the prints start in random locations. I can jog the head to the center of the bed and it'll print from there, but it won't print in the center if I place the part in the center on the slicer (Cura). Three, and this is the biggest issue, it won't print on the print bed. There is a 1-2" gap between the nozzle and bed. I have to pause the printer, jog the bed up, and then print.

I'm totally at a loss here. I've never messed with G code, and would hope I don't have to manually modify the code each time I do a print. My Flashforge is very much push the button and walk away. Any thoughts?
Is Cura set up for your exact printer? And have you set 0,0,0?
 

Bodj Built

Well-known member
Joined
Feb 3, 2016
Messages
1,165
Location
Moorpark, CA
Is Cura set up for your exact printer? And have you set 0,0,0?

Yes it is set up for this printer. Not sure how to define the origin. I've been looking but don't see an option aside from the checked box that says "origin at center"

1696630305793.png

I guess I'll try printing a test cube or something and see if I can copy the gcode into here
 

kaymccampbell

Well-known member
Joined
Feb 27, 2015
Messages
29,417
Location
Upstate New York
Yes it is set up for this printer. Not sure how to define the origin. I've been looking but don't see an option aside from the checked box that says "origin at center"

1696630305793.png

I guess I'll try printing a test cube or something and see if I can copy the gcode into here
You set that on your printer. In the firmware. It's got some little screen to do that, doesn't it?
 
To avoid these ads, REGISTER NOW!

Bodj Built

Well-known member
Joined
Feb 3, 2016
Messages
1,165
Location
Moorpark, CA
You set that on your printer. In the firmware. It's got some little screen to do that, doesn't it?

I didn't see one and I believe I went through all of the settings. All I saw was calibrating the level of the bed.

I found a start and end code someone else used and it worked pretty well. I just need to figure out how to keep the bed warm while it prints. It preheats fine but doesn't stay hot while printing. Shows it's supposed to under the material preset, so not sure why it's happening. Works fine for the preloaded SD parts though.
 

kaymccampbell

Well-known member
Joined
Feb 27, 2015
Messages
29,417
Location
Upstate New York
I didn't see one and I believe I went through all of the settings. All I saw was calibrating the level of the bed.

I found a start and end code someone else used and it worked pretty well. I just need to figure out how to keep the bed warm while it prints. It preheats fine but doesn't stay hot while printing. Shows it's supposed to under the material preset, so not sure why it's happening. Works fine for the preloaded SD parts though.
Is it possible you have some gcode scripts in Cura that are loading inappropriately? I forget what is called, but you can prepend gcode in a screen in Cura, and it loads every time. It can really eff things up.
 

Pressingonward

Well-known member
Joined
Mar 9, 2016
Messages
522
Location
SW WA
It's not fun, but you can open one of the print files that prints well in Notepad as well as one from Cura that prints badly and compare the starting G code commands to see what the difference is. Google search will tell you what each command is doing.

Once you see the difference you can figure out how to adjust it in Cura.

Or, since your issues are pretty specific already, you might be able to figure out the right setting to tweak in Cura right off the bat with a bit of googling.

For height off the build plate, the machine typically does a homing routine and the first layer will print at whatever the initial layer height is set to in Cura, unless your printer has an offset in the onboard menu. My printer has no z height adjust onboard and I wanted to be able to set it in Cura, so I downloaded an add-on called "z offset adjust" or something to that effect. Not sure why yours would be so far off though, I typically only tweak it by a tenth of a mm or two.
 

gte718p

Well-known member
Joined
Mar 12, 2009
Messages
3,950
I have had nothing but problems with Cura. I switched to PrusaSlicer and then Superslicer which is a fork of PrusaSlicer. Same .stl same setting Prusasllicer works Cura doesn't. I could probably figure out what the differences in G-code are, but it is not worth my time.
 

gte718p

Well-known member
Joined
Mar 12, 2009
Messages
3,950
The Ratrig printer has been frustrating me recently. I feel like I'm spending more time screwing with it then printing. Occasionally I wish I had gone with the Bambu. However, today I got it dialed in and printing good. I think I have been fighting filament. New roll of PLA+ and life is good. Today I'm printing beautiful prints at 250 mm/s. It is so satisfying. I'm not even pushing it right now. I'm pretty sure I can get to 400mm/s. I was watching a guy do 1000mm/s but I would need to lighten the gantry a little. In any case, it is so satisfying to watch it print fast.
 

Xti04

Well-known member
Joined
Nov 11, 2016
Messages
2,286
Just bought my son an ender 3 neo max for his 11th birthday next week. Grabbed a bunch of PLA and some Petg to be ready when he gets to open it up this coming week. I have already gotten some stl files downloaded of things I want to print as well as some mods for the printer. Cant wait to learn it with him.
 

longlv85

Member
Joined
Oct 16, 2022
Messages
22
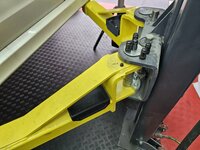
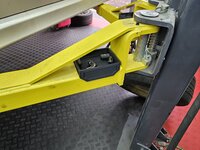
Wanted to help stay organize when removing lug nuts. So made this for the maxjax. Fits perfect, now all the lug nuts have a home on each arm.
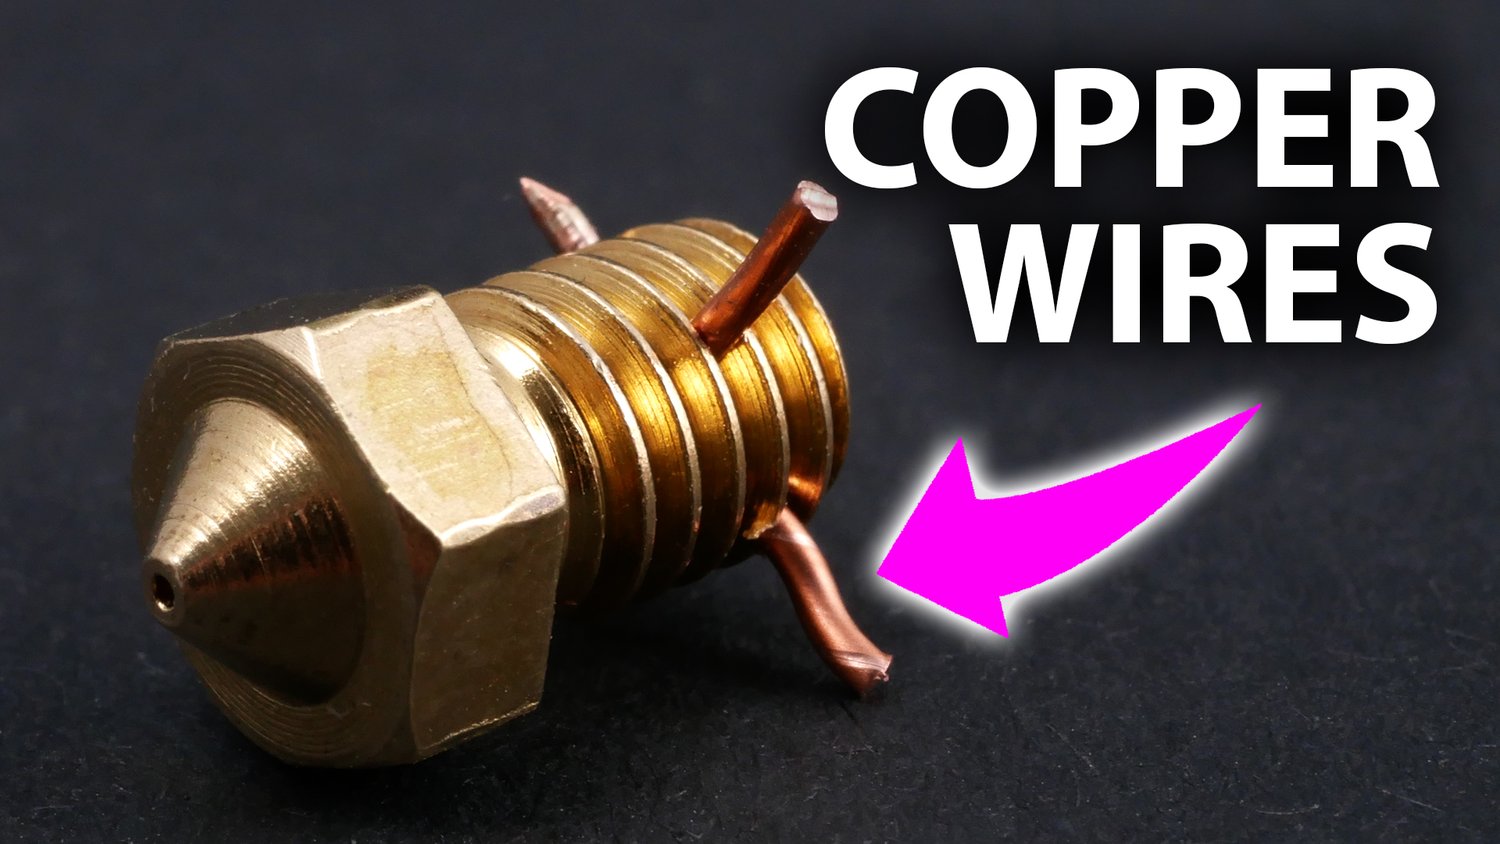
 

Attachments

  • 20231016_121009.jpg
    20231016_121009.jpg
    683.9 KB · Views: 111
  • 20231016_120935.jpg
    20231016_120935.jpg
    687.5 KB · Views: 120
  • 20231016_120915.jpg
    20231016_120915.jpg
    666.9 KB · Views: 121
  • 20231016_120623.jpg
    20231016_120623.jpg
    828 KB · Views: 121

loganb

ALLIANCE MEMBER
Joined
Dec 29, 2011
Messages
5,497
Location
Omaha, NE

jeepxj

Well-known member
Joined
Mar 2, 2008
Messages
17,831
I'm running the .6 CHT tri flow black magic nozzle lol....but it works. Bumped the temps up a bit as well and can run almost 25 or 30% more filament then with a standard nozzle. Haven't tried any of the generics, but the originals work

hoping to increase flow rates a bit
 

loganb

ALLIANCE MEMBER
Joined
Dec 29, 2011
Messages
5,497
Location
Omaha, NE
It will definitely allow more filament. If running small parts with short layer times watch the minimum layer time limit as it can negate the benefit of a higher flow nozzle on small pieces
 
To avoid these ads, REGISTER NOW!
Top Bottom