
Clutch71
Member
Been lurking on this site for awhile and am just now getting around to posting. I finally bought my first house in April of 2010 after patiently waiting for the right deal. I had consigned myself to staying in my apartment with its detached single car, single outlet garage and living like a redneck Powerball winner and buying **** I didn't need. Then I found the right house in a small, small town about 12 miles south of work. Everything fell into place. Best of all, it had a 2-car garage with some sweet stained concrete and a deep section in lieu of a laundry room. Going from a one-car to a deep 2-car was going to be heaven.
In the process of new home ownership, I stumbled across Jack Olsen's 12-Gauge Garage on one of the DIY websites I was on. Like so many people here, I was blown away by how much he was able to pack into a small space on the cheap and it be practical AND look cool. You can tell his space was designed for function, but it has such a great aesthetic to it. I have always appreciated the art of the bargain and figuring stuff out yourself. Stubborness + tools + limited funds + liquid ingenuity (in limited doses) = good things. Once I got some of my other inside projects squared away, I was going to work on the garage.
Fast forward 3 years. After cutting my teeth on various car and house projects, I'm giving the garage the attention it deserves. It's been through several configurations as I've learned what works best for me, and I'm still going back and forth on a few things. It also took a while to come up with a name, but the Flying Hammer Garage fits. I have a lot of patience, but when it goes, the red-headed redneck in me comes out, my undiagnosed Tourets' Syndrome scares the neighbors, and I have been known to throw tools and various Ford parts.
So I'll start with some early pics and go from there.
This is the unmolested garage before I moved in. The builder cut a perimeter of 24" around the floor as well as the diamond in the middle and stained them a cool rust color. Rather than have a laundry room, he made the garage about 30 feet deep. This was one of the selling points of the house for me. I intended for that deep section to be a small shop type area. Also liked the spigot in the garage, figured that could come in handy.
View attachment 292554
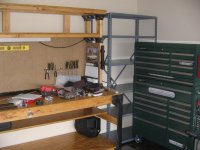
One of my first projects was to build a workbench. I cheated and got one of those 2x4 Basics kits off Amazon. I made it as big the kit allowed and it ended up being 30 inches deep and 8 feet with a riser to hold my secondary stereo system and 2 speakers. I also put a pegboard back and sides. I did a split shelf below to make room for the shop vac and all my plastic tool boxes. The whole thing took longer than it should have because my OCD kicked in and I ended up staining it and coating it with poly. Later, I mounted a grinder, a vice, and an old Boston pencil sharpener. Like most things, the old ones work best. After living with it for 3 years now, my plan is to reconfigure it into two smaller benches that can moved around. One will be primarily for woodwork, the other more of an assembly/power tool bench. Anyhow, here's some early pics.


This was an early configuration. When my employer moved offices, they sold off their metal shelving units (4 and 5 shelves) for $5 a pop. I got 4 which fit perfectly across the back wall of the single car garage at the old apartment. Now I had to figure out how to configure them in the new garage after I built this big assed workbench.


I also bought the big 41" tool cabinet from Menards when it was on sale. I had long ago outgrown a small 26" and ended up selling it for what I put into it. Love the Masterforce, especially compared to overpriced and underbuilt Craftsman cabinets of today. Like the newer Masterforce boxes even better with the latch system and a cutaway top. Lot more stickers on there now. Kinda wish I had just bought the lower unit so I could build a bench around it like some of the folks here do with the HF units.
In the process of new home ownership, I stumbled across Jack Olsen's 12-Gauge Garage on one of the DIY websites I was on. Like so many people here, I was blown away by how much he was able to pack into a small space on the cheap and it be practical AND look cool. You can tell his space was designed for function, but it has such a great aesthetic to it. I have always appreciated the art of the bargain and figuring stuff out yourself. Stubborness + tools + limited funds + liquid ingenuity (in limited doses) = good things. Once I got some of my other inside projects squared away, I was going to work on the garage.
Fast forward 3 years. After cutting my teeth on various car and house projects, I'm giving the garage the attention it deserves. It's been through several configurations as I've learned what works best for me, and I'm still going back and forth on a few things. It also took a while to come up with a name, but the Flying Hammer Garage fits. I have a lot of patience, but when it goes, the red-headed redneck in me comes out, my undiagnosed Tourets' Syndrome scares the neighbors, and I have been known to throw tools and various Ford parts.
So I'll start with some early pics and go from there.
This is the unmolested garage before I moved in. The builder cut a perimeter of 24" around the floor as well as the diamond in the middle and stained them a cool rust color. Rather than have a laundry room, he made the garage about 30 feet deep. This was one of the selling points of the house for me. I intended for that deep section to be a small shop type area. Also liked the spigot in the garage, figured that could come in handy.
View attachment 292554
One of my first projects was to build a workbench. I cheated and got one of those 2x4 Basics kits off Amazon. I made it as big the kit allowed and it ended up being 30 inches deep and 8 feet with a riser to hold my secondary stereo system and 2 speakers. I also put a pegboard back and sides. I did a split shelf below to make room for the shop vac and all my plastic tool boxes. The whole thing took longer than it should have because my OCD kicked in and I ended up staining it and coating it with poly. Later, I mounted a grinder, a vice, and an old Boston pencil sharpener. Like most things, the old ones work best. After living with it for 3 years now, my plan is to reconfigure it into two smaller benches that can moved around. One will be primarily for woodwork, the other more of an assembly/power tool bench. Anyhow, here's some early pics.
This was an early configuration. When my employer moved offices, they sold off their metal shelving units (4 and 5 shelves) for $5 a pop. I got 4 which fit perfectly across the back wall of the single car garage at the old apartment. Now I had to figure out how to configure them in the new garage after I built this big assed workbench.
I also bought the big 41" tool cabinet from Menards when it was on sale. I had long ago outgrown a small 26" and ended up selling it for what I put into it. Love the Masterforce, especially compared to overpriced and underbuilt Craftsman cabinets of today. Like the newer Masterforce boxes even better with the latch system and a cutaway top. Lot more stickers on there now. Kinda wish I had just bought the lower unit so I could build a bench around it like some of the folks here do with the HF units.
Attachments

Last edited:


