To avoid these ads, REGISTER NOW!

The Flying Shop

OP
P

phred

Well-known member
Joined
Apr 23, 2009
Messages
525
Location
NC
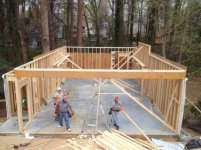
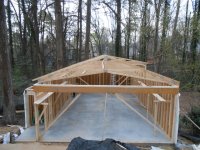
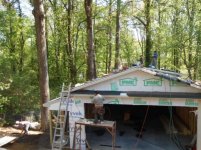
and we have walls!!!
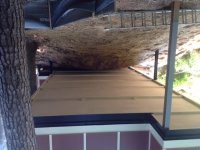
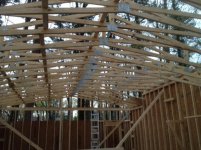
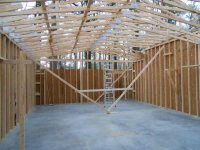
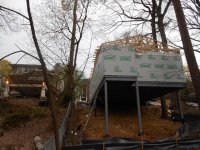
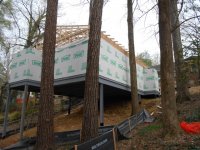
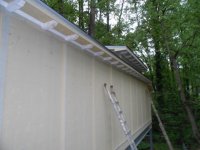
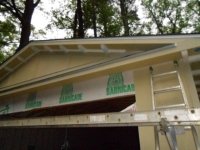
Besides all the hoops I had to jump through to get the permit there are a couple other restrictions that were troublesome. There is height restriction in this part of town that builders somehow manage to get around. The average height cannot be over 20' from ground to ridge. It some kind of crasy formula that city uses to find the average. Well since most of my structure is above ground my average height ends up being 19'8" even though the plate height is 10' and the top of the ridge is 14' I need at least 12' clear inside. We had the trusses high hatted to gain an extra 6" and popped up the roof for 12' over the lift. The inspectors didn't ask and we didn't comment. I now have a clear 12'6" along the right side over the lift area and a full 14" at the ridge. It good to have a superintendent that thinks ahead to solve problems and keeps the inspectors happy!!!
 

Attachments

  • IMG_3083.jpg
    IMG_3083.jpg
    61.9 KB · Views: 284
  • IMG_3090.JPG
    IMG_3090.JPG
    143.1 KB · Views: 293
  • IMG_3089.jpg
    IMG_3089.jpg
    56.4 KB · Views: 274
  • IMG_3087.jpg
    IMG_3087.jpg
    57.4 KB · Views: 277
  • IMG_3086.jpg
    IMG_3086.jpg
    57 KB · Views: 270
  • IMG_3085.JPG
    IMG_3085.JPG
    131.3 KB · Views: 253
  • IMG_3084.jpg
    IMG_3084.jpg
    55.4 KB · Views: 259
To avoid these ads, REGISTER NOW!
OP
P

phred

Well-known member
Joined
Apr 23, 2009
Messages
525
Location
NC
More framing shots. you cans see its getting pretty imposing from the rear and how close we are to the trees. We had some pretty bad storms since completion and the tree that is closest to the building barely moves. Yes it could hit the shop, but even if I had taken that one down the other around it could fall in a storm and do the same amount of damage.
 

Attachments

  • DSCN0878.jpg
    DSCN0878.jpg
    112.3 KB · Views: 240
  • DSCN0877.jpg
    DSCN0877.jpg
    105.4 KB · Views: 256
  • DSCN0876.jpg
    DSCN0876.jpg
    107.6 KB · Views: 271
  • DSCN0873.jpg
    DSCN0873.jpg
    124.9 KB · Views: 309
  • DSCN0871.jpg
    DSCN0871.jpg
    123.4 KB · Views: 285
  • DSCN0870.jpg
    DSCN0870.jpg
    116 KB · Views: 258
  • DSCN0868.jpg
    DSCN0868.jpg
    130.2 KB · Views: 261

SouthernGemini

Well-known member
Joined
Jul 7, 2013
Messages
50
Location
St Tammany Parish, LA
Thanks so much for putting detailed pics of the 'pan on beam' method of concrete floor. I am is discussions with my structural steel guy currently and this is the method we are going with. I investigated different methods and the simplicity and ability to overbuild with this type of assembly won out.

I will be using lightweight concrete (pea style as per Parish Concrete) b/c will be OVER my garage, not parking on it. And it will have radiant cooling. Your pictures are a help.
 
OP
P

phred

Well-known member
Joined
Apr 23, 2009
Messages
525
Location
NC
Here are a few more framing shots. You can see in one shot the pop up. The blocking is for the mini split that will provide heating and cooling. Cooling is most important in Atlanta when the humidity is 65% and the air temp is 95. I've worked in the heat for too many years. The mini-split is worth every penny. Its a 2.5 ton and it keep the shop a comfortable 70 degrees easily. The panel is only a 100amp. One of the members of the variance review board was adamant that I install a small panel so it cant be converted to a living area. Luckily 100 amps actually works fine since all the lighting will be super efficient LED.
 

Attachments

  • DSCN0890.jpg
    DSCN0890.jpg
    116.2 KB · Views: 200
  • DSCN0894.jpg
    DSCN0894.jpg
    97.1 KB · Views: 195
  • IMG_3097.JPG
    IMG_3097.JPG
    111.1 KB · Views: 197
  • DSCN0888.jpg
    DSCN0888.jpg
    90.6 KB · Views: 194
  • DSCN0886.jpg
    DSCN0886.jpg
    127.3 KB · Views: 213
  • IMG_3093.JPG
    IMG_3093.JPG
    116.5 KB · Views: 186
  • IMG_3091.JPG
    IMG_3091.JPG
    142.7 KB · Views: 211
OP
P

phred

Well-known member
Joined
Apr 23, 2009
Messages
525
Location
NC
Thanks so much for putting detailed pics of the 'pan on beam' method of concrete floor. I am is discussions with my structural steel guy currently and this is the method we are going with. I investigated different methods and the simplicity and ability to overbuild with this type of assembly won out.

I will be using lightweight concrete (pea style as per Parish Concrete) b/c will be OVER my garage, not parking on it. And it will have radiant cooling. Your pictures are a help.


This floor is solid and has very little vibration. It does however vibrate if you happen to let a 35" duratrac tire and wheelslip out of your hand from 4 feet up.
 
Last edited:

fatkidracer

Well-known member
Joined
May 3, 2011
Messages
54
Location
DuBois, PA
The panel is only a 100amp. One of the members of the variance review board was adamant that I install a small panel so it cant be converted to a living area.

wow, again i am glad i live in the country! thank you again for sharing this build it is helping a lot of us with sloped lots!
 
OP
P

phred

Well-known member
Joined
Apr 23, 2009
Messages
525
Location
NC
Been out of town for thanksgiving. Just now catching up on work and emails. Finally found some time to post up some more of the build photos. I hate not having receptacles where I need them. I putting them 8 feet on center down each side wall, six across the rear wall. A couple in the office for my fridge, computer, microwave and wireless router. There will be 4 underneath the building and 1 exterior by the entry door. The compressor, welder, plasma cutter, lift and forklift will all have dedicated receptacles. Here the beginnings of the wiring.
My BigAss Light arrived. Wow these things are well built. Only pull 1.2 amps and 6 of these equal 21 double tube 4' fluorescents. Yeah they are expensive individually but when you do the math they are actually a little cheaper for the same amount of light and the quality of the light is so much better. The lights are 425 each. only draw 7.2 amps total. 21 fluorescents are about 50 bucks each and draw nearly 80 amps total. I can use a smaller panel, smaller service, poor bills will be less. never need to change the bulb and they don't loose lumens as they age. Plus the wiring cost is lower since I only need 6 ceiling receptacles and all on a 15 amp breaker. I actually saved about 100 bucks using these 6 fixtures over the 21 that we figured would be necessary to get the foot candles I wanted. BigAss lights even did a photometrics study to help me place the lights for optimal coverage.
The roofers arrived saturday morning at 730. They hit it hard, 3 tab shingles on the 4/12 section and torch down on the 2/12. All flashed, and completed by 1200. Theses guys didnt slow down. Now its completely dried in and we can finalize the electrical and plumbing.
 

Attachments

  • DSCN0900.jpg
    DSCN0900.jpg
    78 KB · Views: 172
  • DSCN0898.jpg
    DSCN0898.jpg
    75.1 KB · Views: 179
  • DSCN0901.jpg
    DSCN0901.jpg
    78 KB · Views: 180
  • DSCN0896.jpg
    DSCN0896.jpg
    72 KB · Views: 176
  • IMG_3100.JPG
    IMG_3100.JPG
    98 KB · Views: 204
  • DSCN0893.jpg
    DSCN0893.jpg
    97.3 KB · Views: 167
  • DSCN0891.jpg
    DSCN0891.jpg
    91.8 KB · Views: 174
OP
P

phred

Well-known member
Joined
Apr 23, 2009
Messages
525
Location
NC
I don't use the occupancy sensor. They are chain hung from j-hooks. They come with a a 10' cord with a plug. You can hardware them if you wish. It doesn't affect the warranty. I left the plug on so I could adjust them in the future if I see a need. They provide great pure white light. Great for detailing a car. Almost like sun light. I am going to add one more light as one of my trucks is pretty large and it casts a shadow when I have it in the shop.


Sent from my iPhone using Tapatalk
 
OP
P

phred

Well-known member
Joined
Apr 23, 2009
Messages
525
Location
NC
Dried in and siding going on. The main house is a 1920's brick bungalow with stucco accents. We wanted to make the shop blend but brick would look silly on the elevated structure audit would break the budget. We opted to use stucco patterned hardiboard and hardiboard battens to use match he stucco accents on the house. There are some pretty cool brackets and details on the main house and I wanted to mimic as much detail as I could and without over doing it. The contractor had a bunch of cypress brackets left over from another job sitting in his warehouse. He made me a deal on them. They milled them down to size and bam I had real brackets.
We ran a 1" PEX water line over from the house for the sink and hose bibb.
 

Attachments

  • IMG_3102.JPG
    IMG_3102.JPG
    91.5 KB · Views: 189
  • IMG_3101.JPG
    IMG_3101.JPG
    112.3 KB · Views: 189
  • DSCN0918.jpg
    DSCN0918.jpg
    112.7 KB · Views: 205
  • DSCN0914.jpg
    DSCN0914.jpg
    105.8 KB · Views: 221
  • DSCN0916.jpg
    DSCN0916.jpg
    101.5 KB · Views: 187
  • DSCN0910.jpg
    DSCN0910.jpg
    129.7 KB · Views: 195
  • DSCN0904.jpg
    DSCN0904.jpg
    115 KB · Views: 195
OP
P

phred

Well-known member
Joined
Apr 23, 2009
Messages
525
Location
NC
Heres the PEX (blue tube) and more brackets. I like the brackets. They really did a bang up job. They put crown between each bracket, again to mimic some of the details of the house.
 

Attachments

  • DSCN0920.jpg
    DSCN0920.jpg
    81 KB · Views: 159
  • DSCN0919.jpg
    DSCN0919.jpg
    78.9 KB · Views: 151
  • IMG_3121.JPG
    IMG_3121.JPG
    128.5 KB · Views: 154
  • IMG_3119.jpg
    IMG_3119.jpg
    46.4 KB · Views: 139
  • IMG_3118.jpg
    IMG_3118.jpg
    49 KB · Views: 131
  • IMG_3117.jpg
    IMG_3117.jpg
    51.5 KB · Views: 141

@e91kiter

Well-known member
Joined
Oct 12, 2016
Messages
79
Location
Milton, Ontario
Very cool build! Reminds me of Ferris Bueller's day off.

camerons-house2.jpg
 

SouthernGemini

Well-known member
Joined
Jul 7, 2013
Messages
50
Location
St Tammany Parish, LA
I appreciate how you cut your eave around the tree. I love my trees and my carport was very close to a large pine that I would NOT cut down. I built my eave around the tree and my friends thought I was silly. 7 years later it looks great but the tree has grown in width some so I needed to cut the roofing material back a few inches a year ago. Well worth it to get the most size out of my carport and keep my tree! :rocker:
 
OP
P

phred

Well-known member
Joined
Apr 23, 2009
Messages
525
Location
NC
Yeah my back yard is an oasis. Living in town I wanted to keep as much tree canopy as possible. This was the best solution.


Sent from my iPhone using Tapatalk
 
OP
P

phred

Well-known member
Joined
Apr 23, 2009
Messages
525
Location
NC
This spring I hope to redo all the rear landscaping and build the patio under the shop for entertaining. We'll have to wait and see how bad my taxes are come February. The drought has reduced the rear yard to a dust bowl. My dogs play back there and there is very little ground level vegetation left.


Sent from my iPhone using Tapatalk
 
OP
P

phred

Well-known member
Joined
Apr 23, 2009
Messages
525
Location
NC
Framing and rough electrical passes. Now insulation. No batts here. Spray foam
e062037c4767630b64e5dc36d4df5f88.jpg
3ab585285d934e6705012e64e76888dd.jpg
7af3f13b387fc56852a78644ca66c804.jpg
c411c8d7685866fded60b1efaeaa6f15.jpg

We sprayed everything including the underside of the metal pan. It's like a cooler in there. Cool in the summer and warm in the winter. It was so quiet before we installed the plywood on the walls. More pics to follow


Sent from my iPhone using Tapatalk
 

hpw

Well-known member
Joined
Oct 7, 2007
Messages
989
love the foam....more info.? How much(if u don't mind me asking)?
 
To avoid these ads, REGISTER NOW!
OP
P

phred

Well-known member
Joined
Apr 23, 2009
Messages
525
Location
NC
The foam cost about 1.35/sf. The foam guys had the job done in about 3 hours including insulating the ceiling of the basement where we dug out. We thought long and hard about how to insulate the slab. We finally decide foam was going to be best. The only issue is keeping pests out of the foam. We ended up skinning the entire underside of the shop with hardboard panels with battens similar to the sides. More on that when we get to that.
 

Attachments

  • DSCN0912.jpg
    DSCN0912.jpg
    84.6 KB · Views: 219
  • DSCN0917.jpg
    DSCN0917.jpg
    97.3 KB · Views: 224
  • DSCN0923.jpg
    DSCN0923.jpg
    85.1 KB · Views: 204
  • DSCN0922.jpg
    DSCN0922.jpg
    75.3 KB · Views: 197
  • DSCN0921.jpg
    DSCN0921.jpg
    79.1 KB · Views: 201
OP
P

phred

Well-known member
Joined
Apr 23, 2009
Messages
525
Location
NC
The insulation on the underside went on about 4" thick. In hindsight adding some resistance heating elements in the floor would have been a good idea and fairly inexpensive. The shop stays nice and warm in the winter with the 2.5 ton minisplit but the slab cools quickly and is slow to warm up. We don't see extreme cold but if it's in the 20's for a few days the slab will get down to about 50. That's pretty cold on your feet, even with boots if you are on it for extended periods. I don't run the heat or ac round the clock since Im only working in there 3 days a week. I could have put in a 500 sq section of wire down the middle of the floor for about 2500. This would have helped take the edge off on those really cold days. Lesson learned.


Sent from my iPhone using Tapatalk
 

jvitez

Well-known member
Joined
Nov 30, 2009
Messages
2,429
Location
Big Sky Country, Canada
Amazing work! Thanks for posting. Good thing you're in the business, as I know I wouldn't have had the patience to deal with all the obstacles you met.

One thing though: looking at the pics of the block walls going up, I couldn't help but think of the Cask of Amontillado.....:)
 
OP
P

phred

Well-known member
Joined
Apr 23, 2009
Messages
525
Location
NC
One thing though: looking at the pics of the block walls going up, I couldn't help but think of the Cask of Amontillado.....:)[/QUOTE]

Ha Ha thats good, It does kinda feel that way now that I think about it.
 

C_F

ALLIANCE MEMBER
Joined
Jan 21, 2005
Messages
9,675
Location
Utah...SNOW BLOWS!
I just ran across your thread today...WOW, it's great! Thanks for sharing your build with us all.:thumbup:

And e91kiter is right, it does remind me of Ferris Bueller's garage in a way.:lol:
 
OP
P

phred

Well-known member
Joined
Apr 23, 2009
Messages
525
Location
NC
I've got something shiny and red living in there now. It's 42 years old.
e756270a4b9481ac0a4e8190d246f836.jpg


Sent from my iPhone using Tapatalk
 
OP
P

phred

Well-known member
Joined
Apr 23, 2009
Messages
525
Location
NC
Thanks. Here's his big brothers
05f945e73ec401a4cd0e9c8f5c2f7299.jpg


Sent from my iPhone using Tapatalk
 

madoc1

Well-known member
Joined
Dec 11, 2012
Messages
1,242
Location
spicewood, tx
very nice shop and very nice trucks. your 42 yo looks nicer than my 41 yo fj40! one question-the last support beam in the middle rear, when was that added and did you have a large foundation for it also. couldn't find it in any of the pics. is that the bunp out for the minisplit? any way, nice job.

jim
 

karlhungus

Well-known member
Joined
Nov 29, 2010
Messages
73
Location
Niwot, Colorado
I love this thread, looking forward to more updates. Very unique. I humbly suggest a window or two to really give that "flying" feeling when inside. Not like they would be a security risk.
 
OP
P

phred

Well-known member
Joined
Apr 23, 2009
Messages
525
Location
NC
very nice shop and very nice trucks. your 42 yo looks nicer than my 41 yo fj40! one question-the last support beam in the middle rear, when was that added and did you have a large foundation for it also. couldn't find it in any of the pics. is that the bunp out for the minisplit? any way, nice job.


jim


The middle column in rear went up when the rest of the steel went in I just didn't get a good shot of it. It's footing is about 4x4x2 primary due to poor soils. It supports the little 4x8 bump out I use as an office.

I thought about windows but decided against them for cost reasons and I wanted the wall space plus they would get dirty and I hate cleaning windows especially ones that high.


Sent from my iPhone using Tapatalk
 
OP
P

phred

Well-known member
Joined
Apr 23, 2009
Messages
525
Location
NC
I hate Sheetrock. I hate working with it. I hate the crappy finish it provides and especially hate that you have to look for studs if you want to hang anything on the wall. OSB looks like, well OSB no matter what you do to it. I decided to use mdo plywood for the walls and ceiling because it is slick, takes paint well and you can put a nail or screw where ever you want. It cost about the same as drywall and went up way faster. With. 10' plate I didn't want a 2' strip of plywood so I came up with a way to run base and crown that eliminated the need for the strip.
b59369c1e498b4293cdf752c3bcc4f9b.jpg
2d5005c73ad46ae3d511b660f9d723dd.jpg
194e38a7b9d0ca737d3df97ae95c269d.jpg
9080200c8a24a4074d58fae17029727e.jpg


Sent from my iPhone using Tapatalk
a08483f67d2c8974c6a5f755aef9b15e.jpg


I used the 2x12 as a base board because I know I will bang my jacks or welding table against the wall if I don't have something to act as a bumper. The 2x's are screwed in and can be replaced if damaged and can take the abuse. The 1x6's make up the other foot and provide additional thickness should I ever decide I want mount something heavy on the wall at the top or mid-line
 
Last edited:
OP
P

phred

Well-known member
Joined
Apr 23, 2009
Messages
525
Location
NC
I did lots of sketches for details and general info for myself and the contractor. I keep a sketch book with all the time to keep ideas fresh and help me workout details for fab work or new designs before I try to build something. Here are some more from the garage sketch book
837219e14f8fc63cdb37c8bb95ca02ea.jpg
697bb926499a4cd06f2c9df353899798.jpg
9b4f586e388321318b1b975a43a054aa.jpg
3aa825f5ddd6a4f92cd3354adb3cc075.jpg
2280fe242a1afcca34464604709e5896.jpg


Sent from my iPhone using Tapatalk
 
OP
P

phred

Well-known member
Joined
Apr 23, 2009
Messages
525
Location
NC
Thanks ajohno.
All the interior mdo is installed and the painting has started, office door track installed and started finishing the new space under the house attached to the existing garage.
The underside of the shop is now finally enclosed with hardipanels to protect the insulation.
 

Attachments

  • IMG_3175.JPG
    IMG_3175.JPG
    117.1 KB · Views: 153
  • IMG_3173.jpg
    IMG_3173.jpg
    55.7 KB · Views: 162
  • IMG_3171.JPG
    IMG_3171.JPG
    100.2 KB · Views: 157
  • IMG_3156.JPG
    IMG_3156.JPG
    70.4 KB · Views: 146
  • IMG_3153.JPG
    IMG_3153.JPG
    66.3 KB · Views: 142
  • IMG_3152.JPG
    IMG_3152.JPG
    61.9 KB · Views: 143
  • IMG_3145.JPG
    IMG_3145.JPG
    68.6 KB · Views: 140
OP
P

phred

Well-known member
Joined
Apr 23, 2009
Messages
525
Location
NC
Sorry about the upside down photos. I thought I had that fixed. Anyway the painting continues and the first new toy arrives! yep thats a Mohawk A7 modified for infloor hydraulic connections.
The big *** light are also installed and I started putting in some the cabinets.
 

Attachments

  • IMG_3180.JPG
    IMG_3180.JPG
    66.7 KB · Views: 115
  • IMG_3179.JPG
    IMG_3179.JPG
    133.9 KB · Views: 111
  • IMG_3177.JPG
    IMG_3177.JPG
    139.4 KB · Views: 110
  • IMG_3168.JPG
    IMG_3168.JPG
    89.7 KB · Views: 113
  • IMG_3154.JPG
    IMG_3154.JPG
    60.3 KB · Views: 114
  • IMG_3153.JPG
    IMG_3153.JPG
    66.3 KB · Views: 108
  • IMG_3181.JPG
    IMG_3181.JPG
    65 KB · Views: 127
OP
P

phred

Well-known member
Joined
Apr 23, 2009
Messages
525
Location
NC
Here are some photos of the shop with the lights on and off for a comparison
1fac994a20b01e66f0c3bc4225e4b262.jpg
2524da891778c903f34a1c42c4e89753.jpg
751e91e3f75816f52d83a079a1c4f7e6.jpg
f44d017cec2b1d3ed9f0192a89ef6db7.jpg

Pretty amazing for 6 fixtures that only pull 7.2 amps total.
We painted everything gloss white to help reflect as much light as possible. This also will make it easier to clean the walls since they are slick. Before I moved in I went back and repainted the bottom 4' of the walls with rustoleum oil based metal coating in gloss white. It's tougher than the oil based house paint and has a higher gloss. The lower half of the wall will take the most abuse from tools, people leaning in them with greasy clothes and hand etc.


Sent from my iPhone using Tapatalk
 
To avoid these ads, REGISTER NOW!
Top Bottom