To avoid these ads, REGISTER NOW!

The Flying Shop

To avoid these ads, REGISTER NOW!
OP
P

phred

Well-known member
Joined
Apr 23, 2009
Messages
525
Location
NC
You'll really like it. I need one more light. If I have all 4 trucks in the shop there are shadows by the big doors. One more light centered over the door should solve that problem. Its amazing how much more light I need now compared to when I was 40 yrs old


Sent from my iPhone using Tapatalk
 
OP
P

phred

Well-known member
Joined
Apr 23, 2009
Messages
525
Location
NC
Well it was time to start reconfiguring the driveway and parking pad so we can have access to both the existing garage and the new shop. The drive and parking pad were a patchwork of pours dating from the early 1930's to date. We expanded the pad about 8 more feet to get have a better turn around area. By the time we reshaped to lower pad to get water to flow there was not much left to save. We cut back the rear of the parking area and poured a footing for a new retaining wall while we were at it
 

Attachments

  • IMG_3185.jpg
    IMG_3185.jpg
    53.9 KB · Views: 131
  • IMG_3191.JPG
    IMG_3191.JPG
    136.4 KB · Views: 117
  • IMG_3190.jpg
    IMG_3190.jpg
    63.5 KB · Views: 112
  • IMG_3189.jpg
    IMG_3189.jpg
    59.9 KB · Views: 105
  • IMG_3188.jpg
    IMG_3188.jpg
    52.7 KB · Views: 99
  • IMG_3187.JPG
    IMG_3187.JPG
    140.7 KB · Views: 101
  • IMG_3186.jpg
    IMG_3186.jpg
    62.6 KB · Views: 111
OP
P

phred

Well-known member
Joined
Apr 23, 2009
Messages
525
Location
NC
Ok can someone tell me how fix the upside down photos???
 
OP
P

phred

Well-known member
Joined
Apr 23, 2009
Messages
525
Location
NC
yeah they were but I saved them in the correct orientation. When I post them they revert back to the old way.
 
OP
P

phred

Well-known member
Joined
Apr 23, 2009
Messages
525
Location
NC
Well I tried reformatting the photos so we'll wee if these work.
We got the old driveway removed and the new retaining wall in. Time to form and pour. Like everything we did I wanted to make sure the driveway was solid and will not break if I bring in a heavy vehicle. We put down 4" of 57 stone, #4 bars 12" on center each way and 4000 psi concrete with fiber. Over kill I know for a residential drive but I often have dually f250's, 350's and the occasional service truck down the drive and the driveway edges crack and break. I didn't want that to happen again. We thickened up the drive alone the edges to 6"+/- and the apron in front of the shop is about 10" thick because of the recess for the sliding door track.
 

Attachments

  • IMG_3245.JPG
    IMG_3245.JPG
    101 KB · Views: 72
  • IMG_3243.JPG
    IMG_3243.JPG
    101.2 KB · Views: 73
  • IMG_3239.JPG
    IMG_3239.JPG
    104.2 KB · Views: 69
  • IMG_3238.jpg
    IMG_3238.jpg
    57.5 KB · Views: 69
  • IMG_3198.jpg
    IMG_3198.jpg
    66 KB · Views: 67
  • IMG_3197.JPG
    IMG_3197.JPG
    116.7 KB · Views: 62
  • IMG_3195.jpg
    IMG_3195.jpg
    54.1 KB · Views: 66
OP
P

phred

Well-known member
Joined
Apr 23, 2009
Messages
525
Location
NC
Time to do some interior work while the driveway cures out. Added a built-in desk in the little office. Added some more shelves to the rear wall of cabinets. Started installing the Maxair air lines. I went with the 3/4" lines. The cost was not much more than the 1/2" stuff and I liked the compression fittings better than the press in fittings. Made a water trap and drain from iron pipe. Of course the local big box store's pipe threader was broken so i had to use what they had in stock so the diameter of the main drop is not as large as I wanted but it actually works pretty well in the humid south.
Started the data, cable and security connections to the main house.
 

Attachments

  • IMG_3265.JPG
    IMG_3265.JPG
    84.7 KB · Views: 85
  • IMG_3258.JPG
    IMG_3258.JPG
    67 KB · Views: 84
  • IMG_3257.JPG
    IMG_3257.JPG
    99.2 KB · Views: 81
  • IMG_3256.JPG
    IMG_3256.JPG
    65.7 KB · Views: 74
  • IMG_3254.JPG
    IMG_3254.JPG
    42.3 KB · Views: 77
  • IMG_3202.JPG
    IMG_3202.JPG
    64.9 KB · Views: 83
  • IMG_3200.JPG
    IMG_3200.JPG
    77.3 KB · Views: 108

fergus

Well-known member
Joined
Oct 4, 2009
Messages
1,620
Location
Yolo County CA
Cool build. I like the MDO plywood interior walls. I may have to use that someday if/when I finish the inside of my shop.
 
To avoid these ads, REGISTER NOW!
OP
P

phred

Well-known member
Joined
Apr 23, 2009
Messages
525
Location
NC
Well the big day finally arrived. Installation of the Mohawk lift. The job superintendent and an ironworker friend and myself took a day to install this beast. We used my electric forklift to lift and set the columns in place. The steel frame was designed for the columns to sit directly over on of he main beams. We drilled through the slab and put 1/4" thick plates on the underside. No way for the 1" grade 8 threaded rods to pull out. We only need a couple very thin shims to get the columns perfectly plumb. In hind sight it would have been cheaper to have Mohawk install the lift as it took the 3 of us a full 9 hours to get everything set, plumb and bolted down and I spent another 12 hours installing the arms, electrical cable, inflow hydraulic lines, and testing the system. I learned the lift well and can now service it myself if need be.
 
OP
P

phred

Well-known member
Joined
Apr 23, 2009
Messages
525
Location
NC
well **** the pics didn't show up lets try again.
 

Attachments

  • IMG_3277.jpg
    IMG_3277.jpg
    78.9 KB · Views: 131
  • IMG_3276.jpg
    IMG_3276.jpg
    69.9 KB · Views: 118
  • IMG_3275.JPG
    IMG_3275.JPG
    81 KB · Views: 115
  • IMG_3274.jpg
    IMG_3274.jpg
    63.4 KB · Views: 119
  • IMG_3273.jpg
    IMG_3273.jpg
    58.2 KB · Views: 114
  • IMG_3272.jpg
    IMG_3272.jpg
    55.5 KB · Views: 108
  • IMG_3271.jpg
    IMG_3271.jpg
    66.2 KB · Views: 108
OP
P

phred

Well-known member
Joined
Apr 23, 2009
Messages
525
Location
NC
Added the arms and give it a first test.

The arms are crazy heavy. About 250 each assembled and the bolts are nothing to laugh at.
 

Attachments

  • IMG_3279.jpg
    IMG_3279.jpg
    65.9 KB · Views: 80
  • IMG_3280.jpg
    IMG_3280.jpg
    74.8 KB · Views: 95
  • first flight.jpg
    first flight.jpg
    142.5 KB · Views: 97
Last edited:
OP
P

phred

Well-known member
Joined
Apr 23, 2009
Messages
525
Location
NC
Installed the wash sink and water heater. installed the water trap and regulator.
Started the install of the mini split heat pump. First the wall brackets and then a pulley system to lift the compressor into place.
You will all be glad to know that I didn't actually use the pulley system to lift the compressor. I had a couple buddies from the gym come over and they just pressed it up there. Its handy to know guys that can squat 500 lbs and overhead press 250. They made it look easy and it was way safer.
 

Attachments

  • IMG_3307.JPG
    IMG_3307.JPG
    117.6 KB · Views: 102
  • IMG_3296.JPG
    IMG_3296.JPG
    95.2 KB · Views: 81
  • IMG_3287.jpg
    IMG_3287.jpg
    54.2 KB · Views: 85
  • IMG_3286.jpg
    IMG_3286.jpg
    47.8 KB · Views: 82
  • IMG_3285.jpg
    IMG_3285.jpg
    45 KB · Views: 89
OP
P

phred

Well-known member
Joined
Apr 23, 2009
Messages
525
Location
NC
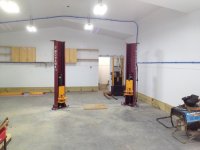
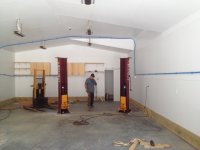
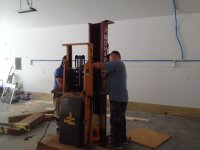
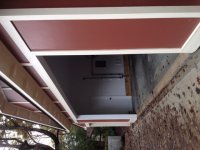
Now its time to start the longest most complex and frustrating part of the build. The sliding doors. I didn't want a big over head door that would block the overhead lights when it was open or reduce the ceiling height. So I looked at barn doors, sliding doors, carriage doors, and coiling overhead doors. All had the pros and cons. I liked the barn door look but they don't seal or secure well. Carriage doors are beautiful. Are easy too seal and secure but large openings tend to have issues with sagging. Coming overhead doors have one con. They are ugly. Sliders are a good compromise but can be heavy. I talked to hanger door manufacturers to see about having some tabbed but the size I needed was not efficient or cost effective. The steel fabricator that put up the steel frame said he could make the tracks, rollers and frames for me for $4500 and he would install the tracks and set the frames inplace. That seemed like a fair price for custom frames and track. All I would need to do is put the skins on and install all the weather strip. We agreed on the design and cost in April. The driveway was poured in August with he blackout for the lower track. The track and doors didn't arrive until November. One thing after another kept getting in the way. Big job out of town kept him out of the shop. He hurt his back, someone was sick. All legit reasons but I needed doors. I started hunting other fab shops to complete the work. I was willing to buy what was started and have some one else finish it up. Finally all the pieces arrive and I paid the cost of the fab work and did the install myself so I could close in the shop and finish the interior work.
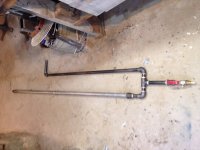
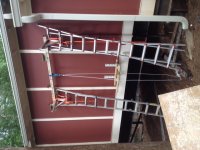
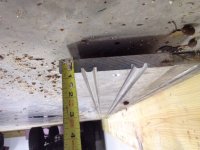
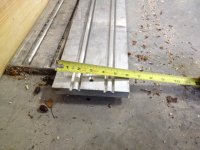
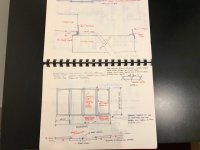
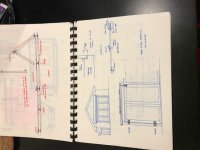
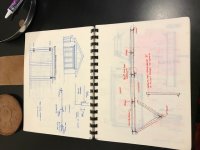
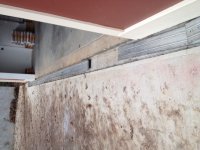
Here are some sketches of different door designs we discussed. The custom lower track milled from 6061 aluminum, and the recess in the driveway slab for the track.
 

Attachments

  • IMG_3500.JPG
    IMG_3500.JPG
    106.6 KB · Views: 70
  • IMG_3497.JPG
    IMG_3497.JPG
    113.2 KB · Views: 59
  • IMG_3495.jpg
    IMG_3495.jpg
    94.4 KB · Views: 61
  • IMG_4306.JPG
    IMG_4306.JPG
    65.9 KB · Views: 62
  • IMG_4299.JPG
    IMG_4299.JPG
    67.1 KB · Views: 58
  • IMG_4298.JPG
    IMG_4298.JPG
    69 KB · Views: 54
  • IMG_4297.JPG
    IMG_4297.JPG
    69.5 KB · Views: 68
OP
P

phred

Well-known member
Joined
Apr 23, 2009
Messages
525
Location
NC
We did take in photos of the track install. I guess I was to anxious to actually get doors up that I just forgot. The 2" deep by 8" wide recess allows us to have the bottom track flash with the driveway slab and the shop slab. I need to be able to roll my fork lift, press and other heavy tools into the shop. Any kind of lip would be a problem. I spent the better part of a day getting the 3 10' sections of track aligned and level. I used CH Lawrence mini shims to get the fine adjustment I needed. Once all the track was level and secured with concrete anchors ww mixed up non-shrink grout and poured the recess full. The recess too about 10 50lb bags of grout to fill. Thats a lot of grout mixed 5 gallons at a time
 

Attachments

  • IMG_3717.JPG
    IMG_3717.JPG
    117.8 KB · Views: 96
OP
P

phred

Well-known member
Joined
Apr 23, 2009
Messages
525
Location
NC
Thanks hewey. Unfortunately we had to move for work and the “flying shop” and the house now belong to someone else. Last I heard the shop had been converted in to an apartment, the one thing the city told me I could not do!. I guess I didn’t grease the right palms?! Anyway I’ve got a new shop at a new place. Here’s a link to the new build thread. https://www.garagejournal.com/forum...de-or-the-opposite-of-the-flying-shop.506790/

It’s still in progress as they always seem to be.
 
OP
P

phred

Well-known member
Joined
Apr 23, 2009
Messages
525
Location
NC
Yeah I really liked that build. The shop was perfect for what I had at the time and was well thought out given the constraints of the site and lot. My new shop is twice as large and is jammed full of stuff. More tools of course and currently I have 4 trucks in it with room to wrench on all 4. Typical I wish I had done things differently but every build is a leaning experience.
 
To avoid these ads, REGISTER NOW!
Top Bottom