
You are using an out of date browser. It may not display this or other websites correctly.
You should upgrade or use an alternative browser.
You should upgrade or use an alternative browser.
The Gearhead Garage
- Thread starter EarlyBroncoGuy
- Start date
OP
EarlyBroncoGuy
King Of The World
- Joined
- Aug 15, 2013
- Messages
- 921
2/1/2014
Weather has been a real roller coaster here the past few weeks, from 80 down to the teens (and snow), back to 70's - plus wind from south and north. The construction crew had some tough days, but they got it done.
Just before they got the roof done, a major cold front came through, with temps in the teens and snow. Normal Janurary weather for most of the country, but down here in central Texas, it's a pretty big deal. Not too often you get snow inside your shop:

And a little outside:

Just a few days later, it was back in the 70's and they knocked the roof and doors out in 2 days.

That's our large main dog standing guard on the BendPak lift that was just delivered.

..and our small, emergency back-up dog inspecting the concrete inside.

Single back door, showing the trailer I backed into with the Bobcat and broke the coupler on

There are a few minor things to get done (remove roof insulation from under skylights, adjust door tracks, etc), but it's pretty much done. Now I need to run electricity to it, get some lights up, and start moving stuff in.
Weather has been a real roller coaster here the past few weeks, from 80 down to the teens (and snow), back to 70's - plus wind from south and north. The construction crew had some tough days, but they got it done.
Just before they got the roof done, a major cold front came through, with temps in the teens and snow. Normal Janurary weather for most of the country, but down here in central Texas, it's a pretty big deal. Not too often you get snow inside your shop:
And a little outside:
Just a few days later, it was back in the 70's and they knocked the roof and doors out in 2 days.
That's our large main dog standing guard on the BendPak lift that was just delivered.
..and our small, emergency back-up dog inspecting the concrete inside.
Single back door, showing the trailer I backed into with the Bobcat and broke the coupler on
There are a few minor things to get done (remove roof insulation from under skylights, adjust door tracks, etc), but it's pretty much done. Now I need to run electricity to it, get some lights up, and start moving stuff in.
shinertx
Active member
looks good, just built me a 50' x 50' x 16' walls last year still trying to finish it.
1/2 Cup
Member Emeritus
Wow, your build looks great, thanks for the update.
Neno330
New member
beautiful
metalhead140
Well-known member
Now that's a nice big empty space... Looking forward to seeing it kitted out!
BrownEnterprises
Well-known member
Looking good. Plan on the exact same size building in the future. Will be watching this one.
OP
EarlyBroncoGuy
King Of The World
- Joined
- Aug 15, 2013
- Messages
- 921
2/19/14
Building shell is done, Bend Pak XPR-10A is installed, but don't have any power run to the shop yet, so I can't play with it - so I started moving stuff in.

Most of the toys in their new home in the corner - TRX70, 125M, 200x, 250r, 350X, a 200m I built into a quad with 450r and 400ex parts, minibike, bobber project, etc. 200X is my current rider, 250r is current project bike, and 350x is waiting it's turn.

Getting those columns into place was fun with the Bobcat, pretty much maxed out the height of the bucket, but it worked. Lift is centered on rear door opening, 12' back.

That's my '70 Bronco project hiding back in the corner - it looks like ****, I know, it was sitting out under a tarp for way too long during the move and the shop build. I had already removed and sold the rear 9" axle before we moved, had to stick the full width, 8 lug Dana 60 under there just to roll it. It'll be going on the lift soon to get the body off the frame. Roll cage looks funky because it's not installed, just sitting in the tub for now.
The corner to the left (just over bed of the UTV in the photo) will be enclosed, room will measure 8' tall, 14' x 20'. Overhead of that will be a loft area for parts storage to get all the boxes off the floor and out of my way. The corner to the right (where the Bronco is) will be workbench area, with benches along the walls, wall cabinets over them, and a large worktable in the middle. Might run a loft over that corner also, not sure yet.

The skylight panels let in more light than I thought they would - during the day, I won't need any lights on to work, even with no windows.

Building shell is done, Bend Pak XPR-10A is installed, but don't have any power run to the shop yet, so I can't play with it - so I started moving stuff in.
Most of the toys in their new home in the corner - TRX70, 125M, 200x, 250r, 350X, a 200m I built into a quad with 450r and 400ex parts, minibike, bobber project, etc. 200X is my current rider, 250r is current project bike, and 350x is waiting it's turn.
Getting those columns into place was fun with the Bobcat, pretty much maxed out the height of the bucket, but it worked. Lift is centered on rear door opening, 12' back.
That's my '70 Bronco project hiding back in the corner - it looks like ****, I know, it was sitting out under a tarp for way too long during the move and the shop build. I had already removed and sold the rear 9" axle before we moved, had to stick the full width, 8 lug Dana 60 under there just to roll it. It'll be going on the lift soon to get the body off the frame. Roll cage looks funky because it's not installed, just sitting in the tub for now.
The corner to the left (just over bed of the UTV in the photo) will be enclosed, room will measure 8' tall, 14' x 20'. Overhead of that will be a loft area for parts storage to get all the boxes off the floor and out of my way. The corner to the right (where the Bronco is) will be workbench area, with benches along the walls, wall cabinets over them, and a large worktable in the middle. Might run a loft over that corner also, not sure yet.
The skylight panels let in more light than I thought they would - during the day, I won't need any lights on to work, even with no windows.
Last edited:
Crusher47
Well-known member
Looks great so far!
OP
EarlyBroncoGuy
King Of The World
- Joined
- Aug 15, 2013
- Messages
- 921
3/19/14
Got the corner "office" all framed up, just need to get the 2x10x14 joists to go over it to give me a floor for the storage loft.

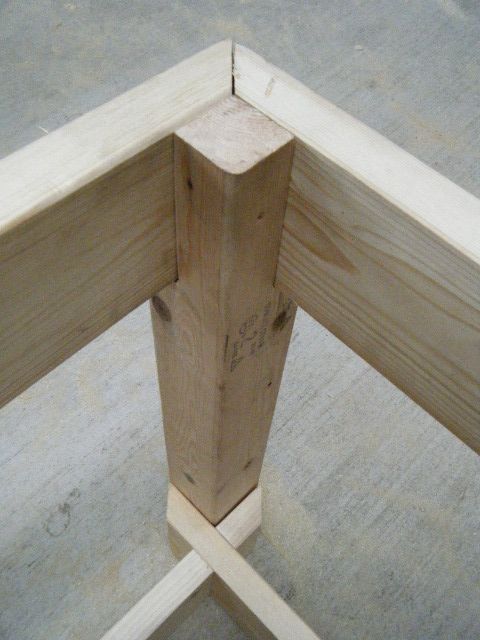
Got the framed doors from a building supply recycling place for cheap - both are steel, insulated, one with window, the other one just plain. The long wall with the window door in it is 2x6, since it will supporting the weight of the joists. The corner post is 4"x6"x12', the additional height gives me a nice sturdy corner post for the railing around the upper floor, plus I might bolt one of the those truck bed cranes to it to lift heavy or bulky items up that I don't want to carry up the stairs. Speaking of stairs, they will be from left to right, starting at the corner post and ascending up the side wall, just clearing the door. You can see the wood scraps nailed to the studs behind the Dewalt drill on the workbench that give me an idea of the spacing, run, and rise of each step. Under the stairs will be an enclosed storage space.
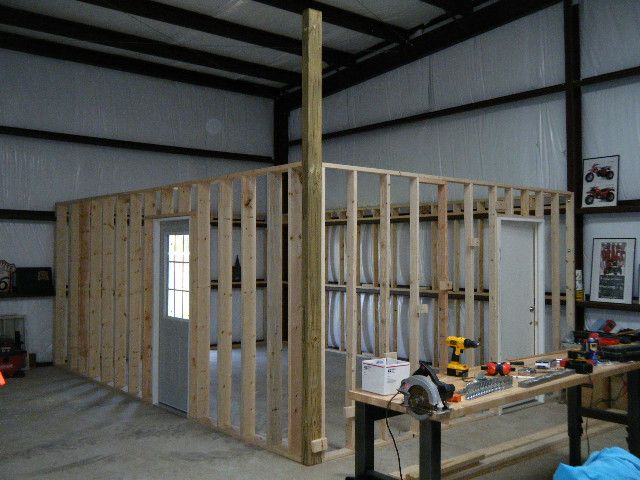
Integrating the wood walls into the steel structure of the building walls was interesting, but not difficult. Since this will be a load-bearing wall, I wanted full support from the ground all the way up. Each of the steel horizontal channels has a 2x4 up underneath it and on top of it, screwed together through the steel. The steel channel has a small lower lip that's bent inward, so it had to be notched for every 2x4 stud to allow the walls to stand vertical and flush with the front face of the channels.

It would have been nice if the upper channel was at 8 feet, but it's just over 7', so I had to build the short height extension all the way across. The plain door is 30" away from the side wall of the building, giving me space on the other side for a workbench along the wall.

Got the corner "office" all framed up, just need to get the 2x10x14 joists to go over it to give me a floor for the storage loft.
Got the framed doors from a building supply recycling place for cheap - both are steel, insulated, one with window, the other one just plain. The long wall with the window door in it is 2x6, since it will supporting the weight of the joists. The corner post is 4"x6"x12', the additional height gives me a nice sturdy corner post for the railing around the upper floor, plus I might bolt one of the those truck bed cranes to it to lift heavy or bulky items up that I don't want to carry up the stairs. Speaking of stairs, they will be from left to right, starting at the corner post and ascending up the side wall, just clearing the door. You can see the wood scraps nailed to the studs behind the Dewalt drill on the workbench that give me an idea of the spacing, run, and rise of each step. Under the stairs will be an enclosed storage space.
Integrating the wood walls into the steel structure of the building walls was interesting, but not difficult. Since this will be a load-bearing wall, I wanted full support from the ground all the way up. Each of the steel horizontal channels has a 2x4 up underneath it and on top of it, screwed together through the steel. The steel channel has a small lower lip that's bent inward, so it had to be notched for every 2x4 stud to allow the walls to stand vertical and flush with the front face of the channels.
It would have been nice if the upper channel was at 8 feet, but it's just over 7', so I had to build the short height extension all the way across. The plain door is 30" away from the side wall of the building, giving me space on the other side for a workbench along the wall.
Last edited:
metalhead140
Well-known member
Looking good, and I like the layout plans!
OP
EarlyBroncoGuy
King Of The World
- Joined
- Aug 15, 2013
- Messages
- 921
4/8/14
Making some progress on the storage loft/upper deck/observation platform. Got the 2x12 joists installed, then the 3/4" tongue and groove OSB decking in, and the stairway done.
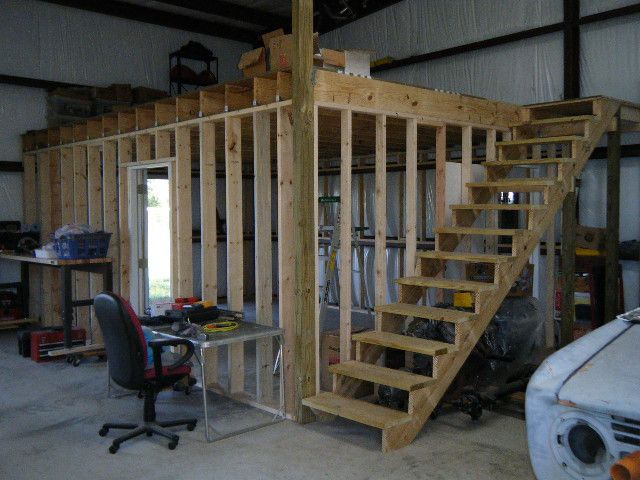
The joists weren't too hard to put up, just lifted one end up on the wall and then walked the other end up the ladder and into place. The decking, on the other hand - those were fun. Those things are heavy, and I couldn't lift them into place by myself - so I used my extension ladder as a ramp and slid them up one at a time. Making sure the ends lined up over the joists was a little tricky, because the joists tend to warp a little. I just cut a piece of 2x6 to 14 1/2" long and used it as a spacer between the middle of the joists (16" centers) as I went along.
The stairs are on 2x12 stringers notched to fit over 4x4 vertical posts (which are notched to hold 2x6 horizontal supports), rise is 8", run is 10", treads are two 2x6's set with a 1" overhang.


I haven't decided on a railing design yet, but that didn't stop me from starting to move some of my junk upstairs. I need to build some shelves up here. Even with an 8' ceiling in the office below, 12" joists above that, and 3/4" decking, there is still over 7' headroom up here at the wall. The peak is even higher. The size of the loft is 20' x 14', about the size of a good-sized bedroom, or a one-car garage. I need the room to store all the parts from my various projects - Porsche 912, Bronco, ATC's, etc. I'll put the heavier stuff on shelves along the walls and the bulkier parts like fenders, hoods, etc in the middle. The really heavy parts (engine, transmissions, axles, etc) stay downstairs.


A view from across the shop shows how the floorplan is taking shape - the office and loft take up the front corner, with the stairway tucked beside it. The rear corner will be my main work area, with tool chests, benches and wall cabinets along the 2 walls and a large (4'x8') heavy duty worktable in the middle.

Making some progress on the storage loft/upper deck/observation platform. Got the 2x12 joists installed, then the 3/4" tongue and groove OSB decking in, and the stairway done.
The joists weren't too hard to put up, just lifted one end up on the wall and then walked the other end up the ladder and into place. The decking, on the other hand - those were fun. Those things are heavy, and I couldn't lift them into place by myself - so I used my extension ladder as a ramp and slid them up one at a time. Making sure the ends lined up over the joists was a little tricky, because the joists tend to warp a little. I just cut a piece of 2x6 to 14 1/2" long and used it as a spacer between the middle of the joists (16" centers) as I went along.
The stairs are on 2x12 stringers notched to fit over 4x4 vertical posts (which are notched to hold 2x6 horizontal supports), rise is 8", run is 10", treads are two 2x6's set with a 1" overhang.
I haven't decided on a railing design yet, but that didn't stop me from starting to move some of my junk upstairs. I need to build some shelves up here. Even with an 8' ceiling in the office below, 12" joists above that, and 3/4" decking, there is still over 7' headroom up here at the wall. The peak is even higher. The size of the loft is 20' x 14', about the size of a good-sized bedroom, or a one-car garage. I need the room to store all the parts from my various projects - Porsche 912, Bronco, ATC's, etc. I'll put the heavier stuff on shelves along the walls and the bulkier parts like fenders, hoods, etc in the middle. The really heavy parts (engine, transmissions, axles, etc) stay downstairs.
A view from across the shop shows how the floorplan is taking shape - the office and loft take up the front corner, with the stairway tucked beside it. The rear corner will be my main work area, with tool chests, benches and wall cabinets along the 2 walls and a large (4'x8') heavy duty worktable in the middle.
OP
EarlyBroncoGuy
King Of The World
- Joined
- Aug 15, 2013
- Messages
- 921
5/4/14
Been busy - got the trench dug to bury the electrical supply cable and conduit, and got most of it laid in.
Bought a 500 foot spool of 4 wire stranded, 4 ga aluminum wire (this is what's left over):

Each individual wire is about as big around as my finger:

A bunch of 2" conduit:

Rented a walk-behind trenching machine and spent most of the day fighting it to dig a 20" deep trench, starting at the front wall of the shop:

continuing on a few hundred feet (yeah, I know it's not straight - the trenching machine would bog down every few seconds when the chain dug up a rock, and I had to keep reversing it and then start digging again. Pain in the ***.)

curved around the end of the driveway:

Here the cable will go under the driveway, through a piece of conduit that was already there, and across the front yard to the power pole and into the the disconnect box under the meter:

Now, just waiting for the electrician to install the breaker panel in the shop, run the cable through the wall fitting, and hook things up. After I fill the trench in, I'll have a few truckloads of crushed granite brought in to pave the new driveway extension back to the shop.
Been busy - got the trench dug to bury the electrical supply cable and conduit, and got most of it laid in.
Bought a 500 foot spool of 4 wire stranded, 4 ga aluminum wire (this is what's left over):
Each individual wire is about as big around as my finger:
A bunch of 2" conduit:
Rented a walk-behind trenching machine and spent most of the day fighting it to dig a 20" deep trench, starting at the front wall of the shop:
continuing on a few hundred feet (yeah, I know it's not straight - the trenching machine would bog down every few seconds when the chain dug up a rock, and I had to keep reversing it and then start digging again. Pain in the ***.)
curved around the end of the driveway:
Here the cable will go under the driveway, through a piece of conduit that was already there, and across the front yard to the power pole and into the the disconnect box under the meter:
Now, just waiting for the electrician to install the breaker panel in the shop, run the cable through the wall fitting, and hook things up. After I fill the trench in, I'll have a few truckloads of crushed granite brought in to pave the new driveway extension back to the shop.
OP
EarlyBroncoGuy
King Of The World
- Joined
- Aug 15, 2013
- Messages
- 921
6/16/14
Progress has been slowing down a little lately, it's getting too damn hot to be outside for very long. I sweat so much that I go through s few Tshirts a day, and it's no fun when the sawdust and dirt sticks to you like glue.
I did get the framed walls sheathed with 1/2" plywood, cut window openings into the walls on either side of the door, and built the stairway banister and railings for the storage loft. The posts are 4x4 douglas fir cut and notched to fit over stairs and sunk through the decking upstairs to rest on the top header of the wall, all secured with 1/2" carriage bolts.

Getting a little crowded in here...

..mainly because I moved everything out of this corner so I could start measuring and building the cabinets and countertops that will go along the walls.

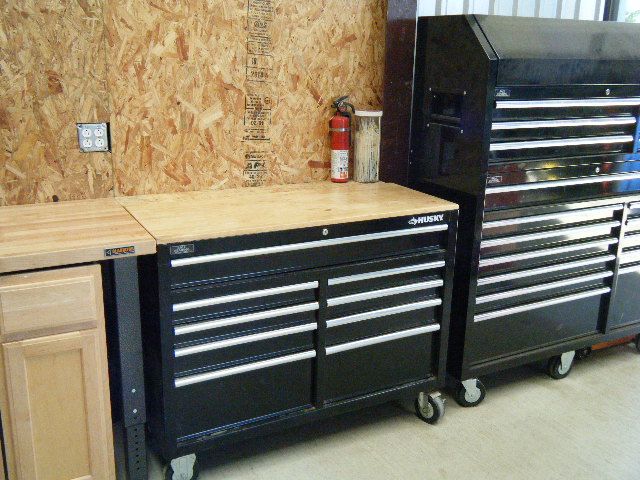
My Father's Day present, had to use the engine hoist to unload it from the truck and lift the upper cabinet into place. 52" tool chest, ball bearing drawers, got tired of my flimsy Craftsman that the drawers kept literally falling out of.

Progress has been slowing down a little lately, it's getting too damn hot to be outside for very long. I sweat so much that I go through s few Tshirts a day, and it's no fun when the sawdust and dirt sticks to you like glue.
I did get the framed walls sheathed with 1/2" plywood, cut window openings into the walls on either side of the door, and built the stairway banister and railings for the storage loft. The posts are 4x4 douglas fir cut and notched to fit over stairs and sunk through the decking upstairs to rest on the top header of the wall, all secured with 1/2" carriage bolts.
Getting a little crowded in here...
..mainly because I moved everything out of this corner so I could start measuring and building the cabinets and countertops that will go along the walls.
My Father's Day present, had to use the engine hoist to unload it from the truck and lift the upper cabinet into place. 52" tool chest, ball bearing drawers, got tired of my flimsy Craftsman that the drawers kept literally falling out of.
Last edited:
Carl_WI
Well-known member
I just trenched in 350ft with a walk behind trencher this last weekend and I think it’s impossible to get a straight line. You did a great job.
OP
EarlyBroncoGuy
King Of The World
- Joined
- Aug 15, 2013
- Messages
- 921
Great progress!!. How easy was it to draw that cable thru the conduit. Looks like a tight fit?
It's not really that tight. We suspended the cable spool from my engine stand with a piece of pipe through the middle of the spool so it would roll, then strapped the end of the cable to the UTV and used it to pull the cable through the conduit on the long runs. Getting the EMT run inside and Romex pulled through it up near the ceiling was harder, had to go rent a 16' stepladder so we could reach that high.
JTS
Well-known member
Nice Job! Looking forward to updates.
OP
EarlyBroncoGuy
King Of The World
- Joined
- Aug 15, 2013
- Messages
- 921
8/24/14
It's been seriously hot, I don't spend as much time out in the shop as I want to, but I've been working on it when I can. Finally got all the electrical done, ran conduit across the ceiling and then down to the various parts of the shop I wanted outlets at. The drop to the BendPak lift is 220v, I had the electrician run an additional neutral conductor from the panel so I could have a 110v outlet at the post. I also hung the air hose reel there to make it easy to use air tools at the lift.

In the corner where I'll spending most of the time, I put quad outlets along the walls, on top of the purlin that's roughly waist high. This puts them above the countertops I'm installing but below the upper cabinets that I will run along the wall. Once I had them done, I screwed 19/32" OSB along the walls, cutout for the quad outlets.

The red drawer unit is an old blueprint case with ball bearing drawers, I use it to store all my hardware - and it's heavy. It's too big (36" deep) to put under the countertop, so the corner is the only place I could really fit it. The counters I built out of 4x4 and 2x4 pine.

Along the back wall, I put the 8 foot workbench and 4 foot rolling workbench/toolchest and adjusted them so the worktop height matched.
Since the rolling workbench is not quite as deep front to back as the 8 foot workbench, I built a small shelf out of OSB along the wall to make up the difference.
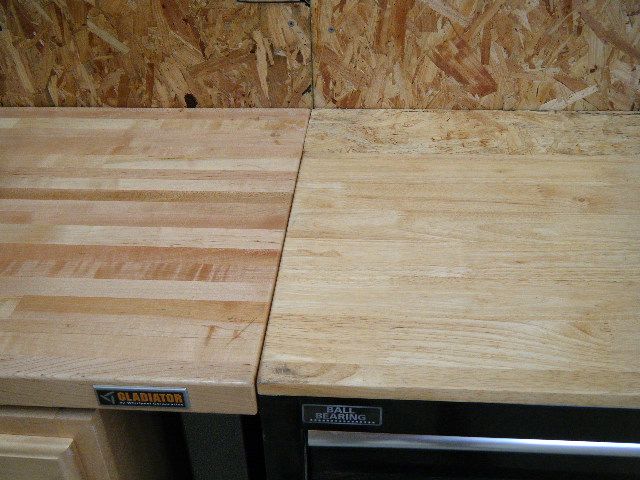
This way, I can pull it out and roll it to wherever I need it in the shop, but when it's back in place I still have the full depth of the worktop surface.

I found some kitchen base cabinets for cheap at a recycling place, they fit just about perfectly under the big workbench. Still need just a little cleaning up.

Got some posters up for now, wall cabinets will go up there once I find enough of the same size and type.


It's been seriously hot, I don't spend as much time out in the shop as I want to, but I've been working on it when I can. Finally got all the electrical done, ran conduit across the ceiling and then down to the various parts of the shop I wanted outlets at. The drop to the BendPak lift is 220v, I had the electrician run an additional neutral conductor from the panel so I could have a 110v outlet at the post. I also hung the air hose reel there to make it easy to use air tools at the lift.
In the corner where I'll spending most of the time, I put quad outlets along the walls, on top of the purlin that's roughly waist high. This puts them above the countertops I'm installing but below the upper cabinets that I will run along the wall. Once I had them done, I screwed 19/32" OSB along the walls, cutout for the quad outlets.
The red drawer unit is an old blueprint case with ball bearing drawers, I use it to store all my hardware - and it's heavy. It's too big (36" deep) to put under the countertop, so the corner is the only place I could really fit it. The counters I built out of 4x4 and 2x4 pine.
Along the back wall, I put the 8 foot workbench and 4 foot rolling workbench/toolchest and adjusted them so the worktop height matched.
Since the rolling workbench is not quite as deep front to back as the 8 foot workbench, I built a small shelf out of OSB along the wall to make up the difference.
This way, I can pull it out and roll it to wherever I need it in the shop, but when it's back in place I still have the full depth of the worktop surface.
I found some kitchen base cabinets for cheap at a recycling place, they fit just about perfectly under the big workbench. Still need just a little cleaning up.
Got some posters up for now, wall cabinets will go up there once I find enough of the same size and type.
Last edited:
Posi
Well-known member
..... I've been working on it when I can.....
Any more progress?

dubber
Well-known member
This is really coming together nicely!
OP
EarlyBroncoGuy
King Of The World
- Joined
- Aug 15, 2013
- Messages
- 921
Any more progress?
Nothing dramatic, finished the base cabinets and countertop (used laminate flooring left over from the doing the house), lower cabinet doors, moved an old big screen TV out there and put in an extender for my wireless network from the house, so now I have Internet access and football on the weekends.

The laminate flooring countertop worked out well, I think. The drawer unit I'm going to have to repaint, red doesn't go with anything in the shop. Maybe black to match the Husky rolling toolbench and chest.

It was a little tricky cutting and fitting the flooring at the corner where they meet at 90 degrees, but I just made careful cuts and spent some time on it.

Nearly 20 feet of countertop here.

Base cabinet doors are just plywood cut to fit, with 1x4 pine frames. Wife says they look like shipping crates, I might just label them with some black stencils.

Beer fridge hides behind this one.

TV is an old projection big screen, but it works just fine, has an HDMI input and pretty darn good sound system. My daughter gave me her old BlueRay player, it has wireless built in, so I use it to connect the TV to YouTube, Pandora, Hulu, etc. Had to use the engine hoist to lift it up onto the countertop, sucker is heavy.
I was getting ready to have the office inside walls finished with sheetrock, but the transmission in my truck decided to strip the sun shell, so I've got to spend a couple grand getting it repaired. Stock rebuild would be cheaper, but I figured I'd take the opportunity to beef it up some - considering I've got a 408 forged, supercharged stroker ready to go in the truck soon.

Last edited:
OP
EarlyBroncoGuy
King Of The World
- Joined
- Aug 15, 2013
- Messages
- 921
12/19/14
Haven't been too busy out in the shop, now that the weather has cooled off, I've been working outside, clearing the back of my property. It's overgrown with weeds, vines, dead trees, and thorn bushes, it's slow going. Lots of work, but it'll be nice when I get it done.
One thing I have been working on is a heavy-duty worktable for the shop. I had a table in the garage at my old house, but it was not that sturdy, it had to fold up and lean against the wall so I could park cars in the garage. Now that I have plenty of room, I can build the kind of worktable I really want.


It's 4' x 8', will be the same height as the benches along the walls once I put the big casters underneath the legs. Frame is 4"x4" legs, notched for the 2"x6" beams. Bottom brace/shelf support is also 2"x 6" boards, notched so that they nestle together. I plan on having all kinds of projects on this table over the years, (even using it to support the Bronco body when I sandblast and powdercoat the frame), so I'm making sure it's strong and won't flex when I roll it around with a load on it. Top will be 5/8" MDF, topped with a sheet of Butcher block laminate that's sold for countertops - one solid piece of plastic, so fluid leaks and spills won't soak into the top itself.
Haven't been too busy out in the shop, now that the weather has cooled off, I've been working outside, clearing the back of my property. It's overgrown with weeds, vines, dead trees, and thorn bushes, it's slow going. Lots of work, but it'll be nice when I get it done.
One thing I have been working on is a heavy-duty worktable for the shop. I had a table in the garage at my old house, but it was not that sturdy, it had to fold up and lean against the wall so I could park cars in the garage. Now that I have plenty of room, I can build the kind of worktable I really want.
It's 4' x 8', will be the same height as the benches along the walls once I put the big casters underneath the legs. Frame is 4"x4" legs, notched for the 2"x6" beams. Bottom brace/shelf support is also 2"x 6" boards, notched so that they nestle together. I plan on having all kinds of projects on this table over the years, (even using it to support the Bronco body when I sandblast and powdercoat the frame), so I'm making sure it's strong and won't flex when I roll it around with a load on it. Top will be 5/8" MDF, topped with a sheet of Butcher block laminate that's sold for countertops - one solid piece of plastic, so fluid leaks and spills won't soak into the top itself.
OP
EarlyBroncoGuy
King Of The World
- Joined
- Aug 15, 2013
- Messages
- 921
4/1/15
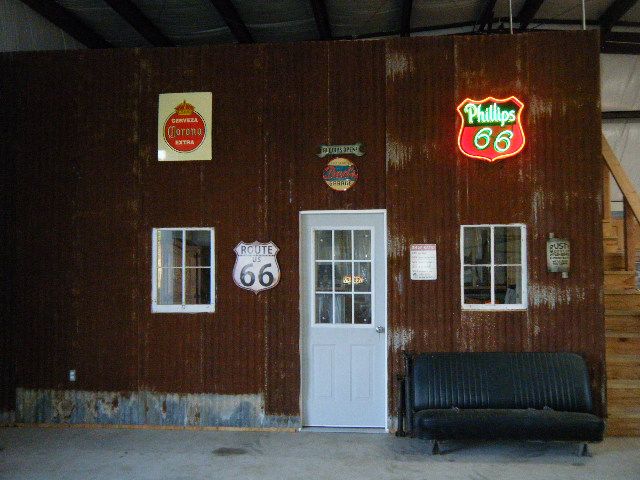
Been doing a little "interior decorating". I found a guy just down the road from me that had a bunch of old rusty barn tin, so I went and brought back a trailer load. Just what I was looking for, lots of patina - rust, holes, dents, etc. Sheets are 12 feet long, so they cover a lot of wall space. I spent a few hours straightening out some of the warped ones, but overall I left them just as I got them.


I've been collecting signs, posters, and other stuff for decades, now I've got enough wall space to finally display them. Lots more to put up still.

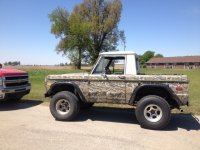
My latest acquisition, a '66 C10 swb big window. Rust in the usual places, but that's OK. I've wanted one for a long time, so I got one before the prices get out of hand. No drivetrain, but that works out well, since I plan to swap in the 6.0 out of my '01 GMC once I upgrade it a little with the Magnuson blower that's been sitting in a box for years. Install a front IFS, coilovers, big brakes - but leave the body just as it is, rust, faded paint, and all.
Been doing a little "interior decorating". I found a guy just down the road from me that had a bunch of old rusty barn tin, so I went and brought back a trailer load. Just what I was looking for, lots of patina - rust, holes, dents, etc. Sheets are 12 feet long, so they cover a lot of wall space. I spent a few hours straightening out some of the warped ones, but overall I left them just as I got them.
I've been collecting signs, posters, and other stuff for decades, now I've got enough wall space to finally display them. Lots more to put up still.
My latest acquisition, a '66 C10 swb big window. Rust in the usual places, but that's OK. I've wanted one for a long time, so I got one before the prices get out of hand. No drivetrain, but that works out well, since I plan to swap in the 6.0 out of my '01 GMC once I upgrade it a little with the Magnuson blower that's been sitting in a box for years. Install a front IFS, coilovers, big brakes - but leave the body just as it is, rust, faded paint, and all.
q20v
Well-known member
Awesome garage!
And I really like this, very clean and tidy looking, while functional:
And I really like this, very clean and tidy looking, while functional:
OP
EarlyBroncoGuy
King Of The World
- Joined
- Aug 15, 2013
- Messages
- 921
Awesome garage!
And I really like this, very clean and tidy looking, while functional:
Thanks. I'm no carpenter or woodworker, but I've built projects in the past (workbenches, tables, porch railings, etc) that I always wished I had spent more time on, and gone the extra mile instead of just nailing or screwing them together - so I'm trying to hold myself to higher standard of construction for things I build now. I'm more of an engineer, while I don't draw up plans or compute loads or strains or moment arms, I try to envision how something needs to be put together to best support whatever loads are going to be put upon it, and how to assemble pieces so they will work together to minimize shifting/spreading/deformation.
The only tools I have to use (so far) is an old circular saw and a reciprocating saw. Lots of careful measuring, fitting, and clamping parts together while gluing and driving screws works pretty well.
BuickFarmer
Well-known member
4/1/15
Been doing a little "interior decorating". I found a guy just down the road from me that had a bunch of old rusty barn tin, so I went and brought back a trailer load. Just what I was looking for, lots of patina - rust, holes, dents, etc. Sheets are 12 feet long, so they cover a lot of wall space. I spent a few hours straightening out some of the warped ones, but overall I left them just as I got them.
I've been collecting signs, posters, and other stuff for decades, now I've got enough wall space to finally display them. Lots more to put up still.
My latest acquisition, a '66 C10 swb big window. Rust in the usual places, but that's OK. I've wanted one for a long time, so I got one before the prices get out of hand. No drivetrain, but that works out well, since I plan to swap in the 6.0 out of my '01 GMC once I upgrade it a little with the Magnuson blower that's been sitting in a box for years. Install a front IFS, coilovers, big brakes - but leave the body just as it is, rust, faded paint, and all.
Now you're talking my language! Love the old rusty tin. And the swb C10. And the old signs! Maybe I missed it, did you ever stencil the "crate" cabinet doors? Sounds like a good project for the wifey.
Thanks for the update! I may just have to subscribe to this one now. Keep up the good work
Last edited:
SatisTraction
Well-known member
- Joined
- May 28, 2013
- Messages
- 122
OP
EarlyBroncoGuy
King Of The World
- Joined
- Aug 15, 2013
- Messages
- 921
6/19/15
Work had me busy for a few months, then my daughter graduated college and we had her party here at the house, and we've had some interesting weather the past weeks here in central Texas, but things have finally settled down a little and I've been able to get back to work in the shop.
I tore the Bronco apart so I could have the frame sandblasted and powdercoated, used the BendPak to lift the body off the frame and set it down on my worktable. I thought it would be hard to roll with all that weight on it, but it was no problem at all.


Moved the frame over to the work area where the table usually is so I could remove everything and do some test fitting of the new front suspension (full width high pinion Dana 44 out of a '79 full size Bronco, longer coils, new radius arms, relocated mounts, etc). I changed over the outer knuckles to 8 lug Chevy versions, gave me disk brakes and higher steering arms also.


Rear axle is a full floater 8 lug Dana 60, I fabricated custom mounts for the disk brakes. New leaf springs, spring hangers, bushings, shock mounts, pretty much everything will go in once the frame is back from the powdercoaters.
Engine is 351W I rebuilt a few years ago, trans is a ZF 5 speed 4x4 version, will use a custom adapter to connect to the Bronco Dana 20 transfer case. I also modified the T-case shifters to "twin-stick" configuration (allows full independent selection of front and rear axles - low or high range or neutral for each one. Front wheel drive only is possible, if I would ever want to use it)
Work had me busy for a few months, then my daughter graduated college and we had her party here at the house, and we've had some interesting weather the past weeks here in central Texas, but things have finally settled down a little and I've been able to get back to work in the shop.
I tore the Bronco apart so I could have the frame sandblasted and powdercoated, used the BendPak to lift the body off the frame and set it down on my worktable. I thought it would be hard to roll with all that weight on it, but it was no problem at all.
Moved the frame over to the work area where the table usually is so I could remove everything and do some test fitting of the new front suspension (full width high pinion Dana 44 out of a '79 full size Bronco, longer coils, new radius arms, relocated mounts, etc). I changed over the outer knuckles to 8 lug Chevy versions, gave me disk brakes and higher steering arms also.
Rear axle is a full floater 8 lug Dana 60, I fabricated custom mounts for the disk brakes. New leaf springs, spring hangers, bushings, shock mounts, pretty much everything will go in once the frame is back from the powdercoaters.
Engine is 351W I rebuilt a few years ago, trans is a ZF 5 speed 4x4 version, will use a custom adapter to connect to the Bronco Dana 20 transfer case. I also modified the T-case shifters to "twin-stick" configuration (allows full independent selection of front and rear axles - low or high range or neutral for each one. Front wheel drive only is possible, if I would ever want to use it)
accordfreak
Member
- Joined
- Dec 30, 2009
- Messages
- 6
looks great! any pictures of inside the office space?
I like the old tin, bad ***.
Front digs are a thing, and its fun...
Is the Bronco steering a push pull draglink to the drivers side knuckle? Have you looked into doing cross over steering and making a flat top D44 knuckle for a passenger side high steer arm? Now would be the time to do it.
Edit: never mind see you already bought the parts. I read pictures....
Last edited:
OP
EarlyBroncoGuy
King Of The World
- Joined
- Aug 15, 2013
- Messages
- 921
1/10/2017
OK, so it's been awhile since I posted some updates, but I've been busy. I scored some more tin from a local guy who tears down barns and sells the materials, the good stuff always goes fast and is pricey, but I met him at the site of the barn he was tearing down and he let me haul off the tin nobody else wanted - with some pressure washing and some time spent with a hammer straightening out the dents and creases, and cutting off the really rusty bits, I had plenty to finish the corner of the shop where I spend most of the time.

The wall cabinets were all sourced from salvage places like Habitat Restore, I wasn't too picky about size or color, but I lucked out on some, the faces and doors were in nearly perfect shape, so far I can't bring myself to drill screws into those for signs or posters. Beer bottle collection along the top, still have a few hundred more I guess I'll have to build shelves for. The pool table light over the center worktable was a gift from my daughter. I think I'll run some LED strip lights under the wall cabinets. The posters above the cabinets I've had for years, had to put them up somewhere. I don't know if they really fit the look of the old tin, I might move them into the corner office once I get the drywall finished, and put up some old road, beer, neon, and oil/gas signs up there instead.

I closed off the open railing of the staircase, and built another small worktable there, the top is a leftover 8 foot section that I ended up not using for the 2 car garage attached to the house. The panels of tin actually fit perfectly between the banister supports, all I did was cut them at an angle to match the banister and inset them. Gave me more wall space to hang some signs and posters and assorted stuff. The hard hat and tool belt were my Dad's when he worked for the Texas Highway Department.

The Bronco project is coming along, did some modifications to the frame (removed the old front and rear shock mounts, original radius arm and rear bumpstop brackets, and welded in new front and rear shock hoops, relocated and stronger radius arm brackets, bump stop pads, and new bracing for the leaf spring mounts), got it sandblasted and powdercoated, installed the 351W, ZF trans, rebuilt the axles, and finally it's a rolling chassis.


And last but not least, one of best scores so far - a 5 hp, 2 stage, 80 gallon air compressor, for free. One of my customers upgraded to a new compressor for his business, this was the old one that he replaced because it kept tripping the breaker. He said if I hauled it off I could have it, so I drug it home, cleaned it up, replaced some bad wiring in the electrical box, the belts and filter, and a leaking cap on the motor, and it works just fine. It will go out back of the shop on a concrete pad and inside a vented enclosure - the casters are just to make it easier to move around for now.

OK, so it's been awhile since I posted some updates, but I've been busy. I scored some more tin from a local guy who tears down barns and sells the materials, the good stuff always goes fast and is pricey, but I met him at the site of the barn he was tearing down and he let me haul off the tin nobody else wanted - with some pressure washing and some time spent with a hammer straightening out the dents and creases, and cutting off the really rusty bits, I had plenty to finish the corner of the shop where I spend most of the time.
The wall cabinets were all sourced from salvage places like Habitat Restore, I wasn't too picky about size or color, but I lucked out on some, the faces and doors were in nearly perfect shape, so far I can't bring myself to drill screws into those for signs or posters. Beer bottle collection along the top, still have a few hundred more I guess I'll have to build shelves for. The pool table light over the center worktable was a gift from my daughter. I think I'll run some LED strip lights under the wall cabinets. The posters above the cabinets I've had for years, had to put them up somewhere. I don't know if they really fit the look of the old tin, I might move them into the corner office once I get the drywall finished, and put up some old road, beer, neon, and oil/gas signs up there instead.
I closed off the open railing of the staircase, and built another small worktable there, the top is a leftover 8 foot section that I ended up not using for the 2 car garage attached to the house. The panels of tin actually fit perfectly between the banister supports, all I did was cut them at an angle to match the banister and inset them. Gave me more wall space to hang some signs and posters and assorted stuff. The hard hat and tool belt were my Dad's when he worked for the Texas Highway Department.
The Bronco project is coming along, did some modifications to the frame (removed the old front and rear shock mounts, original radius arm and rear bumpstop brackets, and welded in new front and rear shock hoops, relocated and stronger radius arm brackets, bump stop pads, and new bracing for the leaf spring mounts), got it sandblasted and powdercoated, installed the 351W, ZF trans, rebuilt the axles, and finally it's a rolling chassis.
And last but not least, one of best scores so far - a 5 hp, 2 stage, 80 gallon air compressor, for free. One of my customers upgraded to a new compressor for his business, this was the old one that he replaced because it kept tripping the breaker. He said if I hauled it off I could have it, so I drug it home, cleaned it up, replaced some bad wiring in the electrical box, the belts and filter, and a leaking cap on the motor, and it works just fine. It will go out back of the shop on a concrete pad and inside a vented enclosure - the casters are just to make it easier to move around for now.
Last edited:
hoho98925
ALLIANCE MEMBER
Nice shop, that tin looks amazing! Nice touch.
metalhead140
Well-known member
Nice work! Shop's looking great, the Bronco chassis looks clean and super tough, and I like the c10 and your plans for it a lot too. Btw, I think that compressor score is worthy of a "You ****!". Nice one.
Nice one.Terrick down Under
Well-known member
G'day, i just found this. Love your walls and detail. Will be watching for updates. I too am interested in what you have in mind for the C10.
Well done.
Well done.
OP
EarlyBroncoGuy
King Of The World
- Joined
- Aug 15, 2013
- Messages
- 921
Well, it's been awhile, so I thought I'd update the thread a little. Amongst all of my toys and yard equipment is a side-by-side I picked up used a few years ago, cheap on CL because it had a blown motor. I rebuilt the 13hp Honda GX 390 back then with a rebuild kit from eBay, it worked OK for a few years until this past fall//winter when it started smoking pretty bad and making some interesting noises, so it became my winter project. I was just going to pull the motor and rebuild it again, but once I had it out I decided to clean up the chassis, paint the hood and bedsides, apply bedliner to the inside of the bed, paint the wheels, etc...it kind of snowballed.

Shop is getting crowded with the Bronco over in the corner, the Porsche next to it, my '01 GMC, '66 C10, my son's XJ, not to mention all the ATC's you can't see in that pic. I need to rearrange things a little, and find another 30 or so old tin roof panels to finish covering the walls.
The motor problem turned out to be one of the the piston pin clips had come out of it's groove, allowing the pin to walk sideways and start gouging a nice groove into the cylinder wall. Since the cylinder is part of the engine case on these Honda GX engines, that meant a new case, as well as a piston, pin, rings, gaskets, bearings, etc. I couldn't resist painting the engine cooling shroud to match the body.
Just when I was 99% done with that project, I was gifted a couple of Honda ATV's from my brother in law, out of the blue. He and his ex used to ride a lot, but since they split up years ago the quads have just been sitting - and he just wanted them gone. I was happy to load them up and bring them back to my shop before he changed his mind. I didn't really need any more projects, but I couldn't pass these up. They ended up being good projects to work on during the "stay at home" weeks of the Covid-19 mess.
They were in sad shape, having been ridden hard and put away wet (literally) - they rode some back country trails, lots of mud, sand, dirt had found it's way into everything and then dried, plus several years out in the weather didn't help. They had installed some homemade snorkels, which gives an idea of how deep these quads went swimming/mudding. Both had river bottom sand and mud in the battery wells, storage compartments, air boxes, even found some in the carb float bowls. They both had decent aftermarket wheels and tires, and the Rancher had a lift kit.

The older quad ('96 Fourunner) was the worst, the rear axle differntial was one solid mass of rust and grit. Water and sand had got in and destroyed the bearings, the pinon wobbled around and destroyed itself against the ring gear.

The master cylinder for the front hydraulic drum brakes was seized, the brake hose was clogged, the wheel cylinders were stuck, the electrical system had some hack job wiring repairs, and the foot pedal for the rear cable drum brake was missing. Surprisingly, the fenders were not cracked or faded, the engine was intact and in good shape, even had new, clean oil in it. After cleaning out the tank, carb, and fuel system, cleaning the spark plug, and installing a new battery, I got the engine running and was able to put the trans through all gears just to check them out. Then I tore it down to the frame, painted it, replaced the ball joints, tie rods, wheel bearings, master clyinder and hose, rebuilt the wheel cylinders, completly rebuilt the entire rear axle (ring+pinion, bearings, shims, seals, brake shoes, etc), repaired the wiring, and cleaned evertyhing up. It turned out pretty good and is fun to ride - only 2wd, but it goes places you wouldn't think it can.

The newer quad ('06 Rancher) I was able to get running with a new carb, battery, flushed the fuel system, adjusted the valves, changed the oil, and some minor electrical work. It still needs some major service (ball joints, CV's, brakes, a good cleaning) but it runs OK and I'm using it to clear trails on the back of my property for now.

Shop is getting crowded with the Bronco over in the corner, the Porsche next to it, my '01 GMC, '66 C10, my son's XJ, not to mention all the ATC's you can't see in that pic. I need to rearrange things a little, and find another 30 or so old tin roof panels to finish covering the walls.
The motor problem turned out to be one of the the piston pin clips had come out of it's groove, allowing the pin to walk sideways and start gouging a nice groove into the cylinder wall. Since the cylinder is part of the engine case on these Honda GX engines, that meant a new case, as well as a piston, pin, rings, gaskets, bearings, etc. I couldn't resist painting the engine cooling shroud to match the body.
Just when I was 99% done with that project, I was gifted a couple of Honda ATV's from my brother in law, out of the blue. He and his ex used to ride a lot, but since they split up years ago the quads have just been sitting - and he just wanted them gone. I was happy to load them up and bring them back to my shop before he changed his mind. I didn't really need any more projects, but I couldn't pass these up. They ended up being good projects to work on during the "stay at home" weeks of the Covid-19 mess.
They were in sad shape, having been ridden hard and put away wet (literally) - they rode some back country trails, lots of mud, sand, dirt had found it's way into everything and then dried, plus several years out in the weather didn't help. They had installed some homemade snorkels, which gives an idea of how deep these quads went swimming/mudding. Both had river bottom sand and mud in the battery wells, storage compartments, air boxes, even found some in the carb float bowls. They both had decent aftermarket wheels and tires, and the Rancher had a lift kit.
The older quad ('96 Fourunner) was the worst, the rear axle differntial was one solid mass of rust and grit. Water and sand had got in and destroyed the bearings, the pinon wobbled around and destroyed itself against the ring gear.
The master cylinder for the front hydraulic drum brakes was seized, the brake hose was clogged, the wheel cylinders were stuck, the electrical system had some hack job wiring repairs, and the foot pedal for the rear cable drum brake was missing. Surprisingly, the fenders were not cracked or faded, the engine was intact and in good shape, even had new, clean oil in it. After cleaning out the tank, carb, and fuel system, cleaning the spark plug, and installing a new battery, I got the engine running and was able to put the trans through all gears just to check them out. Then I tore it down to the frame, painted it, replaced the ball joints, tie rods, wheel bearings, master clyinder and hose, rebuilt the wheel cylinders, completly rebuilt the entire rear axle (ring+pinion, bearings, shims, seals, brake shoes, etc), repaired the wiring, and cleaned evertyhing up. It turned out pretty good and is fun to ride - only 2wd, but it goes places you wouldn't think it can.
The newer quad ('06 Rancher) I was able to get running with a new carb, battery, flushed the fuel system, adjusted the valves, changed the oil, and some minor electrical work. It still needs some major service (ball joints, CV's, brakes, a good cleaning) but it runs OK and I'm using it to clear trails on the back of my property for now.
Attachments
![IMG_0328[1].jpg](/forum/data/attachments/903/903729-647e625132d6c40a735555535db3e97a.jpg)
![IMG_0269[1].jpg](/forum/data/attachments/903/903704-0ee10d0426b8ff8b9f1b80df29bb7e3d.jpg)
![IMG_0385[1].jpg](/forum/data/attachments/903/903802-a1a8482f73ddbb50413c47ebdacfa9bc.jpg)
![IMG_0325[1].jpg](/forum/data/attachments/903/903837-7e86aafb797f8f8d7aa771df82d06193.jpg)
Last edited:
zmotorsports
ALLIANCE MEMBER
Nice shop and cool projects.
Subscribed.
Subscribed.
PhantomEB
Well-known member
Definitely a dream garage of mine now. Especially with the EB!
OP
EarlyBroncoGuy
King Of The World
- Joined
- Aug 15, 2013
- Messages
- 921
.
Last edited: