To avoid these ads, REGISTER NOW!

The Hodgepodge Garage

bj383ss

Well-known member
Joined
Sep 29, 2011
Messages
3,166
Location
TX
Great build Thread Jeremy. I read GJ nearly every morning and still amazed at how I miss great threads like yours. I like all your projects they are all very similar to stuff I do or would do. The workbench came out great. Love all the old tools you are saving.

The Truck bed is just an awesome idea. Can't wait to see that finished. I didn't have enough time this morning to read your whole thread will do that when I get some free time. Look forward to your future updates.
 
To avoid these ads, REGISTER NOW!

drivesitfar

Well-known member
Joined
Oct 23, 2013
Messages
36,040
Location
Pacific Northwest
Jeremy: i was just looking at your cabinets and wondering how you made those labels? did you buy or make them? nice selection BTW.

also i had no idea you can cut metal with a skill saw that clean. any idea if you can cut 1/4 inch metal with that blade or is meant for more like 1/8 th and under?

thanks for the wood glue tip and even though i have a few projects on my plate this spring and summer i think building a wood bench out of my 4 x 4 10 foot white oak sounds like it might work out best for me. i'll make a thread if and when i get started on it.
 
OP
J

JeremyBurke

Well-known member
Joined
Nov 5, 2013
Messages
609
Location
Near Portland, OR
BJ Thanks for the kind works. I know exactly what you mean. I have read a lot of threads on this board but I bet I haven't even read 5% of what there is to read. It is always fun to find a new one and I hope you enjoy stopping by here from time to time.


Drives Here is the information on the labels. I got them on amazon and they are a generic set found here

If I need to add to the set that came I will just buy some of this magnetic Paper and print others.

 
OP
J

JeremyBurke

Well-known member
Joined
Nov 5, 2013
Messages
609
Location
Near Portland, OR
This past weekend I got the tires cut down to fit under the fenders. I had to use a large set of bolt cutters to get through the steel belt but otherwise it went pretty smooth.


Who else didn't know that this is what steel belted radial means.


Here is what the tires look like cut.


Here they are on the rim


Here is a shot of them under the fender.


and one more with the hub caps on.


I also got all the mounting holes drilled in the bed itself so now I just need to make some spacers to place the wheels in the right location inside the fenders.
 

LaneRover

Well-known member
Joined
Jan 19, 2014
Messages
301
Location
Maine
I really like the bed design . . . the shortbed twinbed?

Are you going to put any expandable spray foam into the tire to help it keep it's shape over the years?

Or to start them young put a small trailer axle under it and put complete but smaller tires on so your son can jack up his bed and change the tire!
 
OP
J

JeremyBurke

Well-known member
Joined
Nov 5, 2013
Messages
609
Location
Near Portland, OR
LaneRover: If I hadn't already cut everything the trailer axle ideal would have been killer. I guess when I make the next one. Yes I cut it down to short bed length or there abouts and chopped it for the right width and now it should fit a twin mattress pretty well and have room for a few stuffed animals and blankets. I do plan to put expandable spray foam in the tires to preserve shape and prevent my boys from filling them up with matchbox cars and the like.
 
Last edited:

drivesitfar

Well-known member
Joined
Oct 23, 2013
Messages
36,040
Location
Pacific Northwest
Jeremy: any updates to post pictures of? that bed you are building for your son is one of the coolest ideas I've seen on GJ. worthy of a thread on it's own if you want to start on in the fabrication section. cutting steel, welding, wood attached to metal, re sizing tires and frame to fit a twin bed all qualify for good information we all could learn. also the tips on cutting a tire with a bolt cutter so you don't ruin a new bandsaw blade.

great project and shows a lot of your talent. BTW what color have you or your son picked for it?
 
OP
J

JeremyBurke

Well-known member
Joined
Nov 5, 2013
Messages
609
Location
Near Portland, OR
Hey Drives: right ow I have been swamped with work and family things and not a lot is going on in the garage. I have put the bed back in the elements so the welds can rerust and get the patina back. As for color we are doing a few Orange highlights as that is my boys favorite color however for the most part it is going to be as it sits with rust and all. We are planing to to clear coat it so avoid to many issues with rust transfer.

Cheers,
Jeremy
 
OP
J

JeremyBurke

Well-known member
Joined
Nov 5, 2013
Messages
609
Location
Near Portland, OR
1948 Ford F2 Big Boy Bed

So this weekend I got back to the bed project for my son again. I pressure washed and clean the whole thing and then painted the Ford logo on the Tail gate his favorite color Orange.


All the taping and cutting took me about 45 minutes.


the painting took about 35 seconds.


Of course the tape let some paint bleed through so that meant I had to scrape some but I am happy with how it turned out.


drivesitfar

Well-known member
Joined
Oct 23, 2013
Messages
36,040
Location
Pacific Northwest
Jeremy: was the black already on the Ford or did you paint a primer coat under the orange. it's hard for me to see a rusty bed in a boy's room, but i'll wait to see the pictures of it installed and the smile on your son's face before i make further judgments.

awesome job and even better thinking and planning to make this all work.

keep us posted
 
OP
J

JeremyBurke

Well-known member
Joined
Nov 5, 2013
Messages
609
Location
Near Portland, OR
I will post many many more details when I can but the bed is finished and in the little man's room.


Full process photos and details to follow.

 
Last edited:

RustCollector

Well-known member
Joined
Mar 23, 2014
Messages
76
Location
Riverside,CA
I think the bed is neat, but not for a child. As a parent of two grown boy's, I've made a few trips to the ER in my day. There are so many way's they could be injured in that truck bed and it's not worth it for the cool factor. I think if you could wait until he's at least 8 yrs old, you could spare yourself the heartache of a hurt child. This is only an opinion.I do like the bed and the fact that you are willing to do more that get him a generic store bought item, I just see the potential for a small disaster in the future.
 
OP
J

JeremyBurke

Well-known member
Joined
Nov 5, 2013
Messages
609
Location
Near Portland, OR
Rust: you may be right and time will tell. He is a pretty cautious kid by nature so I think it will be ok. Plus I had set a bit of a president with his older 2 brothers beds. Here is an example of one of them.


The oldest is in a boat bed so all transport themed.

Thanks for your thoughts and words of caution.
 
Last edited:
OP
J

JeremyBurke

Well-known member
Joined
Nov 5, 2013
Messages
609
Location
Near Portland, OR
1948 Truck Bed project process

Here are a few shots of the wheel spacers I welded up last week as well as the filing process to make the mounting bolts fit.


I then had to file the mounting holes in the bed sides to accept the carriage bolts.


I used these 2 files. 1 is a pretty standard (I think) Nichols flat file the other is a saw file Stamped Oregon (They are a local Chain saw bar company as far as I know)


So round holes can now fit square pegs.


Here they are bolting together.
 
OP
J

JeremyBurke

Well-known member
Joined
Nov 5, 2013
Messages
609
Location
Near Portland, OR
1948 Ford F2 Bed Installation

Here are a few shots of the installation process on the bed as well.


The Bed Sides weigh a lot and carrying them upstairs to my son's room nearly ended this project.:eyecrazy::scared:


A few more of assembling everything


And one more of a happy boy and his brothers playing in it.

 
OP
J

JeremyBurke

Well-known member
Joined
Nov 5, 2013
Messages
609
Location
Near Portland, OR
Atlas x-y table reproduction vise jaws.

While I was finishing up the bed at home I was working in this on my lunch breaks at work. I posted this on the vise 101 thread earlier but I wanted to put it here as well since I use this as a reminder of what I have gotten done.

I need to begin by thanking some people

Outlaw: for alerting me to the group buy of recast jaws on owwm.org
Bob: at owwm.org for arranging the buy and getting new jaws cast.
My Buddy John at work for the machining advice.

One more caveat this is not Rev. Scott (chips) level work but I think it is pretty decent for a total hack like me. Now on with our show.


So about 2 months ago I received a package with these two reproduction cast jaws in it.


Once I cleared a few back logged projects I used a few of my lunch breaks to machine them into form.

Squaring the sides. I had to shim the rough castings in the mill vise to get it as square as possible.
[url=https://flic.kr/p/sqvMMw]


Once I had square sides to work with I clamped them up and used a 3/4" end to machine the bottom and working face of both jaw in a single setup.


I then used those faces as origins to drill all the mounting and clamping holes.


The final steps where making dynamic jaw plates and t-nuts from scratch.

I started with 3/8" CRS cut to size and machined on all for sides. I then faced it with a fly cutter.


Drilled and reamed some holes to accept Dowel pins.


I then pressed in the (frozen) dowel pins with a 0.0015-0.002" press fit.


Since the dynamic doesn't require tools to change out and I had the material tried something new to expand my skills.

Using some Angle blocks I clamped another jaw plate in the mill at 45 degrees and cut a groove to clamp round stock.


The last little job was turning some t-nuts on the lathe.


Here this parallel ensures the 2 flats are parallel to one another.


Here is the completed jaws on the x-y table on my Walker Turner DP. I need to clean up the table a little but it should be ready to put into service at this point.


OP
J

JeremyBurke

Well-known member
Joined
Nov 5, 2013
Messages
609
Location
Near Portland, OR
It's Official I have a problem

I already posted this on the Garage Sale thread but I thought since the rehab would happen in the shop I would post it here too. This weekend a free (read this already cost me 3 hours and is going to cost me much much more to finish) tool made its way into my garage.


It is gonna take a lot of work but I am hopeful it will look like this someday and be a nice addition to the shop.

WTSander055.jpg


It did come with a very nice 1/2 hp Baldor motor I am hoping I can save.

 
To avoid these ads, REGISTER NOW!

drivesitfar

Well-known member
Joined
Oct 23, 2013
Messages
36,040
Location
Pacific Northwest
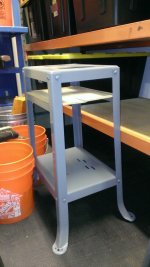
Jeremy: so i don't necessarily agree with the baby poop green color of the restored one i might have something that will look pretty close for that sander to sit on.

nice find

i'm a little concerned about having 3 young boys around all that old metal Ford pick up bed you made for your youngest, but if they survive without any trips to the emergency room then you did an awesome job and are up for a Dad of the year vote.

cheers


BTW in case you didn't hear Jeremy tonight on the GJ channel or read the vise thread he is also looking for a Reed 1C sort of like this one i own. I bet he wouldn't turn down Ritzblitz's 1C that he let his sister paint.
 

Attachments

  • WP_20150601_030.jpg
    WP_20150601_030.jpg
    136.3 KB · Views: 62
  • WP_20150529_002.jpg
    WP_20150529_002.jpg
    153 KB · Views: 56
  • WP_20150529_001.jpg
    WP_20150529_001.jpg
    137 KB · Views: 54
  • Fi P1090720.jpg
    Fi P1090720.jpg
    97.4 KB · Views: 55
  • Ritzblitz Reed 1C.jpg
    Ritzblitz Reed 1C.jpg
    147.8 KB · Views: 130
OP
J

JeremyBurke

Well-known member
Joined
Nov 5, 2013
Messages
609
Location
Near Portland, OR
Drives: it's funny you mentioned the stand. As soon as I saw the ad for the sander my thought was, "and I bet that stand I just bought from drives will fit it." Thanks again for getting it.

And yes I really want a 1C, or a 2C.
 
Last edited:

Vieux

Well-known member
Joined
Jan 31, 2014
Messages
2,531
Location
Russia
I liked your theme and your work. You are a very talented person!
Subscribe.
 
OP
J

JeremyBurke

Well-known member
Joined
Nov 5, 2013
Messages
609
Location
Near Portland, OR
Vieux: Thanks for your kind words. What part of Russia are you from? My father and mother in law lived in both Moscow and the Sakhalin islands for a time while my father in law worked on several oil projects for his company. Sadly it was just before my wife and I married and I never got to visit.
 
OP
J

JeremyBurke

Well-known member
Joined
Nov 5, 2013
Messages
609
Location
Near Portland, OR
Jeremy: so i don't necessarily agree with the baby poop green color of the restored one i might have something that will look pretty close for that sander to sit on.

...

I agree on the color Drives but I liked the mods to the stand I think I am going to go with something close to vintage 5196 series craftsman blue/grey.
 

Vieux

Well-known member
Joined
Jan 31, 2014
Messages
2,531
Location
Russia
Vieux: Thanks for your kind words. What part of Russia are you from? My father and mother in law lived in both Moscow and the Sakhalin islands for a time while my father in law worked on several oil projects for his company. Sadly it was just before my wife and I married and I never got to visit.

I live in Central Russia, Penza city. It's 600 km from Moscow to the East
 
OP
J

JeremyBurke

Well-known member
Joined
Nov 5, 2013
Messages
609
Location
Near Portland, OR
Guess who's wife and kids got him a label maker and some business card magnets for Father's Day.


I can definitely see myself becoming addicted to labeling everything.
 
Last edited:
OP
J

JeremyBurke

Well-known member
Joined
Nov 5, 2013
Messages
609
Location
Near Portland, OR
I did a quick trip out of the office on my lunch break yesterday and found this great metal cabinet. It is going to replace the much less sturdy one I have been using for a while now.


It isn't a Lyon like my lockers, even though it looks the same. It is a Hillside made in NJ.


I need to rearrange a few things and sell of some unused cabinets now. I never have found a use for my Napa Cabinets so I am probably going to list those ones too.
 
OP
J

JeremyBurke

Well-known member
Joined
Nov 5, 2013
Messages
609
Location
Near Portland, OR
Hodgepodge Garage Adjacent (Part 1)

It has been far too long since my last update. I have been very busy with one project and I thought it was time to detail some of those efforts for you all.

When we first moved into the house a few years ago I had to remove a deck behind the garage. The old deck was falling down due to poor foundation leveling. So even though the wood that made the deck was in good shape, down it came. That wood was used to build my kids a fort and to build a small deck in the back corner of my property under some shade trees. Unfortunately it also left a nasty, ugly hole in the yard behind the Hodgepodge Garage (opposite side of the wall where by "L" bench in located.

So starting 1 month ago on the long July 4th weekend I began work to rebuild the deck. I had to begin by replacing the 2x6 ledger board with a more substantial 2x10. I then framed the perimeter of the main deck.


The weather here in Oregon has been way warmer than normal (100F/38C) but fortunately as you can see this area is in the shade for the worst part of the day. After the perimeter was set I began filling in the rest of the joists for the main deck. (with help from the youngest of my 3 foreboys)


With all the time it took to level and set the pier block and do the foundation work this is all I was able to finish on the first weekend.


The next part will detail more help from the foreboys and progress on the steps up to the deck.
 
OP
J

JeremyBurke

Well-known member
Joined
Nov 5, 2013
Messages
609
Location
Near Portland, OR
Hodgepodge Garage Adjacent (Part 2)

The following weekend, again with a lot of help, I was able to frame the large steps up to the main deck. This required that a lot of dirt and even a few shrubs be moved (removed) to make room. This is the part that the foreboys really helped with.


I neglected to mention in the previous post that a lot of the wood used in the main deck and some used in the steps as well was reclaimed from other people removing decks. This meant I had a lot of nails to pull from the boards and the bucket shown in the above picture is about 1/2 full of deck nails and old joist hangers. But the wood is completely sound and should outlast the decking I am putting on it. Plus it cost a lot to feed 3 foreboys so I have to save money where I can.

This pictures shows the near complete step framing as well as the beginnings of the bracing for the main deck going in. Also you will notice the complete overkill of bracing down the center of the main deck. This will make more sense once the decking goes on in a later post.


To the far right in this grainy picture you can also see the beginnings of the framing for the ramp up into the Hodgepodge Garage. For a better scale on the project I should say that the main deck is 20' wide X 12.5' deep (6.1m X 3.8m), the steps are 10' Wide by 6' and 3' respectively (3m X 1.8m, 0.9m).


Prior to this weekends work the family (mostly me and the foreboys) adopted a new Hodgepodge Garage Dog (read Dodge). Meet Floyd, he is 4 months old, and we are told he is a mixed breed mostly containing Catahula, a breed I had never heard of before. However, since he is a rescue unless we do a gene sequence we may never know for sure.

Here he is right after getting home from the shelter.


Here he is trying to fit into "Buddy's" extra bed.


Buddy is the elder statesman of the house at 17-19 years old (we aren't sure since he was adopted fully grown in 2000).

We got Floyd a bed that fits him better but he hasn't exactly figured out how it works.


In the next post I will complete the framing and start the decking.
 
Last edited:
OP
J

JeremyBurke

Well-known member
Joined
Nov 5, 2013
Messages
609
Location
Near Portland, OR
Hodgepodge Garage Adjacent (Part 3)

The following weekend I had a lot of lumber to pick up so I took the Friday off work borrowed by dad's big boy truck (Ford F250). My little 4 Cylinder Toyota Tacoma wasn't up to the task. So Dad, the middle Foreboy and I set out in search of 900 linear feet of 2x6" Cedar, and 3 Redwood slabs (one 16' (4.9m) and one 9' (2.74m) piece for me and one 9' piece for dad). I will get more into what those are for in a later post.

The following day I completed the bracing and started in on the decking. This picture shows my 2 slabs in the foreground is the 9' slab and the 16' is in the background.


To fasten the boards I used the Camo deck fastening system like this one.

Found here

It worked great and helped set a nice consistent gap in all the boards. Time will tell if the holding power is good over the long run.


As you can see I left most of the boards long and then used my DeWalt Track saw to cut multiples at once later.


I only got to work on Saturday and then took a family trip to the airshow. It was hot on the Tarmac but everyone had fun until the real jets took off with afterburners on and everyone under 7 ran screaming (literally), including my youngest. So that ended the show for us but it was fun while it lasted.


This one was taken later during the week and shows a evenings worth of progress.


Floyd also inspected, tasted and approved the work.
 
OP
J

JeremyBurke

Well-known member
Joined
Nov 5, 2013
Messages
609
Location
Near Portland, OR
Hodgepodge Garage Adjacent (Part 4)

The following weekend I was able to complete the decking in a sometimes very heavy rainstorm. Even though it was unseasonably wet it was nice that it wasn't so hot.


As you can see the rain didn't help the wood stay clean.


With the kids, dogs, and worst of all me, the deck was a mess. Also I was very worried about mill glaze since my material was pretty fresh from the mill. So in the next post we will look at how I dealt with these issues.
 
OP
J

JeremyBurke

Well-known member
Joined
Nov 5, 2013
Messages
609
Location
Near Portland, OR
My local equipment rental place had some nice 12"x18" random orbit floor sanders for a good price. So this past Friday I picked one up along with 10 sheets of 100 grit sandpaper and set about sanding the deck and slabs.


Then again with the help of my Foreboys we started staining. These are the boards that will wrap the post at the front of the deck.


They had to take turns "because I didn't have enough brushes out." (in reality it was for my sanity).


This picture shows the contrast between the sanded wood and the stained wood really well.


I put up the netting to keep the dogs at bay but ended up just having to leash them and walk them around the back yard.


Once the stain was dry I wrapped the posts with the boards the boys helped me stain and started prepping for the bracing for the longer slab that will be cut in two and set at bar height on the main deck.


Please forgive the image artifacts in this panorama shot but it show the complete deck well. Including the areas still left to be stained. This is making my oldest Foreboy completely crazy so hopefully in the next few days we can finish that up and this coming weekend I can get the bar cut and mounted.


The shorter two posts to the left in that shot will serve as the mounting location for the other slab that will be cut 2/3-1/3 length wise and serve as a bench.


So far those two items only live on paper and in my head but I hope to be able to update you all soon on there completion. For now here are few more shots of the stained deck.


Next up finish the last of the staining and then make the bar and bench. The bench in particular has a lot of open items to make it a reality. I am sure this forum with help solve those issues as they come up.
 
Last edited:
OP
J

JeremyBurke

Well-known member
Joined
Nov 5, 2013
Messages
609
Location
Near Portland, OR
1/2 cup and brett: Thanks so much for the kind words guys. It has been a lot of work and a lot of fun. I am very hopeful that I can get it finished before the rain sets in again.
 
To avoid these ads, REGISTER NOW!
Top Bottom