To avoid these ads, REGISTER NOW!

The hoist is in

hudson48

Active member
Joined
Jan 1, 2008
Messages
37
Location
Brisbane Australia
After a couple of years of settling into the new house I finally got the 4 post hoist.It is a Direct Lift ProPark 8H(extra height).Finished the assembly this week and got it working yesterday.Haven't had a car on it yet but looking forward to being able to get under a car without lying on the floor.
 

Attachments

  • DSC00153 (Large).jpg
    DSC00153 (Large).jpg
    151.7 KB · Views: 802
  • DSC00154 (Large).jpg
    DSC00154 (Large).jpg
    141.9 KB · Views: 700
  • DSC00155 (Large).jpg
    DSC00155 (Large).jpg
    142.1 KB · Views: 663
  • DSC00157 (Large).jpg
    DSC00157 (Large).jpg
    140.7 KB · Views: 664
To avoid these ads, REGISTER NOW!

Kevin54

MEMBER EMERITUS
Joined
Jan 12, 2005
Messages
29,341
Location
Urbana, Ohio
Welcome back. Glad to see you are getting towards the end of the building and can get back to the enjoyable things. Great looking garage BTW. :thumbup:
 

toolman1967

Well-known member
Joined
Jan 8, 2008
Messages
426
Location
Benton Illinois
You have got to give me a real world review of that lift. It is the exact one I am looking at right now. Going to pull the trigger in a month or so. Let us know good and bad!
 
OP
H

hudson48

Active member
Joined
Jan 1, 2008
Messages
37
Location
Brisbane Australia
You have got to give me a real world review of that lift. It is the exact one I am looking at right now. Going to pull the trigger in a month or so. Let us know good and bad!

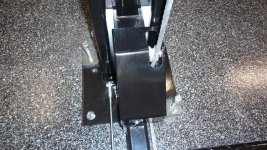
The instruction booklet is minimal at best.Get onto the website and you can follow the steps and print the pics individually.In particular the most difficult was making sure all the cables were right(going around the correct pulleys) and then correctly locating the ends in the cable "collector" under the ramp.

Also you will need to pull out the ram shaft and will need some kind of "come along".I used the straps that we use to tie down loads on the trailer and they have a ratchet and are made of heavy duty webbing.It takes a fair effort to pull it out.

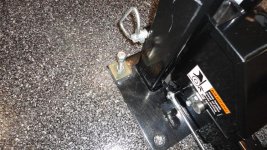
The welded tabs on the inside of the main ramp are for the lock release shaft to run through.Nowhere did I see it mentioned to run the threaded bolt inside these tabs.Commonsense prevailed when I got to that part.

I contacted someone in USA about running the cables and they advised to not follow the rule book.I was having trouble with the cable ends getting caught behind the pulleys.He said to do the opposite of the instructions and run the threaded end out and up the pillars to the locking position.Make sure the cables run on the inside of the white plastic cable pulley(cable will be on the ramp side of the pulley not the post side)

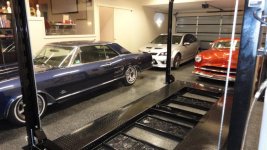
I did most of the assembly myself but needed another 6 guys to help lift the ramps into position for bolting to the cross beam.The ramps come upside down when packed.This is for a reason.You then have to have help to turn the ramp over and we used the 6 guys to lift the ramps onto two saw horses(steel ones to take the weight) and have the cross beam set up at that height to easily slip the bolts through.

Just make sure you double check every nut and bolt.On a test run the rear of the lift was not unlocking from the safety latches.
When I was moving the unlock handle at the front the bar under the ramp did not have the nuts of the joiner tightened so was not turning the bar and therefore not unlocking at the other end.

Another stupid thing I did was filling the fluid reservoir.I filled to the correct level and then raised the lift and all was working fine.Then I noticed the level was way down and I thought"oh it has to fill the ram underneath" and proceeded to add more fluid.Well when the lift drops it pushes the fluid in the ram back into the reservoir and then I had fluid pouring out of the fill hole.
Got it back to the right level and a clean up of the floor and all is OK.

A couple of web addresses.The first one is general info
http://www.gregsmithequipment.com/ProductDetails.asp?ProductCode=TPPRO-PARK8

This one is the Assembly guide
http://www.gregsmithequipment.com/Articles.asp?ID=301

The book says 2 men can do it in 4 hours but using some mechanical means to lift the ramps.The main ramp with the hydraulics is 440lb and the secondary ramp is 220lb.I say BS and as I did most myself it probably took closer to 10 hrs.

Now I have run it up and down several times and everything is going well.
Also moved it around on the castors(used it to put the 2 pedal cars up in the loft area) and we won't be bolting it down.Haven't put a car on yet but I am confident all will be well.

Feel free to PM me if you need more advice.
 
Last edited:

hick

Active member
Joined
Jan 13, 2008
Messages
29
Please... Is there either way you could post more pictures of your cars... or link me to a thread where you have already...

The RHD thing is blowing my mind...

Gorgeous vehicles
 

Texas Aggie

Well-known member
Joined
Mar 23, 2010
Messages
66
Location
Austin, TX
Very nice garage and cars, especially the Riviera. I like the diner table with the view of the cars. One comment about bolting down the lift. I had no intention of bolting mine (a Bendpak) down either. But with an epoxy floor, the lift shifted forward quite a bit when I stepped on the brakes after driving a car up onto the lift. I didn't like the thought of lifting a car when I wasn't sure how straight and parallel the vertical posts were, so ended up getting everything square and bolting it down. I think the lift feels a lot more secure after being bolted down, and it doesn't move around when I drive a car up onto it. I know many others haven't bolted theirs down, but just thought I'd mention my experience.
 

toolman1967

Well-known member
Joined
Jan 8, 2008
Messages
426
Location
Benton Illinois
Hudson48, thanks for the REAL world review. After you straightened out the issues, did it raise and lower well. We will be using it to work on out trucks and some maintenance on the other family vehicles, I just want to make sure it is stable and does the lifting it is supposed to do. After you put a vehicle on it, let us know how it feels and if there is anything you regret or wish you would have done/bought.

Great comments on the issues thus far...Big THANKS to you!
 
OP
H

hudson48

Active member
Joined
Jan 1, 2008
Messages
37
Location
Brisbane Australia

Attachments

  • Darryls Run 27th June 2010 003 (Large).jpg
    Darryls Run 27th June 2010 003 (Large).jpg
    129.9 KB · Views: 189
  • HSV GXP 004 (Large).jpg
    HSV GXP 004 (Large).jpg
    121.7 KB · Views: 191
  • HSV GXP 002 (Large).jpg
    HSV GXP 002 (Large).jpg
    93.7 KB · Views: 193
  • HSV GXP 001 (Large).jpg
    HSV GXP 001 (Large).jpg
    76.3 KB · Views: 219
  • Garage and Rumpus 3.jpg
    Garage and Rumpus 3.jpg
    89.7 KB · Views: 208
  • Garage and Rumpus 2.jpg
    Garage and Rumpus 2.jpg
    111.1 KB · Views: 252
  • Garage and Rumpus 1.jpg
    Garage and Rumpus 1.jpg
    100.7 KB · Views: 240
OP
H

hudson48

Active member
Joined
Jan 1, 2008
Messages
37
Location
Brisbane Australia
The Hudson
 

Attachments

  • 110_1060 (Medium).JPG
    110_1060 (Medium).JPG
    113 KB · Views: 114
  • 110_1059 (Medium).JPG
    110_1059 (Medium).JPG
    134.5 KB · Views: 135
  • 110_1056 (Medium).JPG
    110_1056 (Medium).JPG
    121.2 KB · Views: 148
  • 110_1050 (Medium).JPG
    110_1050 (Medium).JPG
    105.2 KB · Views: 131
  • 109_0974 (Medium).JPG
    109_0974 (Medium).JPG
    111.7 KB · Views: 135
  • 109_0973 (Medium).JPG
    109_0973 (Medium).JPG
    143 KB · Views: 115
  • 109_0972 (Medium).JPG
    109_0972 (Medium).JPG
    115.3 KB · Views: 127
To avoid these ads, REGISTER NOW!
OP
H

hudson48

Active member
Joined
Jan 1, 2008
Messages
37
Location
Brisbane Australia
Well today I went to put the Hudson on the hoist and it wanted to skate the whole hoist up the floor.It is on a slippery epoxy type floor but I don't think it would matter even if it was bare cement.

So off to the hardware store for some special bolts to screw it down.What I bought was some special threaded masonary bolts.You drill a hole 12mm(diameter) and the threaded piece is about 13.5mm.When you bolt it into the concrete it makes its own thread and can be unscrewed from the floor if needed.I will do two in each post.

Anyone else used these to secure an item into concrete that could need to be removed and replaced,but not regularly.Haven't drilled the holes yet but will also check with my builder neighbour for his input.

The other option is something like a chemset application where you drill the hole,and using the special compound,insert a femaile threaded piece into the concrete.This sets hard and then use a bolt to screw down into the threaded insert.

Any advice???
 

toolman1967

Well-known member
Joined
Jan 8, 2008
Messages
426
Location
Benton Illinois
I was planning on anchoring mine down with a set of sleeve anchors. The kind with the permanent sleeve set into the ground and the bolt thread into it. This way I can unbolt the lift to move it if I wish and will not have the bolts sticking up out of the ground. I have read several posts on the lifts sliding on the floor while driving onto it.
 
OP
H

hudson48

Active member
Joined
Jan 1, 2008
Messages
37
Location
Brisbane Australia
Yes that is what I intend to do now.I purchased a Ramset product called
Loxin which is a sleeve with a threaded nut inside and will insert that into the floor slab.

http://www.ramset.com.au/public/article/show.asp?articleid=1130&menuItemID=213&toplvlID=3&menuNo=0


I was planning on anchoring mine down with a set of sleeve anchors. The kind with the permanent sleeve set into the ground and the bolt thread into it. This way I can unbolt the lift to move it if I wish and will not have the bolts sticking up out of the ground. I have read several posts on the lifts sliding on the floor while driving onto it.
 

lupin

Member
Joined
Oct 20, 2010
Messages
22
Location
Australia
I look at these photos and realize just how much I have to do at home.

Loving the shelf above the door though, might steal that idea.
 
OP
H

hudson48

Active member
Joined
Jan 1, 2008
Messages
37
Location
Brisbane Australia
Wow! What a nice garage set up ... particularly like the diner / pool room / theater feature! Is this garage attached to your house?

The garage is part of the house.It is the downstairs area and access is by the steps from the rumpus room.Also downstairs is a toilet,bathroom,2 bedrooms,my study/office that also has a drop down queen bed for guest overflow.
Upstairs is all our main living.Kitchen,dining,living room,formal lounge,powder room,and our bedroom and ensuite.Also upstairs is a large deck that is actually above the main garage and measures about 30ft X 20ft.My wife has another garage at the top level so that gives me potential for 5 cars downstairs with one on the hoist.
We had some professional photos taken by our builder who entered the house into a building awards competition.
The house was the culmination of about a 5 year process.The original house on the site was built in 1919 but had serious concrete cancer and was totally demolished.We then rebuilt with the emphasis on the new house resembling the original art deco style built originally.It was also important(to me) that the new house had plently of garage/car space.
In fact my wife reckons the house was built around the garage.:)
 

Attachments

  • _IMA1113.jpg
    _IMA1113.jpg
    138.2 KB · Views: 143
  • _IMA1303.jpg
    _IMA1303.jpg
    139.7 KB · Views: 138
  • _IMA1150.jpg
    _IMA1150.jpg
    135.2 KB · Views: 133
  • _IMA1244.jpg
    _IMA1244.jpg
    136.9 KB · Views: 132
  • _IMA1459 (Medium).jpg
    _IMA1459 (Medium).jpg
    110.9 KB · Views: 113
  • _IMA1392 (Medium).jpg
    _IMA1392 (Medium).jpg
    106.3 KB · Views: 128
Last edited:
OP
H

hudson48

Active member
Joined
Jan 1, 2008
Messages
37
Location
Brisbane Australia
Well the first test of driving a car on the hoist revealed that we would have to secure it to the floor.The Hudson is about 3600lbs I guess and as soon as it went up the ramps it skated the hoist along the floor.

I got some concrete anchors called Dynasets.They are only a few inches long and have a threaded section at the top(12mm).The bottom portion has slots.
Inside the unit is a bullet.We drilled down into the concrete about 6 inches and dropped the Dynaset in.You then get a punch(or pay extra for the special tool) and hit the "bullet" which moves down the Dynaset and splays out the slotted end.This secures it in the concrete.

We then took some stainless threaded 12mm rod and measured the lengths we needed.Made these up with 2 nuts at the top as locking nuts to thread the bolt into the hole and a loose nut and washer below.Then threaded the unit into the Dynaset until it hit bottom and then tightened the "locking" nut down onto the base plate of the hoist.

We did 2 on each post diagonally.If I ever want to move the hoist it will take about 5 mins to undo the 8 bolts and fit the castors.Just the hole in the concrete when it is shifted.

We could have used conventional bolts but getting the right measurement would have been a hassle.This was very easy.The whole job was done in one & a half hours.

http://www.ramset.com.au/public/article/show.asp?articleid=1121&menuItemID=214&toplvlID=3&menuNo=4
 

Attachments

  • Hoist Anchored 1.JPG
    Hoist Anchored 1.JPG
    123.7 KB · Views: 39
  • Hoist Anchored 2.JPG
    Hoist Anchored 2.JPG
    144.6 KB · Views: 29
OP
H

hudson48

Active member
Joined
Jan 1, 2008
Messages
37
Location
Brisbane Australia
Used the hoist to lift the Hudson for the first try.Had to do a little adjustment as the locks weren't setting in evenly at first.Adjusted the locking plates at the front(several times) and finally got it right.
Part of my procedure before stepping under the car is checking front and rear that the locking mechanism has moved right across to the locking position.
Hadn't looked under the Hudson for some time.Needs a little clean up!!:)
 

Attachments

  • DSC00162 (Small).JPG
    DSC00162 (Small).JPG
    58.6 KB · Views: 62
  • DSC00163 (Small).JPG
    DSC00163 (Small).JPG
    78.9 KB · Views: 59
  • DSC00164 (Small).JPG
    DSC00164 (Small).JPG
    81.5 KB · Views: 59

mrstang69

Well-known member
Joined
Feb 16, 2009
Messages
217
Location
South Texas
Hadn't looked under the Hudson for some time.Needs a little clean up!!:)


:wtf: 
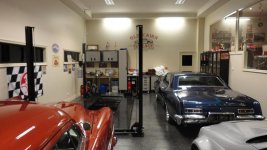
How do you put up with all that filth under there?:willy_nil Glad you have the lift in to clean it. :lol_hittiYou are truly blessed with a wonderful house, cars and garage, and not to forget the wife who is truely wonderful for building the house around the garage. :thumbup: Keeper :bowdown:
 
To avoid these ads, REGISTER NOW!
Top Bottom