To avoid these ads, REGISTER NOW!

The making of a table

Toxicscrew

Well-known member
Joined
Nov 22, 2006
Messages
296
Location
Saint Louis, MO
I'm going to need some help with this one.

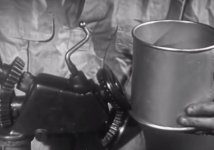
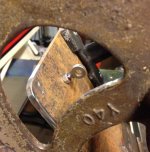
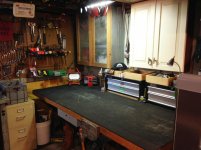
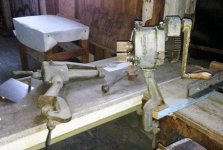
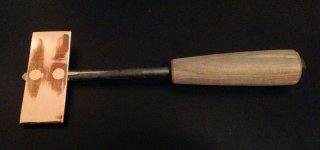
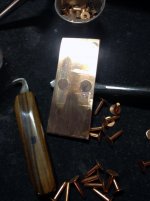
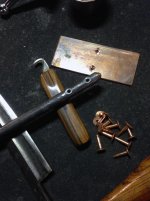
Looking for ideas on how/what to do with this old electrical knife blade circuit box.

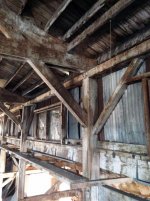
Salvaged from an old building.

Put an LED strip in them with the blades closed. Use for accent/stair lighting. First thing that came to my head.
Pieces like that are way cool, but finding use for them is a challenge.
 
To avoid these ads, REGISTER NOW!

Toxicscrew

Well-known member
Joined
Nov 22, 2006
Messages
296
Location
Saint Louis, MO
Toxic,

I really enjoyed going thru your website. Very cool stuff. The beer post in the blog made me thirsty!

I actually get do fairly similar type projects in Seattle.

After working in a creative environment, I'd sure hate to even think about going back to building housing for the masses.

Looking forward to seeing your upcoming projects.

Thanks, yours continue to impress. Been a bit since I've been on GJ, trying to get caught up. Need to update my website too, maybe with the coming could days I'll have some time. Read your MR2 thread, very nice job.
 
OP
R

RivennHewn

Well-known member
Joined
Jun 4, 2011
Messages
10,372
Location
PNW
Toxic,

Kinda like the idea of making the elect. box into a light fixture.

Got my wheels turning………..

Thanks
 

Toxicscrew

Well-known member
Joined
Nov 22, 2006
Messages
296
Location
Saint Louis, MO
OP
R

RivennHewn

Well-known member
Joined
Jun 4, 2011
Messages
10,372
Location
PNW
I have an upcoming project at work that will require a welding spoon.

I was going to buy one, but tonight while the wife was prepping for Thanksgiving I got some shop time.

Started with one rather large nail, some scrap copper, and a chunk of apple wood from the lathe pile. Stained with vinegar and steel wool rust.

Handle is hand shaped with a draw knife, plane and spokeshave.

The copper is riveted on with copper rivets.

It got too late, and people were start to go to bed, so I'll finish the face tomorrow.
 

Attachments

  • weldingspoon.jpg
    weldingspoon.jpg
    125.1 KB · Views: 137
  • spoonrough.jpg
    spoonrough.jpg
    112.6 KB · Views: 111
  • spoonparts2.jpg
    spoonparts2.jpg
    131.8 KB · Views: 111
  • spoonparts.jpg
    spoonparts.jpg
    138 KB · Views: 117
  • spoonhandle.jpg
    spoonhandle.jpg
    139 KB · Views: 126
  • spoonraw.jpg
    spoonraw.jpg
    139.3 KB · Views: 106
OP
R

RivennHewn

Well-known member
Joined
Jun 4, 2011
Messages
10,372
Location
PNW
Couple more pics of the completed welding spoon.

Hope you all are having a nice Thanksgiving weekend.
 

Attachments

  • weldingspoon4.jpg
    weldingspoon4.jpg
    146.3 KB · Views: 93
  • weldingspoon3.jpg
    weldingspoon3.jpg
    140.1 KB · Views: 81

Radio Ron w4ron

Well-known member
Joined
Jan 23, 2013
Messages
867
Location
Radio Heaven (near Charlotte NC)
Thanks Turbo.

The handle is Californian Buckeye Burl. I used another vertebrae to cover the nut and washer that hold the handle on.

I sold it, and used the $$ to buy my rivet gun. Now it's garage related!


I love the cane. I've made a few over the years, with my bad back
and screwed up right ankle I have to use one to keep from falling down.

I'd love to find a cane like that someday.

.
 
OP
R

RivennHewn

Well-known member
Joined
Jun 4, 2011
Messages
10,372
Location
PNW
Thank you Radio Ron. With your skills, you shouldn't have any trouble making a cane for yourself. It was a fun, but time consuming, project.

Made good progress on the Delta Rockwell belt sander. The new bearings went in super easy. Mostly all put back together, with just a few minor details left.

I want to put a link belt on it, so I can't set the motor until I pick one up.

Also need to switch the motor wiring, so I can plug it into a 115V outlet.
 

Attachments

  • Deltasander5.jpg
    Deltasander5.jpg
    141.5 KB · Views: 178
  • Deltasander6.jpg
    Deltasander6.jpg
    145.3 KB · Views: 191
  • canetopsmall.jpg
    canetopsmall.jpg
    146.4 KB · Views: 156
OP
R

RivennHewn

Well-known member
Joined
Jun 4, 2011
Messages
10,372
Location
PNW
Good news: The sander is completely back together. Smooth and quite.

Bad news: Wired for 115V it only runs in the wrong direction. When It was wired 230V it was running in the right direction. I guess at 230 you can change direction, but at 115 you can't. (based on schematic on the motor)

I plan on contacting the manufacture for directions on reversing it, or worst case scenario, adding another outlet to the shop.
 

bsg

Well-known member
Joined
Feb 10, 2009
Messages
329
Location
Imlay City, MI
Good news: The sander is completely back together. Smooth and quite.

Bad news: Wired for 115V it only runs in the wrong direction. When It was wired 230V it was running in the right direction. I guess at 230 you can change direction, but at 115 you can't. (based on schematic on the motor)

I plan on contacting the manufacture for directions on reversing it, or worst case scenario, adding another outlet to the shop.

If you can reverse it in high voltage you should be able to do the same in low voltage.
You have to pull the leads out of the motor and swap two of the leads, there should be a schematic inside the cover where you make the electrical connection to the motor.

Kevin
 
OP
R

RivennHewn

Well-known member
Joined
Jun 4, 2011
Messages
10,372
Location
PNW
If you can reverse it in high voltage you should be able to do the same in low voltage.
You have to pull the leads out of the motor and swap two of the leads, there should be a schematic inside the cover where you make the electrical connection to the motor.

Kevin

Kevin,

I'm assuming it's do-able, but there is no schematic. I've read a little online and watched a video or two, but I'm going to go to the source and contact the manufacturer.

I need the "wiring for the electrically challenged" version.

I'm assuming that the note "To reverse interchange red and black leads" applies to the high voltage only. Maybe I'm wrong.
 

Attachments

  • Motorlable.jpg
    Motorlable.jpg
    138.6 KB · Views: 72
Last edited:
OP
R

RivennHewn

Well-known member
Joined
Jun 4, 2011
Messages
10,372
Location
PNW
There was no other schematic other than the label. Had my electrician look at it at work today, and got it figured out.

Now it runs, and in the right direction!

I bought a trunion arm off Ebay, and should receive it on Thursday.

Now on the hunt for the table.

Total out of pocket so far: $225, including paint, bearings, and the arm.
 

Attachments

  • DeltaRockwell1.jpg
    DeltaRockwell1.jpg
    136.4 KB · Views: 88
  • trunion.jpg
    trunion.jpg
    85.1 KB · Views: 71

1/2 Cup

Member Emeritus
Joined
Apr 28, 2012
Messages
19,283
Location
Shepparton. Victoria. Australia
There was no other schematic other than the label. Had my electrician look at it at work today, and got it figured out.

Now it runs, and in the right direction!

I bought a trunion arm off Ebay, and should receive it on Thursday.

Now on the hunt for the table.

Total out of pocket so far: $225, including paint, bearings, and the arm.

Good news:thumbup:
 
OP
R

RivennHewn

Well-known member
Joined
Jun 4, 2011
Messages
10,372
Location
PNW
With the sander project all but done, it's time to turn my attention to the lathe.

I'm coming to the conclusion that this lathe never was intended to be a high quality tool. More of a homeowner/hobbist level tool.

It's still pretty cool.

As I got it, it took up a huge bit of real-estate, so my plan is to give it a smaller footprint.

I also want to give it an oil tray to contain any messing dripping.

The backplate that will hold the pulleys/brackets will be hinged, and hang on the belts to provide tension. I can always add more weight if needed.

I will have to reverse the motor to get it rotating the appropriate direction.
(oh please, not this again) This motor is set up to be bi-directional.
 

Attachments

  • lathetable5.jpg
    lathetable5.jpg
    140.7 KB · Views: 73
  • lathetable4.jpg
    lathetable4.jpg
    139.8 KB · Views: 71
  • lathetable3.jpg
    lathetable3.jpg
    142.9 KB · Views: 78
  • lathetable2.jpg
    lathetable2.jpg
    143.7 KB · Views: 84
  • lathetable.jpg
    lathetable.jpg
    140.1 KB · Views: 85
  • Sypherlathe.jpg
    Sypherlathe.jpg
    158 KB · Views: 103
To avoid these ads, REGISTER NOW!
OP
R

RivennHewn

Well-known member
Joined
Jun 4, 2011
Messages
10,372
Location
PNW
Little more progress on the lathe table today.

Got the chip/oil tray tacked up, and the hinged pulley mount installed.

I got to use my new welding spoon to fill in some pre-existing holes that I didn't want to see.
 

Attachments

  • Sypherhinges.jpg
    Sypherhinges.jpg
    138.4 KB · Views: 102
  • lathetray7.jpg
    lathetray7.jpg
    145.8 KB · Views: 93
  • lathetray6.jpg
    lathetray6.jpg
    141.3 KB · Views: 94
  • lathetray8.jpg
    lathetray8.jpg
    136.3 KB · Views: 96
  • lathetable9.jpg
    lathetable9.jpg
    136.6 KB · Views: 110
  • maiktamiller.jpg
    maiktamiller.jpg
    143.6 KB · Views: 98

1/2 Cup

Member Emeritus
Joined
Apr 28, 2012
Messages
19,283
Location
Shepparton. Victoria. Australia
The tray is looking great and fits the era of the lathe.:thumbup:


I have to admit I have never seen a welding spoon as such. For many years now I have been using a range of copper and brass bar and they work nicely on thinner gauge sheet metal as a heat sink.

Regards
 
OP
R

RivennHewn

Well-known member
Joined
Jun 4, 2011
Messages
10,372
Location
PNW
Thanks 1/2Cup.

It's coming along. The welding spoon thing was just me wanting to play with my new toy. I was just using it as a backing while filling the holes with puddle weld.

Here's a short clip of the motor, belt and pulleys in action. Funny how the chuck seems to be turning the wrong way. Look at the belt direction VS the chuck.

The belts are new, and haven't relaxed yet.

I was hoping the weight of the backplate would help tension the belts, but it isn't enough.

Working on a tensioning system next.

 
Last edited:

1/2 Cup

Member Emeritus
Joined
Apr 28, 2012
Messages
19,283
Location
Shepparton. Victoria. Australia
The lathe runs great, I would not over do the tensioning though. Perhaps a washing machine bowl centring spring with an all threaded adjustable nut and locknut arrangement or similar.???

Just a thought, regards
 

nine4gmc

Well-known member
Joined
Mar 24, 2012
Messages
14,357
Location
Dallas
The sander is almost too pretty to use, I think it would be incorporated into my living room somehow:D

No words for a FREE lathe other than the usual, YOU ****! :beer: Can't wait to see the table finished. I love this thread!
 
OP
R

RivennHewn

Well-known member
Joined
Jun 4, 2011
Messages
10,372
Location
PNW
Nine and 1/2 cup,

Wish I had a tenth of the talent you guys have.

Reading thru your threads gives me plenty to strive for.

Thanks
 
OP
R

RivennHewn

Well-known member
Joined
Jun 4, 2011
Messages
10,372
Location
PNW
Found an online pulley/belt speed calculator.

http://www.blocklayer.com/Pulley-BeltEng.aspx

Think I'm going to have to play with the pulleys some more.

I set them up as they were when I got it, but the chuck is only doing 258 RPM.

Figuring out the belt lengths for one speed was a PITA. Getting set up for a couple more speed options - ugh…...
 

Attachments

  • pulleyscreenshot.jpg
    pulleyscreenshot.jpg
    91.5 KB · Views: 44
OP
R

RivennHewn

Well-known member
Joined
Jun 4, 2011
Messages
10,372
Location
PNW
1942 Vocational training video for Sheet Metal Worker Guidance:


Attachments

  • Screen Shot.jpg
    Screen Shot.jpg
    71.2 KB · Views: 47
OP
R

RivennHewn

Well-known member
Joined
Jun 4, 2011
Messages
10,372
Location
PNW
Settled on using a turnbuckle for tensioning the belts on the lathe.

Added an eyebolt to the pan, and one to the hinged plate that holds the pulleys.

The eyebolts came out of the Landis Shoe Stitcher that became the base for my zinc topped round table.

Need to find the right turnbuckle, but not many places carry the Jaw-Jaw style.

Everywhere I went, they only carried hooks or eyes, so I had to order one.
 

Attachments

  • uppereye.jpg
    uppereye.jpg
    135.8 KB · Views: 43
  • lowereye.jpg
    lowereye.jpg
    139.2 KB · Views: 45
OP
R

RivennHewn

Well-known member
Joined
Jun 4, 2011
Messages
10,372
Location
PNW
Found some time at work today to work on the side cover of the Rockwell belt sander.

The belt had cut thru almost the entire length of the cover.

Ready for final grind, and paint. (Last of the ugly green)
 

Attachments

  • beltcoverweld1.jpg
    beltcoverweld1.jpg
    146.3 KB · Views: 80
  • beltcoverweld2.jpg
    beltcoverweld2.jpg
    147.6 KB · Views: 76
  • cutguard2.jpg
    cutguard2.jpg
    106.3 KB · Views: 76
Last edited:
OP
R

RivennHewn

Well-known member
Joined
Jun 4, 2011
Messages
10,372
Location
PNW
Had our sandblasting subcontractor out to the job site today to blast some 80 year old Douglass fir 2 X 12s and some beams.

They had some nasty old paint on them. Now they have a nice dark, weathered look to them.

Should be more than enough to do the job, so there should be some left over for me to use in an upcoming project for myself.

Thinking I might……make a table?
 

Attachments

  • blasted2.jpg
    blasted2.jpg
    146.8 KB · Views: 113
  • blasted1.jpg
    blasted1.jpg
    143.7 KB · Views: 119
  • blasted3.jpg
    blasted3.jpg
    134.6 KB · Views: 138

1/2 Cup

Member Emeritus
Joined
Apr 28, 2012
Messages
19,283
Location
Shepparton. Victoria. Australia
Your eyebolt and turnbuckle idea will not look out of place.:thumbup:

Looking forward to seeing the sander finished, coming up well..

The Douglas fir will make one nice table top, looks very similar to the Oregon we get out here.


Regards
 
OP
R

RivennHewn

Well-known member
Joined
Jun 4, 2011
Messages
10,372
Location
PNW
I find a clean bench is a sterile environment for creativity.

I like a little more clutter in my life.

Still, every once in a while a good cleaning is called for.
 

Attachments

  • cleanbench.jpg
    cleanbench.jpg
    138.4 KB · Views: 194
OP
R

RivennHewn

Well-known member
Joined
Jun 4, 2011
Messages
10,372
Location
PNW
Showed up at an address for a CL find this afternoon, and got lost in an old building.

40,000 sq ft of total awesomeness.

Spent about an hour touring this old building that just got vacated, and is going on the market.

Besides the high ceilings and large beams, the grain elevators are 6 stories of stacked 2x6s.

The outside dimensions of the silos were about 25' X 40', and had interior partitions as well.

That is an insane amount of wood.
 

Attachments

  • RRCo6.jpg
    RRCo6.jpg
    148.6 KB · Views: 244
  • RRCo5.jpg
    RRCo5.jpg
    144.7 KB · Views: 237
  • RRCo4.jpg
    RRCo4.jpg
    146.4 KB · Views: 217
  • RRCo3.jpg
    RRCo3.jpg
    144.3 KB · Views: 205
  • RRCo2.jpg
    RRCo2.jpg
    145.5 KB · Views: 208
  • RRCo1.jpg
    RRCo1.jpg
    146.3 KB · Views: 235
OP
R

RivennHewn

Well-known member
Joined
Jun 4, 2011
Messages
10,372
Location
PNW
Tools too…..
 

Attachments

  • RRCo7.jpg
    RRCo7.jpg
    137.6 KB · Views: 218
  • RRCo9.jpg
    RRCo9.jpg
    137.1 KB · Views: 181
  • RRC10.jpg
    RRC10.jpg
    138.7 KB · Views: 170
  • RRCo8.jpg
    RRCo8.jpg
    144.2 KB · Views: 187
To avoid these ads, REGISTER NOW!
Top Bottom