To avoid these ads, REGISTER NOW!

The "Money Pit" Garage

jigaib

Member
Joined
Feb 23, 2009
Messages
14
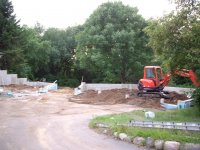
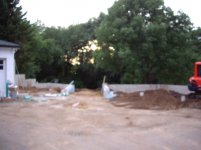
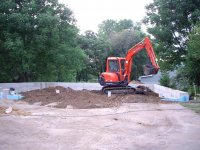
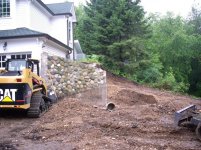
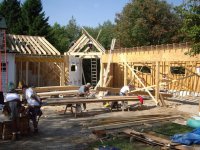
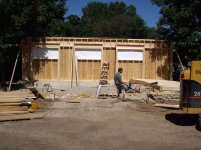
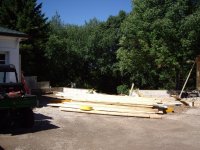
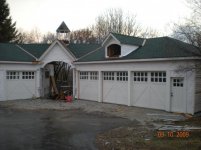
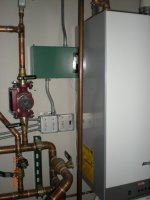
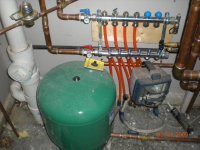
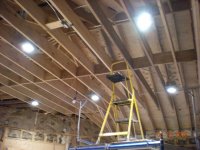
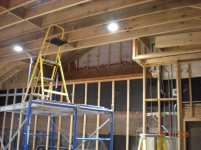
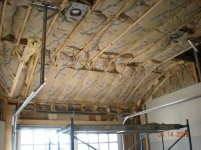
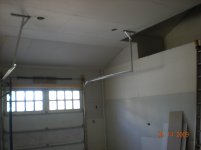
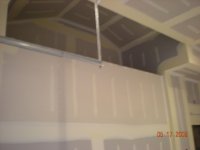
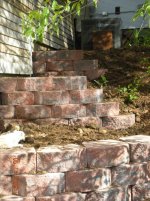
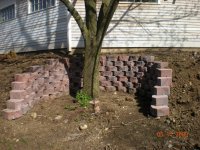
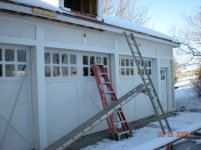
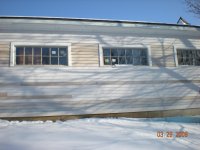
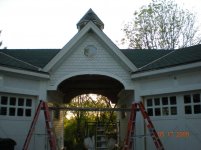
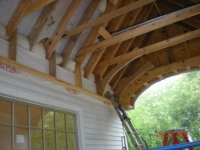
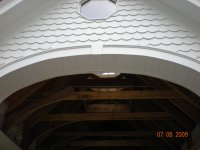
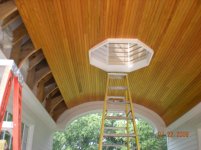
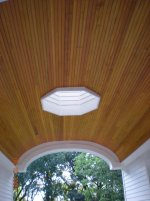
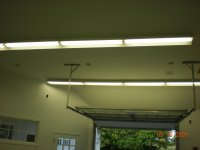
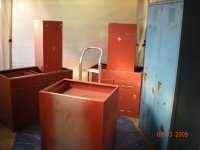
Hello everyone, I am new to the site. Actually I've been on here quite a few times, so now I think that it is only fair that I share the project that I have been working on. In early August of last year my dad and I decided we needed a new place to store and work on all our junk! So when my mom went out of town for a weekend we began construction or rather excavation on the new garage. Doing everything ourselves except the concrete work and shingles this is how far we have gotten. The plan is to try and finish everything before I go off to college at the end of the summer. I welcome any ideas, comments, concerns you guys have.
Thanks, Jimmy
 
To avoid these ads, REGISTER NOW!
OP
J

jigaib

Member
Joined
Feb 23, 2009
Messages
14
I hoped this worked. You can see the excavation that we did here. The concrete retaining wall held back a hill of dirt that went all the way up to the base of the siding on the existing garage. That all had to get taken out as it would be in the way. Don't know if you can see it in the pictures, but there was also a root cellar toward the back of the garage that we had to cut out and remove. During excavation we had to maneuver around the gas line coming into the house, the 400 amp electrical service coming into the house, the telephone line coming into the house, as well as the septic coming out of the house. In fact before we could grade the area out, we had to dig down to the septic tank and we put on all new taller riser pieces to extend them to grade. Needless to say the mother was not too happy when she came home to see her landscaped area of the house all torn out! There were some big bushes, three large pine trees, and a whole bunch of other **** that needed to come out. I should find a picture of that to show as well. But she got over it and we moved on. I'll post more pics as soon as i find them.
 

Attachments

  • IMGP2324.jpg
    IMGP2324.jpg
    147.8 KB · Views: 355
  • IMGP2354.jpg
    IMGP2354.jpg
    148.1 KB · Views: 309
  • IMGP2353.jpg
    IMGP2353.jpg
    131.5 KB · Views: 290
  • IMGP2352.jpg
    IMGP2352.jpg
    150.3 KB · Views: 282
  • IMGP2327.jpg
    IMGP2327.jpg
    151 KB · Views: 283
  • IMGP2326.jpg
    IMGP2326.jpg
    153.9 KB · Views: 319
  • IMGP2325.jpg
    IMGP2325.jpg
    151 KB · Views: 401
OP
J

jigaib

Member
Joined
Feb 23, 2009
Messages
14
I am officially reviving this build. For those of you that had seen it before and then were wondering what happened. I kinda forgot about this thread and got all wound up in building the garage/preparing for college. But now that I am at school with many pictures on my computer I think it is only fair that I share my build with you guys. In this post I've included some pictures of the lumber delivery, putting up the first walls and then some roofing work.
Jimmy
 

Attachments

  • IMGP2444.jpg
    IMGP2444.jpg
    142.5 KB · Views: 227
  • IMGP2439.jpg
    IMGP2439.jpg
    134.2 KB · Views: 237
  • IMGP2433.jpg
    IMGP2433.jpg
    154 KB · Views: 308
  • IMGP2437.jpg
    IMGP2437.jpg
    140.3 KB · Views: 209
  • IMGP2436.jpg
    IMGP2436.jpg
    141.6 KB · Views: 209
  • IMGP2392.jpg
    IMGP2392.jpg
    148.7 KB · Views: 215
  • IMGP2393.jpg
    IMGP2393.jpg
    148.7 KB · Views: 207

Kevin54

MEMBER EMERITUS
Joined
Jan 12, 2005
Messages
29,341
Location
Urbana, Ohio
Single car to the left and three car to the right with an archway to the rear yard? I like it!!! Looking forward to more pics.
 
OP
J

jigaib

Member
Joined
Feb 23, 2009
Messages
14
Included in these pictures are some more roof sheathing pictures. A couple pictures of the copula going up over the Coacheree (The drive thru part). a somewhat overall view of the garage setup. a picture of me putting up christmas lights, but it gives some idea of the new setup. The new placement of the gas meter. (This was quite a project as we moved the whole thing and dealt with the gas line all through construction.) Also seen is the new 1 1/2" line over to the boiler room for the garage. and lastly a picture of the garage doors finally in. For these we went with Wayne Dalton same as the original ones on the house, but were surprised to find that after only a few years (8) they had changed how they made the doors entirely. the old ones were nice solid doors, where as the new ones were just a piece of insulation sandwiched between 1/8 " plywood. Regardless, we put these up ourselves and saved about $1,000 a door. but they did take quite a while to prime, paint, and putup.
Thanks for looking
Jimmy
 

Attachments

  • DSCN0152.jpg
    DSCN0152.jpg
    141.2 KB · Views: 644
  • DSCN0156.jpg
    DSCN0156.jpg
    140.4 KB · Views: 299
  • IMGP2498.jpg
    IMGP2498.jpg
    147.9 KB · Views: 372
  • IMGP2475.jpg
    IMGP2475.jpg
    147.6 KB · Views: 395
  • IMGP2456.jpg
    IMGP2456.jpg
    142.4 KB · Views: 260
  • IMGP2458.jpg
    IMGP2458.jpg
    133.4 KB · Views: 278
  • IMGP2442.jpg
    IMGP2442.jpg
    134 KB · Views: 270

rieferman

Well-known member
Joined
May 18, 2009
Messages
2,586
Location
Collegeville PA (30 min west of Philly)
wow is right. love that cupola for sure. will you have a light up there? it looks like you're leaving room for one. also, that space above the arch looks like a perfect place to display something, just not sure what the something is. do you have plans for anything like that?

very impressive
 
OP
J

jigaib

Member
Joined
Feb 23, 2009
Messages
14
yeah there will be a light up there in the cupola. You will see in future posts what we did with the space above the archway. Thanks for lookin
Jimmy
 
OP
J

jigaib

Member
Joined
Feb 23, 2009
Messages
14
as far as toys go we have my 67 camaro still in the works, my dads 41 buick, some daily drivers (2500 GMC, Canyon, Tahoe), a ski doo snowmobile, and many assorted tractors and machines for maintaining the property.
I dont really have many pics of them, heres one i found of the buick when he first got it home, and one of the camaro when it first came. you can see some of our other "toys" in the earlier posts... The mini backhoe, cat track loader, Gator are all ours. sadly the lift was not.
 

Attachments

  • IMGP1924.jpg
    IMGP1924.jpg
    149.6 KB · Views: 89
  • IMGP1864.jpg
    IMGP1864.jpg
    128.3 KB · Views: 94
OP
J

jigaib

Member
Joined
Feb 23, 2009
Messages
14
These are some of the pictures of the radiant heat install and the whole system, this took quite a lot of time and I don’t think that the pictures fully do the process justice, but you can get the idea. We’ve got three pumps to supply the system, One pump for the one car, one pump for the three car, and one pump for the future ice-melt system (the very distant future mind you). The boiler is a condensing boiler (Very efficient, don’t ask me how it is, it just is) from the triangle tube company. A watts radiant manifold, as well as a lot of copper! One problem that we did have when installing the system was purging the air bubbles out of the lines… we ended up hooking up one of the 2” pond pumps we had to finally get all the air out of the system. Any one have any thoughts on this? Also included in the update is one of my light boxes (just a 1’ by 1’ drainage box) for underneath the future lift. And lastly a couple of pictures of the conduit, we ran something like 700’ (maybe more) of ½” and about 200’ of ¾”.
sorry about the lag in the updates, trouble uploading pictures
Jimmy
 

Attachments

  • DSCN0151.jpg
    DSCN0151.jpg
    141.1 KB · Views: 156
  • DSCN0158.jpg
    DSCN0158.jpg
    134.1 KB · Views: 181
  • DSCN0159.jpg
    DSCN0159.jpg
    127.4 KB · Views: 129
  • DSCN0160.jpg
    DSCN0160.jpg
    141.5 KB · Views: 148
  • DSCN0150.jpg
    DSCN0150.jpg
    135.3 KB · Views: 153
  • DSCN0174.jpg
    DSCN0174.jpg
    133.1 KB · Views: 161
  • DSCN0179.jpg
    DSCN0179.jpg
    134 KB · Views: 146
To avoid these ads, REGISTER NOW!

katmat

Well-known member
Joined
Jan 10, 2007
Messages
91
Great to see conduit being used! Doesn't cost much more & it's much safer & great for future expansion.
 
OP
J

jigaib

Member
Joined
Feb 23, 2009
Messages
14
agreed on the conduit. ever since we did some remodel work on our house and found some of the romex chewed through by mice, we have always used conduit.
Jimmy
 
OP
J

jigaib

Member
Joined
Feb 23, 2009
Messages
14
In this update I've got some pictures of the final things we did before the insulation/drywall in the one-car. The first picture shows the 6 can lights we put in, they are rated for 100W so they put off some light, and they are also rated for use with insulation. In the finished product we are going to have a few florescent lights as well- should be plenty of light in this shop! In the second picture you can see the framing we did for the little display shelf in the garage (we don't know exactly what to put up there, an old motorcycle maybe... any ideas?). Then we have a couple of insulation pictures R-38 in the ceiling and R-19 in the walls. R-38 may seem like a lot, but to anyone who is planning their own construction I would definitely suggest it as we got a rebate of 75% from the Government. We ended up being able to insulate the whole place for under like $500. Then came the drywall, although we were originally planning to do everything on this project we contracted out the some of the drywalling and taping and painting... just made sense that way when for a few hundred bucks more than material they would put everything up. They did an amazing job! there were some tricky angles with the roofline and all, but it all looks great. Next week I got some exciting outside work pictures coming!
Thanks for lookin
Jimmy
 

Attachments

  • DSCN0147.jpg
    DSCN0147.jpg
    144.2 KB · Views: 131
  • DSCN0149.jpg
    DSCN0149.jpg
    141.2 KB · Views: 118
  • DSCN0269.jpg
    DSCN0269.jpg
    141.3 KB · Views: 131
  • DSCN0271.jpg
    DSCN0271.jpg
    135 KB · Views: 121
  • DSCN0273.jpg
    DSCN0273.jpg
    153.8 KB · Views: 120
  • DSCN0275.jpg
    DSCN0275.jpg
    159.7 KB · Views: 117
  • DSCN0288.jpg
    DSCN0288.jpg
    183 KB · Views: 133
OP
J

jigaib

Member
Joined
Feb 23, 2009
Messages
14
Ha, there was the initial little comments of "What are you guys thinking?" and what not, but she came around once the idea that she wouldn't have to scrape her windshield in the winter anymore.
 

ka41

Active member
Joined
May 12, 2009
Messages
35
Very nice build so far. Christmas lights up in September? Also I see snow, where do you live?
 
OP
J

jigaib

Member
Joined
Feb 23, 2009
Messages
14
ooh sorry for the confusion, we started this project in august of last year... that picture was taken around thanksgiving 2008. But we are from norther illinois, it can get kinda sorta cold.
 
OP
J

jigaib

Member
Joined
Feb 23, 2009
Messages
14
These are some pictures of the outside work that we did, not exactly in order but you get the idea. The first two are of the retaining walls that I put in, as well as a couple of siding pictures, a picture of the work we did over the garage doors, and lastly some of the beginning of the thruway work.
 

Attachments

  • DSCN0277.jpg
    DSCN0277.jpg
    152 KB · Views: 59
  • DSCN0278.jpg
    DSCN0278.jpg
    151.2 KB · Views: 62
  • DSCN0157.jpg
    DSCN0157.jpg
    136.3 KB · Views: 53
  • DSCN0187.jpg
    DSCN0187.jpg
    138.4 KB · Views: 57
  • DSCN0189.jpg
    DSCN0189.jpg
    134.6 KB · Views: 53
  • DSCN0286.jpg
    DSCN0286.jpg
    127.3 KB · Views: 67
  • DSCN0285.jpg
    DSCN0285.jpg
    140.8 KB · Views: 76
OP
J

jigaib

Member
Joined
Feb 23, 2009
Messages
14
In this update Ive got a picture of the first coat of paint on in the one car section, and then the remaining pictures are all of the thru-way ceiling construction. Its funny how looking at the pictures it seemed like the ceiling went so fast, whereas in reality it took upwards of 3 weeks!! Lots of intricate cuts, and much thought went into this little section. You can also see the completed cupola on top of the thru-way, as well as the skylight coming down. The cupola was a whole other story, as that also had so many parts. and also is constructed of some old windows we had laying around... but needed to be trimmed up and re glazed.
 

Attachments

  • DSCN0290.jpg
    DSCN0290.jpg
    158.9 KB · Views: 51
  • DSCN0293.jpg
    DSCN0293.jpg
    133.2 KB · Views: 53
  • DSCN0312.jpg
    DSCN0312.jpg
    129.6 KB · Views: 49
  • DSCN0315.jpg
    DSCN0315.jpg
    123.1 KB · Views: 45
  • DSCN0318.jpg
    DSCN0318.jpg
    137.3 KB · Views: 54
  • DSCN0327.jpg
    DSCN0327.jpg
    134 KB · Views: 53
  • DSCN0346.jpg
    DSCN0346.jpg
    138 KB · Views: 51
OP
J

jigaib

Member
Joined
Feb 23, 2009
Messages
14
This update pretty much catches you guys up with the progress thusfar, weve got the finishing of the thru-way ceiling, the finishing of the shelf in the one car. the painting of the one car walls and ceiling, used Break-Through paint seems like pretty high quality stuff, then after much debate over seemingly every possible floor covering we just went with the rust-oleum home depot special. we just couldnt justify 2,000 for the floor.
 

Attachments

  • DSCN0328.jpg
    DSCN0328.jpg
    135.8 KB · Views: 29
  • DSCN0339.jpg
    DSCN0339.jpg
    201.4 KB · Views: 24
  • DSCN0340.jpg
    DSCN0340.jpg
    124.3 KB · Views: 29
  • DSCN0341.jpg
    DSCN0341.jpg
    284 KB · Views: 22
  • DSCN0352.jpg
    DSCN0352.jpg
    136.5 KB · Views: 24
  • DSCN0359.jpg
    DSCN0359.jpg
    198 KB · Views: 26
To avoid these ads, REGISTER NOW!
Top Bottom