To avoid these ads, REGISTER NOW!

The Northern Early's shop

Joined
Jan 10, 2016
Messages
22
Location
PNW
Hello everyone. I have been a member for a bit and a lurker for a decade. My shop has never been anything to show off but I've always been proud. I'm slowly creating my perfect shop and I want to share my journey, now that it's not a complete pigpen.

My shop is in the basement of the house I live in. About 1200sqft separated between three main rooms. A dirty shop, a clean shop, and a storage room.

me: give me something broken and I'll fix it. I specialize in houses. I'm a wood worker by trade and a maker by heart.

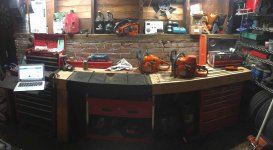
My clean shop is for wood and electronics. It houses my main go to tools and benches. It's also where I unload my van into on a Friday when I just want beer so it can be quite the pile. My dirty shop is for the motor/transmission rebuilds and welding or greasy/painting projects. The storage room is turning into a bench mount tool room as I get rid of dumbing hoarding type car parts.

Welcome to my journey and I hope you enjoy the ride. Not only will it be bat **** crazy but we will probably chuckle at least twice along the way.
 
To avoid these ads, REGISTER NOW!
OP
N
Joined
Jan 10, 2016
Messages
22
Location
PNW
To start yesterday was my birthday. How many? You'll have to ask my mother because without doing the math I don't know.

Anyway.

I have had a bench in design phase for the last two years or so. A machinist friend of mine bought a metal shear brake (press?) and pillaged the legs off of it so he could make a really cool desk. I felt like a scrapper but I giddily grabbed the bench from his scrap pile to some day be the center piece of my future work bench. Oh man it could even be the welding bench in my wood world. Perfect.

At some point I found the time to glue up a bunch of 2x6's. Then a month later I found the time to plan my new bench flat. Well turns out Sunday and Monday I found the time to fit the shear table and fit it in my shop with time to throw some finish on it for my birthday. Sweet!

Swept the floor and brushed the cob webs off the lights and I came out with a picture of a shop that dosent even begin to explain how far it's come, but I hope you all enjoy my "budget" shop.


Thumper68

Well-known member
Joined
May 16, 2013
Messages
5,134
Location
Duluth MN
If I read that right your bench is solid 2x6's?

Very nice start to a shop thread, keep adding pics and descriptions.
 
OP
N
Joined
Jan 10, 2016
Messages
22
Location
PNW
Another minor part of my shop is the off road camping supplies/ bike shop bench. I have grown to love these little Rubbermaid totes that a created a roof rack for my ohv to fit them specifically. Fishing. Load these three. Camping load these five. Zombies load them all and gtfo!

 
OP
N
Joined
Jan 10, 2016
Messages
22
Location
PNW
And just because you should do something every day that scares you I have a RAS in my shop. Mostly just use it for half lap mortise joints in torsion boxes or whatever. I am very comfortable at a table saw but even this thing keeps me on my toes and humble. That's a good thing. It's is admittedly an out dated stupid tool. But where it shines nothing else touches it. At some point it will be replaced by a 12" compound slider miter saw or a kapex. But for now it stays and no one gets to touch it @g00danya

In case you caught it. I drink the koolaid and have the bumper sticker.

 
OP
N
Joined
Jan 10, 2016
Messages
22
Location
PNW
Because most of my work is onsite my shop is more for hobby and or future production of short run goods (working on this) most of my tooling is portable. Along with this I have been working on #project357 for a few years now. A full house remodel of another member, my father. I built a cabinet shop in his newly built garage to build my parents kitchen and vanities. Along with somewhere to do all of the siding and trim work.

I took his old craftsman table saw and built a bench around it while putting on a verysupercooltools beysemer style fence on it. That picture is escaping me at the moment but I'll find it and post it.

While building the table saw bench I needed an assembly bench and came across a Moroccan work bench here ( http://www.wkfinetools.com/contrib/wMyers/moravianBench/moravianBench-01.asp ) as I am a Festool junkie I had to make it an mft.

My Moroccan mft born


the kitchen is done and the bench went to my employers cabinet shop. I pulled it out the other day to do some sanding in the sun. This was my birthday and it was a good day (as are damn near all of them).

 
OP
N
Joined
Jan 10, 2016
Messages
22
Location
PNW
This may be more of a blog post than a shop post but you will end up seeing allot of what I make on this feed if allowed.

I don't know that I have seen this specific joint before though I'm sure it has been done because it's that simple. The goal is a 5'x15' conference table that needs to fit in an elevator. 1" shop grade ply with a walnut edge band. Here is the locking joint.


4 sections and this joint is seen 12 times in the 4 pieces. A and b slide together with an outer bracing piece not drawn. Once together the 3 legs are inserted from the bottom locking the 4 "leafs" together.

It was the first engineering design to come to mind when the project was brought up and I think it was perfect. No visible Fastners and a ridiculously tight fit and rigid body of the table.


In process pictures. I'll get a final when it's ready and installed
 
OP
N
Joined
Jan 10, 2016
Messages
22
Location
PNW
If I read that right your bench is solid 2x6's?

Very nice start to a shop thread, keep adding pics and descriptions.

Yes. In my work I do allot of reclaimed fir (PNW Douglas fir) glue ups for,shelfs and counter top. I had the glue and I had the fir. Found the time so I made my self a sledge hammer bench.

Plenty more pics to come as I clean and organize my shop.

Edit: needed something I could put a ****** and two transfer cases on. As well rebuild a differential which on a Toyota takes about 400ft lbs to set the pinion spacer. I'm young enough that a proper bench to do proper work makes sense to me. Maybe I have foresight, maybe I'm dumb as a square nail. I'm having fun and that's my goal.
 
Last edited:
OP
N
Joined
Jan 10, 2016
Messages
22
Location
PNW
Here's an over view picture of my "clean" shop. Granted I don't have a pile of parts on everything. Caught me at a good moment.


Table saw bench (which is close to next on the list. Torsion box frame with a 3/4" layer of CDX and a 1/4" layer of mdf (as a replaceable layer for the track saw). Delta model 9 contractors saw built into the bench with a very super cool tools fence. (I bought two of the vsct kits and I love them if you want to fine tune your table saw or band saw).

Bench in the back is my main work bench. At 46" it is a standing bench. Ment for soldering and other close up work. Mostly acts as a tool coral but in the 5+ years I've had a tall bench I love it for what it is. It's the only bench in my shop that isn't the same height as the others and works amazing when I need to be close to something. It's about 36" deep and with 12" of storage at the back It still allows me a full work surface. Though reaching tape and what not above it can be a stretch.


It houses allot of my rink a dinks like a 8mm projector which I still want to get some old chaplan movies for. Go to tools and heirloom tools ( which I still use....'because they are still tools and damn finely made).
 
Last edited:
OP
N
Joined
Jan 10, 2016
Messages
22
Location
PNW
Driving home last Friday I saw the scraps of a newly fallen tree for takesies.

Sat and today I started slabing and router planning them. I have a couple cool ideas for them. This led me to an addition to my "assembly table". It may take a couple weeks to fine tune the design but I'm pretty stoked on the idea, and to share it with you. I love time lapse making things videos so hopefully some day I'll get that togeather as I time lapse almost everything I do.

"Stoked"
 
To avoid these ads, REGISTER NOW!
OP
N
Joined
Jan 10, 2016
Messages
22
Location
PNW
I did very poorly at keeping up with my shop journal. I plan on changing that.

About a month ago i redid my my dust collection to simplify it and shorten my runs. Previously i had about 60' of ducting and have dropped that down to about 45'. ***** way better. I had a cabinet from my van that i upgraded/ changed around, so I used that old cabinet to make one for the DC.


The system itself has always been an ever evolving tool. started with a HF fan and a 5 micron bag. Next upgraded to a smaller Onedia Dust Deputy. That unit now goes on site with me and i bought a bigger unit. A centrally located hardwire switch turns the unit on and off from the plug.
 
Last edited:
OP
N
Joined
Jan 10, 2016
Messages
22
Location
PNW
Not shoptool related but i figure i would drop a project in here every now and then. I often do random glue ups of scrap wood to play with. Have lathe, will turn.

Got a little thin and blew up on me. But hand me a lemon and ill drink it with tequila.


The other glue up is the off cut from some 1x6 fjp that should have been delivered as 1x5. Tossed it in the planner to get glueable sides and made a block. I will scroll saw the block out into a couple jars with grain matched lids and the cut off from that may turn into pens.


Last edited:
OP
N
Joined
Jan 10, 2016
Messages
22
Location
PNW
Thanks 1/2 cup. One of the next big tooling projects in progress with no pictures yet will be my main table. 4x6 Douglas fir, cut in half and glued up. They will sit on a roubo style leg system with my 9' delta table saw, jessum router lift, and end vise (yet to be figured out) inserted. Should be the perfect size, big; a good weight, heavy as a baby elephant; and about the most used thing i have ever made. An idea 4 years in the making and i am really excited to show you all.

(random add on pics of things)
-Glue up, there are 4 in the clamp
-Made a few rings, very delicate, need to find a happy medium between size and strength
-Ipe outdoor fireplace (work)
-Card scraper wallet for my work tote
-Chisel and jap saw sheath to insert into my work tote
 

Attachments

  • IMG_3591.jpg
    IMG_3591.jpg
    154.7 KB · Views: 13
  • IMG_1650.jpg
    IMG_1650.jpg
    131.9 KB · Views: 15
  • IMG_3479.jpg
    IMG_3479.jpg
    140.9 KB · Views: 18
  • IMG_7597.jpg
    IMG_7597.jpg
    135.5 KB · Views: 12
  • IMG_3972.jpg
    IMG_3972.jpg
    144.5 KB · Views: 15
  • IMG_7572.jpg
    IMG_7572.jpg
    137.5 KB · Views: 16
OP
N
Joined
Jan 10, 2016
Messages
22
Location
PNW
Its Sweden night in the lab tonight. That means Husqvarna play time. Going through the machines. The big one is a 575xp and the medium one is a 445. The little one on the shelf has lost all labels and is a constant project to figure out what it is. Next door to my shop is a guy that rebuilds scooters. Some day ill bring it over to him to find new rings. Most people would probably throw the shelved saw away but I'm not that smart and I'm definitely that stubborn.

attachment.php


P.S. I think this is my favorite work bench i have ever made. That being said the table saw bench is glued up and i bet will be done by Christmas, thats just me being honest, sorry.
 

Attachments

  • IMG_5346.jpg
    IMG_5346.jpg
    148.6 KB · Views: 212
OP
N
Joined
Jan 10, 2016
Messages
22
Location
PNW
Just found out about the PB issue. i will change things around as soon as i can... This may just be the kick in the but to start a personal website, for less than four Benjamins' let alone.
 
OP
N
Joined
Jan 10, 2016
Messages
22
Location
PNW
I got a start on my main Roubo table saw table before the end of the year but was far from the ability to finish. I was able to get the legs built up and an actual drafted design. The base for this table is set and tomorrow hopefully i can get the tops set.

But his post is about the distraction that i received while on holiday. My grandfather was/is an engineer and i was asked if i wanted his at home drafting table. As a kid I used to sit at this table and absolutely not draw on anything. It was all important blue prints, so instead I looked at them. Figured them out. Learned.

A bit of a remodel to my shop and how i use my space with my new acquisition. To start my old main work bench had to go, a bit of a hard decision, change is hard. I set this bench height about 46" aff. mostly made to house tools and a place to put my laptop. I loved the height for standing at and doing circuitry or fixing electronics. Construction is 2x4 framing with plywood top. the front "face frame" is an old barn beam i scored from a cabinet maker friend a decade ago. I didn't want to cut it so this was the best place to store it in that time.

IMG_6788.jpg


IMG_6789.jpg
 
OP
N
Joined
Jan 10, 2016
Messages
22
Location
PNW
So the drafting table is all highly stripped maple. Mostly glued up to form the dimensions needed. It was sold by Lietz San Fransisco / Los Angeles.

A true heritage treat for me in my shop.

IMG_6504.jpg


IMG_8019.jpg


IMG_2720.jpg


Also at the end of last year I found a fella on Instagram that challenged himself to turn a bowl a day last year. I thought, "i don't have enough things to do, HA!, lets give it a shot". these bowls are all sitting on whats left of my upper workbench from before. 365 bowls will stack up quick. That journey can be followed on instagram @ NorthernEarly_Bowls though it hit a speed bump working out of town the last couple weeks.

IMG_7128.jpg
 
OP
N
Joined
Jan 10, 2016
Messages
22
Location
PNW
The Drafting table also came with a wire straight line guide but better yet a Bruning Drafting Machine. This things is awesome. I am of an era of computers and digital drafting. When I was around 18 I moved to The Oregon and basically walked away from computers. Pencil and Paper is more my style. While I am decent with a few different cad softwares i very much prefer to hand draw plans.

Bruning+Drafting+MAchine.JPG


(Not sure if a shared video as an image will work but worth a shot, let me know any issues with my attachments if you would, thanks)

Looks like a no go, here is the link if you want to see the action of the Bruning https://www.icloud.com/sharedalbum/#B0x532ODW3VcFa;342E0B4E-42B8-4F03-B80D-B8862DEF12AB
 
Last edited:
To avoid these ads, REGISTER NOW!
Top Bottom