To avoid these ads, REGISTER NOW!

The "Obsessed Garage" Project

Money2536

Well-known member
Joined
Dec 31, 2011
Messages
201
Location
The Villages, FL
The Obsessed Garage Project


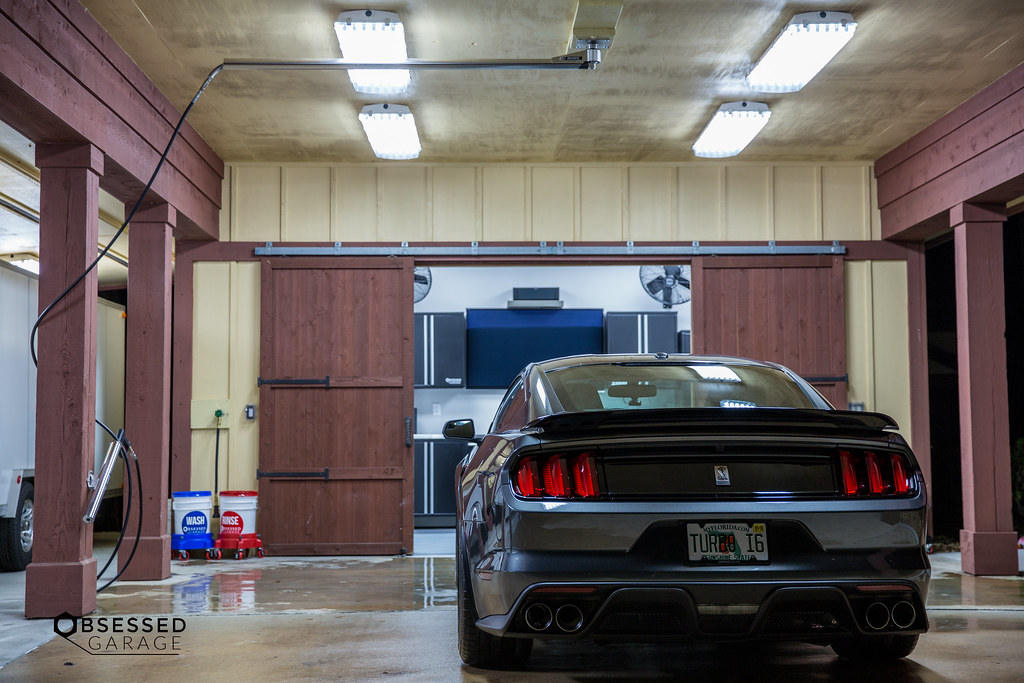
Wash Bay as of 12/10/16

A Tour of My Dedicated Wash Bay


Start of the Project

God willing, it won't be long, so I've actually started putting pen to paper to organize my thoughts.

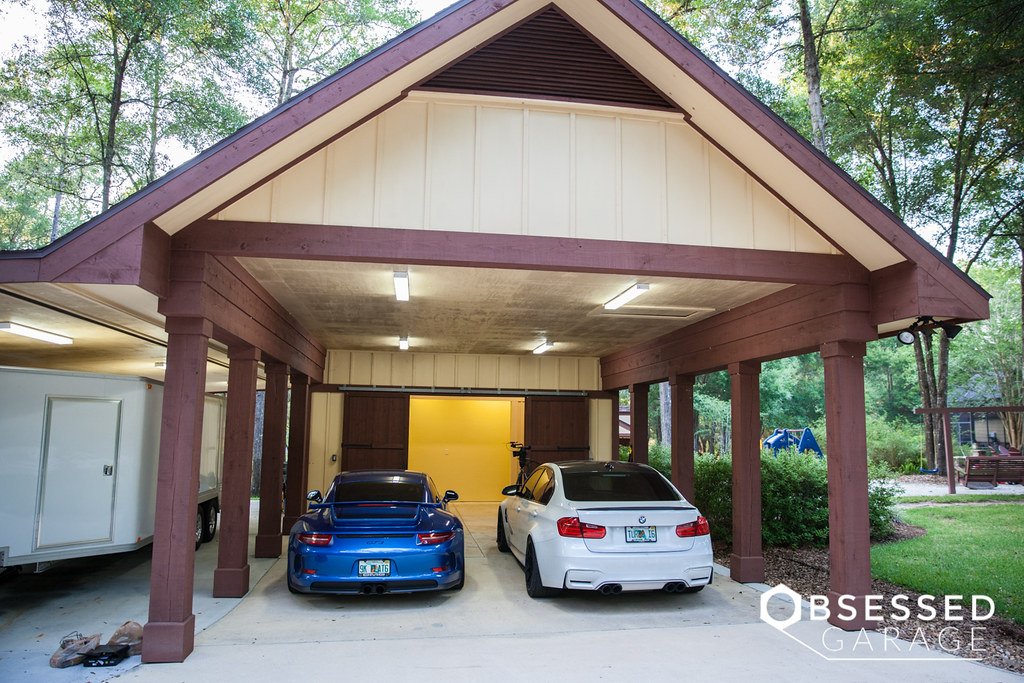
Farewell Tour of "The Temporary Garage"


This past year, I've come to the realization that it is not the cars that are the anchor of my obsession. Since I'm not interested in being a “track-rat” or having grease all over the floor, I've had to come to grips that the cars are just a by-product of my passion for what is The Garage.

The general theme of this project could be the use of the word “sterile.” Well lit, super clean, highly organized, and overly simple with ample tools and great tech are my primary goals. My vision for this sanctuary is in my head, but I would say it’s blurry. I intend to dump down what I know on this thread and reason out the rest as I work through design.

For the construction of this, I have a very simple vision that includes a myriad of complex issues and careful planning. I wish to take you on this journey with me, and my hope is that you will add your input and share your thoughts as I progress.

Here is the short story.

  • Started Blogging my Ownership Experience of My Carrera S & M3
  • Designed a Website to Dump What is in My Head onto the Net
  • Sold My Old House at the 11th Hour and Moved Into the New One in May

Now that you're up-to-date let's start talking about the new project. Until construction starts, (fingers crossed sometime late '16), I intend to share the design process. I figure I can't explain to a builder what I want unless I have a solid grasp on what that is, so I bought Home Designer software. If you haven't used this software, I'd highly recommend it. I messed around with Sketch-Up and some other software, but found it too difficult to navigate without spending tons of time learning how to use them. Someone suggested on my first video about the new garage that I get the Home Designer Suite. I bought the $99 version, and it's been great to work with. I'd highly recommend it.

https://www.homedesignersoftware.com/products/home-designer-suite/?gclid=Cj0KEQiA7rmzBRDezri2r6bz1qYBEiQAg-YEtubQQvk0abodtRtfeUNdU2gjMr7k6QQnR-ILTBSIdOsaAplX8P8HAQ

suite-dvd-r-348x502.png


Initial Ideas

My initial ideas were to save cost and add onto the current pole barn. I also had grand plans to wash inside the garage. If you care to see the evolution of my thought process, these videos below explain it.

The Obsessed Garage Project Episode 1: Initial Ideas


The Obsessed Garage Project Episode 2: I've Caught the Vision


The Obsessed Garage Project Episode 3: It Keeps Getting Bigger


Actual Design

I decided after getting a quote for about $300,000, that adding onto the existing barn wasn't a good choice. It's not what I really wanted anyway, so I decided to build a car compound instead. This is the survey of my 5.67 acres and where the house is placed on the property.

26937091443_a454c85b74_b.jpg


I have 8' set-back requirements, so the main garage will run along the property line. This isn't to scale.


So this is what my dream looks like using my crude Home Designer software skills. The pole barn that currently exists will become a dedicated car washing bay complete with a 19' x 13' room for all the awesome stuff I use to wash cars.


This thing is pretty awesome. It is 30' X 40' with 11' ceilings.


The relationship of the two structures are going to look something like this.


The main garage is going to be 36' wide x 90' long with 12' ceilings. The doors on the front will be 10' x 10' and the back door will be 10' x 18'.

27268775260_7eb34db9ea_c.jpg


27268775740_a04fde3a65_c.jpg


27268775920_891a8c6806_b.jpg


I'll be sure to update you as I continue on this process.


Last edited:
To avoid these ads, REGISTER NOW!
OP
M

Money2536

Well-known member
Joined
Dec 31, 2011
Messages
201
Location
The Villages, FL
The OG Dedicated Wash Bay

I'm not a "barn" kind of guy, but this thing it pretty sweet. At some point, we will probably change the color of the house, but for now the yellow is going to stay. Here is what it looks like with the cars and trailer in it.

The OG Wash Bay Project: E1 - The Before Footage


Here is my vision for what the room facing the washing area will look like. This isn't large enough to fit a car and will simply store all of my washing equipment. I have a lot of stuff. This is completely unnecessary, but so is a 3500 sq.ft. garage...


The walls are painted plywood. I want cleaner looking drywall. You can see where they added onto this a few years back. I want this to be one open room.


The week after I moved into the new house and had all of my boxes unpacked, I decided I would take a peak behind the walls of the pole barn.


Pulling that one panel off turned into a massive demolition project where I ended up having eight friends stop by to swing a sledge hammer over the course of two days. All or nothing is the way I do things. Despite have 50 other things to do in the new house, this was the most important to me, so my wife let me go.

The OG Wash Bay Project: E2 - Demo Day 1


There were two buried electrical lines coming into the garage, so it looked like we were good. My friend James, aka The Mad Scientist, looks at them and knows they are 30amp four conductor wires. This was good, but we ended up spending the rest of the afternoon coming to the conclusion that I only had about 20amps of service coming into the building. This isn't going to fly with the amount of gear I plan on putting in this thing.


This thing was cockroach crazy, so I had my exterminator come out and decontaminate this this. I guess it's part of living in the woods, in FL.

The OG Wash Bay Project: E3 - Update #1


I decided to do it right and hired an electrician to come out and put a 100 amp service in. That way I'll have more than enough power to run whatever I can dream up. This meant we needed a 8" x 2' trench dug. I called my landscape guy that understands my level of obsession. He dug a pretty darn nice ditch and cut the driveway.


The OG Wash Bay Project: E4- Update #2


Last edited:
OP
M

Money2536

Well-known member
Joined
Dec 31, 2011
Messages
201
Location
The Villages, FL
Wash Bay Updates

I've gotten a lot done over the past few weeks on the wash bay.

1. Electrical roughed in
2. Prewired for picture and sound
3. Stringers put in for mounting TV, cabinets, fans, pressure washer, and deionizer
4. Plumbing Done
5. Hose reel and bucket filler mounted
6. Received flooring, pressure washer, boom pole, windows


The OG Wash Bay Project: E5 - Update #3


I finally found a plumber that gets what I'm doing here.


Test fitting the CR Spotless. I have the wall mount version coming, DIW-20.


Putting a waterline stub in so I can get drywall done.


30 amp 220V wiring for the Kranzle K165STS Pressure Washer


This is the Mosmatic 6'9" Boom Pole that will go overhead of the washing area. This thing is built like a tank. It costs about $600.


These Prier Quarter Turn hose bibs are absolutely amazing. I scoured the internet to the tune of 5+ hours over several nights figuring out what bibs to use. I learned that, although unnecessary for Florida, the frost-free version was the only acceptable enough quality for my high standards. Check these things out if you need one.

http://www.prier.com/index.php?option=com_k2&view=item&id=342&Itemid=118

I chose the quarter-turn, with built in anti-siphon(makes sure water doesn't pull back into the line or only comes out not in) P-164. These are really nice. I chose the threaded 4" pipe version. You can order the pipe with Pex ready end (not as secure) up to 24" long.

http://amzn.to/1Yuxu8v


I added a Gilmour quick connect to the end of all three bibs, so I can quickly adapt to any of my hoses. I'm super proud of my engineering prowess on my bucket filler idea. I thought about doing some sort pot filler faucet, but stumbled on a braided hot water heater hose at Home Depot. This was perfect. 20" long, pliable, and easily adapted to work with a hose bib. You just need 3/4" threaded adapters to convert the higher pressure treads to regular hose threads.


Crappy old hose bibs went straight into the trash.


I also had time to get all of the low-voltage wiring done. I'm doing center channel on a floating shelf above the 65" Panasonic plasma, left and right that will sit on the countertop, subwoofer, and HDMI.


I also prewired the AirKing fans to be switched.


Center channel (Will be Dynaudio Excite X24)


Home Run back to the receiver and right speaker (Dynaudio Excite X14)


Subwoofer Prewire (JL Audio E112)


Stub for the pressure washer/deionizer. I'm not sure what piping we are going to use to plumb/valve it. That's next week project.


I also installed my Eley hose reel.

http://www.obsessedgarage.com/home/gear/detailing-gear/eley-hose-wall-mount-hose-reel/


Last edited:
OP
M

Money2536

Well-known member
Joined
Dec 31, 2011
Messages
201
Location
The Villages, FL
Swisstrax Flooring, AirKing, Kranzle, CR Spotless Install

I got the drywall in, walls and ceiling painted, so now it's time to do the flooring install. I'm a simple guy, so gray and black suit me. I'll most likely be painting the exterior of the pole barn at the same time as the main garage when it's done, so this sterile vibe will look a little less out of place.


The OG Wash Bay Project: E6 - Swisstrax Flooring Install


Swisstrax is pretty awesome stuff. I've never been a fan of any kind of flooring outside of polished concrete, but this stuff has changed my opinion. It always looks clean. All the dirt and **** fall underneath and is invisible. Leaves get trapped in the first few tiles rather than blowing all the way to the back.

The gray tiles are Ribtrax.

http://www.swisstrax.com/ribtrax-garage-flooring/


The black are Rubber Ribtrax.

http://www.swisstrax.com/recycled-rubber-flooring/

I'll have a ton more photos of the finished product once I get my lighting done.


Ryan helping with clean-up


I had Air King fans in my previous garage and really liked them. These are super heavy, industrial grade products that really move some air. It's a significant investment at nearly $300 each, but my guess is that this these are going to last for a long time. I'll have more pictures of them later on in this thread.

AirKingLimited.com

These are the quiet version. They are pretty loud, so I couldn't imagine what the regular ones sound like. They make them in 24" and 30." Mine are the 24" version.

Amazon Link


The OG Wash Bay Project: E7 - AirKing Fan Install


I've had my eye on this wall-mounted, professional, German made pressure washer ever since I discovered Kranzle from Phil's blog at Detailers Domain. This model is the K165STS and costs almost $5K! Now I know what you're thinking, but this this is one of those bucket list, spare no expense items that I hopefully only have to buy once. Kranzle makes a very similar, version without the fancy stainless box for a lot less, but I wanted the clean looking version.

Kranzle K165STS

I'll have much more detail and footage on this unit once I get it all set-up and have some time using it.


The OG Wash Bay Project: E8 - Kranzle Wall-mounted K165STS Pressure Washer Install


I've had the cart version of this Deionizer for about a year now, and it has worked flawlessly in combo with my Kranzle 1122TST pressure washer. The wall mounting and hard plumbing of this will be amazing. I will never have to roll anything out again. I'll have more detail on how this gets plumbed with valves once I figure it out. I'm going to use T316 stainless steel piping and valves.

CRSpotless DIW-20

The OG Wash Bay Project: E9 - CR Spotless DIW-20 Deionizer Install


Last edited:
OP
M

Money2536

Well-known member
Joined
Dec 31, 2011
Messages
201
Location
The Villages, FL
Trim, Cabinets, etc. Installation

I have done trim work before in my first house. I bought a Dewalt saw and some material, and got to work. For some reason the saw wasn't cutting straight 45s, but I got the job done and cleaned up with some latex caulk.


The OG Wash Bay Project: E10 - Terminating Speaker Wire


The OG Wash Bay Project: E11 - Trim Work and Painting


The OG Wash Bay Project: E12 - Saber Cabinet Arrival/Unboxing/Assembly


I love Saber Cabinets. I think its the simplicity that I like so much. They are super durable and are 90% of the quality of cabinets that cost 5 times more.

www.sabercabinets.com


The OG Wash Bay Project: E13 - Saber Base Cabinet Install


The OG Wash Bay Project: E14 - Continuing Saber Cabinet Install


While working on the cabinet install, I had a concrete company come out and pour a new sidewalk to replace the flagstone.


Last edited:

Clemson13

Well-known member
Joined
May 30, 2015
Messages
425
Re: The Obsessed Garage Project

Can't wait!!

Still selling the gt3?

Sent from my imagination using sharks with friggin lazer beams
 

Mr. Roboto

Well-known member
Joined
Dec 11, 2012
Messages
2,160
Location
New Hampshire
Just watched some of your videos on YouTube and read your backstory on the new place...can't wait to see the new space take shape. I will be following along for sure. Good luck with everything!
 

Clinton_FL

Member
Joined
Dec 12, 2005
Messages
22
Location
Alachua, FL
In For updates. One question, how much cheaper will building a whole structure be compared to adding on to the existing. I ask because your quality and attention to detail is second to none, and I can see that a 36x90 garage, full of everything you want, getting up there in price very quickly. And I only know that by watching all your videos. :)
 
OP
M

Money2536

Well-known member
Joined
Dec 31, 2011
Messages
201
Location
The Villages, FL
In For updates. One question, how much cheaper will building a whole structure be compared to adding on to the existing. I ask because your quality and attention to detail is second to none, and I can see that a 36x90 garage, full of everything you want, getting up there in price very quickly. And I only know that by watching all your videos. :)

My budget for the main garage is $250K. I'm hoping I'm can get it done for that.
 
To avoid these ads, REGISTER NOW!

wrenchMONKEY_

Well-known member
Joined
Jul 9, 2013
Messages
279
Saw the updates on Rennlist and found the thread here. Look forward to following along Matt.

BTW, I watched your trailer video All of it.... I don't really know why, but, I watched it. I have a strange urge to buy a Alu race trailer now.....
 
OP
M

Money2536

Well-known member
Joined
Dec 31, 2011
Messages
201
Location
The Villages, FL
Saw the updates on Rennlist and found the thread here. Look forward to following along Matt.

BTW, I watched your trailer video All of it.... I don't really know why, but, I watched it. I have a strange urge to buy a Alu race trailer now.....

Ha, ha... It amazes me every day that people watch my stuff.
 

Bob Heine

ALLIANCE MEMBER
Joined
Oct 24, 2009
Messages
10,705
Location
Boca Raton, Florida
Re: Wash Bay Updates

The hose reel looks great. I'm done with the plastic hose reels that leak and eventually fall apart. I also found better hoses. My cheap air hose reel came with a 50-foot 3/8" rubber air hose:
ImpactWrenchHolders_zpsef842d7a.jpg


When the rubber hose started to crack near the fittings I replaced it with a 50-foot 1/2" Flexzilla hose. It's lighter weight and more flexible. They also offer whips and snubber air hoses.
50-Foot%20Hose%20Reel_zps0sx6yvwl.jpg


I haven't bought any Flexzilla water hoses but that's next.
http://www.flexzilla.com/
 

e36mpwr

New member
Joined
Jun 12, 2016
Messages
4
Wow, I remember seeing your videos on YouTube and thinking "this guy is legit" , but geez, you have taken it to a whole new level. You've inspired me once again!
 

racestatus

Well-known member
Joined
May 25, 2016
Messages
300
Location
Danbury, CT
I can attest to flexilla hoses as well. I have 3 in my house and 2 at work. they are matco branded but same thing. I will never use any other hose again.. nice job on the wash bay that is very sweet. I was pretty much lost when you said gt3 than bummed without more pictures of it!!
 

Stretch-22

Well-known member
Joined
Apr 13, 2013
Messages
76
Location
Margaritaville
Dude this entire project looks awesome! Congrats on finding the perfect place and best of luck on making it exactly what you want. I love the attention to detail and making sure it is done right. Having the dedicated washing area would be so nice to have. Cannot wait to see more of this, thanks for sharing!
 
OP
M

Money2536

Well-known member
Joined
Dec 31, 2011
Messages
201
Location
The Villages, FL
A/V and Lighting Install

The OG Wash Bay Project: E15 - Audio/Video Install


Lights to me are tricky. There just isn't a whole lot of information out there. I haven't found an LED that rivals T8 Verilux bulbs. T5HO are very directional, so I made the decision to stick with what I know.

These are the fixtures I chose for the outdoor washing area after waiting 6 weeks for the AEI version. They are Howard Lighting 6 lamp T8 Vapor Proof fixtures. I ended up having to modify them a little bit to get the mounted to the ceiling.


The OG Wash Bay Project: E16 Outdoor Howard Lighting Install


A forum friend of mine from Rennlist owns a lighting company and sent me some of these for my previous garage to try. They are 6500K and are super color accurate. They make a big difference.

Verilux Bulbs F32T8VLX4 - White - 32 Watt


The Howard Lighting fixtures are taller than the AEI ones that I originally ordered, so I needed to pull the pole down and add another spacer off the ceiling.


The interior fixtures are from AEI. I wouldn't recommend them. The "patented" system to allow access to the guts is junk. The clips don't work very well. I ended up needing to drive some short screws into the sides to get them to seat properly. Anyway...don't buy these. I'm not sure what you should buy instead. My $80 Lithonia lights from Home Depot in my old garage were the same quality as these for $200.


Last edited:

Pay2play

Well-known member
Joined
Jun 20, 2015
Messages
180
Re: The Obsessed Garage Project

Great wash bay. Looking forward to your huge garage build. I love your attention to detail! I'm at the point in life where I want less, just high quality or the best I can afford for what needs to be replaced.


Sent from my iPhone using Tapatalk
 
To avoid these ads, REGISTER NOW!
Top Bottom