To avoid these ads, REGISTER NOW!

The Powermatic Playground (28x28 Detached)

automobiliben

Well-known member
Joined
Jan 9, 2012
Messages
181
Location
Greenville, SC
Time that I get a thread going for my garage/woodshop project...

I am being relocated from the Chicago area to Greenville, SC and of course this meant looking for a house with a detached shop (this was agreed upon by my wife as well, she didn't want the mess in the house anymore). So after looking at 12 houses in the area (all with detached shops) we settled on one a mere 8 miles from work situtated on 2.2 acres!

I am a woodworker but dabble in metalworking and tinkering as well. We were in our previous house for a bit over 4 years and in that amount of time I amassed quite a collection of industrial grade woodworking equipment and a metal lathe (which I got for free!). Most of the tools I bought were older models, so I spent a lot of time refurbing them and getting them ready. Than with work, I spent 50% of my time in China last year, so I am excited to get back to having shop time.

I will start with the present state, here is my current 10x25 shop in the basement of our house in Chicago, the house had an unfinished basement when we started, I finished it by myself:

(Pictures are starting at the door working counter clockwise, my tool "collection" has grown much since these pictures were taken, but they were all I had)

2010-08-14_14-05-11_902.jpg


2010-08-14_14-05-18_765.jpg


2010-08-14_14-04-39_558-1.jpg


2010-08-14_14-04-50_757-1.jpg


In the garage I also have a 20" drill press and my metal lathe (which is almost ready to get back in business!):

702570717_photobucket_13513_.jpg


702570717_photobucket_7817_.jpg


I got the Sheldon lathe for free, the previous owner I got it from was trying to move it on moving dollies and dropped it over. I have everything ready to go back in to service with it, less one shaft that will have to wait until after it is moved.

Now on to the new house in SC, here is the new shop. It is roughly 28x28 stick built on a slab. As you can see it is pretty much a clean slate.

2012-06-11_19-32-47_743.jpg


2012-06-12_16-34-57_756.jpg


2012-06-12_16-33-25_968.jpg


Sorry, for the poor pictures, I left my good camera in IL. :dunno: We will be officially moving next week, the movers are going to hate me!

That is it for now, time to go get some work done!

(In case you don't get the title, Powermatic is a woodworking equipment manufacturer. They are still in business albeit they are an importer now. The majority of my tools are Powermatic's from the 50-80s all Made in the USA (in fact, I don't think I have a larger tool that wasn't made int he USA!)).
 
To avoid these ads, REGISTER NOW!

Shoottx

Well-known member
Joined
Jan 30, 2011
Messages
314
Location
Plano Tx
Cool

Welcome as a fellow wood worker, and old tool restorer, I landed here at GJ looking for ideas for my shop. Now I have spent more time reviewing garages than organizing the shop.

A couple of quick thoughts, what ever you want to do with the floor do it before loading up the shop, whether you paint epoxy or install a wood floor it will be easier with out stuff in the way.

Plan out too much electricity, and electrical outlets. Like clamps, you can never have enough outlets or lights.

Also layout dust collection, air compressor and air lines, again more is better.

Plan material storage, for lumber and plywood, supplies and in my case turning material.

Lastly try laying out the shop arrangement based on your typical work flow and the types of work you tend to enjoy. Of the advice I have reviewed look at what will be the center of your work flow, some use the work benc and assembly area, others use the table saw. Then arrange the tools in a work flow appropriate for your work.

I am jealous of your space and the ability to start with a clean sheet.

Looking forward to see your progress.

There are lots of shops to look at for inspiration like the 1950's Craftsman Garage and a couple of other I will try and recall and post later.
 
Last edited:

ODIS

Well-known member
Joined
Apr 30, 2012
Messages
2,110
Location
Pacific Northwest
I have PM too. The only one I have that is made in the USA is the Model 66 table saw (that is to say, at least the American flag is prominently displayed on it). Pretty sure all the others are imported. Great equipment. Band saw is Laguna and oscillating spindle sander is Jet, or just more of the same with different paint. RAS is Craftsman. Oh yeah, forgot the 3520 lathe is US built.

Looking forward to the posts in your thread.

Ody.
 
Last edited:
OP
A

automobiliben

Well-known member
Joined
Jan 9, 2012
Messages
181
Location
Greenville, SC
Hey guys!

Let me see if I can run down my Powermatic line-up:

???? PM30 combo sander, pre and post restoration. Calling this machine a sad ba$tard would be an understatement...

001.jpg


702570717_photobucket_22299_.jpg


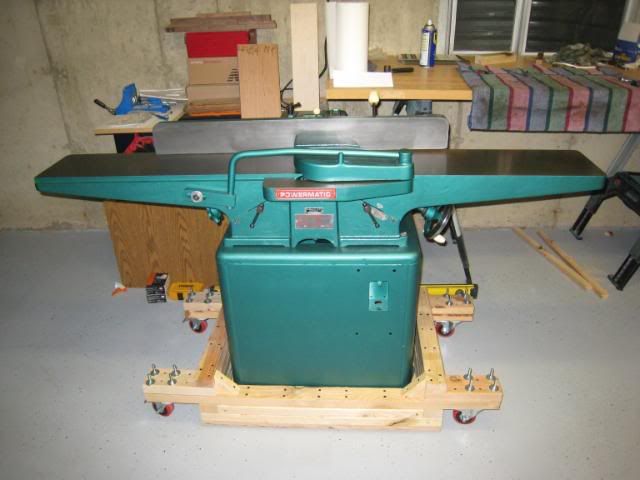
1979 PM60 Jointer, came from the Wrigley (the gum) company:

IMG_1786.jpg


IMG_1903.jpg


1959 PM10 Chisel Mortiser, came from Northwestern University, had sat outside for a while, just needed rust removed and bearings replaced:

2011-12-20_17-17-00_636.jpg


PM100 12" Planer, I bought this restored from a friend:

702570717_photobucket_15185_.jpg


1979 PM90 12" Lathe upgraded to 24" Swing

2011-12-14_19-02-46_290.jpg


PM95 Variable Speed Scroll Saw (camera shy!)

I can "catalog" the rest of my tools in later posts!
 
OP
A

automobiliben

Well-known member
Joined
Jan 9, 2012
Messages
181
Location
Greenville, SC
Ok, this post will bring me up to the current state of the shop. The first couple of nights I spent emptying every thing out of the rafters. The house and shop are 30 years old and it appears the shops rafters were the catch all for lumber during that period. We will be having a heck of a bon fire!

For HVAC, I have purchased a Fedder's 1.5ton Heat Pump system to supply heating and cooling to the shop. It is sitting in Chicago waiting to hop a ride on the moving truck South (I got a great deal on it!). I plan on doing the install myself and running the lines, at that point I will call in a HVAC professional to vacuum the system and do the initial start up.

imgCache-FeddersHD012H15D01_514_0.jpg


My plans for the walls are 1/2" OSB, R13 in the walls and blown-in insulation in the attic to R23 value (what is recommended in my area). To start on this, I installed Durovent in the truss "bays" to keep the blown-in out of the soffits:

2012-06-16_15-11-31_371.jpg


30 sheets of OSB...

2012-06-17_15-42-18_987.jpg


After that it was off to installing R13, I am about 1/3 done currently. I also got 2 sheets of OSB up on the walls, not bad for doing this all by myself! For fellow GJ people looking to do this, I would recommend 3" drywall screws, I started with 1 5/8" and was having issues with the screws puling tight due to a combination of bow in the walls and OSB sheets.

2012-06-17_13-58-18_395.jpg


And if you have the means,I highly recommend picking up a Porter Cable 314 4 1/2" (or a Rockwell variant) circular saw, these things are the bees knees for breaking down sheet goods! I have dreamt of getting a nice guided saw system (Festool, Dewalt, Makita, etc.) but a 314 and a simple plywood made guide does a great job. :beer:

2012-06-17_15-09-58_83.jpg


Electrical has been my biggest source of heart burn thus far. In this picture you can see what I had assumed when I bought the house was a 100A sub panel:

2012-06-12_16-34-57_756.jpg


Well, it ends up that the inspector totally botched the inspection, read more here:

http://garagejournal.com/forum/showthread.php?t=154103

The 100A panel ended up being only 30A, not even enough to run a dust collection system. So in the end, I will be running another 200A service to the workshop. I have a contractor coming over tomorrow to sign the paper work and get the job started, this is a $1350 expense I wasn't looking to incur. But I did get the inspector to refund the full inspection price due to his oversight...

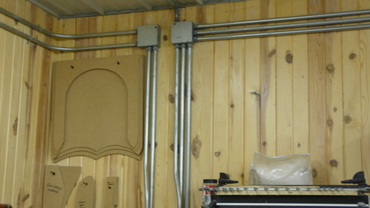
Once the 200A panel is installed I will surface mounting all electrical in conduit. I am thinking about copying a lot of things I have seen from a woodworkers shop I saw in a magazine:

http://www.larryciesla.com/workshop.html

I really like how he has double or triple conduits up top to feed his boxes below:

L1010064.JPG


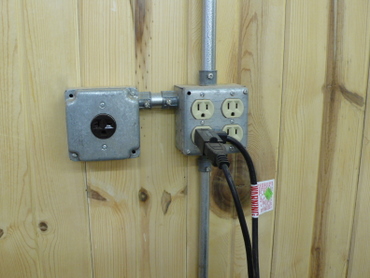
He even mounted some quad 110s along with a 220 (although I will put mine below).

L1010054.JPG


Lighting will be taken care of by 12 8' long 4-T8 bulb Lithonia fixtures, I have them purchased and just waiting for the OSB to go up on the ceiling. Here is a thread I started on workshop light recommendations in case anyone hasn't seen it:

http://garagejournal.com/forum/showthread.php?t=150938
 

Nighttrain

Well-known member
Joined
Aug 6, 2009
Messages
2,682
Location
Dripping Springs, Tx
Congrats on the new garage. I have a woodshop on one side and my future metal/auto on another side. Hope to keep the metal and wood dust seperate. I did a behind the wall dust collection, its in my build thread.
 
OP
A

automobiliben

Well-known member
Joined
Jan 9, 2012
Messages
181
Location
Greenville, SC
How did you do that? I gotta a pm90 and my only complaint is the throw. Did you make the risers or did you find them somewhere, inquiring minds want to know?

Shoottx,

I got really lucky and a guy on OWWM posted those cast riser blocks for sale, I snatched them up quick! For a couple years, Powermatic sold a variant of the PM90 called the PM91, which included 6" cast riser blocks like mine has (the person I bought my riser blocks from didn't know if they were OEM, but they were built really stout).

The reason people think that the machine was short lived is because the base wasn't changed to compensate for the 6" raise. I am only 5'6" and had to build a 6" platform in front of the lathe, so that I am at the correct height for turning. Since the PM90 was geared as a high school shop class machine, I expect there were plenty of kids with issues getting to the correct stance at the lathe while working.

If you are interested in doing something similar to your machine, I can send you some links on OWWM of people that made riser blocks out of plywood, it seems to work perfectly fine.

I paid $275 for the blocks, and think it was well worth the expense. That being said though, the base could use some re-inforcement which I plan on addressing in the new shop (either bolting the lathe bed to the wall or adding re-inforcement to the bed, that is a bridge I will cross when I come to it...). I paid $275 for the blocks, but I also needed a new banjo from Oneway and all accesories, in the end I have $600-700 invested in it, but have a lathe that I will never need to upgrade!

Here are some pictures of an actual PM91:

file.php


file.php


(Judging that the PM91 riser for the headstock has a lip on it and mine doesn't, I would assume that mine are not OEM, which makes you wonder who took the time to make them...)

I should be making some progress on the shop tonight, my drywall lift is getting delivered today, so time to get some work done on the ceiling! :thumbup:

Ben
 
Last edited:

Shoottx

Well-known member
Joined
Jan 30, 2011
Messages
314
Location
Plano Tx
Ben

I was familiar with the model 91, have never seen one other than in literature. Since my PM 90 was inherited from my Dad (free) I have a hard time thinking about giving it up. But it has limitations in it's current configurations for what i am doing. It is due for an overhaul and I was thinking during the overhaul of building a set riser blocks and adding 3ph motor with a vfd for forward more speed control and reverse for sanding.

Yeah and like most stuff I saw the riser block sale thread on OWWM after they were sold, apparently to you.

Or I may just save my pennies and springing for a new Oneway or Robust and make the 90 a project for someone else.

Thanks for the response.


Now back to the regularly scheduled garage build!
 
OP
A

automobiliben

Well-known member
Joined
Jan 9, 2012
Messages
181
Location
Greenville, SC
Well, I made a little progress last night, but than had to un-make progress tonight. I realized that all of the trusses weren't perfectly 24" on center and that hanging the OSB parallel to the trusses WASN'T a good idea. So, down the 3 pieces that I got hung last night came. I ordered a drywall hoist on Amazon and it is working really well so far, only paid $150 for it and the local BORG wanted $40/day rental, I think I am money ahead...

Also, another question that I have thought of, is using the 1/2" OSB on the ceiling fine with my 24" spaced trusses or should I go with something thicker to prevent sag?

2012-06-20_21-02-45_944.jpg


I need a little bit of help on the following from members here. How did you make your wall covering install look clean around an existing garage door? I am not quite sure what I should do to hang the OSB around these and not just cut it in around the edges. Any suggestions on this would be greatly appreciated!

2012-06-21_21-04-27_763.jpg


2012-06-21_21-04-38_138.jpg


2012-06-21_21-04-51_192.jpg


Also, the electrician came by today and I put the deposit down for the 200A install in the shop! Should be going in the week of July 4th. :beer:
 
Last edited:

amp2oo1

Active member
Joined
Sep 5, 2008
Messages
31
Location
Joliet, IL
you need to come by my house when you are back up here next week and help me finish mine. After 6 months all I've done is made a mess of my garage. Need to get the walls/insulation done and finish up the new electric so the car has a respectable place to sleep!
 

Red Leader

Well-known member
Joined
May 15, 2011
Messages
2,689
Location
Denver, CO
Wow, very nice!!! I like the theme. Excellent:thumbup:

Have you thought about a pea green or striped yellow garage paint color to go with the tools?

Looking forward to more on this one.


I, sadly, still need to do something about dust containment. :(
 
OP
A

automobiliben

Well-known member
Joined
Jan 9, 2012
Messages
181
Location
Greenville, SC
Wow, very nice!!! I like the theme. Excellent:thumbup:

Have you thought about a pea green or striped yellow garage paint color to go with the tools?

Looking forward to more on this one.


I, sadly, still need to do something about dust containment. :(

Red,

Thanks, you have been a source of many ideas! I am thinking a gray and blue art deco style paint color on the walls, don't want to clash with the green machines. Thoughts?

I have been thinking about having a sign store make a large Powermatic badge for the wall too.

Dust collection is in scope, but not at the start. Come bonus time I will probably order a 5HP Oneida and make it the last collector I ever need.

I need to keep multi function in mind though, as this will also be the shop I work on cars in. I didn't make that very clear, but the house also has a attached 2-car garage, pictures to follow...

Ben
 

Red Leader

Well-known member
Joined
May 15, 2011
Messages
2,689
Location
Denver, CO
I need to keep multi function in mind though, as this will also be the shop I work on cars in.

Ben

You and me both, brother.

So you have a 2-car garage in addition to this? That is sweet.

I think your paint idea sounds good! Two-tone and art deco are things I'm pretty agreeable with:D
 
OP
A

automobiliben

Well-known member
Joined
Jan 9, 2012
Messages
181
Location
Greenville, SC
So you have a 2-car garage in addition to this? That is sweet.

Yes, the car has a 2-car attached garage and a detached "workshop". From talking to the neighbors it sounds like the house has always had a attached garage, but it used to be a garage and laundry room combo. Well, the previous owners walled off the laundry room from the rest of the garage. Honestly, I can't understand much of what happened, too many possible scenarios. All I know is that the house has 2 garages! :bowdown:

The issue with the attached garage is that it is pretty snug to fit 2 cars (or at least I think from the measurements that have been taken). I might need to re-configure some steps and some other things. I will document that in this thread as well.

On to some pictures!

The house has enough concrete that the UPS man can drive up the driveway and make a complete circle to head out. I was also able to pull in my truck towing a tandem axle trailer and make a full loop! All I know is that somebody has invested some $$$ in concrete!

2012-06-22_17-54-49_188.jpg


A view from the street:

2012-06-22_17-55-29_218.jpg


And what every man dreams of, a window from inside the house/kitchen into the garage! :thumbup:

2012-06-22_19-43-00_763.jpg


2012-06-22_19-43-31_148.jpg


I was making some progress on hanging insulation in the shop until the neighbor came over and offered me some free beers, who can deny free beer and meeting neighbors? :beer:
 

n2ocamaro

Well-known member
Joined
Aug 3, 2011
Messages
183
Location
Clarksville, IN
Also, another question that I have thought of, is using the 1/2" OSB on the ceiling fine with my 24" spaced trusses or should I go with something thicker to prevent sag?
You should have no problem with 1/2". I have 23" spaced cross beams:)dunno:) and I used 1/4" OSB on mine and it was almost too thin. I have a two spots sagging but not bad. I intend to go back fix those spots before I paint. I will be using 1/2" on the walls.

You are making good progress. Looking forward to more updates.
 
OP
A

automobiliben

Well-known member
Joined
Jan 9, 2012
Messages
181
Location
Greenville, SC
You should have no problem with 1/2". I have 23" spaced cross beams:)dunno:) and I used 1/4" OSB on mine and it was almost too thin. I have a two spots sagging but not bad. I intend to go back fix those spots before I paint. I will be using 1/2" on the walls.

You are making good progress. Looking forward to more updates.

Did you insulate above the OSB on the ceiling? I am planning on using blown-in insulation and was wondering if I need to use a vapor barrier above it. I was thinking about covering the trusses with plastic and hanging the OSB on top of that...

Nice Space, so 2.2acres, hope its not all lawn for you to mow..

I probably have about 1.5 acres that needs mowing and tending to. We probably also have about 0.5 acres of forest.

I had this delivered on the day of closing to help out with the yard work! :rocker:

2012-06-12_16-54-29_588.jpg
 
To avoid these ads, REGISTER NOW!

Red Leader

Well-known member
Joined
May 15, 2011
Messages
2,689
Location
Denver, CO
Red,

Thanks, you have been a source of many ideas! I am thinking a gray and blue art deco style paint color on the walls, don't want to clash with the green machines. Thoughts?

I have been thinking about having a sign store make a large Powermatic badge for the wall too.

Dust collection is in scope, but not at the start. Come bonus time I will probably order a 5HP Oneida and make it the last collector I ever need.

I need to keep multi function in mind though, as this will also be the shop I work on cars in. I didn't make that very clear, but the house also has a attached 2-car garage, pictures to follow...

Ben

If I were to answer in the true style of the 1950s Craftsman Garage, I would tell you get whatever is cheap:D. However, there are lots of options for you. I would recommend having a lighter color in there somewhere so it increases brightness in your shop, which could either be cream or the gray like you mentioned. I like the blue/teal thing, but I'm also a huge fan of surf/seafoam green. You could always do a seafoam green/cream (or grey) paint scheme, and then the green in the powermatic tools won't clash, but won't have to blend in with the walls either.

I'm also a fan of orange - and light orange and creme would also look pretty cool. A cream/dark tan would be a good reliable choice as well.

Lots of options!
 
OP
A

automobiliben

Well-known member
Joined
Jan 9, 2012
Messages
181
Location
Greenville, SC
Well, a quick update. I have been MIA for 2 weeks as we moved officially from Chicago to Greenville. Our belongings arrived a week ago Tuesday and everything has been about unpacking since than. Luckily, my wife returned to Chicago for 2 weeks to finish off her job, so I have plenty of shop time with her gone! :rocker: Before she left, I got her help hanging the rest of the OSB on the walls. I will spare everyone the monotonous pictures of 45 sheets of OSB being hung, but I am about 90% done!

2012-07-02_12-36-14_211.jpg


Last Thursday the electrician came over and installed the 200A service, it passed inspection on Friday and I signed off everything with the power company yesterday. Now the waiting, the power company said it will be 10-12 days till it is installed.

2012-07-06_08-43-16_652.jpg


2012-07-06_08-43-35_264.jpg


Tonight I also re-hung the 30A sub panel from the house in the shop. I plan on running the lights and heat pump off of it, as the rate is $0.04/kwh cheaper than the shops service. I also took the time to go to Lowe's and get all of the paint for the shop.

I plan on going with Woodlawn Colonial Gray on the walls:

MPC00089719-2.jpg


Safari Beige will be the base color of all of the cabinets:

042397034206xl.jpg


And for drawers and door on cabinets, I had them color match the belt cover on PM95 scroll saw. The right was the first attempt that the computer did, and than we whitened it up on the left. It looks great! (It blends in in the picture, but to the left of the dark green there is another splotch of paint) :rocker:

2012-07-11_21-40-18_642.jpg


And part of the shop welcoming committee, Black Widow Spiders, I have seen a ton so far, UGH!

2012-07-01_14-13-36_505.jpg
 

n2ocamaro

Well-known member
Joined
Aug 3, 2011
Messages
183
Location
Clarksville, IN
Did you insulate above the OSB on the ceiling? I am planning on using blown-in insulation and was wondering if I need to use a vapor barrier above it. I was thinking about covering the trusses with plastic and hanging the OSB on top of that...
Sorry it took me so long to see this. Yes, I have r-19 batts with the kraft face in the ceiling. You should have some type of vapor barrier.
 

n2ocamaro

Well-known member
Joined
Aug 3, 2011
Messages
183
Location
Clarksville, IN
automobiliben;2427654 And part of the shop welcoming committee said:
http://i424.photobucket.com/albums/pp325/martbj/SC%20Workshop%20Build/2012-07-01_14-13-36_505.jpg[/IMG]
We found one next to our AC unit a few weeks ago. Promptly had the exterminator out a few days later.
 

bgarrett

Well-known member
Joined
Feb 11, 2006
Messages
4,393
Tell us what you were doing in China so we will know if we should hate you. :)
 

Ryf

Well-known member
Joined
Jun 8, 2012
Messages
244
Location
Southern Ohio
Yeah, I can't find out if they are helpful or not. I haven't been killing them yet.

things that can kill you are not helpful. I would make this a priority, they do help keep down other bugs, but do you want to get bit?

I would have them treat your house and garage, that way they dont just move in to your house
 

richtersrodz

Well-known member
Joined
May 16, 2011
Messages
983
Location
Waxahachie, TX
I haven't seen black widows at my new place in the country, but we have killed like 6 or more brown recluse spiders. I really don't know which one is worse.. The recluse just hides in your clothes and in your stuff in your garage, and doesn't make a web... So it's hard to spot, until it's on you, or you've almost touched it.. I hate them both..
 
OP
A

automobiliben

Well-known member
Joined
Jan 9, 2012
Messages
181
Location
Greenville, SC
You guys won't like the expanded picture of these little critters than! On the right is all of her babies, and there was even some egg sacks on the web too. Wikipedia has taught me a lot about these little guys! I think I even saw some wolf spiders around, but also didn't know what they were.

Luckily, with the termite bond on our house we got a free pest control treatment, just put in the call and it will be done on next Thursday!

2012-07-01_14-13-49_108.jpg


Tell us what you were doing in China so we will know if we should hate you. :)

No need to hate, I am an engineer and design Mining equipment. We were building a machine over there for sale in their market. It was designed mostly in the US. I think it was a good story, as our company could have used our Chinese engineers to design the machine if they wanted. The majority of the powertrain will also be imported from the US.

You obviously didn't look at the pictures of my shop equipment if you think that I don't support US manufacturing! My paycheck depends on it! :thumbup:
 
OP
A

automobiliben

Well-known member
Joined
Jan 9, 2012
Messages
181
Location
Greenville, SC
Time for an update, been busy in the shop most nights of the week and most of the weekends. Just not a lot of progress to photograph.

We can start with a couple pictures of what the shop looked like once the moving company showed up. Luckily I had gotten the majority of the ceiling up by this time.

2012-07-14_13-17-19_406.jpg


2012-07-14_13-16-17_302.jpg


2012-07-14_13-16-24_20.jpg


It looks like a bomb went off, but I kept everything about 3' from the walls so I could get the OSB finished and painted. I also decided to install the old cabinets before I painted because I wanted to empty some boxes into them to make more space....than I decided to re-paint them, so the unpacking never happened, lol.

2012-07-14_13-16-59_536.jpg


This past weekend I got two coats of Oil based Kilz on the walls.

2012-07-14_16-06-20_551.jpg


Tonight, I got one coat of the top coat "grey" on, it will need one more coat, than it is finished. I also got 2 coats on the drawer fronts, they will probably need 1 more.

2012-07-19_20-06-01_365.jpg


I was supposed to have a shed delivered on Wednesday night but the storm that came through kept them from delivering it, it will be delivered tomorrow. I should be able to clean some more stuff out of the shop and attached garage to make room and more progress.

The visible progress has been very slow, but I have been working my tail off in the heat down here. It took 49 sheets of OSB to finish the walls and ceiling (I still have 4 more to hang on the ceiling). The front yard has been marked for the power company to run the line to the shop, so that should be happening any day now!
 
OP
A

automobiliben

Well-known member
Joined
Jan 9, 2012
Messages
181
Location
Greenville, SC
Well, time for an update to the thread. I have been slacking lately, but I have been making progress!

First and foremost, my 200A service has been ran and it now hooked up and active! The electrical can start moving forward now! :thumbup:

2012-07-25_20-08-31_40.jpg


2012-07-25_20-07-46_385.jpg


2012-07-25_20-08-01_184.jpg


Also, all of the wall are painted! I have been working on the heat pump lately as I am getting tired of sweating my A$$ off in the shop. The heat pump is basically complete, waiting on a friend to come over help me vacuum the lines and activate it.

2012-07-22_16-32-05_395.jpg


2012-07-22_16-31-50_799.jpg


2012-08-01_17-07-51_499.jpg


And the anaconda coming out of the wall...

2012-08-01_17-08-17_853.jpg


During this time, I have also had a shed delivered to get a lot of the lawn and garden clutter out the attached and detached shop. I bought one delivered for the price it was going to cost me to build one!

2012-07-20_17-22-40_28.jpg


The last couple of nights I have been working hanging the 8' 4-bulb T8 fixtures. So far I have 3 up, 9 more to go. I should be able to use the shop as a tanning booth if I want to! I am planning on putting 8 on one circuit and 4 on another.

In case you missed my other thread:

http://www.garagejournal.com/forum/showthread.php?p=2471865&posted=1#post2471865

I picked up a sweet vintage mini fridge for the shop!

2012-08-02_19-08-16_571.jpg
 

teuflhund

Member
Joined
Apr 11, 2012
Messages
7
To late to help from the looks of it, but it may help someone else. Typically garage door openings are framed with 2x6 material. All hardware is then mounted to the 2x6. Do not place drywall in between mounting hardware/pully's. Mount hardware to solid surface only. Prior to framing the opening, seal and insulate around grage door. **** joint wall material to 2x6 and caulk the seam.

I need a little bit of help on the following from members here. How did you make your wall covering install look clean around an existing garage door? I am not quite sure what I should do to hang the OSB around these and not just cut it in around the edges. Any suggestions on this would be greatly appreciated!

2012-06-21_21-04-27_763.jpg
 
OP
A

automobiliben

Well-known member
Joined
Jan 9, 2012
Messages
181
Location
Greenville, SC
To late to help from the looks of it, but it may help someone else. Typically garage door openings are framed with 2x6 material. All hardware is then mounted to the 2x6. Do not place drywall in between mounting hardware/pully's. Mount hardware to solid surface only. Prior to framing the opening, seal and insulate around grage door. **** joint wall material to 2x6 and caulk the seam.

I got lucky there, I simply unbolted the door rails (luckily these are held up with the "safe" springs, easy to disconnect), removed the 2x4s they were attached to, slid the OSB behind it and than shimmed to the thickness of the 2x4.

This picture shows it well:

2012-07-14_13-16-37_281.jpg
 

Hounddog

Well-known member
Joined
Nov 3, 2013
Messages
386
Location
NW Florida
I love those PM's you got there...very nice...gotta love the green! Just by chance I have alot of delta and only one PM (yellow) Helix Plainer 20in. My Delta comitted sucide by leaping off a forklift...jack screws...got jacked. sold it off to a fella that was willing to swap them out for big bucks.... I decided to just upgrade.

Love your shop and detail!
 
OP
A

automobiliben

Well-known member
Joined
Jan 9, 2012
Messages
181
Location
Greenville, SC
Man, I will have to get my thread updated...

Needless to say, the shop is done and am chugging along on some projects.

Here is the Morris Chair that I finally got finished:


And this is my current project, a crib for our daughter due at the end of May!


Ben
 

Firebrand

Well-known member
Joined
Feb 23, 2010
Messages
294
Location
New Hampshire
Looking great! I too have an affection, or affliction, for older vintage quality USA built power tools for metal and wood working. Looking forward to more shots of how you laid out your shop workflow!
 
To avoid these ads, REGISTER NOW!
Top Bottom