To avoid these ads, REGISTER NOW!

THE Problem...........

Charles (in GA)

Well-known member
Joined
Jan 11, 2006
Messages
12,489
Location
50 mi south of Atlanta
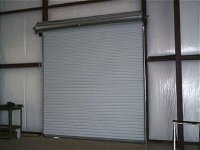
Is this door in the north side of my metal building. Its a 10x10 sheet roll up door. Now, if you know anything about roll up doors, as they come up/open, the roll gets larger, so they have to be mounted far enough inboard from the header that it doesn't rub when its up, but when its down, the roll get smaller, and, well, you have this gap at the top. In additon, they don't fit very tight in the "tracks" on the sides, due to their corrugated design.

Some people use brush seals, and in Australia, THIS SEAL KIT is marketed to close the gap primarily to prevent burning embers from brush fires from getting inside the building. Well, I went to my local door company and the nice lady took my name and number and said someone would call me about a brush seal. That was a couple of years ago, haven't heard from them since. I've had more than one bad experience with a door company, they just don't seem to care if they have any business or not.

That being said, I have issues with the top gap, for one, the cold winter wind blows on the north side of the building, and right up thru the gap. Stick your head over the top of the door roll, and its like riding a motorcycle in the winter time with no helmet! Secondly, winter, and spring, birds seem to manage to get thru the gap to the inside of the building, but cannot figure out how to get out....... lots of bird poop, then I have to leave the doors open hoping the bird will leave. What a pain.

Below are a series of pics.

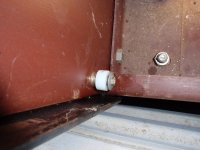
First, the door, as viewed from the outside.

Second, the door, as viewed from the inside.

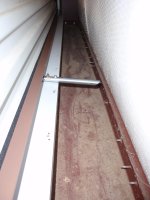
Third, leaning over the top of the roll, looking down thru the gap at the outside of the door.

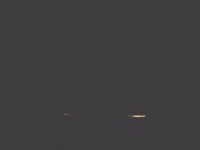
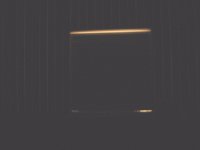
Fourth, basically the same pic as the first, taken at night, with the lights on inside. I lightened it some to make it easier to get oriented.

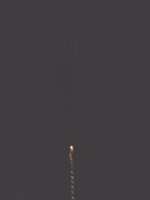
Fifth, taken at night from the outside, lights on inside, with my shoulder against the door, looking up at the gap and part of the left side track (the wavy looking lighted section is the corrugations of the door in the track).

Next post...... The Fix.

Charles
 

Attachments

  • outside view of roll up door.jpg
    outside view of roll up door.jpg
    38 KB · Views: 349
  • inside view of roll up door.jpg
    inside view of roll up door.jpg
    37.8 KB · Views: 705
  • looking over top of door, down the outside thru the gap.jpg
    looking over top of door, down the outside thru the gap.jpg
    116.3 KB · Views: 341
  • in the dark outside view lightened NO blocker door.jpg
    in the dark outside view lightened NO blocker door.jpg
    55 KB · Views: 259
  • in the dark looking up at the gap from outside lightened no blocker door.jpg
    in the dark looking up at the gap from outside lightened no blocker door.jpg
    72 KB · Views: 262
Last edited:
To avoid these ads, REGISTER NOW!
OP
C

Charles (in GA)

Well-known member
Joined
Jan 11, 2006
Messages
12,489
Location
50 mi south of Atlanta
Re: THE FIX...........

Wandering around the shop the other afternoon, I realized I had several ten foot sections of L shaped, pre-finished trim left from the building's construction ten years ago. Hmmmm…… Ten foot, and the roll up door is ten foot wide. So I moved the tractor, and positioned the JLG scissor lift parallel to the door so I could work comfortably above the door. I went up and dropped the trim in place, but it was too long, so I quickly cut off about an inch of it, and it fit perfectly!

I spent the next couple of days pondering how to make the metal pivot out of the way when the door needed to be opened. At first I thought "piano hinge", but when I discovered it would cost $25 or more to run the hinge full length, and the trim is pretty flimsy, so it needed all the help it could get, I looked for other options.

Finally I stumbled on the idea of drilling and pop riveting the trim to a section of 3/4" EMT (electrical conduit). I had half inch, but no 3/4, so I went and bought a section, taking care to get one as straight as possible (lay it on the floor in Home Depot and roll it a couple of turns, that will tell if its straight).

After a couple of mis-starts I finally put the trim on the front edge of the top of my workbench and clamped it down using some thin wood strips. I then clamped the conduit to the trim and using my newly purchased Makita 18v cordless drill, I drilled and pop riveted the trim to the conduit (riveting it only after a couple of trial fits)

Then I fabricated a couple of nylon rollers on spacers and screws and turned the rollers to a size that would just fit inside the conduit. Installed the roller on one end, and put the other one inside the conduit and tied a thread to it and fed the thread thru the hole I had drilled in the frame. Set the blocker door in place, pulled the screw, spacer and roller out and installed a nut and presto, it works!!!!!!!!!!!!!!

Picture six is an end view of the L shaped trim with the conduit riveted to it, and sponge rubber seal attached to it.

Picture seven is the pivot bushing/roller installed on one side, ready for the conduit to be slipped over it.

Charles
 

Attachments

  • left pivot bushing installed.jpg
    left pivot bushing installed.jpg
    137.1 KB · Views: 380
  • end view of blocker door.jpg
    end view of blocker door.jpg
    121.8 KB · Views: 375
Last edited:
OP
C

Charles (in GA)

Well-known member
Joined
Jan 11, 2006
Messages
12,489
Location
50 mi south of Atlanta
Re: It WORKS...........

I needed some way to keep the blocker door from flipping completely over and also provide some place strong enough to connect a cable to pull the blocker door up out of the way. I finally hit on a piece of 1/2 conduit scrap and cut it to length and cut one end on a 45 degree angle, drilled it and attached it with one thru screw, nut and washers, and one self drilling screw thru into the 3/4 conduit shaft. This works perfectly.

Picture eight is the blocker mounted and in the door closed position, showing the center support attached to it.

Picture nine is the blocker door open, showing how the center support stops the door from going too far open.

Picture ten is a night time outside view with the lights on inside. This is the same view as in the first and fourth pics in the first post. It works, the only light showing is that at the BOTTOM of the door, where the concrete is uneven and the seal doesn't seal good.

Picture eleven is the same view as in the fifth pic, in my first post, shoulder against the door, looking up at the header and the upper section of the door track. I lightened this pic to make it possible to see, but all you can make out is a spot or two of light past the sponge rubber and the light in the upper corner and the door track itself.

Hopes this helps you'all understand the problem, and possibly it will help someone in the future.

Charles
 

Attachments

  • blocker door closed.jpg
    blocker door closed.jpg
    124.6 KB · Views: 379
  • blocker door open.jpg
    blocker door open.jpg
    139.4 KB · Views: 334
  • in the dark outside view lightened blocker door closed.jpg
    in the dark outside view lightened blocker door closed.jpg
    42.9 KB · Views: 254
  • in the dark looking up at the gap from outside lightened blocker door closed.jpg
    in the dark looking up at the gap from outside lightened blocker door closed.jpg
    46.7 KB · Views: 233

edboyles

Well-known member
Joined
Jul 30, 2005
Messages
176
Location
DFW, TX
I have the same issue on a 16' and a 10' door. I have ordered some rubber off of eBay 1/8" thick that I will fold over to make a soft lazy oval which will contact the door at all times. I hope that it will "flip up" or "flip down" depending on the door travel direction.

My gap is a 2", and about 1-1/2" of that will be the soft lazy oval. The other 1/2" will be the rigid mount. I am think about a 2-3" wide metal strip mounted on the underside of the top door frame opening. Worse case scenario I can use a 1x4 treated lumber. Once I get the material and test I will provide a update. I could have used felt as well but am pleased with what I believe the rubber will provide.

Hopefully you can visualize the concept.
 

stafford

Well-known member
Joined
Nov 5, 2010
Messages
185
Location
North Geogia
The brush seals work very well, (compared to not having them). I called a local door company and they quoted me 9.00 per foot. I was referred by someone to www.chateauproducts.com , I got it from them for something like 15.00 or less per 8'. I installed it inside and outside vertically and got it on the inside of the header and still have to put it outside at the header, it made a huge difference in the amount of air blowing around the door.
 

edboyles

Well-known member
Joined
Jul 30, 2005
Messages
176
Location
DFW, TX
The brush seals work very well, (compared to not having them). I called a local door company and they quoted me 9.00 per foot. I was referred by someone to www.chateauproducts.com , I got it from them for something like 15.00 or less per 8'. I installed it inside and outside vertically and got it on the inside of the header and still have to put it outside at the header, it made a huge difference in the amount of air blowing around the door.

Did you order the brush holder as well?
 
OP
C

Charles (in GA)

Well-known member
Joined
Jan 11, 2006
Messages
12,489
Location
50 mi south of Atlanta
The reason I did not try to use some sort of bulb or flap seal is that it will be rubbing on the outside of the door all the way up and down, eventually marring and scarring the door and wearing the paint off of it. (in warm weather the door is opened nearly every day). I have to remember to open the blocker door first, but I am designing a cable operated opener setup that will be at the same location as the drive chain, so it will not be easily missed.

Charles
 
To avoid these ads, REGISTER NOW!

stafford

Well-known member
Joined
Nov 5, 2010
Messages
185
Location
North Geogia
Yes I had to order the holders, I used the 45degree for the verticle peices. On the outside I turned them so the brush would be inside the channel the door travels in, you can't even see the brush. on inside I pop riveted it to the door channel and the brush lays on the surface of the door and you can see it but I don't think it'll hurt anything, if it does the brush will be covering it up. BTW I used the 2" brush . I'm pretty happy with it if I can remember I'll take some pics for ya and post them tomorrow
 

dnroe

Well-known member
Joined
Nov 4, 2010
Messages
113
Location
Easley, SC
I just had my 10x12 rollups installed about a month back and am looking for a fix for the same gap between the leading edge of the roll and the back side of the header. My gap is consistent at the bottom of the header but varies up higher as the door is raised and lowered. From what I have seen on GJ there are 3 ways to correct this. Using a roll of rubber to build a large bulb would probably work but I dont like the idea of it dragging and wearing or scratching the paint when rolling. My thoughts are to use a combination of the other 2 methods. My doors will primarily be used during warmer weather and I dont plan to cool it during the summer so a brush type would be sufficient in keeping out birds and wasps. However I would want to stop the drafts during cold weather to help keep the cold air out and I feel like you would need more than the brush to stop the air. I am thinking of installing a moveable seal like Charles has pictured above that can be closed during winter. Very rarely are the doors opened this time of year so it wouldnt be a hassle to open and close the seal and then just leave it open when its warmer. Anyone have any ideas or suggestions? Is this a possible solution to use both sealing methods? Stafford if you could post some pics of the brush it would be greatly appreciated! Sorry to those that are not interested for the long post.
 

Boyd

Well-known member
Joined
Dec 16, 2009
Messages
866
Location
Forney, TX
Yes I had to order the holders, I used the 45degree for the verticle peices. On the outside I turned them so the brush would be inside the channel the door travels in, you can't even see the brush. on inside I pop riveted it to the door channel and the brush lays on the surface of the door and you can see it but I don't think it'll hurt anything, if it does the brush will be covering it up. BTW I used the 2" brush . I'm pretty happy with it if I can remember I'll take some pics for ya and post them tomorrow


I would like to see some pictures of this if you have any. Thanks in advance.
 
OP
C

Charles (in GA)

Well-known member
Joined
Jan 11, 2006
Messages
12,489
Location
50 mi south of Atlanta
If you take some rubber and make a large "bulb seal" attach it to the door sheet itself and let it just get rolled up in the door roll, and pop out when the door is down. This is much like the Aussie design...............

attachment.php


Charles
 

Andybull

Well-known member
Joined
Jun 8, 2012
Messages
345
Location
NW, South Carolina
My roll up doors came with the seal attached as shown by edboyles. It's OK, but the door didn't roll round and it hit the top of the frame as it grew larger the higher it went. Then came the one door where the rubber seal folded partially the wrong way and stayed that way (memory bend).
 
To avoid these ads, REGISTER NOW!
Top Bottom