To avoid these ads, REGISTER NOW!

The Rat's New Garage

PERFORMANCE-RED

Well-known member
Joined
Sep 18, 2008
Messages
62
I would love to see a nice over all inside shot of the garage with the lights on. Those lights give it a very nice finished look.
 
To avoid these ads, REGISTER NOW!
OP
R

Rowdy Rat

Well-known member
Joined
Aug 12, 2005
Messages
117
Location
PA
I would love to see a nice over all inside shot of the garage with the lights on. Those lights give it a very nice finished look.

I'll post a few shots this weekend.

For those of you using (or thinking of using) the Visual Lighting software... It works! The electricians finished their end of the job yesterday and I was able to try the lights when I got home. All I can say is WOW! It will really be a treat to get to work in that garage when it is finally completed.

There are four switches that control the twelve light fixtures. Each fixture has two ballasts (electronic so no humming!) that control three lamp tubes each (six lamps per fixture). Each switch turns on three lamps in six fixtures so I can run various degrees of lighting depending on what side of the garage that I'm working on. Sounds complicated, but it should work out very well.

The garage door installer was supposed to be out Monday to install the doors and openers, but of course they had to reschedule and will now be out this coming Monday. That really messed up my plans to epoxy the garage floor this weekend as well as pushing the driveway installation back. At some point after the epoxy floor is in, I'll have to get the Rotary rep back to install the control unit and arms for the lift, but that shouldn't keep me from starting to move things into the garage.

Still, with just the doors, floor, and driveway left to do, the end is in sight and I should be in before November.

Regards,

Stan
 
OP
R

Rowdy Rat

Well-known member
Joined
Aug 12, 2005
Messages
117
Location
PA
The garage door installers were out today.

Did a good job getting the doors installed without causing too much collateral damage… I’ll still need to go back and do some detail work and some touch up, but I’ll wait until after the epoxy floor is done.

DSC_0365.jpg


DSC_0366.jpg


The doors are Wayne Dalton (5200 series) and are pretty basic… No fancy designs or windows. I wanted something with very good insulation numbers and these fit the bill with an R value of 14.8. I also went with the powder coated tracks, but there are still some items that will need some detail work (including addressing the ridiculous erector set bracing that everyone uses).

DSC_0367.jpg


The openers are LiftMaster 3800 series jackshaft openers. These are the first time that I’ve actually seen them in person and made my decision to use them based on positive feedback from this forum. Now that I’ve had a chance to see one operate, I can say it is a really nice unit and operates very smoothly and quietly. If it is reliable as well, I’ll be a very happy camper.

The photos below show the garage interior with the lights on. The bulbs were recommended by the distributor as a good choice for a “car showroom” application. The temperature is listed as 3600K and is considered middle of the road while the CRI is 85. It is definitely bright in the garage!

DSC_0368.jpg


This one is of the work area… Very bright and shows detail well.

DSC_0369.jpg


I may try lamps down the road around 4500K-5000K and a CRI of 90… Just to see how they compare, but for right now these lamps/fixtures are going to work great.

The driveway is supposed to be installed either tomorrow or Wednesday and as soon as that is done, I can start to prep for the epoxy floor.

Regards,

Stan
 

bluesman2a

Well-known member
Joined
Aug 16, 2005
Messages
1,312
Location
Atlanta, Ga.
DSC_0368.jpg


What is the black ******** the garage door track?

It's a door stop. With the 3800 series openers there is nothing really to keep the door from over-extending out the end of the tracks at the back, like you would have with a tradidional opener setup. These keep the door from going too far to the rear of the track. I have the same thing on mine and asked the same question when they installed it.
 

Brickout

Well-known member
Joined
Feb 15, 2008
Messages
82
Location
Chicago Area
It's a door stop. With the 3800 series openers there is nothing really to keep the door from over-extending out the end of the tracks at the back, like you would have with a tradidional opener setup. These keep the door from going too far to the rear of the track. I have the same thing on mine and asked the same question when they installed it.

Do those door stops come with the 3800? Or do I need to buy those separately?
 
OP
R

Rowdy Rat

Well-known member
Joined
Aug 12, 2005
Messages
117
Location
PA
The GC had asked me to lay out where I wanted the driveway so I picked up a spray can of white paint and a hose and worked on a couple of options. I find that a garden hose is great for mapping layouts (especially those with an arc or radius) as you can change or make corrections quickly. Once the shape is set the way you want it, go back and paint it on the ground with the spray can (downwind, so you don’t paint the hose). I used the same method for the pool deck and fence… Works great.

DSC_0373.jpg


The pavers showed up this morning as I was leaving the house. Hopefully they’ll be finished by the time that I get home.

DSC_0374.jpg


As I mentioned before, I have a lot of items currently in storage (including a couple of cars) that will eventually be brought over once the epoxy floor is done. One item that I wanted to address now (while the scaffolding is still on the job site) was an OK USED CARS neon sign that I picked up several years ago. The GC had installed a couple of 2”x10” blocks between the studs where the sign would be mounted and the electricians put an outlet in this location as well.

We should have it up in the next couple of days… I’ll take some photos after the installation, but here are a couple of the sign for now.

DSC_0371.jpg


DSC_0372.jpg


It should look pretty cool when it’s up… And I have some additional items to dress the garage up as well when everything is completed.

Regards,

Stan
 
OP
R

Rowdy Rat

Well-known member
Joined
Aug 12, 2005
Messages
117
Location
PA
That sign is awesome!

Thank you!

I really like it as well. Bought it about six or seven years ago from a gentleman who restores them as a hobby. I never had a garage with a high enough ceiling to mount it until now.

Regards,

Stan
 
OP
R

Rowdy Rat

Well-known member
Joined
Aug 12, 2005
Messages
117
Location
PA
The paving crew ended up doing a real nice job with the driveway.

DSC_0375.jpg


DSC_0376.jpg


Once the final grading is done and I get some grass growing on the bare spots, it should look very nice.

I have to stay off of it for a few days, but I wasn’t planning on putting anything into the garage until the epoxy floor is completed so it isn’t a problem.

Which leads me into my epoxy floor…

I followed the threads in the flooring section for a long time trying to get a handle on what type of flooring to put down. I had used VCT on a portion of my last garage and while I definitely liked the look, it really wasn’t as durable as I had hoped. I looked at epoxy products and after coming to the conclusion that 100% solids, self installed floor was the way to go, I decided on using Wolverine Coatings. This product has been used in industrial/commercial locations for many years and I liked the fact that I could get answers directly from the factory when I needed them... That’s a necessity for someone like me who has little experience installing epoxy floors and has (will have) questions about the product and installation. I did outsource the color flakes due to cost consideration. My final floor cost (including flakes and supplies) should be right around $2.00 a square foot.

My product inventory… I will be using Wolverine Coatings’ new UV resistant top coat.

DSC_0346.jpg


This is what 225 pounds of color flakes looks like.

DSC_0377.jpg


Color mix is 55% white, 30% black, and 15% grey.

DSC_0378.jpg


I intend to do the installation this weekend if the weather cooperates… I’ll post photos of the process when the job is complete.

Regards,

Stan
 
OP
R

Rowdy Rat

Well-known member
Joined
Aug 12, 2005
Messages
117
Location
PA
Now that that basic structure is more or less completed, it’s time to tackle the interior of the garage.

One of the first things I looked into when designing the garage was what to put on the floor. There seems to be an ever increasing number of options for garage floors (which is a good thing)… Most of them look fantastic when installed, but some handle particular work situations better than others. I had used VCT in my previous workshop and know a person using interlocking plastic tiles in their garage. Both were adequate for my intended purpose (auto restoration), but they both had some drawbacks that I really didn’t want to deal with. After seeing an epoxy floor locally as well as those that have been posted on this site, I decided that this was the floor system that would meet all of my requirements.

I made some calls and did quite a bit of research. The conclusion that I came to was that I needed a 100% solids epoxy and that the local companies that I talked to were very expensive. From the feedback on the Garage Journal, it seemed that a DIY installation with acceptable results was possible for considerably less money than the quotes from professional installers that I received... So it looked like I would be putting this floor in myself. One of the epoxy companies that stood out for me was Wolverine Coatings. First off, they produced their own product and did their own R&D. They also have a significant list of references in various applications (some of which are very demanding environments). Wolverine Coatings also was very responsive to questions that were posed (both mine and others) and were presented in a way that you didn’t have to be a chemical engineer to understand. I spoke and corresponded with Eric at Wolverine Coatings as well as Fred at Alpha Garage and worked out a plan for my garage. The product list that Eric and Fred proposed consisted of:

• 4.5 gallons of BondTite 1101 (1 – 3 gallon kit and 2 – 3 quart kits) for use as a primer
• 10.5 gallons of LiquaTile 1184 (3 – 3 gallon kits and 2 – 3 quart kits) for use as the color coat as well as a medium for broadcast color chips
• 3.75 gallons of EnduraShield 2254 (3 – 1.25 gallon kits) for use as a UV resistant clear top coat to seal the color chips
• 1 gallon of IntegraFlex 1921 (1 – 1 gallon kit) to fill the expansion cuts in the slab
• 2 pair of spike shoes (since my wife would be helping me)

This product list was thought to be adequate for my garage and compressor room which total approximately 1,350 square feet. One thing that you might notice is that I did not purchase my color chips from Wolverine Coatings/Alpha Garage. The cost per pound (even with a volume discount as I would have received) for 225 pounds of chips was not inexpensive. Fred has told me the he and Eric are working on a source for quality chips at a better price than what was available when I ordered. Hopefully, by the time you read this, they will have that color chip source in place.

The transaction was very easy (done through Pay Pal) and the product arrived within a two days of my order. The garage wasn’t quite ready as there was still work being done so I had to wait for several weeks before I could start my floor. As it worked out, I got my opportunity to start this weekend.

I worked on getting things together that I would need for the installation… Some of these items I had, others I would have to purchase. It’s a rather long list, but I’m going to post it here for others to look at and decide which of these items they will need on their own floor project.


Drill (for mixing)
Extension cords
Garden hose and nozzle
Mixers (4)
Buckets (2 gallon buckets for mixing product)
Measuring cups (5 – 1 quart cups and 5 – 2 quart cups for measuring product)
Plastic drop cloth (I used what was left of my vapor barrier – worked well)
Tape (painters tape for masking)
Painters plastic (for covering walls)
Broom
Dust pan & hand broom
Hand grinder
Rollers (Sherwin Williams, 18” with ¼” nap, shed resistant, epoxy rated)
Roller extension pole
Brushes (3 – nylon bristle brushes)
Scrapers (to remove any residue on floor)
Disposable gloves
Floor squeegee
Spiked shoes
Shop-Vac
Knee pads
Power-washer
Safety equipment – eyes, ears, nose/mouth
Tape measure
Calculator
Scale (for measuring color chips)
Spatulas – cheap ones from dollar store
Paper shop towels
Wash bucket
Wash brush
MEK (for cleanup)
Garbage can (with bag for cleanup)

That pretty much covered it for me, but for others, the list may change a bit.

Cleanup, even with a new, never occupied garage is probably going to be the worst part of the project from what I’ve experienced so far. If you can make it through that, the rest of the job should go smoothly. I started off giving the garage a thorough cleaning (sweep and vacuum) to prepare for the next step.

Wolverine Coatings recommends either mechanical texturing (shot blasting or grinding) as a preferred method or acid etching (with muriatic acid). I did not have access to the required mechanical equipment and I had heard horror stories about corrosion issues with muriatic acid so I was looking for another alternative. Wolverine Coatings offers an organic etcher, but it was outside of my budget. I initially tried Behr’s concrete etcher (phosphoric acid base), but it really didn’t do too much of anything. I finally bit the bullet and used the muriatic acid as recommended (you were right Fred) and the process seemed to well after that. The muriatic acid that I used was the standard swimming pool acid (31% hydrochloric acid) and I diluted it three parts water to one part acid. Remember to add the acid to the water, not the other way around. I used a plastic garden watering can to wet the surface, but a mop and bucket would work just as well.

DSC_0379.jpg


The fumes are not too bad if you have adequate ventilation (I kept the garage doors open), but they are still present. I wasn’t about to bet on the strength of the fumes and went with a respirator, goggles, rubber gloves… The whole nine yards. It just isn’t worth taking chances on something like this.

DSC_0381.jpg


The chemical etching process causes the muriatic acid to bubble when it hits the concrete surface. When the bubbling is done, the process is complete and what is left should be washed off of the surface before it dries. I ended up washing the surface of the slab after etching three times (including once with a scrub brush to make sure that I got everything). The surface of the slab is definite “rougher” than it was before although some areas appear rougher than others… Not sure if it was an acid issue or a concrete issue, but retreating the spots with acid seemed to make very little difference so I left it at that.

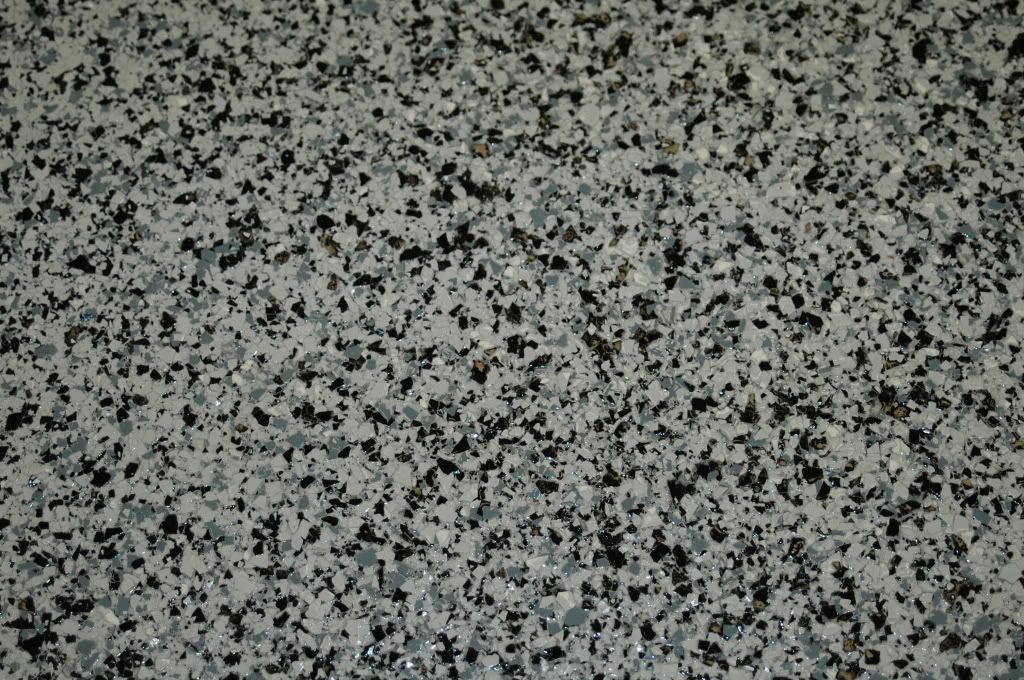
In the end, this was typical of what the concrete looked like.

DSC_0380.jpg


I started this process Friday evening after work and spent the better part of four hours out there the first night cleaning, etching and then washing it off twice. I washed the floor an additional two times on Saturday and let the floor dry out with the doors open (temperature has been in the mid 60s during the day and low 40s at night).

Sunday morning my wife joined me in helping to tape off the garage door hardware and walls. Everything was painted so I didn’t want to take a chance of errant epoxy finding its way on to the walls, doors, etc. Took us a while to do, but it will help protect the walls from potential mishaps (you can bet that if we hadn’t done this, something would have happened that would require a full repaint). I left the garage doors open a bit so that we could epoxy underneath them and covered the opening with some plywood. We took a break and came back a few hours later to start on the primer coat of BondTite 1101.

DSC_0383.jpg


DSC_0382.jpg


I used a piece of vapor barrier that I had left over as a staging/mixing area and I would recommend that anyone attempting this process do the same. It keeps everything in one area and also keeps the entire work area clean (and the area underneath epoxy free). We broke the garage down into six parcels and this seemed to work very well in our case. I was concerned that the epoxy would harden quickly so we decided that after the two parts of the 1101 were mixed, we would move as quickly as possible with my wife cutting in with a brush and me getting the open area with the roller. As it turned out, my fears of this product being like a “five minute” epoxy adhesive were unfounded… There was plenty of time to apply the product. We were able to move at a very good pace and used the same roller and measuring cups for the entire project. The 1101 goes on very easily and you can see the concrete get darker as it covers the surface. I had contemplated getting the notched squeegee, but it really wasn’t necessary. At the end of the job, we have enough left to do the lift cover plates and the compressor room so it appears that we used enough of the product.

Here is a photo of the floor with the BondTite 1101 applied.

DSC_0384.jpg


All things considered, the project has started off very well.

Today, we will use the IntegraFlex 1921 to fill the expansion cuts and also apply the LiquaTile 1184 and color chips. More information and photos to follow.

Regards,

Stan
 

FFPL

Well-known member
Joined
Oct 12, 2007
Messages
157
Location
Massachusetts
• 3.75 gallons of EnduraShield 2254 (3 – 1.25 gallon kits) for use as a UV resistant clear top coat to seal the color chips

I can tell you that you will be happy with Endurashield. I did bondtite as my topcoat but the endurashield is a really nice product. Very very hard. And a long work time as well so it will be easy to put down. Watch out carefully with the mix ratios. Its a .25 to 1 mix and is pretty critical as I understand. I didn't have any issues so I reckon you won't either.

Looking forward to how yours turns out.

The customer service is really fantastic with these guys. I had to get extra supplies and they (Fred and Eric) did everything to get them to me when I needed them.
 
OP
R

Rowdy Rat

Well-known member
Joined
Aug 12, 2005
Messages
117
Location
PA
I can tell you that you will be happy with Endurashield. I did bondtite as my topcoat but the endurashield is a really nice product. Very very hard. And a long work time as well so it will be easy to put down. Watch out carefully with the mix ratios. Its a .25 to 1 mix and is pretty critical as I understand. I didn't have any issues so I reckon you won't either.

Thank you for the feedback!

I followed along with your garage floor installation as well as your work on your neighbor's floor... Both were very informative and help me with my own installation. This forum really is pretty fantastic in that regard. Lots of great information being passed around this site.

I do remember you doing the topcoat with BondTite in your own garage... Did you use the EnduraShield in your neighbor's? I don't recall.

Looking forward to how yours turns out.

Me too!

The customer service is really fantastic with these guys. I had to get extra supplies and they (Fred and Eric) did everything to get them to me when I needed them.

I couldn't agree more.

Wolverine Coatings and Alpha Garage do an excellent job of customer service and it really makes for an enjoyable transaction and installation experience.

Fred has been available to answer my questions (and there have been a lot of them) when I call and even when he isn't in the office, he has always returned my telephone calls promptly and accurately. For a DIY product, this type of service is an absolute must and they have done a great job.

Regards,

Stan
 
OP
R

Rowdy Rat

Well-known member
Joined
Aug 12, 2005
Messages
117
Location
PA
Excellent thread.I'm staying with you.

Thanks!

The floor portion of the job is getting close to completion. I still have the compressor room to do (as well as moving the compressor in) and the Rotary rep is due out in a couple weeks to finish the lift installation. I do intend to go with Lista cabinets... I even have the plan drawn out and the models picked, but that is going to have to wait a while.

It is getting close though and in a week or so I should be able to move the cars and some of the equipment back in.

I see your in the Cleveland area... I used to live out that way a while back.

Regards,

Stan
 

FFPL

Well-known member
Joined
Oct 12, 2007
Messages
157
Location
Massachusetts
I do remember you doing the topcoat with BondTite in your own garage... Did you use the EnduraShield in your neighbor's? I don't recall.
Yes, we used endurashield on my neighbors floor. Originally he bought 2x1.25 gallon kits but subsequently bought another 2 kits. We put 3 coats on the walls and 3 on the floor. Make sure you don't put it down too heavy otherwise you will see small bubbles. We didn't see any on the floor nor on the finished walls but when doing the walls we saw some where we masked the floor (this stuff will run on a vertical surface).
One really nice thing is that you have a long pot life and working time. You won't have any issues with roller marks and the finish will be water clear and very very hard. Harder than the bondtite.
 
OP
R

Rowdy Rat

Well-known member
Joined
Aug 12, 2005
Messages
117
Location
PA
Thanks again for the information.

I'm also happy to hear that the EnduraShield is easy to work with and has a long pot life which should make application tomorrow a bit more enjoyable. Fortunately, I only have a single horizontal surface... I can only imagine what is was like applying this stuff to walls (and other pieces too).

Tonight, I'll be busy with a scraper and a vacuum cleaning up rejected color chips so that I can apply the EnduraShield. I'll post my IntegraFlex/LiquaTile/Color Chip experience tomorrow (which should provide some entertaining reading as a result of a screw up on my part and underestimating the application time required).

I do want to thank you again for passing along the EnduraShield info... Should make my life easier!

Regards,

Stan
 
OP
R

Rowdy Rat

Well-known member
Joined
Aug 12, 2005
Messages
117
Location
PA
Well after a relatively smooth start on the floor, I should have expected at least one bump in the road, right?

The BondTite application seemed to go well. When I checked it the following morning, it had hardened significantly (although it would leave very light finger prints and shoe marks). I had left the heat in the garage set at 65º to keep the temperature in the range that Wolverine Coatings specifies for their product and that seemed to help reduce the time required for the BondTite to fully harden. I am told that this hardening process is a chemical reaction rather than the evaporative process that you have with normal paint. This is the reason that you can apply 100% solids epoxy products over one another quickly (before the prior product has fully cured); there is no air/evaporation required to support the process. As it was explained to me, it takes only a day or so for this process to provide a relatively stable product even though the reaction requires several days for the product to fully harden.

Enough of the chemistry lesson though… My next step was to address the saw cut control joints in the slab. There were two cuts, thirty feet long and about two inches deep. Wolverine Coatings offers a product called IntegraFlex that can be used for cuts and cracks such as this. The product fills the joint, but does not harden completely which allows it to move as the concrete expands and contracts without cracking. My plan was to work as much of the IntegraFlex into the crack and feather out additional product (thinking that just filling the joint might not provide enough surface area for the IntegraFlex to adhere to). I got up early and mixed a batch of IntegraFlex… It is MUCH thicker than the BondTite. A previous thread advised using a metal “corkscrew” mixer and I would agree with that assessment completely. I applied the product, feathered it out about three inches on either side, and thought that I was good to go.

I got home and discovered that the product was setting up well. I called Fred at Alpha Garage to go over a few questions that I had and fill him in on my progress so far. Fred told me that while the IntegraFlex would probably work in the manner in which I had applied it, it was really meant to fill cracks only and not as a surface leveler as it would always remain at least a bit pliable… My screw up for not asking questions before applying the IntegraFlex! Fred said that it would probably be OK as long as it wasn’t in a high traffic area, but I gathered from the conversation that it would be better if it wasn’t feathered to either side. I grabbed a six inch putty knife and started to remove the product that I had feathered around the expansion cut. While the IntegraFlex hadn’t completely hardened, it had thickened to the point where it was a sticky mess to remove… I was actually able to remove the IntegraFlex from the floor well (leaving just the product in the cut), but the product was a pain to remove cleanly from the putty knife (and my hands). It did work though. Two hours later, I had successfully removed the IntegraFlex from the slab and corrected my mistake. Lesson learned… Ask questions and know exactly how the product is to be used before proceeding.

It was getting late, but I was committed to installing the LiquaTile and color chips and my wife and I thought that it shouldn’t take much longer than the BondTite to install (about three hours or so). Turns out that that we were both overly optimistic on the time required to do this.

The LiquaTile is thicker than the BondTite, but much thinner than the IntegraFlex. There is also a lot more of it… Wolverine Coatings specifies 12 mils thickness with this product which is 2½ times that required for the BondTite. We used a very light silver color that I didn’t think would work too well when Eric initially suggested it, but after seeing it, it looks almost like a very light gray and should work very well in my application. As others have said when installing the LiquaTile, it looks impressive all by itself! You could leave it like that (without the chips) and have an absolutely beautiful floor. I wish that I had shot some photos of just the LiquaTile, but my wife and I were both a bit of a mess, it was late, and we wanted to keep the project moving rather than stop to take pictures.

We broke the floor down into six sections again and my wife started by cutting in around the floor perimeter and the garage doors. I started with the roller (do yourself a favor and use an 18” roller, especially if you have a lot of floor to cover) and worked until we ran out of epoxy. She would then mix the product while I threw color chips. When she was ready to mix, I would stop and give her a hand with that. We basically repeated that process until we were done and it seemed to work well. As noted before, the LiquaTile is applied thick… I can see where the notched squeegee would work well with this product. If you use just a roller as I did, try and resist the temptation to apply the product thinner than specified just because “there is a lot there”. Do the math, figure out how much you will need for each section and apply all of the product evenly on that section. The color chips were applied “to rejection” and I figured the amount I would need based on Eric’s number of .150 pounds per square foot (it turned out to be a very accurate number). I purchased the spiked shoes (I don’t see how you can do the chip broadcast without them) and used the “chicken feed" method. I also broke down my chip inventory based on the six sections of floor and handled it the same way the epoxy was done. After six hours of work, the floor looked something like this.

DSC_0386.jpg


I was surprised by the amount of chips soaked up by the epoxy… A full broadcast requires a lot of chips! One of the nice things about the chips is that they hide most imperfections in the floor (something LiquaTile alone can’t do completely). I never liked how the area around the drain was finished, but after the chips were applied, it looked great!

A couple of things that I have learned so far on this floor installation that should help the aspiring epoxy floor installer on their own project:

• Have everything you need for the entire project before getting started. Seems simple enough, but it really cuts down on time wasted running back and forth to the store to get an item previously forgotten. I actually did pretty well on this as I tend to plan well.

• Leave yourself plenty of time to do the job. Installing an epoxy floor might be business as usual for the professional, but for the typical DIY installer, it is going to take a lot longer than it will the pro (they have the product knowledge, experience and the specialized tools on their side). If it is possible, leave yourself a couple of weekends to do the job. The first to clean and profile the garage floor and the second to install the epoxy. A floor project done with Wolverine Coatings products can probably be accomplished in three or four days by the DIY installer, but you are going to be spending a lot of time in the garage to get the job done in that amount of time.

• Have a helper if at all possible. While the job can certainly be completed by a single person, having a helper certainly speeds up the process. My wife did great job with taping of the walls, measuring and mixing product, and cutting in the perimeter of the floor. It’s great when you don’t have to stop working all the time to mix more product.

I still believe that this was the best way for me to achieve the results with the floor that I wanted. The professional installers that I talked to in this area typically want a small fortune to install a 100% solids epoxy floor which made it cost prohibitive for me. By installing it myself, I’m able to get the floor that I wanted.

I followed up last night by vacuuming up the rejected color chips and scraping any chips that were sticking up. A lot more chips adhered to the epoxy than I thought would (I applied over 200 pounds of chips), but there was still a lot to be swept up… I ended up with 21 pounds of rejected chips. Between the scraping and the vacuuming, I spent another six hours getting the floor ready for the EnduraShield. Here are a couple of photos of the floor after scraping and vacuuming.

DSC_0395.jpg


DSC_0396.jpg


I’ll be doing the EnduraShield application tonight, but I probably won’t be able to post a write up or photos until Sunday as I am heading out of town for a few days. I’m still on track to get my “stuff” back in the garage before the end of the month!

Regards,

Stan
 
Last edited:

FFPL

Well-known member
Joined
Oct 12, 2007
Messages
157
Location
Massachusetts
wow. fantastic job. Would have loved to see a pic of the liquitile before the flakes. That's one of my favorite (and easiest) steps. The Endurashield will really make that floor. Well done.
 
To avoid these ads, REGISTER NOW!
OP
R

Rowdy Rat

Well-known member
Joined
Aug 12, 2005
Messages
117
Location
PA
I finished up with the last stage of my garage floor on Wednesday evening, but have been out of town the past few days so this is the first opportunity that I’ve had to post an update.

I made a small change to my previous procedure for applying the EnduraShield. For the BondTite and LiquaTile applications, I had the ability to use the expansion joint cuts as a reference for applying product… Basically, use the saw cuts to divide the room into thirds and then split those down the middle to create six sections that were relatively equal in area. Now that the LiquaTile and color chips were down, there weren’t any expansion cuts to reference! I broke the length and width of the floor into thirds and marked the points on the wall with blue painter’s tape giving me nine equal sections. Not entirely different, but still a change from my previous application method.

The EnduraShield is a clear top coat that is resistant to UV radiation and is less prone to yellowing than BondTite. It mixes a bit differently (1:4 ratio), but serves essentially the same purpose as the BondTite top coats that others have used on their garage floors. As I had been told by Fred, FFPL, and others, the EnduraShield is very easy to work with and has a long pot life. My wife and I split our product inventory into thirds and then marked our application bucket into thirds as well giving us the nine portions that we would need to finish the nine sections of the garage. I was warned not to apply the EnduraShield to heavy or the potential for air bubbles forming was high, but my experience was that you will need every drop to cover a heavy chip application. We mixed the products (separately and together) and applied the product as before with my wife cutting in and me rolling out the rest. The EnduraShield application went much quicker than the LiquaTile and we were able to finish in about two hours.

I still have some detail work to do, but for the most part, the garage floor is done and I’m absolutely pleased with how it turned out. About the only thing that I’m unsure of at this point is if it could use an additional coat of clear, but for now, it will serve my purposes just as it is.

DSC_0397.jpg


The floor looks great, but the budget on this job was important as well… That’s one of the reasons why a professional installation wasn’t feasible. The products that I purchased from Wolverine Coatings/Alpha Garage came to just under $2,200 and my cost for miscellaneous materials (measuring cups, acid, rollers, respirator, etc.) totaled about $150. Applying those product costs to a 1350 square foot floor without chips works out to $1.74 a square foot. I of course also used a full chip broadcast (.150 pounds per square foot) which consumed almost 205 pounds of chips and pushed my product and square foot cost a bit higher. My chips, with shipping were approximately $630 so my final tally for everything worked out to $2.20 a square foot. I can tell you that in this area of the country, you’d be hard pressed to find a professional that would touch a job for twice that (and many of them are a lot more).

If you don’t mind putting some time and effort into a project, can plan well, and can follow directions, you will have no problems installing a Wolverine Coatings epoxy floor and will have a quality product when you are done.

I finished off the drain with the remaining pieces. Kussel offers several options on their drains, one of which is this perforated basket to prevent important items from being accidentally washed down the drain.

DSC_0400.jpg


The cover plate is very thick and is made from 306 stainless like the rest of the drain. It was designed for fork lift traffic so the occasional car driven over it should be no problem. I was going to epoxy/chip the cover like the rest of the floor, but I like the look and may just leave it as is.

DSC_0401.jpg


I also emptied out one of my storage units (no more rental bills after this month!!!) and brought in my old Pepsi machine that I picked up several years ago. It still works great and while my original intention was to restore it, I will probably just leave it alone until it needs work… At that point I’ll probably restore it.

DSC_0402.jpg


I wouldn’t mind accessing parts and information for restoring it now. If anyone knows a good source for parts, service, and information on these old vending machines, I’d be very thankful to hear about it.

I was also able to bring in one of the cars… Two more to go!

DSC_0403.jpg


I still have a couple of minor items to deal with… The lift installation needs to be completed (three stage arms and control unit), I need to install some type of baseboard to prevent water damage to the drywall, finish the air compressor and ail line hook up, and of course, get the cabinets in (maybe in a year or so). Still, I’m getting to the point where I can start restoring cars again and I’m really looking forward to it!

Regards,

Stan
 
Last edited:

FFPL

Well-known member
Joined
Oct 12, 2007
Messages
157
Location
Massachusetts
About the only thing that I’m unsure of at this point is if it could use an additional coat of clear, but for now, it will serve my purposes just as it is.
Having done quite a bit of this lately, I think 1 coat is nice, 2 coats is nicer and 3 is really the icing. When I did my neighbors floor he was going to do a single coat but after having experienced the walls it was going to be nicer doing more than 1 coat on the floor as well; we ended up doing 3. But just the single coat was pretty good. And since it's so hard it should stay put for quite some time. If you do do multiple coats then you've got to consider some of the grip stuff as it gets somewhat slippery otherwise.
 

AlphaGarage

Well-known member
Joined
Apr 16, 2008
Messages
1,298
Location
Every Garage, AnyTown, USA
Looks just stunning!

Really like the neon sign. I actually have a 8' x 4' old restaurant neon sign in our living room, and another 6' one that will probably go in the dining room after I rehab it.

I'm glad we could be a part of your project. As much as we enjoy giving advice, it's helpful and equally enjoyable to read or hear about the application of our products in the field, always something to learn and pass along to the next guy or gal.
 
OP
R

Rowdy Rat

Well-known member
Joined
Aug 12, 2005
Messages
117
Location
PA
Wow...floor looks great.

Thanks... And thanks for sticking with the project too! It's taken a bit longer than I thought that it would!

Thats a really nice garage, must of cost some major mula.

While it wasn't inexpensive, it wasn't as bad as you would think. When I sent the project out for bid (actually the second bid since the plan was revised from the initial specifications), I basically received quotes that were similar to average home prices in this area (between $100 and $125 a square foot) which was way over what I was willing to spend. While I was contemplating my next option, I was referred to a local contractor with a small crew. He didn't have the fancy equipment the other guys did, but all of his references were outstanding and three of his jobs that I was able to view in person were exceptional quality work. Turns out he bid the job for less than half of what the other contractors wanted... Guess who I went with.

His work on my garage was exceptional and I'd have no problem recommending him to anyone that wanted a quality project done.

It definitely pays to shop around.

nice job. well done. love the car.

Thank you! That's a real compliment coming from someone who has done floors as nice as yours.

I sold a car that I restored to buy that one... Seems that I was always restoring on an old Corvette and as a result I never had one to drive. Figured that if I got a new one, I'd at least have something to cruise around in while I was working on the old ones!

Love your Jensens too! I immediately assumed the one you posted in the your floor thread was an Interceptor and never realized that Jensen built significant cars outside of that. I ended up doing a little bit of research after you posted what it was. That FF is truly impressive... All wheel drive and anti lock brakes in that era was really state of the art!

Regards,

Stan
 

buening

Well-known member
Joined
Dec 17, 2007
Messages
1,338
Location
Decatur, IL
Where did you get your lights at? All I've found locally are the 4 bulb type, not the 6 bulb. I had similar plans as you with the recessed lighting, good to see you found a way around hacking up the bottom truss chords ;)
 
OP
R

Rowdy Rat

Well-known member
Joined
Aug 12, 2005
Messages
117
Location
PA
Where did you get your lights at? All I've found locally are the 4 bulb type, not the 6 bulb.

I purchased mine from a local Rexel distributor. The lights are manufactured by SpecLight which is a division of Lithonia. The Rexel rep originally claimed that there was no such fixture when I first inquired about them... A call to SpecLight/Lithonia cleared that up, but apparently they aren't easily found in the current catalog.

http://www.acuitybrandslighting.com...cLight 2005/Troffer/Troffer/SL06011-TRO05.pdf

I guarantee that they do exist as there are twelve of them currently mounted in my ceiling! :thumbup:

I had similar plans as you with the recessed lighting, good to see you found a way around hacking up the bottom truss chords ;)

Thanks for your comments.

There is a reason why truss manufacturers get real nervous when you start talking about "modifying this" or "cutting that" when it comes to their product. The GC and I were both of the opinion that nothing would be done to the trusses to compromise them in any way. The solution that the we came up with turned out to be a pretty good one as it still gives a clean, recessed look.

Regards,

Stan
 

buening

Well-known member
Joined
Dec 17, 2007
Messages
1,338
Location
Decatur, IL
May I ask what you paid for one fixture?

I've done enough wood connection design that I could make the truss mods work, but that would be a pain compared to what you've done.
 
OP
R

Rowdy Rat

Well-known member
Joined
Aug 12, 2005
Messages
117
Location
PA
May I ask what you paid for one fixture?

If I remember correctly, they were around $240 per fixture. That did not include the T5HO lamps or the drywall installation kit.

I've done enough wood connection design that I could make the truss mods work, but that would be a pain compared to what you've done.

You're right... There were probably a number of ways to address this issue. The GC and I tried to come up with a quick and dirty solution after I came to the realization that 24" wide (the light fixture) and 24" on center (the trusses) were mutally exclusive terms! :lol: As it turned out, the appearance of the lights is actually as nice as if I had them installed flush with the ceiling.

Regards,

Stan
 
Last edited:
OP
R

Rowdy Rat

Well-known member
Joined
Aug 12, 2005
Messages
117
Location
PA
The lift installation is complete!

The installer from Turner Hydraulics was out last week to finish the installation of my lift. I was under the impression that this would be an all day (or more) process, but it actually went much quicker than I thought. I wasn’t sure what to expect so I covered the floor around the work area with cardboard and plastic to prevent any damage to the floor, but the installer was very careful and it wasn’t really necessary… Still, better to be prepared. He was pretty well organized too… Laid out all of the components and made certain that he had everything before getting started.

DSC_0404.jpg


DSC_0407.jpg


The first part of the process involved running the air and hydraulic lines from the lift to the control unit location. This was simply a matter of fishing the lines through the previously installed conduit. The fittings were tightened on the hydraulic lines and the air line installed into a compression fitting.

DSC_0406.jpg


The pump was mounted on the wall… The mounting plate was lag bolted into a 2”x10” that the contractor had installed before the drywall for this purpose. The pump was bolted to the mounting plate and the air and hydraulic lines were attached.

The three stage arms were installed next. The stationary part of the arms attaches to the hydraulic cylinder with four very large bolts. The arms attach to these pieces with a hardened steel pin and a snap ring to keep it in place. All of the parts are VERY substantial and I doubt that I ever have to worry about structural failure.

DSC_0409.jpg


The installer next added hydraulic fluid to the pump and forced the air out of the system. While the unit operates on 220, the electricians aren’t scheduled to be out until December to finish their work (lift, compressor, and a few other odds and ends) and the service wasn’t available. The installer told me that it was common for him to test units on 110 so that is what we used... I had also installed a small compressor temporarily to operate the locks on the lift. After two approximately two minutes, the lift arms started to rise and after a few cycles of raising/lowering the lift and adding hydraulic fluid, I was told it was ready to go as soon as the electricians did their thing.

There are still a few detail items to take care of, but this garage project is getting very close to completion. The lift looks great and as I had wanted, it takes up very little space in the garage. The in ground lift certainly does maximize my floor space!

DSC_0410.jpg


DSC_0411.jpg


DSC_0412.jpg


Regards,

Stan
 

Thomarann

Well-known member
Joined
Sep 25, 2007
Messages
219
Location
Canada, eh?
....I had also installed a small compressor temporarily to operate the locks on the lift. After two approximately two minutes, the lift arms started to rise and after a few cycles of raising/lowering the lift and adding hydraulic fluid, I was told it was ready to go as soon as the electricians did their thing....

Got any pictures of it in action/testing?

Thanks, Stan.

Marc
 
OP
R

Rowdy Rat

Well-known member
Joined
Aug 12, 2005
Messages
117
Location
PA
Thank you for the nice comments gentlemen!

Marc,

I'm afraid that in the excitement of seeing the lift operate for the first time, I neglected to shoot any "action photos." Once the pump motor is hooked to the 220 service and my "real" compressor is in place, I promise that I'll post a few.

akdiesel,

I wish that I could take credit for that, but that is SOP for Rotary. The laminated sheets are quick reference cards for lift operation and I would agree with you that it is an excellent idea and will come in handy if I have any questions.

This weekend I'll be working on the floor again... After a couple of weeks of thinking it over, I decided that I want to put down a second coat of clear to take some of the texture out of the current surface... Nothing at all wrong with it (it really is beautiful; it looks much better in person than in the photos), I'd just prefer a smoother floor. I also need to do the compressor room and the lift cover plates so that will keep me busy tonight and tomorrow.

After Thanksgiving, I'll be bringing in the other cars, my parts inventory, and my automotive library (which has been packed in boxes for a year and a half). It will be nice to have access to them again. Plus, I get to start the restoration on one of my old cars so I'm pretty excited about that.

Regards,

Stan
 
To avoid these ads, REGISTER NOW!
Top Bottom