To avoid these ads, REGISTER NOW!

The Rocket Shop - Fab Lab Module

woodrail

Well-known member
Joined
Feb 23, 2012
Messages
2,456
Location
Lorain, Ohio
This could be a 2017 New Years resolution, or just a goal, but time has come for the next step in growing my shop capabilities.

Some may remember my original thread detailing my detached Rocket Shop. The shop is a dedicated 24x24 structure fro various more technical work, but also basic woodshop and limited metal work.

For many years I have desired to have my own Fab Lab. These are also known as maker spaces or similar names. In short, the lab will contain the hardware and software to "make almost anything".

As I'm maxed out in the detached shop, and have no room for an addition. The lab is going in my semi-finished basement. I have about 12x10 of dedicated space, and about an additional 12x14 of shared space. The basement already contains my 8x8 modeling area, a 10x10 tool/paint mechanical area, wine bar, craft area, laundry room, and various storage/closets.

The fab lab is basically replacing the extremely seldom used home gym. Yea, I'm going another direction......

So what is going in the Fab Lab? 60w laser, vinyl cutter, 3d printer, x-carve, and casting equipment. Plus related computer gear and supplies. It's going to be tight. I'm going to be creative with the layout and some areas will be shared.

The design of the new lab will mimic the original Rocket Shop. The walls will be Slat walls with glass display shelves. Lighting will be 4' LED, and feature down lights in clouds similar to what is above my other workbench. Work surfaces will be Sam's Club Seville brand.

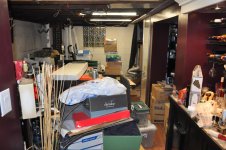
Of course, the project starts with the embarrassing "before" image! We unfortunately had our water main rupture a couple weeks ago between the main and our shutoff valve. The repair (4 guys, 2 excavators, and 14 hours) required meter disconnection. Well the meter is buried in a long-term storage closet, so we had to empty it all over the basement. Lesson learned here.

My timeline for this conversion is about 6 weeks to get operational. My workload is about 50-60 hours per week, so this might slide. No need to kill myself. This is a hobby right?!
 

Attachments

  • DSC_0219.jpg
    DSC_0219.jpg
    146.4 KB · Views: 337
To avoid these ads, REGISTER NOW!

bj383ss

Well-known member
Joined
Sep 29, 2011
Messages
3,166
Location
TX
This should be interesting. Looking forward to the tool setup especially the X-Carve. That is an ambitious timeline you have for working 50-60 hours a week.

Bret
 
OP
W

woodrail

Well-known member
Joined
Feb 23, 2012
Messages
2,456
Location
Lorain, Ohio
So I passed the "week 1" mark. Holy ****, why am I keeping all this ****?

My first goal was to get the new area clean enough to photo, tear down, and sell the old home gym. I'm three days in, and still haven't reached that mark. I've counted roughly a dozen boxes of various hobby stuff, craft supplies, and just old stuff. This stuff needed placed in the "long term storage"area, but that needed cleared out first. Then it was time to purge the old spray paint. Good god, why do I have 50 cans of paint. I whittled it down to 30.

I think I need an intervention.

I'm really hoping by Sunday I can move out of cleaning out mode and into demolition phase. I'm not enjoying myself so far.
 

Hawk136439

Well-known member
Joined
Jan 5, 2017
Messages
117
Location
Illinois
Looks like a space with a ton of potential! Do you already have the 3D printer? If so what is it and if not what do you have your mind on? Looking forward to seeing this take shape!
 
OP
W

woodrail

Well-known member
Joined
Feb 23, 2012
Messages
2,456
Location
Lorain, Ohio
Finally made some progress last night. Looks like I might be getting out of "the rut"!

The home gym, otherwise known as "auxiliary shelves", got dissembled and sold. This opened up the whole area for construction. Some bad masonry joints were filled. Dryloc paint going on today.

The floor is some cheap snap lock pergo **** that has been damaged by humidity over the past 12 years. I didn't realize how bad it is til I started moving things. I need to cut out about 3 inches from the wall in order to get the metal track for the furring down.

Regarding the equipment, I have some of it already, and some is ordered.

I have the computers and design software, 2 vinyl cutters and a 60watt laser. On order is a Uniz Slash 3d printer. Hopefully, this gets here in the next couple of months.

The X-carve is awaiting my tax return!

Hopefully I can get some decent progress photos tonight.
 
OP
W

woodrail

Well-known member
Joined
Feb 23, 2012
Messages
2,456
Location
Lorain, Ohio
Some slow, but decent progress last night. I really need to start taking pictures.

My basement walls have a slight bow to them. Nothing critical, but enough that I need to pay attention to "plumbness".

After careful measurement, I was able to remove all the laminate flooring and subfloor down to bare concrete. I now will be able to tapcon down the metal floor track and start studding up the wall.

My wife did get about 60% of the dryloc painted on, the rest is going on today.

Tonight and tomorrow will be metal work.
 
Last edited:

Hawk136439

Well-known member
Joined
Jan 5, 2017
Messages
117
Location
Illinois
Can't wait to see some pictures of this coming together. It's really nice that your wife is helping with your projects too. Do you have anything in mind to use the 3d printer for and what design software will you be using?
 
OP
W

woodrail

Well-known member
Joined
Feb 23, 2012
Messages
2,456
Location
Lorain, Ohio
All the equipment will be used for offering prototyping services, precision models, architectural models, and some unique gift product for specialty organizations. (and of course custom rockets!)

We will be using AutoCAD and CorelDraw.

It's great that Mrs. Woodrail is buying in!
 
OP
W

woodrail

Well-known member
Joined
Feb 23, 2012
Messages
2,456
Location
Lorain, Ohio
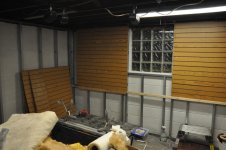
Made some decent progress this weekend. All the metal furring is up. And got started on the slatwall.

I thought I was going to be moving right along, all the studs were set at 16" o.c.

Turns out my slatwall is 46.5" wide. I suppose I should have checked that before hand!
 

Attachments

  • DSC_0372.jpg
    DSC_0372.jpg
    141.8 KB · Views: 89
To avoid these ads, REGISTER NOW!

Hawk136439

Well-known member
Joined
Jan 5, 2017
Messages
117
Location
Illinois
That sounds like it will be a really fun space and I hope you share some of the prototypes that come out of it! Out of curiosity why did you use metal studs instead of wood and how are they to work with? I've only ever framed in wood but always been interested in metal framing.
 
OP
W

woodrail

Well-known member
Joined
Feb 23, 2012
Messages
2,456
Location
Lorain, Ohio
This was my first time using metal studs. This is in a basement. Metal is commonly used.

I loved using it. Very easy. I used 20 gauge. Straight, light, and less expensive than wood. It's all screwed together. I used a 4 1/2" grinder for the cuts. I really didn't have much. Just be sure to use PPE.
 
OP
W

woodrail

Well-known member
Joined
Feb 23, 2012
Messages
2,456
Location
Lorain, Ohio
Seems I'm falling behind on this project.

I need to post some images to get me going again. Walls are up and finished. Lighting and soffits are done. Laser exhaust and air assist is almost complete. Now time for power/data.

First need the furniture as some of it is going in cable trays. I was going camping this weekend, but looks like we are going to have a high of 29.

Looks like some additional build time.
 
OP
W

woodrail

Well-known member
Joined
Feb 23, 2012
Messages
2,456
Location
Lorain, Ohio
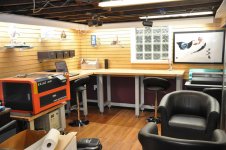
Sorry, this hasn't been much of a "build thread". I'm sneaking up on calling this one done. Timeline was suppose to be 6 weeks, I just about doubled that plus some. I really didn't lay out a budget, but suspect I'm between $2-$3k. Lot's of hidden stuff including led lights, 2 new circuits, home automation, venting, grounding and air assist systems, temperature and humidity monitoring.

I still have some old electrical cleanup and fire suppression to complete. Plus a sink and more cleanup of existing areas.

More pics down the road.
 

Attachments

  • DSC_0415.jpg
    DSC_0415.jpg
    144.8 KB · Views: 107

Hawk136439

Well-known member
Joined
Jan 5, 2017
Messages
117
Location
Illinois
WOW! That's a heck of a change in a short amount of time!! The leather furniture is a nice touch and I cant wait to see more angles of the space!
 
OP
W

woodrail

Well-known member
Joined
Feb 23, 2012
Messages
2,456
Location
Lorain, Ohio
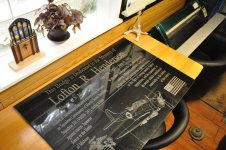
Even though the lab isn't 100% yet, I've done some testing and calibrations. I've even had time to take on a couple of projects.

Here is a memorial plaque for a local park I take care of. It is (6) pieces of 12x12 granite engraved on the laser.
 

Attachments

  • DSC_0593.jpg
    DSC_0593.jpg
    150.2 KB · Views: 69

Radix2

Well-known member
Joined
May 28, 2014
Messages
1,853
Location
the thumb!, MI
Neato lab!

If you get a chance, tell us about your equipment and what it can do. I had no idea a 60w laser could engrave granite...if that is what you used..
 
OP
W

woodrail

Well-known member
Joined
Feb 23, 2012
Messages
2,456
Location
Lorain, Ohio
Finally finished up on a project I've been working on for a long while. This is a scale replica of the main stained glass window of our church that burned three year ago.

All the parts were cut on my 60 watt laser cutter. This includes almost 30 pieces. Parts of the window frame are 1/64" thick. The "glass" is laser printed on bond and encased between 2 acrylic panels.

The black part of the base is wood recovered from a burn pew. It was intentionally left untouched.

The picture of the fire shows where the window was and also where some of the wood I recovered came from.

The first service in our new church building is upcoming in the next few weeks.
 

Attachments

  • DSC_0278.jpg
    DSC_0278.jpg
    150.8 KB · Views: 26
  • fire11.jpg
    fire11.jpg
    99.4 KB · Views: 21
To avoid these ads, REGISTER NOW!
Top Bottom