To avoid these ads, REGISTER NOW!

Above 1200 Sq/FT The Shiloh Shop Project.......................

Wokspaces above 1200 squarefeet.
OP
B

bimmer1980

Well-known member
Joined
Feb 5, 2009
Messages
2,104
Location
York, PA
The drain system was a big deal to me... I really wanted a solid drain system for snow melt runoff and capable of handling forklift weight. I put together this slot drain system.

The slot drain consists of two pieces of 3" angle iron that are separated by a 1/2" nut thickness. Rebar is welded onto the angle iron to provide continuity with the concrete. The angle iron assembly sits on top of a 4" PVC tube that has a slot cut into it. The tube is extended for a cleanout on each end.

The Slot Drain is routed over to a sump pit where there is then a tube to the exterior.

100_8989.jpg

100_8991.jpg

100_8983.jpg

100_8986.jpg

100_8987.jpg

100_8995.jpg

100_9000.jpg
 
To avoid these ads, REGISTER NOW!
OP
B

bimmer1980

Well-known member
Joined
Feb 5, 2009
Messages
2,104
Location
York, PA
I then spent some time doing the final prep for concrete....

--Tying all the rebar.
--Marking the level of the concrete on the wall.
--Bracing the 90 conduit sleeves for the pex.
--1" foam on top of the block walls where the doors would be.
--Form boards at the door opening.

100_9011.jpg

100_9010.jpg

100_9002.jpg

100_9014.jpg

100_9015.jpg

100_9016.jpg
 
OP
B

bimmer1980

Well-known member
Joined
Feb 5, 2009
Messages
2,104
Location
York, PA
Finally on the 8th of August, 2010, I was ready for the second pour....

I used 4000 PSI concrete. It ended up being 29 yards for this pour. It was about 11 yards for the previous pour.

I hired the same group of guys to help place the concrete. Then I did the power troweling and finishing.... My f-in-L & b-in-law helped with the hand finishing as well.

100_9020.jpg

100_9035.jpg

100_9036.jpg

100_9045.jpg

100_9067.jpg

100_9089.jpg

100_9092.jpg
 
OP
B

bimmer1980

Well-known member
Joined
Feb 5, 2009
Messages
2,104
Location
York, PA
I also cut this section of concrete with multiple relief cuts. Then it was thoroughly wet down and covered for 28 days.

We had some other things to keep us busy the rest of August 2010....

100_9106.jpg

100_9108.jpg

100_9107.jpg
 
OP
B

bimmer1980

Well-known member
Joined
Feb 5, 2009
Messages
2,104
Location
York, PA
Labor Weekend. September 4th 2010.

I earnestly began working on the framing. The old Bimmer towed home a load of lumber on the trailer....

I even got the wife, b-in-l and F-in-L to help up with standing up the wall.

The teleboom attachment was helpful for lifting the walls up and onto the protruding pipes -- plumbing and electrical....

100_9251.jpg

100_9245.jpg

100_9248.jpg

100_9254.jpg

100_9266.jpg

100_9267.jpg

100_9279.jpg
 
OP
B

bimmer1980

Well-known member
Joined
Feb 5, 2009
Messages
2,104
Location
York, PA
Weekend of 9/11/2010 More framing....

100_9281.jpg

100_9287.jpg

100_9295.jpg

100_9296.jpg

100_9297.jpg

100_9300.jpg

100_9302.jpg

I think it rains whenever I need to do something.... Mud is my middle name.. :lol_hitti
 
OP
B

bimmer1980

Well-known member
Joined
Feb 5, 2009
Messages
2,104
Location
York, PA
Weekend of 9/18/2010. More framing...

100_9307.jpg

100_9308.jpg

100_9309.jpg

100_9311.jpg

100_9312.jpg

100_9313.jpg

My wife and my F-in-Law gave me a hand with setting these couple of walls. :beer: I was just lounging in the skid steer... :spit:
 
OP
B

bimmer1980

Well-known member
Joined
Feb 5, 2009
Messages
2,104
Location
York, PA
September 24, 2010.

I had the idea of bolting on angle iron to the top of my trailer. This would allow me to more easily unload materials with the skid steer.

100_9327.jpg

100_9328.jpg

100_9329.jpg

100_9330.jpg

100_9331.jpg

I also smoothed and compacted some base material into a ramp up to the garage. Then i was able to drive my forklift up onto the concrete. I had waited to do this until I had at least 28 days of curing time.... overkill perhaps, but that's what I did....

100_9333.jpg

100_9378.jpg
 
OP
B

bimmer1980

Well-known member
Joined
Feb 5, 2009
Messages
2,104
Location
York, PA
I then proceeded with installing some sheathing.... after much debate, I installed the sheet vertically... In hind sight, I wish I had not done it that way. The better way is to run a sheet horizontally, then a ripped sheet in the middle and another full sheet above it... Live and learn...

I did glue and nail each sheet to the wall..... yep, a bit overkill....

100_9337.jpg

100_9379.jpg

100_9380.jpg

100_9381.jpg

100_9393.jpg
 
OP
B

bimmer1980

Well-known member
Joined
Feb 5, 2009
Messages
2,104
Location
York, PA
October 11, 2010. Yay! Some steel showed up. I needed to create a steel beam for supporting some of the trusses. A LVL was not going to work so nicely and this provided some opportunities for a chain hoist at some later point....

100_9384.jpg

100_9385.jpg

100_9386.jpg

100_9388.jpg

100_9497.jpg

100_9499.jpg

100_9500.jpg
 
OP
B

bimmer1980

Well-known member
Joined
Feb 5, 2009
Messages
2,104
Location
York, PA
I had bought a Lincoln tombstone welder for this project on craigslist.... Then I had to roughly wire up the wire from the house so I could use the welder.

Then I was able to weld the plate on the end of the tubes and a couple of mounting plates to the end of the beam.

100_9502.jpg

100_9503.jpg

100_9504.jpg

100_9505.jpg
 

kent_323is

Well-known member
Joined
Nov 13, 2009
Messages
274
Location
South Dakota
Awesome work so far Bro, it brings up memories when you sent me pics during the actual build time.
Between work trips and rain, that block work really sucked, I sure was glad when you got that work done.
I know there's lots more good stuff to come on this garage build... so stay tuned folks!
 

Motoman1100

Well-known member
Joined
Oct 2, 2014
Messages
443
Location
GA
Man you are relentless! Thanks for the pics and well done on the build. Looking forward to the rest.
 

LX-Markham

Well-known member
Joined
Apr 27, 2013
Messages
2,929
Location
Markham, Ont.
That is a really great looking garage! Enjoying the build process. Kudos to all the work you are putting in yourself, wow!
 
OP
B

bimmer1980

Well-known member
Joined
Feb 5, 2009
Messages
2,104
Location
York, PA
Thanks for the comments guys!! I appreciate it. It has been a lot of work, but for the most part I have enjoyed it....

Regarding the skid steers.... yes, both of them... In my search for a skid steer, I settled on the Bobcat 642 because it was close and in my price range ($4000 to 5000). When I had visited a couple of equipment auctions, I had tried a variety of machines. I liked the New Hollands and the Cat. Cat was quite a ways out of my price range.

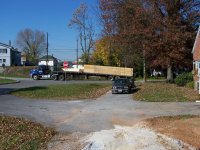
During this time, I was making week long trips to Florida for work each month. I was browsing craigslist down there. I happen to find a listing for the LS150 New Holland for a price that I thought was almost a scam, but it had a local phone number. I called the guy and a coworker and I went and looked at it. I made an offer after a close look over and we settled on a price. We went back later with the company truck and trailer and picked it up. I used the companies flat bed truck to load it onto the semi trailer. As luck would have it, there was a tall concrete retaining wall that worked as a loading dock. That area was not oriented that the semi truck could back up to it.... Once it was at the local shop, I arranged for a LTL truck to haul it to Pennsylvania. Once it was close to my home, I hired a rollback to help unload it.

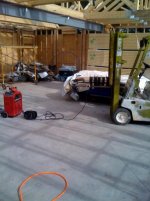
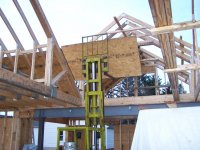
After running the two skid steers for awhile... notice the bobcat was stuck in the center of the foundation... I eventually sold the Bobcat for what I had paid for it...

1photo.jpg

3photo.jpg

4photo.jpg

5photo.jpg

102_7523.jpg

102_7528.jpg

102_7529.jpg

Of course, shortly after I got it home, I was using it and it died midway over the wood bridge ramps to the inside of the foundation. I thought, oh ****, what kind of piece of :shocking::shocking: did I buy??

After some digging around and quick internet research, I determined that the fuel filter was clogged. I got a new filter and it started back up. I ultimately replaced both fuel filters (one is a water separator) and I try to keep the one type of filter in stock at home. I learned that diesel fuel can be a bit dirty....

Over time, I did a few other things to it... It received a new seat.

I did an oil change and discovered the between the engine and the skid plate was just packed with oily sand. I cleaned all that out.

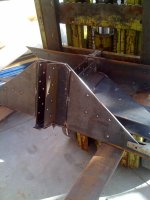
The biggest hassle was a few years later it developed a major hydraulic leak.... After much searching, I ended up tipping the cab and pulling the hydro pumps. Turned out one flange of a hydro pump had cracked off and the leak was between the hydro pumps due to it being loose.... But that's another picture adventure for later in the thread....
 
OP
B

bimmer1980

Well-known member
Joined
Feb 5, 2009
Messages
2,104
Location
York, PA
Alrighty! I had gotten the trusses ordered thru Lowes. I had asked for the trusses to be stacked in the order in which I planned to use them. They each had a specific location. Initially the Lowes Rep at the Pro Desk said that was not possible. I insisted that he request that. He was surprised when the Truss Company came back and said that was not a problem.

Nov 3, 2010.
When the driver showed up, he was very pleasant and seemed to be a good guy. I showed him where I wanted the trusses. That would not be a problem. Check out the pics....

Basically, they back in, pull the trigger on the roll deck, goose the throttle on the truck and the trusses roll off the back as the truck pulls forward. The whole truss packs hits the ground, slides a short distance and makes a satisfying thump!

This guy was good! They landed and slid precisely!!
 

Attachments

  • 100_9519.jpg
    100_9519.jpg
    155.7 KB · Views: 69
  • 100_9517.jpg
    100_9517.jpg
    153.2 KB · Views: 67
  • 100_9514.jpg
    100_9514.jpg
    153.8 KB · Views: 67
  • 100_9512.jpg
    100_9512.jpg
    155.1 KB · Views: 66

Riley

Well-known member
Joined
Feb 18, 2007
Messages
398
Great looking building! Interesting to see how you chose to revise things as you went. Wouldn't have been doing that with a contractor.

When you started did you have a background in the construction trades or were you "book learnin"? Either way, you've got a lot to be proud of in your shop. Looking forward to following along.
 
OP
B

bimmer1980

Well-known member
Joined
Feb 5, 2009
Messages
2,104
Location
York, PA
I did not know at the time that an end wall truss could have been ordered... I went ahead and starting fabricating the end wall with studs. I wish I had waited and build it on top of a truss.... I ended up having to modify the first end wall once it was in place to match the truss..... Live and learn...

I needed a way to get up the air and for the truss to get up there two. I fab'd up a small platform that goes on the fork lift. I then took two pieces of 3" angle iron and made a type of spreader beam to pick the truss. My forklift would go to about 15'6", but that was not quite enough to pick the truss at the top collar board.

This worked fairly well. I proceeded with getting some trusses in the air. My friend Elton and B-in-Law, Cory, helped me with setting the trusses.

Candidly, none of us are people comfortable with heights. Cory and I were both a bit un-nerved being on the forklift platform. The mast naturally moves a bit at full extension.

That being said, we got some trusses set!

100_9532.jpg

100_9536.jpg

100_9537.jpg

100_9542.jpg

100_9547.jpg

100_9548.jpg
 
To avoid these ads, REGISTER NOW!
OP
B

bimmer1980

Well-known member
Joined
Feb 5, 2009
Messages
2,104
Location
York, PA
Great looking building! Interesting to see how you chose to revise things as you went. Wouldn't have been doing that with a contractor.

When you started did you have a background in the construction trades or were you "book learnin"? Either way, you've got a lot to be proud of in your shop. Looking forward to following along.

You are exactly right!! I did modify a number of things along the way as the future needs of the garage continued to develop. I wouldn't have minded doing a SIP wall, but that needed windows planned ahead of time....

My brother and I helped a construction guy build an addition to a house during a summer when we were teenagers. Otherwise, it was just random smaller projects here and there.... My brother and I had a Post frame shop build in SD and we did much of the interior lofts, wall framing, etc.

I'm an engineer that can typically build what I design.... in that sense you find out the flaws in the plan much quicker and learn how to rectify them... :beer:

Thanks for joining in!
 
OP
B

bimmer1980

Well-known member
Joined
Feb 5, 2009
Messages
2,104
Location
York, PA
Nov 13, 2010. At this point I needed to set the post and beam into place. Previously I had welded it up, prep'd all the surfaces, primed and painted with brush on Rustoleum paint.

Let's get the beam set! I really enjoyed this part of the build!

100_9599.jpg

100_9600.jpg

100_9602.jpg

100_9604.jpg

100_9606.jpg

100_9610.jpg

100_9613.jpg

Another thing you may notice is that I drilled 1/4" holes in the top flange of the beam. This was to lag screw the wood nailer onto the top flange. I detest the idea of clinched nails onto the flange..... Does it marginally reduce the strength of the beam? I would venture it is not significant enough in this application.
 
OP
B

bimmer1980

Well-known member
Joined
Feb 5, 2009
Messages
2,104
Location
York, PA
Around the week of Nov 20th, 2010, I was working on a few random details to continue the project.

I went to one of the steel supply places and picked up some flat steel. This will become some brackets for the LVL's...

I put up some OSB on the trusses I already set....

Then I started building one of the gable walls on top of the truss. I decided to build the entire gable wall assembly with the ladder board overhang and lift in one go.....
 

Attachments

  • 100_9619.jpg
    100_9619.jpg
    154.7 KB · Views: 70
  • 100_9618.jpg
    100_9618.jpg
    148.7 KB · Views: 72
  • 100_9615.jpg
    100_9615.jpg
    156.6 KB · Views: 69
  • 100_9614.jpg
    100_9614.jpg
    155.8 KB · Views: 65
OP
B

bimmer1980

Well-known member
Joined
Feb 5, 2009
Messages
2,104
Location
York, PA
Continuing in the week of Nov 20, 2010.

I stood the wall up. The ~40" gap will be for the stairs. The 2x6's span from the truss, over the gap and make the overhang.

Then with some of the bracing pre-installed, it was ready to rig onto the forklift and lift into place.

Then connected it to the double ply trusses by flying the first of the truss and connecting it to the 2x6 ladder assembly, then fly up the second truss and nailed it per the truss design.

Some of the pictures are a little blurry as we did the lift at night.... losing daylight quickly in that time of year...

100_9620.jpg

100_9621.jpg

100_9622.jpg

100_9625.jpg

100_9627.jpg

100_9629.jpg
 
OP
B

bimmer1980

Well-known member
Joined
Feb 5, 2009
Messages
2,104
Location
York, PA
From there, I was able to continue adding trusses.....
 

Attachments

  • 100_9631.jpg
    100_9631.jpg
    154.2 KB · Views: 48
  • South Gable.jpg
    South Gable.jpg
    65 KB · Views: 49
  • South Gable-inside.jpg
    South Gable-inside.jpg
    73.8 KB · Views: 51
OP
B

bimmer1980

Well-known member
Joined
Feb 5, 2009
Messages
2,104
Location
York, PA
11/24 Thru 11/27 2010 Thanksgiving Holiday weekend.

I always look forward to working on a project over a holiday weekend and this one was no exception.

I started with working on the gable wall for the front of the shop. Here you can see how I laid out the wall over a truss. At this stage in the game, I knew I wanted a window in the front, but had not specifically located one.... so I just left a reasonable sized opening and would finish framing it in later.

11-24-10-Gable.jpg

100_9632.jpg

100_9635.jpg

100_9637.jpg

100_9640.jpg
 
OP
B

bimmer1980

Well-known member
Joined
Feb 5, 2009
Messages
2,104
Location
York, PA
Once the front gable wall would be installed, it would be harder to bring trusses in... Since there is a 10' gap in the middle of the garage, I wanted to work my way from the Front of the garage to that gap....

Luckily, the brother-in-law, Cory was around for T-day, do I enlisted his help to haul trusses into the garage and stage them for install.....
 

Attachments

  • 100_9642.jpg
    100_9642.jpg
    156.3 KB · Views: 39
OP
B

bimmer1980

Well-known member
Joined
Feb 5, 2009
Messages
2,104
Location
York, PA
Then I spent some time blowing nails into to a triple lamination of LVLs for the front header. I wasn't exactly sure on what door sizes I wanted, but in the interim, I would have a ~22' opening.

Of course, the forklift was instrumental in setting the beam.

100_9644.jpg

100_9645.jpg

100_9646.jpg

100_9647.jpg

100_9648.jpg

100_9649.jpg

100_9650.jpg
 
OP
B

bimmer1980

Well-known member
Joined
Feb 5, 2009
Messages
2,104
Location
York, PA
Next up was to finish prep'ing the gable overhang and get it ready to lift up.....

It ended up being a little windy the day we were lifting the gable wall into place. It gave me a little pause with that big sail in the air, but it was blowing the wall into the forklift mast, so it worked out....

I also used the Skid Steer as an anchor for some straps to help line things up...

100_9661.jpg

100_9662.jpg

100_9663.jpg

100_9664.jpg

100_9668.jpg

100_9669.jpg

100_9672.jpg
 
OP
B

bimmer1980

Well-known member
Joined
Feb 5, 2009
Messages
2,104
Location
York, PA
Then it was a fairly straightforward process of picking trusses and setting them into place.

Eagle eyes will notice the one truss plate that is missing. That was a treat to fix later.....


100_9671.jpg

100_9676.jpg

100_9682.jpg

Here's my Dr. PHD and Dr. MD brother-in-laws saying WTF about this project.... :lol_hitti

Dr. PHD (Cory) has been good at helping me along the way!! :beer:

100_9681.jpg
 
OP
B

bimmer1980

Well-known member
Joined
Feb 5, 2009
Messages
2,104
Location
York, PA
Weekend of 12/4/2010. The last of the trusses were lifted up.... It was quite tight to get the last few up there due to the tails on the trusses. We staged a few and then spread them apart.

Cory and Elton were helping me that weekend.

The trusses on each side of the 10' opening are four plys.

I then began the process of installing the rough eave boards.
 

Attachments

  • 102_9729.jpg
    102_9729.jpg
    152.6 KB · Views: 66
  • 102_9728.jpg
    102_9728.jpg
    153.7 KB · Views: 60
  • 100_9697.jpg
    100_9697.jpg
    146.9 KB · Views: 48
  • 100_9689.jpg
    100_9689.jpg
    149.9 KB · Views: 50
  • 100_9687.jpg
    100_9687.jpg
    158.2 KB · Views: 52
  • 100_9686.jpg
    100_9686.jpg
    159.7 KB · Views: 51
  • 100_9683.jpg
    100_9683.jpg
    160.9 KB · Views: 58
OP
B

bimmer1980

Well-known member
Joined
Feb 5, 2009
Messages
2,104
Location
York, PA
Home Depot decided they were tired of storing the rest of my materials, so they made a delivery....
 

Attachments

  • 102_9730.jpg
    102_9730.jpg
    158.4 KB · Views: 55
  • 100_9700.jpg
    100_9700.jpg
    154.5 KB · Views: 51
  • 100_9699.jpg
    100_9699.jpg
    152.3 KB · Views: 57
  • 100_9698.jpg
    100_9698.jpg
    155.8 KB · Views: 57
OP
B

bimmer1980

Well-known member
Joined
Feb 5, 2009
Messages
2,104
Location
York, PA
In early January 2011 I was working on fabricating some brackets to hold the LVL beams that would span from the trusses over the open areas.

These might be a little over kill, but that's how I like to roll.

They were a bit of an interesting challenge to make with no official shop. I use my Stihl Demo saw to slice the 7ga plate into the backer plate. Then I used the band saw to cut up some angle iron. In the small porch off the house, I had the small welder, work bench, etc set up as a small fabrication area.

For the heavy welding, I set up the stick welder in the new garage area and proceeded to weld the brackets up.

Since it was a mite chilly in January, I brought the brackets into the basement to prime and paint. The wife was not exactly thrilled with the smell of paint....
 

Attachments

  • bracket-5.jpg
    bracket-5.jpg
    133.1 KB · Views: 53
  • Bracket-4.jpg
    Bracket-4.jpg
    146.4 KB · Views: 52
  • Bracket-3.jpg
    Bracket-3.jpg
    62.8 KB · Views: 51
  • Bracket-2.jpg
    Bracket-2.jpg
    81.6 KB · Views: 55
  • Bracket-1.jpg
    Bracket-1.jpg
    127.7 KB · Views: 52
  • bracket.jpg
    bracket.jpg
    139.1 KB · Views: 53
OP
B

bimmer1980

Well-known member
Joined
Feb 5, 2009
Messages
2,104
Location
York, PA
Fast forward a few months as Sheathing and other things were slowly happening.....

I must admit, I was not fond of this part of the job.....
 

Attachments

  • 102_9871.jpg
    102_9871.jpg
    155.3 KB · Views: 52
  • 102_9860.jpg
    102_9860.jpg
    160.7 KB · Views: 50
  • 102_9829.jpg
    102_9829.jpg
    155.9 KB · Views: 52
  • 102_9821.jpg
    102_9821.jpg
    155.9 KB · Views: 47
  • 102_9816.jpg
    102_9816.jpg
    153.1 KB · Views: 51
OP
B

bimmer1980

Well-known member
Joined
Feb 5, 2009
Messages
2,104
Location
York, PA
Mid April of 2011 I was working on the dormers.

This is the 10' wide dormer that faces west.

After the wall was built, I hoisted it into position with the forklift.
 

Attachments

  • 102_0105.jpg
    102_0105.jpg
    149.9 KB · Views: 38
  • 102_0103.jpg
    102_0103.jpg
    150.1 KB · Views: 40
  • 102_0100.jpg
    102_0100.jpg
    159.1 KB · Views: 39
  • 102_0098.jpg
    102_0098.jpg
    155.1 KB · Views: 37
  • 103_0017.jpg
    103_0017.jpg
    140.8 KB · Views: 35
  • 103_0015.jpg
    103_0015.jpg
    126.8 KB · Views: 35
  • 103_0020.jpg
    103_0020.jpg
    136.5 KB · Views: 36
OP
B

bimmer1980

Well-known member
Joined
Feb 5, 2009
Messages
2,104
Location
York, PA
Then I built up the side walls and hoisted them into position.
 

Attachments

  • 102_0122.jpg
    102_0122.jpg
    148.2 KB · Views: 35
  • 102_0114.jpg
    102_0114.jpg
    150 KB · Views: 31
  • 102_0113.jpg
    102_0113.jpg
    147.1 KB · Views: 28
  • 102_0112.jpg
    102_0112.jpg
    150.3 KB · Views: 29
  • 102_0111.jpg
    102_0111.jpg
    148.8 KB · Views: 29
  • 102_0110.jpg
    102_0110.jpg
    152.1 KB · Views: 28
OP
B

bimmer1980

Well-known member
Joined
Feb 5, 2009
Messages
2,104
Location
York, PA
At this point, I could start installing the ridge brackets onto the trusses.

I drilled pilot holes and cranked the lag screws in....
 

Attachments

  • 102_9813.jpg
    102_9813.jpg
    104.1 KB · Views: 37
  • 102_9812.jpg
    102_9812.jpg
    120.2 KB · Views: 40
  • 102_9811.jpg
    102_9811.jpg
    119.7 KB · Views: 40
  • 102_9808.jpg
    102_9808.jpg
    69.8 KB · Views: 41
  • 102_9805.jpg
    102_9805.jpg
    111.3 KB · Views: 42
  • 102_9800.jpg
    102_9800.jpg
    148.5 KB · Views: 35
  • 102_9796.jpg
    102_9796.jpg
    137.8 KB · Views: 41
OP
B

bimmer1980

Well-known member
Joined
Feb 5, 2009
Messages
2,104
Location
York, PA
Then I was able to start setting the beams into place. It was a little hairy for me to maneuver the beams into place from the forklift platform, but I got it done... some of the beams were 10' two ply and the others were 14' single ply LVL's.
 

Attachments

  • 102_0127.jpg
    102_0127.jpg
    156.3 KB · Views: 43
  • beam-4.jpg
    beam-4.jpg
    138.1 KB · Views: 39
  • beam-3.jpg
    beam-3.jpg
    79.9 KB · Views: 40
  • Beam-2.jpg
    Beam-2.jpg
    71.9 KB · Views: 41
  • Beam-1.jpg
    Beam-1.jpg
    78.9 KB · Views: 41
OP
B

bimmer1980

Well-known member
Joined
Feb 5, 2009
Messages
2,104
Location
York, PA
Mid May of 2011.

Next up was to work on the valley rafters.

Most of this work was done off the forklift platform.
 

Attachments

  • 102_0143.jpg
    102_0143.jpg
    122.8 KB · Views: 37
  • 102_0142.jpg
    102_0142.jpg
    146.5 KB · Views: 34
  • 102_0140.jpg
    102_0140.jpg
    129.9 KB · Views: 32
  • 102_0139.jpg
    102_0139.jpg
    151 KB · Views: 31
  • 102_0136.jpg
    102_0136.jpg
    147.5 KB · Views: 32
  • 102_0138.jpg
    102_0138.jpg
    149.3 KB · Views: 31
  • 102_0135.jpg
    102_0135.jpg
    154.9 KB · Views: 33
OP
B

bimmer1980

Well-known member
Joined
Feb 5, 2009
Messages
2,104
Location
York, PA
Memorial Day Weekend of 2011.

Continued the work on the valley rafters and framing of the roof.
 

Attachments

  • 102_0148.jpg
    102_0148.jpg
    140.1 KB · Views: 36
  • 102_0149.jpg
    102_0149.jpg
    141.2 KB · Views: 34
  • 102_0150.jpg
    102_0150.jpg
    135.1 KB · Views: 36
  • 102_0153.jpg
    102_0153.jpg
    137.1 KB · Views: 37
  • 102_0157.jpg
    102_0157.jpg
    149 KB · Views: 36
  • 102_0161.jpg
    102_0161.jpg
    150.2 KB · Views: 49
To avoid these ads, REGISTER NOW!
Top Bottom